Getting Started
Jump to:
Quick start guide
Jump to:
- Overview of MRPeasy.
- Play with demo data.
- Remove demo data and prepare a test task.
- Enter parts and products.
- Plan and report production.
- Buy parts and materials.
- Sell products.
- Stock management.
- Usage tips.
Overview of MRPeasy
MRPeasy is suitable for both make-to-stock and make-to-order production.
The program is divided into eight main sections:
- CRM - sales and order management.
- Production planning - production planning and management.
- Stock - inventory management.
- Procurement - purchasing management.
- Dashboard - quick overview of important metrics.
- My production plan and Internet-kiosk - real-time reporting of manufacturing operations performed by workers.
- Settings - MRPeasy settings, account management, user management, and database maintenance.
- Accounting - standard accounting module.
This flowchart shows how the different modules in MRPeasy work together.

Play with demo data
MRPeasy comes preloaded with a sample dataset. By playing with this demo data, you can explore the system and understand how it works, without needing to set anything up.
- You can explore three demo datasets, all available in the Demo data and videos section.
- The default dataset is the simplest, and is based on a company that produces a basic product - a Wooden Table:
- The wooden table has a simple BOM: table legs, a table top, and varnish. These are separate items with their own vendors, lead times, and prices.
- The wooden table is produced in two steps: Assembly and Painting. Each step has an assigned workstation, duration, and cost.
- You can see how the system lets you buy parts by creating a Purchase Order.
- You can produce tables from available parts by creating a Manufacturing Order.
- You can see how the system lets you sell products by creating a Customer Order.
- You can clear and re-upload demo data in the Demo data and videos section.
- Watch the demonstration videos to learn more about how the software works.
- Follow the Testing manual to be guided through important workflows when using the demo dataset.
Prepare a test task
Once you're ready to start testing with your own data, follow these steps:
- Clear all demo data from your database under Settings -> Database maintenance.
- Add other users who will test the system under Settings -> Human resources.
- Enter a simple test task. Make sure to:
- Add a simple product that requires a few materials and operations.
- Define what you want to accomplish with each test task.
- Read and apply the MRPeasy Implementation Guidelines.
- Follow the examples in the Testing manual.
Enter your parts and products
At Stock -> Items, enter your items in the following order:
- The parts and materials you buy.
- For procured items, add the Purchase Terms to define the vendor(s), cost, and lead time.
- The products you make.
- For manufactured items, add a Bill of Materials (BOM) and a Routing.
See also:
- Demo videos:
- User Manual: Item details.
Plan and report production
To make new products, go to Production planning -> Manufacturing orders, and create a new Manufacturing Order (MO).
- You can view your production progress and material usage from stock by clicking Go to production in the MO.
- Products are counted into stock once the MO is finished.
- You can add new users and give them rights to My Production Plan or the Internet kiosk. This allows other users to log in and report production in real time.
See also:
- Demo videos:
- User Manual:
Make-to-stock (MTS) manufacturing
In make-to-stock manufacturing, production is planned before customer orders arrive.
When making stock, there are several ways of creating a Manufacturing Order (MO):
- Add a new MO under Production planning -> Manufacturing orders.
- Assign a Reorder Point (ROP) for each item (the ROP can be set to 0). When stock falls below the ROP, you can create a Manufacturing Order under Stock -> Critical on-hand.
- Create an MO under Procurement -> Forecasting function.
Make-to-order (MTO) manufacturing
In make-to-order manufacturing, production is planned after you receive a sales order (referred to as a Customer Order (CO) in MRPeasy).
- Add a new CO under CRM -> Customer Orders.
- After saving the CO, you can estimate costs and delivery dates.
- When you are ready to start planning production, you can:
- Automatically generate one MO per one CO line.
- Create a single MO for multiple COs (i.e., the same product across multiple orders).
- Manually create a Manufacturing Order (MO) and book it to the CO.
Buy parts and materials
You can order parts and materials from a vendor by creating a Purchase Order (PO) under Procurement -> Purchase Orders.
After receiving items from a vendor, mark the PO as received, and the ordered items will be placed into stock.
See also:
- Demo video: Purchasing Management.
- User manual: Purchase Order details.
Low inventory alerts
MRPeasy provides two reports that show which items need to be ordered. This makes it easy to know which Purchase Orders you need to create. You can find these reports under:
- Procurement -> Requirements.
- Shows items missing from specific sales and manufacturing orders.
- Procurement -> Procurement Critical on-hand.
- Shows items whose available quantity is below their Reorder Point (ROP).
MRPeasy automatically generates these reports based on the information from stock, customer orders, and manufacturing orders.
- If parts are missing for an MO, demand is generated automatically.
- If products are missing for a CO, demand is generated after you try to book them.
Sell products
To enter a new sales order, create a new Customer Order (CO) under CRM -> Customer Orders.
In MRPeasy, the CO is the core document used for tracking a sale from quotation to delivery. It’s used to:
- Create quotations, order confirmations, or invoices.
- Estimate costs and dates.
- Book products for the CO.
- Booking reserves specific items for an order.
- Items can be reserved from current stock or from planned supply (e.g., reserved from a future PO or MO).
- If items are unavailable, the system automatically creates demand for them.
- Track payments.
- Create shipments and waybills, and pick products to remove them from stock.
See also:
- Demo videos:
- User Manual: Customer Order details.
Below is an example of how orders can be handled in make-to-order manufacturing.

Stock management
The Stock -> Items provides a detailed overview of your stock. It distinguishes between:
- In stock vs. expected quantities.
- Available vs Booked (i.e., reserved) quantities.
Inventory transactions are automatically made when users with different roles (e.g., sales, production, procurement) report their actions.
See also:
- Demo videos:
- User manual:
Basic principles of inventory management in MRPeasy
- Items must be booked before they can be used in production.
- MRPeasy uses "stock lot tracking" for inventory management.
- Stock lot labels to keep track of batches.
- Get detailed Stock Movement reports.
Complete User Manual
MRPeasy’s User Manual can be found here:
A one-page online version of the User Manual can be found here:
If you prefer the complete User Manual in PDF format, print the one-page version and choose “Print as PDF”.
Usage tips
Jump to:
- Demo video: Usage tips.
- Buttons and icons.
- Quick help.
- Data tables.
- Search wildcards and operators.
- Browser security settings.
- Miscellaneous.
Buttons and icons
- Add Add a new entry
- Edit Edit/View an existing entry
- Bulk editing Bulk editing
- Choose columns Choose columns to be displayed
- Search Search by specified conditions
- Saved searches Saved searches - each user can save personal filters. Saved searches store selected columns, their order, and the values of filled parameters. A saved search can also be set as the default, making it automatically applied.
- Reports View reports
- Important notice Important notice
- Actions View action log
- Rebook materials Rebook materials for planned Manufacturing Orders (Production schedule)
- Press and drag up or down to change order Drag up or down
- Create a Purchase Order Create a Purchase order (Procurement Critical on-hand, Requirements)
- Consume Consume item (MO details for worker)
- Pick Pick item (Shipment)
- Create a manufacturing order Create a Manufacturing order (Critical on-hand in Stock)
- Return item to stock Return item to stock
- Print barcode Print barcode
- Start Start the production operation
- Pause Pause the production operation
- Stop Finish the production operation
- Show images Show images
- Move Move window
- Quick help Quick help
- Tasks Tasks
- Page navigation Page navigation
- List or detailed view List or detailed view
- Sales pipeline view Sales pipeline view
- View sums View sums
- Users Sign in for more users at the internet-kiosk device
- User Switch between users or sign out from the internet-kiosk
Quick help
If you need an explanation of any page throughout the program, click the Quick help button in the top-right corner.
Data tables
- Tables can be sorted by clicking on column titles.
- The column order can be rearranged by clicking, holding, and dragging their titles.
- In many tables, clicking on the "Choose columns" button allows you to show additional columns or hide unneeded ones.
- The table layouts are stored separately for each user.
- If the list of items contains more than 20 elements, the software displays only the first 20 items by default. Click Load more to load the rest of the list.
- In drop-down menus such as Status, you can select multiple options by holding Ctrl.
Search wildcards and operators
There are several wildcards and operators that can be used when searching:
- _ can be used as a placeholder (wildcard) for any symbol.
- "w__d" finds all results with exactly two symbols between "w" and "d," e.g., "wood."
- % can be used as a placeholder (wildcard) for multiple symbols.
- "w%d" finds all results that have any number of symbols between "w" and "d," e.g., "wood" and "washed."
- && ignores the order of words.
- "wood && table" finds both "wooden table" and "table from wood."
- || finds data containing at least one word when searching by text.
- "wood || table" finds both "wooden chair" and "plastic table."
- - (minus) finds data that does not contain certain words.
- "-plastic" excludes "plastic" from the results.
- "table && -plastic" finds all data for "table" except for those containing "plastic."
- "-" is a negative operator only when it is the first character or if it is following a space.
- If your data starts with "-" or has a "-" suffix, depending on which you wish to search, e.g., "-ABC," then please use "%-abc" to find the data.
- "" (double quotation marks) finds rows without data in that column.
- -"" finds non-blank lines.
- Several conditions may apply together. They can be grouped and prioritized using parentheses.
- "table && -(plastic || white)" finds all tables which are neither plastic nor white.
Browser security settings
MRPeasy is an internet-based software that works in a browser. Please check your browser privacy settings: cookies, JavaScript (scripting), and website data must be allowed (at least "Allow from Current Website Only").
Miscellaneous
- Tooltips are provided for all fields throughout the program. If a field is not understandable, hover over its title.
- MRPeasy is only accessible online; it is not downloadable software.
- Sometimes the system malfunctions when users open multiple browser tabs or windows simultaneously. It is recommended not to work simultaneously in multiple browser tabs or windows, or across two MRPeasy accounts.
Supported Languages
MRPeasy is designed for global manufacturers. To ensure a seamless user experience across borders, the software interface is available in multiple languages.
You can select your preferred language during sign-in or from the Start page by clicking the globe icon in the top-right corner.
Please note that while the MRPeasy interface is available in multiple languages, customer support is currently provided in English only.
We are continuously working to improve the quality and accuracy of our localizations. If you notice any issues or have suggestions for improvement, we warmly welcome your feedback. Please don’t hesitate to contact our support team.
Available interface languages
Below is the full list of currently supported languages in MRPeasy:
- Arabic - عربي
- Bulgarian - Български език
- Chinese (simplified) - 简体中文
- Chinese (traditional) - 繁體中文
- Czech - Čeština
- Danish - Dansk
- Dutch - Nederlands
- English
- Estonian - Eesti
- Finnish - Suomi
- French - Français
- German - Deutsch
- Greek - Ελληνικά
- Hebrew - עִבְרִית
- Hungarian - Magyar
- Indonesian - Bahasa Indonesia
- Italian - Italiano
- Japanese - 日本語
- Korean - 한국어
- Latvian - Latviešu
- Lithuanian - Lietuvių
- Norwegian - Norsk
- Polish - Polski
- Portuguese - Português
- Romanian - Limba română
- Russian - Русский
- Slovak - Slovenčina
- Slovenian - Slovenščina
- Spanish - Español
- Swedish - Svenska
- Turkish - Türkçe
- Ukrainian - Українська мова
- Vietnamese - Tiếng Việt
System Requirements
MRPeasy is a cloud-based AI-powered self-service ERP/MRP software for small manufacturers and distributors (10-200 employees).
Cloud-based means that users access the software via their browsers. We support the last stable versions of the main browsers, like Microsoft Edge, Google Chrome, Safari, and Mozilla Firefox.
Concurrent use of multiple browser tabs or windows, or simultaneous access to more than one MRPeasy account on the same device, is not permitted.
We update our mobile applications for iPhones and Android devices ourselves; however, it is recommended that you have the latest stable version of iOS or Android.
As of January 2026, the latest version of iOS is 26, and the newest stable version of Android is 16.
Demo Data and Videos
In the software section Demo data and videos you can watch demo videos, upload demo data, and clear the database.
Jump to:
- Watch the first demo video - get 5 free days.
- All demonstration videos.
- Upload demo data.
- How to delete the demo data and clear the database.
Watch the demonstration video and get 5 FREE days
We have a short video that describes how MRPeasy generally works. Watching this will also give you 5 free days.
In addition, there are many training videos available on every topic. If you are new or have had a pause in working with MRPeasy, these are great learning tools and memory refreshers.
Uploading demo data
You can explore three different demo datasets by adding them to your database.
Their purpose is to demonstrate the general functionality and structure of MRPeasy without requiring you to enter data first, and to provide you with blueprints for conducting your own testing.
Take note:
- Empty your database before adding another demo dataset. Or before you start entering your own data. This helps to avoid any confusion or a mess that could be difficult to clean up later.
- The datasets are added to the existing data in your database.
- You should not add demo data once you are operating with actual data.
Simple discrete manufacturing
The first dataset is a sample setup for simple discrete manufacturing, including assembly and painting of wooden tables.
Understanding this simple dataset is a good starting point for your MRPeasy journey, as the same foundational principles apply across industries, from building tables to producing airplanes.
Complex discrete manufacturing
Do you manufacture more complex products? You can also add demo data suitable for studying multi-level BOMs and multi-level Manufacturing Orders.
This demo dataset is recommended for discrete manufacturing, particularly in the Electronics, High Tech, Industrial Equipment, and similar industries.
Process manufacturing
Are you producing food or in a similar industry? If so, add the demo data focused on process manufacturing. This dataset is an example of ice cream production.
This is a useful blueprint, especially for those in the Food and Agriculture, Pharmaceutical, Health, and Beauty industries or related sectors.
How to delete the demo data and clear the database
There are two options for emptying the database:
- Click the Empty the database button to delete all data (except users and settings).
- Click the Delete all orders and stock button to delete all orders (MO, CO, PO, RMA, SO) and inventory levels only.
The so-called seed or master data will remain - customers, vendors, articles, BOMs, Routings, Workstations, etc.
Database Maintenance
Under Settings -> Database maintenance is possible to:
- Download a database backup.
- Restore a database backup.
- Archive old data.
- Export and update file links.
- Partially clear or fully empty the database.
- Required user access rights.
Database backup and restoration
You can download your database backup file to your computer and keep a copy. It is advised that you do this at least once a month.
You can upload the database backup file to restore your data. The valid backup file is the following:
- The file is not older than 30 days.
- It is downloaded from the same account it is restored to (it is impossible to upload a backup file from one account to another).
- It is not edited in any way.
Your current database will be erased during upload and replaced with the data from the backup file. You are advised to download a new backup file before uploading an older backup.
All users will be signed out during the restoration.
Attention! The MRPeasy database backup file can be used/read only in MRPeasy. Please do not try to open and edit it in other programs.
Archiving old data
It is possible to archive older data, which has not been used for the last 3 months, 6 months, 1, 1.5, or 2 years in bulk at Settings -> Database Maintenance -> Archive old data.
Click Find old data to see how many objects of each type qualify for archiving in the selected period. Tick the checkboxes for the object types you want to archive, then click Confirm.
For each row, you can also download a CSV file of the qualifying objects before archiving.
Archived objects are not deleted completely. These are normally hidden but can be found at any time. The codes of archived items, BOMs, routings, and customers receive an "arch" suffix, so you can also locate them by searching for "arch".
The following objects are can be archived:
- Items, bills of materials, and routings
- Customers
- Customer Orders, Purchase Orders, Manufacturing Orders, Service Orders, and RMA Orders
1. Archiving items, bills of materials, and routings
Those goods that have not been used for a given period and are not in stock can be archived. Stock items are archived along with their bills of materials and routings. BOMs and routings for archived products are also archived, even if only the Stock items checkbox is selected.
Archived:
- Items can be found at Stock -> Items by searching for the part number.
- BOMs can be found at Production planning -> BOM by searching for the BOM number.
- Routings can be found at Production planning -> Routings by searching for the routing number.
Archived items, BOMs, and routings can be restored:
- Find it.
- Open it.
- Click the Restore button.
2. Archiving customers
Customers that have had no activity in the selected period can be archived. A customer qualifies for archiving if none of the following exist within the selected period:
- A Customer Order created or with a delivery date in the period.
- An Invoice created or with a due date in the period.
The following customers are excluded from archiving:
- Customers created within the selected period.
- Customers with active (non-completed) Customer Orders.
Archived customers can be found at CRM -> Customers by searching for the customer number. Archived customers can be restored the same way as items, BOMs, and routings:
- Find it.
- Open it.
- Click the Restore button.
3. Archiving orders
The following orders are archived:
- Customer orders: in statuses Shipped and Delivered.
- Purchase orders: in status Received.
- Manufacturing orders: in statuses Done, Shipped, and Closed.
- Service orders: in status Done, Shipped, and Closed.
- RMA orders: in statuses Shipped, Delivered, and Resolved.
Archived orders get the status Archived.
Objects with the status Archived aren’t shown in the general list.
Exporting and updating file links
At Settings -> Database maintenance -> Export and update file links, you can export a list of all the file links stored in your account and bulk-update them. This is useful, for example, when files attached to your records have been moved to a new cloud storage location.
Exporting file links
Click Export to CSV to download a CSV file listing all files attached to your records, along with the object each file is attached to. A file attached to several records appears on a separate row for each record.
Updating file links
To update file links in bulk, prepare a CSV file with two columns: the current link (old URL) and the replacement link (new URL), then click Upload a CSV file.
Dropbox links, Microsoft OneDrive links, and direct links can be updated this way. To replace a Google Drive attachment, delete it from the record and attach the new file manually.
We recommend downloading a new backup file before updating the links.
Emptying the database
There are two options for emptying the database:
- Empty the database
- Delete all data (except users, system settings, and sites).
- Stock Settings are not part of the System Settings and will be reset.
- Numbering formats will be reset. - Delete orders and stock
- Delete all orders (MO, CO, PO, RMA, SO) and inventory levels.
- The so-called seed or master data will remain - items, customers, vendors, BOMs, routings, workstations, etc.
- Numbering formats will not be reset.
It is advised to download a new backup file before any deletion!
User access rights for database operations
Required user access rights:
- To download a database backup, the user must have read rights for the Settings -> Database maintenance section.
- To restore a database backup, archive data, or empty the database, the user must have Read and Update rights for the Settings -> Database maintenance section.
Account and Billing
You can view and manage your account's state in Settings -> Account and billing.
Here you can:
- See the paid until date, the number of users, and the next invoice amount.
- Order MRPeasy.
- See and pay invoices.
- Change your pricing plan.
- Downgrade your account.
- Pay for more users.
- Change the billing cycle.
- Change the account's company name, contact e-mail, and billing e-mail.
- Stop billing.
- Delete your account.
How to order MRPeasy
Note that you will not be charged during the free trial period or for the free trial.
At the end of the free trial, a proforma invoice will automatically be issued for the next billing period. Once it is paid, you can continue using MRPeasy.
To order MRPeasy:
- Follow the instructions, which you will receive in your email after the end of the trial.
- Or go to Settings -> Account and Billing -> Invoices, open the Invoice, and proceed to checkout.
- If you wish to continue with automatic renewal, choose to save your card or PayPal details for future payments.
After the proforma invoice is paid, a tax invoice is automatically generated and can be found in Settings -> Account and Billing -> Invoices.
You can also enter and change payment details anytime at Settings -> Account and billing -> Payment data.
You can define a separate billing email address for invoice delivery.
How to pay your invoices
You can see your invoices at Settings -> Account and billing -> Invoices.
All invoices are displayed here:
- invoices for the MRPeasy subscription;
- plus additional invoices, e.g., for adding new users, upgrading, or ordering training.
To pay an unpaid invoice, open it and proceed to checkout.
How to add more users to the subscription
To add more users to the subscription:
- Go to Settings -> Human Resources and press the "+" button. Then, you can choose how many users you'd like to add.
- The software will automatically generate a pro forma invoice based on the time remaining until the end of the current billing cycle.
- The amount of the invoice = (pricing plan price) X (number of new licenses) X (days until the end of the current billing cycle) / (365 or 30, depending on the billing cycle).
- Once you have 10 users, you pay for 10 additional users at a discounted rate. For example, if you already pay for 11 users, you can add a user straight away, up to the 20th user.
- Go to Settings -> Account and billing -> Invoices and pay the invoice.
- Go to Settings -> Human Resources, then press the "+" button again to add prepaid users.
NB! Users can be added freely during the free trial, with no restrictions.
How to change the pricing plan
To change your pricing plan:
- Go to Settings -> Account and billing -> Profile.
- Click Edit and choose your desired plan.
- Save
If you upgrade and are a paying customer, the billing system will create an additional invoice that you must pay manually. Your plan will be updated after payment.
For downgrading, please see the next section for additional instructions.
How to downgrade the account
To downgrade from a higher software edition (pricing plan) to a lower one, act as follows:
- Check that your account does not exceed the limits of the chosen lower-priced plan.
- Limits are listed in the MRPeasy Terms and Conditions: /terms/#limits
- Disable all special features that are provided by the higher edition.
- This can be done at Settings -> System settings -> Professional functions and/or Enterprise functions.
- A special feature can be disabled if no special data is created by that function. For example, all serial numbers should be deleted to disable the Serial numbers functionality.
- Change your pricing plan at Settings -> Account and Billing -> Profile.
- In Settings -> Account and Billing, check that you have the desired pricing plan and that the next invoice amount is as expected.
How to change the billing cycle
You can change your billing cycle at Settings -> Account and billing -> Profile.
The new billing cycle will take effect after the current billing period ends.
How to change the company name and contact e-mail associated with the account
Contact e-mail
This is the account administrator's email. You can see the Contact email at Settings -> Account and billing -> Profile. Your company's contact email is used to send information from MRPeasy to you.
There are two ways to change it:
- Change the e-mail of the administrator user at Settings -> Human resources -> Users.
- Or assign another user as the administrator.
Company name and billing e-mail
You can see and edit the Company and Billing e-mail associated with the account at Settings -> Account and Billing -> Profile.
The Company is used on invoices issued by MRPeasy to your company.
- Note that the billing address is entered at Settings -> System settings -> Company details -> Address.
If it is filled, invoices issued by MRPeasy are sent to the Billing e-mail.
How to stop billing
If you just want to stop making payments, you can delete your payment details:
- Go to Settings -> Account and Billing -> Payment data.
- Delete the payment details.
In this case, you can continue using your account until the end of your paid period.
How to delete the account
To delete your account:
- Log in as the administrator.
- Go to Settings -> Account and billing -> Profile.
- Click the Delete my account button.
- Follow the instructions.
NB! Only the administrator can delete the account.
Access and Security
Jump to:
Authentication options
Users can sign in to MRPeasy using their email address and password, or via Google or Microsoft.
Sign in with email and password
Email and password are set during registration or when an administrator creates a user. Read more about setting, changing, and restoring passwords in the User Details section.
Sign in with Google or Microsoft
You can also authenticate using your Google or Microsoft account.
External sign-in is available only for existing MRPeasy user accounts, and the email address of your Google/Microsoft account must match the email address of your MRPeasy user.
Two-factor authentication
Two-factor authentication (2FA) adds an extra verification step during sign-in to protect your account.
Read more about how to set it up and how to configure it for a specific user.
Allowed IP addresses
Allowed IPs restrict access to MRPeasy so users can sign in only from approved networks (for example, your office network or VPN).
Read more about how to configure it and how to enable it for a user.
Need Help?
We’re here to assist you!
The Support page offers you a range of support options to assist with your needs.
If you get stuck:
- Look into the Quick help for instructions from the User Manual and the training videos.
- Search the online resources for frequently asked questions.
- Write to our support team at Support.
- Ask Mr. Peasy, our AI Chatbot, your question.
- You can order personal training sessions with our specialists to better understand MRPeasy functionality.
- Check our Advanced Support plans when you need our experts' help with your business case.
- Our Authorized Partners can offer personal implementation services.
- You can allow technical support access to your data to help diagnose specific issues.
Quick Help
For any page throughout the program, its explanation can be found by clicking the Quick Help button in the top-right corner.
Support Ticket System
If you get stuck and need help, then please go to Support -> Support tickets and create a new support ticket describing the problem in 3 steps:
- Your action – what you did (describe step-by-step, very detailed).
- The expected result.
- The actual output and relevant additional information, e.g., error messages, company ID, username, time, a full screenshot including browser bars, video, etc.
Once you have filed a support ticket, you will receive the response there.
Please select the relevant category for your ticket:
- Functionality question – You have a question about existing functionality or availability.
- Development proposal – You have an idea for development.
- Error message – You have received an error message such as "Please contact customer support." There is a technical error with the software.
- Account and billing – You have questions about your account and billing.
- Other - You have other questions.
Mr. Peasy, the AI Chatbot
Mr. Peasy is designed to provide quick and accurate responses to your MRPeasy-related queries, saving you time browsing the manuals. While it does not replace our human support, it’s a handy resource for prompt replies to common questions.
To ask a question to Mr. Peasy, go to Support -> Ask Mr. Peasy.
Click the chatbot icon at the page’s bottom, type your question, and press Enter or click Send. Mr. Peasy will promptly respond.
We encourage you to try it out and share your feedback.
Training Hours
You can read about training hours and find the price per hour from Support -> Training hours.
Training hours are for learning the functionality of MRPeasy with our specialist's help.
Disclaimer! Please note that we can train on existing MRPeasy functionality, but we cannot advise you on how to use MRPeasy in your business with your data. We also cannot help you set up integrations with accounting and other external programs.
Advanced Support
Advanced Support service provides access to an MRPeasy expert dedicated to your account. The service is designed to enhance the self-implementation experience of MRPeasy.
Advanced Support is offered across several plans that differ by the number of included video call hours per month and price. Visit Support -> Advanced support for more information.
Implementation Help
If you want a personal approach, someone to guide you, and help you set up MRPeasy for your business, please turn to our partners.
Implementation consultations are provided by MRPeasy Authorized Consultants, which are independent consulting companies. Authorized Consultants have their own service and pricing policy. The Authorized Consultants can be found here: /consultants/
Support Access
If you have an issue that you want MRPeasy technical support to investigate and help you resolve, you can allow access to your database so the issue can be investigated.
Access to your database can be allowed at Support -> Settings. To revoke access, please submit a support ticket.
Only some MRPeasy techs have support access. Support personnel with special access privileges can utilize it when a customer specifically asks for technical help with a clear question. Even then, the data is obfuscated, mostly showing only codes, numbers, and dates (i.e., item descriptions, vendor or customer names, contacts, addresses, workstation names, tasks, operation descriptions, attachments, notes, account names, etc., cannot be seen).
As a policy, MRPeasy employees:
- never access customers' data, except when Support access is allowed, and assistance is explicitly requested to resolve a specific issue. Only some tech. support employees have this clearance.
- never review customers' data;
- never input, change, edit, or update customer data in their databases;
- never manually create, edit, or delete accounts/databases. Databases are created automatically with a new account and can only be deleted by the customer or automatically if the account expires.
- never add, edit, or remove users;
- cannot see, add, or edit payment information.
Task Management
The Task Management pane can be used to give assignments to team members or to yourself. Task Management enables a simple way to organize work and keep track of assignments. The Tasks pane can be used to send short messages and to keep longer discussions.
The tasks pane can be accessed in the upper-right corner by clicking the Tasks icon.
Tasks can have
- a deadline,
- content with attachments, and
- comments from team members.
Usage tips
- Every user can create a new task and assign it to other users.
- When a task is complete, mark the checkbox 'Done'.
- When a new task is assigned or an existing task is updated, the Tasks button in the upper right corner blinks.
- A new or updated task is displayed in bold until it is opened.
- Only these tasks are shown: those created by the user or assigned to him/her.
- To remove a task from the pane, the task must be deleted.
- The Tasks pane is updated automatically once per minute.
Access to the Tasks pane
The Tasks pane, located in the upper-right corner of the window, can be opened by every MRPeasy user (except the Internet kiosk user at present).
Dashboard
The Dashboard section of MRPeasy shows the most important metrics about your company's performance.
Tips:
- Clicking a widget opens the detailed report.
- Add or remove widgets by clicking on the Customize dashboard.
- The order of widgets can be changed by clicking on a widget title and dragging it to a new place.
- Depending on user rights, some widgets may not be visible.
The following widgets are available:
- 7 Days Late Invoices - number of invoices in Unpaid or Paid Partially status and overdue 7 days or more.
- Awaiting inspection - the number of stock lots that must be inspected.
- Available with the Quality Control functionality.
- Cash and cash equivalents - current cash balance based on the general ledger.
- Available with the Standard Accounting module.
- Cash flow - the balance of payments received from customers and payments made to customers from the beginning of the month.
- Cash flow forecast - cash flow forecast for the next two months.
- CO ready to ship - a number of customer orders "Ready for shipment."
- Deliveries on time - the percentage of COs that have been shipped on time since the beginning of the month.
- Deliveries on time % = (The number of on-time shipped COs) / (The number of all considered COs)
- If the shipment date (the date when the Shipment was picked) is earlier than or equal to the CO's "Delivery date", the CO is considered on time. If there are several shipments, the latest date is used.
- The following COs are considered:
- Orders that should have been delivered this month - with a "Delivery date" from the beginning of this month to today, with any customer order status from "Confirmed" to "Delivered".
- Orders that are overdue, with a "Delivery date" before this month and statuses "Confirmed", "Waiting for production", "In production", or "Ready for shipment".
- Orders that were delivered early, with a "Delivery date" in the future, and statuses "Shipped" or "Delivered".
- Orders without a "Delivery date" are ignored. Delivery dates of individual CO lines are not used.
- Deliveries on time % = (The number of on-time shipped COs) / (The number of all considered COs)
- Expenses - total expenses from the beginning of the month based on the general ledger.
- Available with the Standard Accounting module.
- Expire in 30 days - the number of stock lots that are due to expire in 30 days.
- Available with the Expiry Date functionality.
- Income - total income from the beginning of the month based on the general ledger.
- Available with the Standard Accounting module.
- Items below reorder point - number of stock items whose available quantity is below the minimum desired quantity, below the reorder point level.
- Late CO is the number of customer orders that are confirmed but not shipped and have a past due date.
- Late MO is the number of manufacturing orders that are not finished and have either a due date or a finish date in the past.
- Late PO - number of purchase orders that are not received yet and have an expected date in the past.
- Manufacturing on time - the percentage of MOs that have been made on time from the beginning of the month.
- Manufacturing on time % = (The number of finished MOs, where "Due date" equals to or is after the "Finish date") / (The number of all MOs, for which "Due date" is on or after the 1st of this month)
- This indicator considers only MOs with a "Due date" greater than the start of this month. MOs without a "Due date" are ignored.
- MO in progress - number of manufacturing orders that are in progress or paused.
- MO is ready to start. The number of manufacturing orders for which materials are ready in stock.
- OEE – the percentage of overall equipment effectiveness from the beginning of the month.
- Purchases on time - the percentage of PO lines that have been received on time from the beginning of the month.
- Purchases on time % = The number of On-time PO lines / The number of all PO lines
- If the "Received date" of a PO line is equal to or before the "Expected date", it is considered on time.
- The following PO lines are considered:
- Received lines with "Expected date" from the beginning of the month to the current date.
- Not received lines with "Expected date" before the beginning of the month.
- Purchase Orders with statuses "Canceled" and "RFQ" are ignored.
- Purchases on time % = The number of On-time PO lines / The number of all PO lines
- Rejection rate - the average rejection rate for the current month.
- Available with the Quality Control functionality.
- Sales - the total sum of invoices from the beginning of the month.
- Stock - the total cost of inventory.
- TEEP – the percentage of total effective equipment performance from the beginning of the month.
Settings
The Settings section of MRPeasy gives the ability to:
- modify the settings of your MRPeasy account,
- set your company details and regional settings,
- define work hours, holidays, business days, etc.
- enable additional functionality,
- configure functionality and the user interface,
- access account and billing options,
- access customer support options,
- manage users and departments,
- create and modify different production sites and stocks,
- download database backups and restore backups.
The Settings section has the following sub-sections:
- System settings: settings that customize how the application works.
- Account and billing - where you can manage your subscription.
- Human resources: contains settings for users, departments, and workforce planning.
- Production sites/Stocks—This option allows managing multiple physical production sites and/or stock locations across different geographical locations. It is available with the Multi-Stock and Production Sites functionality.
- Support - contains conversations with Customer Support (the Support Ticket System), purchasing of training hours, and launch packages.
- Database maintenance - contains options for downloading and uploading backups and clearing the database.
Settings - Frequently Asked Questions
Account and billing:
- How to order MRPeasy?
- How to see and pay invoices? (incl. bills for additional users, training, and pricing plan upgrades).
- How to order more users?
- How to change the billing cycle?
- How to choose the Corporate plan?
- How to change your pricing plan?
- How can I change the company name and billing contact e-mail for the account?
- How to delete your account?
Users:
- How to add users to the free trial?
- How to add users to the subscription?
- What is a free user?
- How to access the database logs?
- How to set user access permissions?
- How to hide costs and prices from the user?
- How to enter the hourly wage for labor cost calculations?
- How to enable the internet-kiosk?
- How to give order approval rights?
- What is the lock handler?
- How to limit the IP addresses from which users can log in?
- How to enable two-factor authentication?
- How to change the password?
- How to delete a user?
MRPeasy system settings:
- Where can I define my company details - name, billing address, etc.?
- Where can I define the regional settings - base currency, the first day of the week, time zone, etc.?
- How do I define additional foreign currencies and exchange rates?
- How do I change the default document numbering formats?
- Where can I enable Professional package functions?
- Where can I enable Enterprise package functions?
- What are the Software settings that reconfigure functionality?
- What are the Usability settings, which reconfigure the user interface?
- How to add custom fields to the MRPeasy database?
- How to define custom write-off types?
- How can I edit PDFs of Purchase Orders, Invoices, etc.?
- How can I manage different warehouses and production sites?
Integrations:
- How to configure integrations?
- How to connect with QuickBooks Online?
- How to connect with Xero?
- How to add attachments in MRPeasy?
- How to display images and CAD files?
- How to connect with Pipedrive?
- How to connect with Shopify?
- How to connect with Magento?
- Where is the API documentation? (API usage is available only on the Unlimited plan)
MRPeasy support:
- How can I reach MRPeasy customer support?
- How to access the Quick Help?
- How can I order personal training?
- How can I get personal implementation help?
- How can I grant or deny technical support access to my database?
Database maintenance:
- How can I download a database backup?
- How can I restore my database from a backup?
- How can I clear the database?
Jump to other FAQs:
System Settings
The Settings -> System settings section contains the settings that customize how the application works.
- Regional Settings - customize how the information is displayed according to local specifics, e.g., timezone, the first day of the week, base currency, etc.;
- Company Details - enter your company information, which will be displayed in the documents sent to your customers and vendors.
- Numeration Formats - set the numeration formats based on which document numbers are generated in MRPeasy;
- Work Hours - define the work hours for each day;
- Holidays - enter the dates of holidays when no work will take place;
- Professional Functions - enable or disable the Professional functions;
- Enterprise Functions - enable or disable the Enterprise functions;
- Software Settings - set preferences for the software interface;
- Usability Settings - set preferences for your personal interface;
- Notifications - set personal e-mail notifications;
- Additional Currencies - define additional currencies and their exchange rates;
- Allowed IPs - define IP addresses that are allowed to sign in to your account at MRPeasy;
- Integrations - configure integrations of MRPeasy with other software;
- PDF editor - customize the layouts of PDF documents;
- Label editor - customize labels;
- E-mail editor - customize subjects and texts of e-mails that can be sent to your customers and suppliers;
- Internet-kiosk editor - customize the information that workers can see for production reporting;
- Custom fields - add custom fields to your MRPeasy database;
- Write-off types - define custom write-off codes for manual write-offs;
- Customer Statuses - rename default customer statuses in CRM.
Regional Settings
The Settings -> System settings -> Regional settings page lets you customize how information is displayed in MRPeasy based on your local settings.
Demo video: Setting up business details, working hours, and PDF editor.
The following information can be defined on this page:
- Time zone - time zone you are in by continent and city, e.g., Europe/London.
- Date Format - how dates are displayed, e.g., dd.mm.yyyy, mm/dd/yy, etc.
- First day of the week - which day the calendars display as the first day of the week.
- Decimal separator - choose whether the decimal separator is a comma or a dot.
- Thousands separator - choose whether the thousands separator is a comma, a dot, or a space.
- CSV separator - choose whether the field separator in CSV files is a comma or a semicolon (when exported).
- Currency sign - your base currency. Enter the default currency sign, e.g., USD, EUR, GBP, AUD, etc. You can also use signs $, €, and £; however, they will not trigger an automatic currency rate update when used.
Important! Changing the base currency sign in a live database will not affect financial values or the recalculation of documents or exchange rates; only the sign will change. - Currency format - how prices and costs are displayed, e.g., as 100€ or €100.
- Generic name of an undefined place in stock - name of the default storage location in Stock; by default, it is "General".
Company Details
The Settings -> System settings -> Company details page allows you to enter information about your company, which will be displayed in the documents created by MRPeasy.
Demo video: Setting up business details, working hours, PDF editor.
The following information can be defined on this page:
- Company name - the name of your company. This information is printed on invoices, quotations, purchase orders, etc., and invoices from MRPeasy.
- Contact details - your company's address is a free text. This information is displayed on invoices, quotations, purchase orders, etc., and invoices from MRPeasy.
- E-mail - enter your company's general e-mail address.
- Website - the URL of your company's website.
- Phone - your company's phone number.
- Reg. no. - your company's registration number.
- VAT number—your company's VAT number if you are from the EU and have a valid VAT number. This eliminates 22% of the VAT from MRPeasy's invoice to you.
- VAT rate / Tax rate - your VAT, GST, or Sales Tax rate. This will be added to the Invoices and Quotations you create as the default tax rate.
- Payment details—Please enter your payment details as free text. This information will be added to the Invoices and Quotations you create.
Holidays
The Settings -> System settings -> Holidays page allows you to enter the dates of holidays when no work takes place.
Demo video: Setting up business details, working hours, and PDF editor.
- No manufacturing operations will be scheduled for these days.
- Custom holidays can be configured for each workstation group at Production Planning -> Workstation Groups -> Details of a Workstation Group.
Numbering Formats
The Settings -> System settings -> Numbering formats page lets you set the numeration formats and current sequence numbers used to generate document numbers in MRPeasy.
Each time a new document is created, the sequence number increases by one.
Here are the default formats for each document:
| Customer orders | CO00001 |
| Customers | CU00001 |
| Invoices | I00001 |
| Pro-forma invoices | PI00001 |
| Quotations | Q00001 |
| Order confirmations | OC00001 |
| Pricelists | PL00001 |
| Manufacturing orders | MO00001 |
| Workstations | C00001 |
| Workstation groups | WCT00001 |
| BOM | BO00001 |
| Routings | R00001 |
| Items | A00001 |
| Lots | L00001 |
| Shipments | S00001 |
| Transfer orders | TO00001 |
| Product groups | AG00001 |
| Relations | RE00001 |
| Bookings and Write-offs | WO00001 |
| Purchase orders | PO00001 |
| Vendors | V00001 |
| Customer Returns (RMAs) | RMA00001 |
| Service Orders | SO00001 |
| Procurement forecasts | PF00001 |
Working Hours
The Settings -> System settings -> Working hours page allows you to define the work hours for each calendar day.
Demo video: Setting up business details, working hours, and PDF editor.
- The work hours define how many hours a day workstations can be loaded.
- The default hours are Monday through Friday, 08:00 – 17:00.
- 24-hour workdays (e.g., three 8-hour shifts) must be defined as 00:00 – 23:59.
- Each day with work hours is considered a business day (material lead times are defined in business days for higher accuracy).
- Custom work hours can be configured for each workstation group at Production Planning -> Workstation Groups -> details of a workstation group.
- The operation time tracker automatically suspends work that is not completed or paused at the end of the working day. This is done from 1 a.m. to 3 a.m.
Professional Functions
You can enable the Professional package functions in Settings -> System settings -> Professional functions.
The additional functions available in the Professional package are:
- B2B Customer Portal - a web store that allows your customers to order products directly from you;
- Co-product BOM - add side-products (side-products, scrap, waste) to BOM, which can also be retrieved to stock from the same Manufacturing Order;
- Custom fields (always on) - add custom fields to the database;
- Disassembly BOM - ability to disassemble a product into parts.
- Expiry date - track expiry dates of stock lots;
- Fixed Quantity - fix a part quantity in a BOM, irrelevant to the order quantity;
- Matrix BOM - define parametric products, which have many variations;
- Non-inventory items - create items that are not tracked in inventory;
- Overlap and special sequences of production operations - subsequent operations can overlap; several chains of operations that can diverge/converge can take place at one time for one product;
- Parallel execution of production operations: an operation can be divided into smaller parallel operations across all available workstations in the same group.
- Piece payment - workers can be paid per piece; time payment can be disabled.
- Quality Control - items can be subject to quality control before being taken into stock (both procured and manufactured);
- Serial numbers - individual pieces of any item can be tracked by their serial numbers.
- Subcontracting - using subcontracted processes in production, free issuing stock to subcontractors;
- Tiered pricing - define different sales price sheets and pricing tiers per order quantity;
- Unscheduled manufacturing orders - the ability to remove planned manufacturing orders from the production schedule.
B2B Customer Portal
The B2B Customer Portal functionality provides a web store where your customers can place orders, track order progress, and access invoices. It is deeply connected with your MRPeasy CRM. You can choose which customers receive access and control which products each can see and buy.
The Customer Portal empowers your customers to:
- Place orders.
- Monitor order statuses, dates, and tracking numbers.
- Access their invoices.
Jump to:
- Demo video: Customer Portal.
- Setting up.
- Using the Customer Portal.
Setting up the Customer Portal
Enabling the B2B Customer Portal functionality
The B2B Customer Portal can be enabled at Settings -> System Settings -> Professional Functions -> B2B Customer Portal.
The setting Auto-creation of variations of the Matrix BOM functionality should be switched off for compatibility with the Customer Portal.
Customer Portal branding
The B2B Customer Portal can be customized with the company logo. The logo displayed is the one configured in Settings -> System settings -> PDF Editor, ensuring consistent branding across customer-facing documents and the portal. For detailed instructions on adding or updating the company logo, see the guide here.
Inviting customers or revoking their access
To invite a customer to the Customer Portal:
- Navigate to CRM -> Customers -> Customer details.
- Press the Invite to Portal button.
- The system will generate a pre-filled email for your customer with a unique link to the Customer Portal. Send this email to your customer.
- The customer can access the portal by opening their unique link.
To revoke a customer's access from the Customer Portal:
- Navigate to CRM -> Customers -> Customer details.
- Press the Revoke customer from Portal button. This will render the previously shared unique link invalid.
Product visibility in the Customer Portal
The list of products a customer can see and order is determined based on the pricelist assigned to the customer:
- If a pricelist is assigned to the customer (as part of the Tiered Pricing functionality), only the products in that pricelist are visible.
- If no pricelist is assigned to the customer, all items with a selling price defined in the item’s details (the default pricelist) are visible.
In all cases, items marked Not for sale in the item’s details are never shown in the Customer Portal, even if they belong to the assigned pricelist.
Customer’s currency
All prices are displayed in the currency assigned to the customer at CRM -> Customers -> Customer details.
If selling prices are defined in a different currency, these will be converted to the customer's currency using the exchange rate specified at Settings -> System Settings -> Additional Currencies.
Using the Customer Portal
Overview of the Customer Portal
In the portal, customers have access to the following pages:
- Catalog - where customers can add products to the cart.
- Cart - where customers can review and place their orders.
- My orders - where customers get a complete overview of all their orders and can access their details.
- Order details: where customers can view their orders and initiate reorders.
- My invoices - where customers get a complete overview of their invoices and can access their details.
- Invoice details: where customers can view the invoice and download a PDF copy.
Ordering through the Customer Portal
- Adding products to the cart. Upon logging in, customers are directed to the Catalog page. Here, customers can add products to the cart.
- Reviewing the cart. Next, on the Cart page (accessible from the top-right), customers can review the order and make any necessary changes.
- Selecting a shipping address. On the Cart page, one shipping address can be selected from the addresses defined in the customer’s details in the MRPeasy CRM. If the customer does not have a saved address, the option "Pickup at Vendor’s location" will be used.
- Placing an order. The order is confirmed and placed when you click the Create Order button on the Cart page.
- Invoicing and payments. Once an invoice for the order is created in the MRPeasy CRM, it will be accessible in the portal, along with payment information.
- Shipping. Once a shipment for the order is created in the MRPeasy CRM, it will be visible in the portal.
- Reordering. When you click Order again at Customer Portal -> My Orders -> Order details, the Cart page opens and is pre-filled with the same items.
Processing portal orders in the MRPeasy CRM
When an order is placed through the Customer Portal:
- It will appear in a Confirmed status at CRM -> Customer Orders.
- A new task will be to notify the customer's account manager of the order.
Subsequently, such orders should be processed as any other orders in the MRPeasy CRM.
Some things to note:
- Invoices are not created automatically.
- The estimated shipping date will be displayed in the portal once the CO delivery date is entered.
- Changes to CO statuses are mirrored in the portal.
CO statuses in MRPeasy CRM and Customer Portal
The Customer Portal displays only customer orders in the following statuses:
|
CO status in MRPeasy CRM |
CO status in Customer Portal |
|
Confirmed |
Ordered |
|
Waiting for production |
Processing |
|
In production |
Processing |
|
Ready for shipment |
Ready for shipment |
|
Shipped |
Shipped |
|
Delivered |
Shipped |
COs with other statuses are not shown in the Customer Portal.
Co-Product BOM
The Co-product BOM functionality allows the production of additional products from a single manufacturing order.
This allows line workers to report the number of co-products, side products, rejected products, or scrap.
This functionality can be enabled at Settings -> System settings -> Professional functions -> Co-product BOM.
Jump to:
- Demo video: Co-Product BOM.
- Configuring co-products.
- Reporting co-products.
- Cost allocation to co-products.
Configuring additional products
Co-products must be previously configured in the BOM of the main product before they can be reported.
To set up additional products:
- At Stock -> Items, create the articles for additional products, such as waste or scrap.
- Open the BOM for your product, where these items will be produced as additional side products.
- Add any additional products to the Additional product section.
- Set the percentage of total MO costs allocated to co-products. If undefined, the cost is 0.
Reporting co-products, adding additional products to stock
Additional products can be reported in several places:
- Co-products are added to stock when workers report them in My production plan or at the Internet kiosk when they pause or finish a production operation. The software will ask for the quantities of products and additional products that have been processed.
- Also, co-products can be reported in the manufacturing operation details. Read: How to edit operations in a Manufacturing Order?
The cost of the additional products
It is possible to allocate the costs of a manufacturing order between the main product and its co-products.
To do so, the percentage of costs allocated to co-products must be specified in the product's BOM details.
Note that:
- A cost allocation percentage is set per unit.
- If the percentage is undefined, the cost is 0.
For example, with one co-product, if 20% of costs are allocated to a co-product, then:
- 100% - 20% = 80% of costs will be allocated to the main product (percentages must add up to 100%).
- One unit of co-product will be allocated 4 times (80/20) fewer costs than one unit of the main product, i.e., a co-product cost will be 1/4th of the main product.
- If the total MO cost is $1000, 24 main products and 4 co-products are made, then costs will be allocated as follows:
| Total MO cost: | A = Direct materials + Direct labor + Overhead = | $ 1000 |
| Cost of 24 main products: | B = 24 x 80% x A / (24 x 80% + 4 x 20%) = | $ 960 |
| Cost of 4 co-products: | C = 4 x 20% x A / (24 x 80% + 4 x 20%) = | $ 40 |
| Cost of 1 main product: | D = B / 24 = | $ 40 |
| Cost of 1 co-product: | E = C / 4 = | $ 10 |
How to find the cost allocation percentage for a co-product
The cost of a co-product is a business decision. Standard costs for co-products and main products should be found, or cost ratios should be set. Only then can the cost allocation percentage be calculated for use in the software.
- General formula: Cost percentage of co-product A = (Cost per unit of co-product A) / (Sum of all unit costs of co- and main products)
- In case of 1 co-product: X = E / (D + E)
X - the cost allocation percentage for the co-product. The unknown variable.
D - the cost per unit of the main product.
E - the cost per unit of the co-product.
If the costs are $40 and $10, we find the cost allocation percentage: X = 10 / (10 + 40) = 20%
If you have more co-products, the same approach can be used for all of them.
For example, 3 co-products:
| Product | Standard cost per unit | Calculation | Percentage | Comment |
| Main product | 10 | 10 / 16 = | 62.5% | This can be calculated for a check to verify that the sum of the cost allocation percentages equals 100%. This is not entered into the software |
| By-product 1 | 1 | 1 / 16 = | 6.25% | |
| By-product 2 | 2 | 2 / 16 = | 12.5% | |
| By-product 3 | 3 | 3 / 16 = | 18.75% | |
| Sum: | 16 | 100% |
If there is no standard cost but ratios or weights are in place instead, the result can be found using the exact same approach as in the above table. E.g., by-product 1 cost is 1/10th of the main product, by-product 2 cost is 2/10ths, by-product 3 cost is 3/10ths, etc.
Co-products in a multi-level MO
Attention! In multi-level MO, co-product BOM cost allocation can only be used at the first level (the main product of the MO).
- The creation of co-products from sub-assemblies can be reported alongside their operations.
- The co-products of sub-assemblies will have a cost of 0, regardless of the cost allocation percentage.
Custom Fields
The Settings -> System settings -> Custom fields page allows you to configure additional database fields in your MRPeasy database.
Demo video: "Custom fields" functionality.
- A maximum of 30 custom fields can be added.
- Custom fields provide additional opportunities for searching and sorting, but not for calculations.
- Custom fields are hidden by default in the tables; click Choose columns to make them visible.
- The custom field can be a free text, a number, a date, or a drop-down with pre-defined options.
- A custom field can be marked "Required," so the user must fill the field.
- For drop-down type custom fields, it is possible to add multi-line text for PDFs as one choice by using "\n" as the line-break character (e.g., "Line1\nLine2\nLine 3" for three separate lines within one option).
- In the MRPeasy user interface, you will still see the text as a single line with line-break characters ("Line1\nLine2\nLine 3"); it will appear on separate lines in generated PDFs.
Custom fields can be added to the following objects:
| Object | Comments |
| Customer orders | |
| Customer returns (RMAs) | |
| Customers | |
| Inspections | |
| Invoice | |
| Manufacturing orders | Custom fields for MOs can be shown in My Production Plan. |
| Procurement invoices | |
| Purchase orders | |
| Purchase terms | |
| Serial numbers | |
| Shipments | |
| Stock items | Custom fields for Stock Items can be added to several PDFs. By editing the layouts with the PDF editor, these fields can be included in other documents besides invoices and POs. |
| Stock lots | Custom fields for Stock Lots can be "Persistent." This means that custom field values will be transferred to a new stock lot, which is automatically created due to a transfer order or a rejection during an inspection. |
| Transfer orders | |
| Vendors |
Disassembly BOM
The Disassembly BOM functionality allows disassembling (cutting) a product into parts. The product's cost is divided among the new parts.
This functionality can be enabled at Settings -> System settings -> Professional functions -> Disassembly BOM.
Jump to:
- Demo video: Disassembly BOM.
- Configuring disassembly BOM.
- Cost allocation percentage calculation.
- Disassembling a product.
Configuring disassembly BOM
- When creating a BOM, choose the "This is a disassembly BOM" option.
- Enter the parts into which the product can be disassembled.
- For each part, enter a quantity and a cost percentage. The sum of the cost percentages must be 100%. See the example below.
Connecting the disassembly BOM with routings:
- The routing can be selected in the disassembly BOM details. In this case, the disassembly manufacturing order will contain operations.
- If no routing is selected in the disassembly BOM details, then the manufacturing order will contain no operations and will be considered as an un-kitting MO.
- Routing can be linked to a normal BOM or a disassembly BOM, but not both.
Disassembly cost calculation example
For example, we wish to disassemble a table into its parts: 1 table top and 4 table legs. We have already figured out the expected standard costs (or cost ratios) for the parts.
The disassembly cost percentages for parts are calculated as follows:
| Part | Standard cost (or cost ratio) of the part | Cost percentage | Comment | |
| Table top | $ 7 | 7 / 10 = | 70% | Note that the quantity of the part in the Disassembly BOM does not play any role in calculating the cost allocation percentage. |
| Table leg | $ 3 | 3 / 10 = | 30% | |
| Total: | $ 10 | 100% | ||
And the disassembly BOM will look as follows:
| Part | Quantity | Cost percentage |
| Table top | 1 | 70% |
| Table leg | 4 | 30% |
If we disassemble the product, when the Disassembly MO has a cost of $19 per piece, we get the following result:
| Total MO cost: | A = Direct materials + Direct labor + Overhead = | $ 19 | |
| Cost of 1 table top: | B = 1 x 70% x A / (1 x 70% + 4 x 30%) = | $ 7 | This correctly equals the expected standard cost in our previous calculation. |
| Cost of 4 table legs: | C = 4 x 30% x A / (1 x 70% + 4 x 30%) = | $ 12 | |
| Cost of 1 table leg: | C / 4 = | $ 3 | This correctly equals the expected standard cost in our previous calculation. |
Disassembling a product
To disassemble a product, create a manufacturing order, and select a disassembly BOM.
If the manufacturing order includes operations, please complete them and report the results. Parts are added to the stock when an operation is paused or finished.
If a manufacturing order contains no operations, it is automatically executed after the required quantity of products has been ordered and received. Parts are automatically added to the stock.
Expiry Date
The Expiry date functionality allows tracking expiry dates and setting shelf life for the stock lots of parts, ingredients, and finished products.
Please note that the Expiry Date functionality requires Tracing to be enabled.
Jump to:
- Demo video: Expiry date.
- Enabling Expiry dates functionality.
- Automatic calculation of the expiry date.
- Manually setting the expiry date.
- Using expired goods.
- The expiry date of kits/bundles.
- Transferring items with expiry dates.
Enabling Expiry dates functionality
This functionality can be enabled at Settings -> System settings -> Professional functions -> Expiry dates.
When it is enabled, then:
- The "Expiry date" field is available for stock lots (at Stock -> Stock lots) and can be manually updated.
- The default "Shelf life" in days can be set for items on the item details page (Stock -> Items).
- Expired items are ignored when the software automatically creates bookings.
- Automatically created bookings for materials and products are based on FEFO (First Expired, First Out), i.e., items that expire earlier are used before items that expire later.
- The "Expire in 30 days" indicator will become available on the Dashboard. It will provide a report of all lots that expire in 30 days.
Automatic calculation of expiry date
When purchase or manufacturing orders are created, the software attempts to automatically estimate the expiry date by adding the item's Shelf life to the date the product is received into stock, i.e., Expiry date = Available date + Shelf life.
Manually setting the Expiry date
The Expiry date can be set for each stock lot in its details at Stock -> Stock lots.
If a stock lot does not expire, leave this field empty.
Using expired goods
The software does not automatically book expired items; however, you can manually book them, use them in production, or ship them to customers.
If a product has expired and is being shipped, the software will issue a warning to the user when picking it up for shipment.
Expiry date of kits/bundles
The expiry date of a kit is automatically calculated and equals the earliest expiry date of its products. To change the kit's expiration date, update the expiration dates of the products it contains.
Transfer orders and expiry dates
When making a transfer order between sites:
- If the source stock lot has an expiration date, the date will be copied to the target stock lot.
- Changing the expiry date in the initial stock lot also updates the expiration date in the target stock lot.
Fixed Quantity
The Fixed quantity functionality allows a component's quantity to be independent of the number of products in the manufacturing order. Normally, the quantities on a BOM are multiplied by the number of items on the MO to calculate the required materials, but the fixed quantity is not multiplied; it's fixed.
This functionality can be enabled at Settings -> System settings -> Professional functions -> Fixed quantity.
When the Fixed quantity option is turned ON, then:
- The Fixed quantity column becomes available on Bills of Materials.
- If some part is used a fixed amount, irrelevant to the order quantity, it can be entered in the Fixed Quantity column on the BOM (e.g. a user manual, gloves, tools boxed with the products, etc.)
- A material's quantity on a MO = MO's number of products x Quantity in the BOM + Fixed quantity in the BOM.
Non-inventory items
The Non-inventory items functionality allows users to use non-inventory items, i.e., turn off inventory tracking for these items.
Examples of non-inventory items include office furniture and supplies, cleaning supplies, equipment rentals, and internet or travel expenses. They can also include small or incidental items necessary for daily operations that do not fit into a specific inventory category.
We do not recommend using non-inventory items for services, as you will not be able to collect sales statistics for them. Please read what we recommend in this FAQ section article.
- Non-inventory items can only be used in Purchase Orders, Customer Orders, and Invoices (they can be bought and sold, such as office equipment).
- Non-inventory items cannot be used in BOMs, Manufacturing Orders, or Shipments.
- These items are not part of inventory or inventory management (they do not have stock lots, bookings, etc.) and aren't visible in Stock -> Inventory.
This functionality can be enabled at Settings -> System settings -> Professional functions -> Non-inventory items.
When the functionality is enabled, then:
- The setting "This is an inventory item (Yes/No)" will be available when creating a new article in Stock -> Items. This setting defaults to "Yes" (the entered item is a stock item).
- Once the item has been saved, this setting cannot be changed. An inventory item cannot be converted to a non-inventory item, nor can a non-inventory item be converted to an inventory item.
Jump to:
- Demo video: Non-Inventory Items
- Using non-inventory items in Customer Orders
- Expense items for procured services
- Charging for services
Using non-inventory items in Customer Orders
If the Professional function “Non-inventory items” is enabled, non-inventory items can be added to customer orders.
You can use these for services without direct cost (for example, an additional guarantee).
When the software updates the customer order’s Status and Part status, non-inventory items are ignored. If a customer order contains only non-inventory items, you can manually select any CO status.
If the item has a cost (for example, shipping your order from a vendor), please create a regular item. This allows linking customer orders to purchase orders and thus allocating costs to specific customer orders. To separate these items from inventory items, please create a separate product group.
Expense items in MRPeasy Accounting
If you pay for services or non-inventory items, which should be expensed immediately, it is possible to:
- Set an expense account as the default posting account for non-inventory items.
- Go to Accounting -> Chart of Accounts.
- Edit the expense account.
- Select it as a default account for "non-inventory items."
- Or set a custom account for the product group that contains the non-inventory items.
Posting date
If you have been billed for your non-inventory item now, but it is actually last month's expense, then enter the invoice date from last month for your correct bookkeeping.
See also: Automatic accounting transactions.
Overlap and Special Sequences of Manufacturing Operations
The Overlap and special sequences of manufacturing operations functionality allow:
- Overlapping consecutive production operations in batch production.
- Configuring special (non-linear) operation sequences, e.g., parallel chains of operations, in a single Routing,
This function can be enabled at Settings -> System settings -> Professional functions -> Overlap and special sequences of manufacturing operations.
When this function is enabled:
- The Overlap column becomes available in the Routing Details with a checkbox (Yes/No) on every operation line. The overlap quantity, which is how many products must be finished in the previous operation before starting, can be defined if selected.
- The Sequence columns are added to the Routing Details page, where each operation's preceding operations can be defined.
Jump to:
- What is Routing?
- What is overlapping? How to set up an overlap of operations?
- What is a special sequence? How to set up special sequences of operations?
- Demo video
Overlap of operations
The Overlap setting in the Routings details means that consecutive operations in the same Manufacturing Orders can overlap; i.e., the next operation can start before the previous one finishes when batch processing products. For example, when 10 table assemblies are finished (of 100 total), the next operation, painting, can start.
For configuring Overlap for an operation:
- Open the Routing of the product.
- Tick the Overlap checkbox on the operation line to allow the operation to start before the previous operation finishes. (The overlap setting cannot be applied to the 1st operation.)
- Enter the number of products that need to be processed in the previous step before this operation can start.
If this function is used:
- The operation is divided into (many) smaller operations, each with an "Overlap" quantity (or greater).
- For best results, it is recommended that multiplication "Cycle time" * "Overlap" = 1 minute or more, and "Overlap" equals or is a multiple of "Capacity".
- If "Overlap" quantity * "Cycle time" < 1 minute, the software rounds it up to 1 minute, which is the minimum scheduling time unit in MRPeasy.
- For example, if "Cycle time = 0.05 min" and "Capacity = 1", then 20 units are processed in 1 minute, and if the "Overlap = 1", MRPeasy will treat each separate 0.05-minute operation as a 1-minute operation (which means it would take 20 minutes for 20 units).
To resolve this, the parameters should be defined along the following lines:
- "Cycle time = 1 min"
- "Capacity = 1 / 0.05 = 20"
- "Overlap = a multiple of "Capacity" = 20 or more"
Take note:
- In practice, this kind of overlap is readily applicable in a balanced production line (i.e., each step takes the same amount of time). However, overlapping scheduling is harder to apply to an unbalanced production line because it's more difficult to avoid queues or idling, which requires careful planning.
- This setting only affects the scheduling of operations, allowing the MO to be scheduled more compactly when workstations are available.
- This setting does not forbid reporting the start of the next operation before the previous one is reported as finished.
Special sequences of operations
The Sequence setting in the Routing details allows defining parallel and converging/diverging chains of operations. While the routing sequence is linear by default, this allows you to configure a custom order of production operations. E.g., when two independent operations start in parallel, and the third operation can only start before these two have finished.
For configuring a special sequence of operations:
- Open the Routing of a product.
- The first operation's Sequence value must be chosen as 0.
- Set the Sequence values for the operations that can start immediately to 0.
- For every other operation, in the operations Sequence choice, set the number of operations that must be completed before this operation can start. (Press the Ctrl or Shift key, or click-hold the left mouse button to select multiple values.)
Example:
| Operation # | Operation | Sequence |
| 1 | 1st operation of the first sequence | 0 |
| 2 | 1st operation of the second sequence | 0 |
| 3 | 2nd operation of the first sequence | 1 |
| 4 | 2nd operation of the second sequence | 2 |
| 5 | Final operation | 3,4 |
The number in the Sequence field indicates after which operation this operation can start. The operation's ID number is displayed at the beginning of its line.
Demo video: How to configure complex sequences of operations - parallel, converging, or diverging chains of operations.
Parallel Execution of Production Operations
This parallel execution of production operations functionality allows dividing a single operation into smaller pieces to be processed in parallel across several workstations. It's possible to define in the Routing that an operation is split across all workstations in the same group.
This functionality can be enabled at Settings -> System settings -> Professional functions -> Parallel execution of production operations
When this function is turned on:
- The Parallelize column becomes available in the Routing Details with a checkbox (Yes/No) on every operation line.
- If the Parallelize option is enabled for an operation, it will be divided into smaller parallel operations among all available workstations of the same group.
- Then approximately: Operation duration = Cycle time x Quantity / Number of workstations*
* The actual planned duration may differ due to workstation productivity and availability differences.
Jump to:
Product Configurator / Matrix BOM / Product with Parameters

The Product Configurator / Matrix BOM functionality is an extremely powerful feature that allows:
- managing a large set of configurations of a product,
- easily configuring products with many variations,
- configuring parameters and variations for a product,
- automatically generating Bills of Materials for each configuration/variation according to selected parameter values,
- selecting parameter values/configurations from drop-down fields.
Some usage examples:
- Products where parameters change used materials, e.g., garments with variations in size and color.
- Machines, industrial equipment, electronics, bicycles, etc., use different parts based on setup/configuration.
- Chemicals, beauty products, pharmaceuticals, food, etc., e.g., ice cream, which is produced in bulk and then packaged into many different standard packages;
- Bulk products such as fasteners and nails are produced in thousands at a time and then packaged into different boxes in different quantities.
- Etc.
Jump to:
- How to enable BOM with Parameters / Matrix BOM?
- What do the parameters, values, relations, and variations mean?
- How to set up a BOM with parameters for an item?
- Auto-creation of variations for orders from e-commerce.
- Examples of setting up Matrix BOM.
- Demo Video: BOM With Parameters (Matrix BOM).
- Troubleshooting.
Enabling Product Configurator / Matrix BOM
To use this function, turn it ON at Settings -> System settings -> Professional functions -> Matrix BOM: Yes.
The following settings are possible:
- Auto-creation of variations (Yes/No):
- If yes, it is possible to choose all parameter values in any combination from drop-down fields when looking up the product (e.g., when entering a CO or an MO), and the software creates the variations that have not been defined earlier.
- If no, only pre-defined variations on the item's details page of a product are allowed to be used. - Unique variation numbers (Yes/No):
- If yes, each variation will have a unique part number. Customizing a variation's part number at Stock -> Items -> Items details -> Variations -> Variation's details is possible.
- If yes, each parameter value must have a unique code, which, by default, will be added as a suffix to the main part number. E.g., for value, the Large suffix L is added to part number A01 -> A01/L.
- If no, all variations will share the same part number. - Separator: a symbol that is used between parameter value codes that are added to the product part number. E.g., "/" is used in A01/L, where L represents the value Large.
- If variations have separate part numbers, this character is used to connect/separate parameter codes, which are added as suffixes to the main part number. - Variable selling prices (Yes/No):
- If yes, it is possible to set price adjustments for particular parameter values that affect the base sales price of the item. When creating a customer order or an invoice, the software will apply price adjustments to the selling price if they are sourced from a stock item's details. Please note that if a custom selling price is defined in a price list, it takes priority over the selling price based on the item's details and price adjustments.
If turned on, then
- the sections Parameters and Relations become available in Stock -> Stock settings.
- column Parameters can be enabled in tables, which display a list of items (e.g., Stock -> Items); this column displays the combination of parameter values of the specific product variation the line in the table refers to.
- parameters can be defined for stock items on the item details page;
- the Variations section becomes available on the item details page for items that have saved parameters.
- Relations can be used as line items in BOMs.
- if some parameter values change quantities of raw materials, additional columns will appear on the BOM for each variation of the parameter(s) value;
- specific parameter values of the product can be chosen when looking up the product (e.g., when entering a Customer Order or a Manufacturing Order). As a result, the software will generate the BOM for this specific variation and track it separately.
Matrix BOM terminology
Matrix BOM has four core components: parameters, parameter values, relations, and variations.
- Parameters - a parameter is one variable of the product.
Different parameter values can change the specific raw materials used, their quantities, or both:
- If a parameter does not affect quantities of raw materials, then only the raw materials themselves can change according to chosen parameter values (via a relation).
- If it does, then extra columns will appear on the BOM, where you must define quantities of raw materials for each parameter value. (Leave the quantity field empty if the quantity is zero for a given parameter value.)
A common example of a parameter is Size, where each size value corresponds to a different amount of fabric used by the clothing item. - Parameter values are the possible settings for a parameter.
Parameter values can have individual codes, which are added as a suffix to the part number.
Parameter values can change the item's base sales price.
E.g. for parameter Size, the values are S, M, L, etc. - Relations - if parameter values must change the raw material used, then the relation connects specific parameter values to specific stock items.
One relation swaps out one part only (one line in the BOM). If a specific combination of parameters changes several parts (several lines in the BOM), you must create several relations, one for each part (line in the BOM).
E.g., a common parameter Package has different values: Small box, Medium box, Large box. The Relation connects each value to a corresponding stock article, e.g., Small box -> #A-01 small carton 10x10x10, Medium box -> #A-02 medium carton 20x20x20, etc. - Variations - one variation corresponds to one final product with a certain combination of parameter values.
E.g. a shirt Size: S, and Color: Red is one specific variation of the product.
Setting up product variations with Matrix BOM
- In Stock -> Stock settings -> Parameters, the parameter(s) must be configured.
- If a parameter's value (or a combination of different parameters' values) swaps the individual materials of the product, Relations must be configured in Stock -> Stock settings -> Relations.
- Add the parameter(s) to the product in the item details page, and save.
- A subsection Variations appears in the item details. Select the allowed values of the parameter(s) for that product in this subsection, i.e., choose the allowed combinations.
- Create the Bill of Materials.
- If some parameter modifies the quantities of raw materials, then extra columns appear in the BOM for entering the corresponding quantity for every parameter value. (Leave the quantity field empty if the quantity is zero for a given parameter value.)
The number of columns cannot exceed 150. - When a part is also parametric, and the product and the part share the same parameters, select the part without specifying particular parameter values when creating a BOM for the product.
When creating an MO, MRPeasy uses the product's parameter values to select the specific variation of the part. All possible variations of the parts must be created earlier.
This is a multi-level Matrix BOM. - If a different part is to be used in the BOM according to different parameter values, then choose the relation as the line item to represent the part that will be swapped. The correct part is input according to the chosen parameter values.
- Create the Routing as normal. The routing is shared among all variations.
Now, Matrix BOM is set up. When creating a CO or MO, first choose the product, then enter the exact values of its parameters.
Auto-creation of variations for orders coming from e-commerce
If an order is received from e-commerce or Zapier integrations, then MRPeasy can create missing variations automatically when all the following conditions are met:
- Both options, "Auto-creation of variations" and "Unique variation numbers," are switched on in MRPeasy -> Settings -> System Settings -> Professional Functions -> Matrix BOM.
- A separator (for example, "-") is set in the Matrix BOM settings.
- Parameters and values are configured in MRPeasy.
- A product with parameters is configured in MRPeasy (for example, a product with part number 'A0001' and parameters 'Size' and 'Color').
Now, when an order is received, e.g., with part number A0001-S-GR, then:
- MRPeasy will split the SKU by the separator and understand that
- The product is "A0001",
- The first parameter's value is "S" and the second parameter's value is "GR."
- If this variation already exists for A0001, it will be used. Otherwise, this variation will be created automatically.
Matrix BOM examples
Jump to an example:
- Demo video.
- Example 1. A parameter value changes a part in the BOM via a relation
- Example 2. Using a phantom BOM to add several parts when selecting a value (or a combination of values).
- Example 3. A parameter value adds or changes several parts in the BOM via several relations
- Example 4. A parameter value changes the item and part quantities in the BOM via a parameter that changes the quantities of raw materials
- Example 5. Several parameter values combine to change a part and quantities in the BOM. Relations and parameters that change quantities are used at the same time
- Example 6. Multi-level Matrix BOM. A part or sub-assembly has the same parameters as the product, and parameter values are passed down to the part/sub-assembly.
Example 1. A parameter value changes a part in the BOM via a relation
- This example shows how one parameter can change a product's parts or raw materials through a relationship.
- In this specific example, an electronics product can have different power ratings, thus, power is considered a parameter, and each value would correspond to a different used Power Supply Unit (PSU).
Step 1. There is one parameter set up at Stock -> Stock settings -> Parameters:
- Power - different values correspond to different Power Supply Units (PSUs). Values: 200W, 500W, 1000W, ...
The Power parameter is configured as This parameter changes the quantities of raw materials: No.
Step 2. One relation is set up at Stock -> Stock settings -> Relations, which relates the Power parameter values to the PSU items:
| Relation: "Power parameter to PSUs" | |
| "Power" value | Corresponding PSU |
| 200W | #A-01, PSU 200W |
| 500W | #A-08, PSU 500W |
| 1000W | #A-14, PSU 1kW |
| ... | ... |
Step 3. In the item's details, one parameter is chosen: Power. And the item is Saved.
Step 4. Allowed variations are added by clicking the + button in the Variations section of the item's details, which is now available.
Step 5. The Bill of Materials will need to be set up as follows for the item:
| Product group | Part | Notes | Quantity |
| Parts | PCB board | 1 | |
| Parts | Capacitor 10uF | 20 | |
| Relation "Power parameter to PSUs" | 1 | ||
| ... | ... | ... | ... |
This means that if you choose Power value:
- 200W - the BOM will contain 1 "PSU 200W";
- 500W - the BOM will contain 1 "PSU 500W";
- 1000W - the BOM will contain 1 "PSU 1kW".
- All other parts are common among all variations.
Step 6. The product's routing, defined in the item's details, is shared among all variations.
Finished. Now, you can plan production and sell these items. The parameter values can be chosen from any product choice field when choosing the product. Each variation is separately tracked in stock (don't forget to enable the Parameters column).
Example 2. Using a phantom BOM to add several parts when selecting a value (or a combination of values).
Sometimes, with a single parameter value (or a single combination of values), it is necessary to include many parts in the BOM.
An easy way to achieve this is with the help of a phantom BOM:
- Create an item representing the collection of parts that will be added to the product's BOM.
- Add a BOM to that item that includes all the components to be added.
- Include this item in the Matrix BOM.
- When this item is added to Matrix BOM, all the parts in the BOM of this collection will be pulled into the product's BOM when a Multi-level Manufacturing Order is created.
Example 3. A parameter value adds or changes several parts in the BOM via several relations
- This example shows how a single parameter can affect multiple parts or raw materials of a product by applying multiple relations to it.
- In this specific example, an electronics product can have different power ratings. Thus, power is considered a parameter, and each value corresponds to a different Power Supply Unit (PSU).
- For each PSU, a specific controller corresponding to the PSU must also be used in the BOM.
Step 1. There is one parameter set up at Stock -> Stock settings -> Parameters:
- Power - different values correspond to different Power Supply Units (PSUs). Values: 200W, 500W, 1000W, ...
The Power parameter is configured as This parameter changes the quantities of raw materials: No.
Step 2. Two relations are set up at Stock -> Stock settings -> Relations, one which relates the Power parameter values to the "PSU" items, and the other which relates the Power parameter values to "Controller" items:
| Relation: "Power parameter to PSUs" | |
| "Power" value | Corresponding PSU |
| 200W | #A-01, PSU 200W |
| 500W | #A-08, PSU 500W |
| 1000W | #A-14, PSU 1kW |
| ... | ... |
| Relation: "Power parameter to Controllers" | |
| "Power" value | Corresponding PSU |
| 200W | #A-02, Controller A |
| 500W | #A-09, Controller B |
| 1000W | #A-15, Controller C |
| ... | ... |
Step 3. In the item's details, one parameter is chosen: Power. And the item is Saved.
Step 4. Allowed variations are added by clicking the + button in the Variations section of the item's details, which is now available.
Step 5. The Bill of Materials will need to be set up as follows for the item:
| Product group | Part | Notes | Quantity |
| Parts | PCB board | 1 | |
| Parts | Capacitor 10uF | 20 | |
| Relation "Power parameter to PSUs" | 1 | ||
| Relation "Power parameter to Controllers" | 1 | ||
| ... | ... | ... | ... |
This means that if you choose Power value:
- 200W - the BOM will contain 1 "PSU 200W" and 1 "Controller A";
- 500W - the BOM will contain 1 "PSU 500W" and 1 "Controller B";
- 1000W - the BOM will contain 1 "PSU 1kW" and 1 "Controller C".
- All other parts are common among all variations.
Step 6. The product's routing, defined in the item's details, is shared among all variations.
Finished. Now, you can plan production and sell these items. The parameter values can be chosen from any product choice field when choosing the product. Each variation is separately tracked in stock (don't forget to enable the Parameters column).
Example 4. A parameter value changes the item and part quantities in the BOM via a parameter that changes the quantities of raw materials
- This example shows how one parameter can change a product's quantities, parts, or raw materials without using a relation.
- In this specific example, an electronics product can have different power ratings. Thus, power is considered a parameter, and each power value corresponds to a different Power Supply Unit (PSU).
Step 1. There is one parameter set up at Stock -> Stock settings -> Parameters:
- Power - different values correspond to different Power Supply Units (PSUs). Values: 200W, 500W, 1000W, ...
The Power parameter is configured as This parameter changes the quantities of raw materials: Yes.
Step 2. No relations are configured at Stock -> Stock settings -> Relations.
Step 3. In the item's details, one parameter is chosen: Power. And the item is Saved.
Step 4. Allowed variations are added by clicking the + button in the Variations section of the item, which has just become available.
Step 5. The Bill of Materials will need to be set up as follows:
| Product group | Part | Notes | Quantity 200W |
Quantity 500W |
Quantity 1000W |
... |
| Parts | PCB board | 1 | 1 | 1 | ... | |
| Parts | Capacitor 10uF | 20 | 30 | 40 | ... | |
| PSUs | #A-01, PSU 200W | 1 | ... | |||
| PSUs | #A-08, PSU 500W | 1 | ... | |||
| PSUs | #A-14, PSU 1kW | 1 | ... | |||
| ... | ... | ... | ... | ... | ... | ... |
This means that if you choose Power value:
- 200W - the BOM will contain 1 "PSU 200W", 20 capacitors, and a PCB board;
- 500W - the BOM will contain 1 "PSU 500W", 30 capacitors, and a PCB board;
- 1000W - the BOM will include 1 "PSU 1kW", 40 capacitors, and a PCB.
Step 5. The product's routing, defined in the item's details, is shared among all variations.
Finished. Now, you can plan production and sell these items. The parameter values can be chosen from any product choice field when choosing the product. Each variation is separately tracked in stock (don't forget to enable the Parameters column).
Example 5. Several parameter values combine to change a part and quantities in the BOM. Relations and parameters that change quantities are used simultaneously.
- This example explains how several parameters can combine to change a product's quantities and/or parts or raw materials. Both relations are used, and parameters change the quantities of raw materials.
- In this specific example, we're building a clothing item that is manufactured in various sizes, fabrics, and colors.
- The combination of fabric and color determines the material used; the size determines the amount of material consumed.
Step 1. There are 3 Parameters set up at Stock -> Stock settings -> Parameters:
- Size - affects the quantities of materials consumed. Values: S, M, L, ...
The Size parameter is configured as This parameter changes the quantities of raw materials: Yes. - Fabric - affects which material will be consumed together with Color. Values: Red, Blue, ...
The Fabric parameter is configured as This parameter changes the quantities of raw materials: No. - Color - affects which material will be consumed together with Fabric. Values: Cotton, Linen, ...
The Color parameter is configured as This parameter changes the quantities of raw materials: No.
Step 2. One Relation is set up in Stock -> Stock settings -> Relations, which links Fabric and Color values to specific materials.
| Relation: "Fabric-Color to material" | ||
| "Fabric" value | "Color" value | Corresponding material |
| Cotton | Red | #A-01, Red cotton |
| Cotton | Blue | #A-08, Blue cotton |
| Linen | Red | #A-14, Red linen |
| ... | ... | ... |
Step 3. At the item's details, the three parameters are chosen: Size, Fabric, Color. And the item is Saved.
Step 4. Allowed variations are added by clicking the + button in the Variations section of the item's details, which is now available.
Step 5. The Bill of Materials for the item will need to be set up as follows:
| Product group | Part | Notes | Quantity, Size S |
Quantity, Size M |
... |
| Relation "Fabric-Color to material" | 1 | 1.5 | ... | ||
| Accessories | Accessory 1 | 1 | 1 | ... | |
| Belts | Belt 1 | 1 | 1.2 | ... | |
| ... | ... | ... | ... | ... | ... |
This means that if you choose Size, Fabric, and Color combination:
- S, Cotton, Blue - the BOM would contain 1 unit of "Blue cotton", 1 "Accessory 1", and 1 "Belt 1";
- M, Linen, Red - the BOM would contain 1.5 units of "Red linen", 1 "Accessory 1", and 1.2 "Belt 1";
- etc.
Step 6. The product's routing, defined in the item's details, is shared among all variations.
Finished. Now, you can plan production and sell these items. The parameter values can be chosen from any product choice field when choosing the product. Each variation is separately tracked in stock (don't forget to enable the Parameters column).
Example 6. Multi-level Matrix BOM.
- This example explains how to pass the product's parameter values to a parametric part/sub-assembly with the same parameters (or a subset of these).
Step 1. Set up the part/sub-assembly with a Matrix BOM.
Step 2. Define all the allowed variations of the part/sub-assembly. All variations must be predefined; auto-creation of variations does not automatically create part/sub-assembly variations!
Step 3. Set up the product, choose the parameters, and allow variations (if auto-creation of variations is not used).
Step 4. In the product's Bill of Materials, select the part/sub-assembly without specifying the parameter values.
| Product group | Part | Notes | Quantity |
| Parts |
Part XYZ |
1 | |
| Sub-assemblies |
Sub-assembly XYZ |
1 | |
| ... | ... | ... | ... |
This means that if you choose specific values for Parameter 1 and Parameter 2 for the product, then the BOM would contain:
- 1 unit of Part XYZ with the same Parameter 1 and Parameter 2 values;
- 1 unit of Sub-assembly XYZ with the same Parameter 1 and Parameter 2 values.
Step 5. Set up the product's routing.
Finished. Now, you can plan production and sell these items. The parameter values can be chosen from any product choice field when choosing the product. Each variation is separately tracked in stock (don't forget to enable the Parameters column).
Troubleshooting
Added a new parameter to an existing item
Issue:
- I still have stock of the items that do not have these parameter values.
- I cannot select those old variations in forms, e.g., a CO.
- I cannot edit existing documents that contain these old variations.
Explanation:
- Because you added a new parameter, the old variations are no longer fully defined. They have a new parameter, but its value is undefined.
To fix this, it is possible to:
- Fully define the old variations by selecting a value for this parameter for these:
1. Open the item and edit the old variations in the "Variations" section of the item details page.
2. Select a value for the new parameter. If none of the values are relevant/applicable, add a new value, e.g., "None" or "NA," which you will use.
3. Save. Now, for this same variation, this value will be used for all existing items.
4. You can now select these form variations and edit old documents. - Remove the new parameter (temporarily).
- Write off the old items under Stock -> Inventory.
To prevent this:
- It might be advisable to create a new item instead when updating or adding parameters.
Piece Payment
The piece payment functionality defines a worker as paid per piece/operation.
This functionality can be enabled at Settings -> System settings -> Professional functions -> Piece payment.
When this function is enabled:
- The Piece-payment column is added to the Routing Details with a checkbox (Yes/No) on every operations line. It is possible to set a worker's wage per piece of product produced.
- The Time-payment column is added to the Routing Details with a checkbox (Yes/No) on every operations line. Time payment is always enabled by default (even if the Piece payment functionality is not enabled); now it's possible to disable it.
- Calculation of the labor cost: Labor cost = (Operation duration* x Worker hourly rate) + (Piece-payment x Quantity)
*The reported times are the basis for the final cost calculation.
Jump to:
Quality Control
The Quality control functionality enables functions needed for quality control. It is possible to turn on quality control for any stock item (both procured and produced) and to perform inspections of arrived goods, which are automatically put on hold for inspection.
Please note that the Quality Control functionality requires Tracing to be enabled.
This functionality can be enabled at Settings -> System settings -> Professional functions -> Quality control.
If enabled, the following functions will become available:
- The Procurement -> Inspections tab becomes available.
- Two additional statuses are available for stock lots: "On hold" and "Rejected".
- It's possible to enable "Quality Control" for each item in the item details.
- It's possible to set a default "On-hold period" in days for each item in the item details.
- The "On-hold period" is a buffer for planning purposes to account for the time it may take to inspect the goods. It could indicate a quarantine period that the goods must pass before inspection, but in practice, the inspection can be completed at any time.
- If the item is procured, the expected availability date of the stock lot = the expected arrival date of the PO + the on-Hold period.
- If the item is manufactured, the expected availability date of the stock lot is the expected finish date of MO + the On-hold period.
- If procured items are subject to quality control, the quantity and the percentage of rejected items are shown for each vendor on the Procurement -> Vendors page.
- It's possible to create Service orders for rejected items in Stock -> Stock lots -> Rejected stock lot details or write them off.
Jump to:
- Demo video: Quality Control
- How does quality control functionality work?
- Setting up quality control for an item.
- Performing quality inspection of incoming goods.
- Repairing and writing off rejected items.
- User rights for performing inspections.
How the quality control functionality works
If a stock item is subject to quality control:
- When a PO is received or an MO is finished, the stock lot of the items is assigned the status "On hold."
- The stock lot status “On hold” can be manually set to send items for inspection, e.g., if quality inspections should be performed again or if the status was not automatically assigned.
- The list of on-hold items is displayed in Procurement -> Inspections with the status "New".
- The quality control manager should approve or reject these, either in full or in part.
- Approved items get received into stock.
- Rejected items:
- Get the stock lot status "Rejected".
- Are assigned a new unique stock lot number (with a reference to the original).
- All bookings for the rejected items are canceled.
- Rejected items can be:
- Repaired with a Service order, which can be created at Stock -> Stock lots -> Rejected stock lot details.
- Manually written off at Stock -> Write-offs.
Setting up quality control for an item
For setting up quality control for an item:
- Open the item's details at Stock -> Items.
- Check the checkbox Quality control: Yes.
- Enter the average on-hold period in days.
The Availability date = Expected date of PO or expected finish date of MO + On-hold period. - Save.
Repairing rejected items
To repair rejected items:
- Go to Stock -> Stock lots.
- Find the rejected lot and open it.
- Click the button "Create a service order." A service order can be for repairing the whole rejected lot or only part of it.
When a service order is created:
- It is possible to book additional materials and assign operations.
- The rejected items are booked as parts.
- A new target stock lot for repaired items will be created. This guarantees full traceability and correct cost control.
- With the Subcontracting functionality enabled, operations can be assigned to vendors, and a PO can be issued to track the progress of repair/replacement.
To write off rejected items from stock, create a write-off.
User rights for performing quality inspection
To perform quality control in Procurement -> Inspections, the user must have the appropriate rights set in Settings -> Human Resources -> Users -> User details.
Serial Numbers
The Serial numbers functionality allows users to use and track parts and products with unique serial numbers (S/N).
The serial numbers functionality tracks every item individually. By default, MRPeasy already tracks all items by batch, so if tracking of Batch No./Lot No. is required, this function is not needed to use.
This functionality can be enabled at Settings -> System settings -> Professional functions -> Serial numbers, after which
- the section Stock -> Serial numbers becomes available.
- for tracked items:
- The section Serial number becomes available in the stock lots details and Manufacturing Orders.
- The item report Serial Numbers becomes available.
- Actions with serial numbers can be reported.
- Serial number labels can be printed. - Custom fields for serial numbers (displayed in the Stock -> Serial numbers section) become available.
Jump to:
- Demo video: Serial numbers
- Enable serial number tracking for an item.
- Enter serial numbers of purchased items.
- Create serial numbers for manufactured items.
- Serial numbers of nested subassemblies.
- Report serial numbers of used components.
- Finish manufacturing orders with serial numbers
- Print serial number labels.
- Ship serial numbered items to customers.
- Transfer serial numbered items to another warehouse.
- Accept customer returns of serial-numbered products.
- Write off serial numbered items.
- Serial numbers statuses.
- User rights.
Enabling serial number tracking for an item
Serial numbers can be enabled in the item's details, at Stock -> Items -> Serial numbers: Yes.
The serial numbers are tracked and saved within its stock lots.
Entering serial numbers of purchased items
- Open the Purchase Order.
- Click on the line item's Target lot link.
- In the Serial numbers section, click the Add button to add serial numbers.
If there are more than 100 serial numbers, these can be added in groups of 100 at a time.
Serial numbers can be entered:
- individually, by keyboard input or barcode scanning;
- You can copy and paste them all at once from a Notepad or an Excel file into the first serial number field. The software will then place each number in its own field.
Creating serial numbers for manufactured items
- Open the Manufacturing Order.
- Scroll to the Serial numbers section.
- Click Add serial number to the product.
- In the reporting screens, this button will become available after the operation starts.
- By default, the software will auto-increment the last serial number of the item by one.
Serial numbers can be entered:
- individually, by keyboard input or barcode scanning;
- You can copy and paste them all at once from a Notepad or an Excel file into the first serial number field. The software will then place each number in its own field.
Serial numbers can also be manually entered or edited at each stock lot's details at Stock -> Stock lots. If there are more than 100 serial numbers, these can be added in groups of 100 at a time.
Finishing manufacturing orders with serial numbers
Serial numbers introduce some constraints on finishing the MO:
-
Product serial numbers must be added in a normal MO before the MO can be finished. The MO can still be finished if parts have unreported serial numbers.
-
In a disassembly MO, serial numbers of both parts and products must be entered before the MO can be finished.
-
Auto-assembly (kitting) and auto-disassembly (un-kitting) MOs are not automatically completed if parts or products have serial numbers. The MO must be manually finished after all serial numbers are entered.
Serial numbers of nested subassemblies in multi-level manufacturing orders
If a subassembly is nested in a multi-level MO, it is not possible to assign serial numbers to the subassembly normally.
Instead, the serial number can be created at the time of reporting, specifying which serial-numbered component was used in a specific serial-numbered product.
To enter a serial number for a subassembly:
- Add a serial number to the main MO product.
- Start reporting the serial numbers of the used components.
- Select the subassembly, then enter the desired serial number.
- Once saved, the serial number of the component:
- Is tied to the serial number of the product.
- It can now be seen in Stock -> Serial numbers, where a label could also be printed.
Reporting used component serial numbers
- Open the Manufacturing Order.
- Scroll to the Serial numbers section.
- Find the product serial number and click the View/Edit button.
- Choose the component serial numbers.
Serial number label, serial number barcode
It is possible to print labels to identify items with serial numbers. The labels for serial numbers can be printed by clicking Print label at
- the Stock -> Serial numbers page,
- the Stock Lot details page, or
- the Manufacturing order, where the products with serial numbers were manufactured.
The label's size, information, and layout can be edited with the Label editor.
The standard label also contains the unique serial number barcode if the Barcode System functionality is enabled.
Read also: What happens when a serial number barcode is scanned?
User rights
User access rights for serial numbers can be configured individually for each user.
With the Read right:
- The user can see a list of all serial numbers at Stock -> Serial numbers. Without this right, this list is unavailable.
- Serial number reports also require the right to read.
With the Create right, the user can create new serial numbers:
- in manufacturing orders details, provided that the user is allowed to access manufacturing orders;
- in stock lots details, provided that the user can access stock lots;
- In an Internet kiosk, the user must have access to the Internet kiosk.
With the Update or Delete rights, the user can edit or delete existing serial numbers:
- at Stock -> Serial numbers, provided that the user has the Read right for serial numbers;
- in manufacturing orders details, provided that the user is allowed to access manufacturing orders;
- in stock lots details, provided that the user can access stock lots.
For example, to allow a worker to report made serial numbers but not to make any changes to existing ones, give this worker only the Create right.
Subcontracting
The Subcontracting functionality enables the placement of subcontracting Purchase Orders to manage outsourced services or manufacturing done by subcontractors (vendors).
This functionality provides support for the following types of subcontracting:
- A product is wholly produced by the subcontractor(s), while you only issue materials.
- Some operations in your production process are outsourced to your vendor.
Jump to:
- Demo video: Subcontracting
- Enabling Subcontracting
- Alternative approaches to setting up subcontracting.
- Method 1: Using Purchase Orders only to order products and ship materials.
- Method 2: Assign operations to vendors inside Manufacturing Orders, and then raise Purchase Orders for these.
Enabling Subcontracting
The subcontracting functionality can be enabled at Settings -> System settings -> Professional functions -> Subcontracting.
The following setting is available:
- Overshipment tolerance: When picking components for shipments, this setting allows exceeding the quantity defined in the BOM by a certain percentage.
- For example, if the Overshipment tolerance is set to 10% and the BOM quantity for a component is 10, the user can pick 11 units to send to the vendor instead of just 10.
When this is enabled, then:
- If the ordered item has a Bill of Materials and an associated Purchase Term, materials can be sent to the vendor in a purchase order.
A subcontracting BOM can be selected from the purchase terms details. - In a Manufacturing Order, it is possible to issue Purchase Orders to vendors for operations they perform.
- Choosing a vendor as a workstation group for the Routing is possible.
- The Subcontracts section appears in a Manufacturing Order if the order includes outsourced operations.
- The Materials and Shipments sections are shown in a Purchase Order if the items have Bills of Materials.
Alternative approaches to setting up subcontracting
Two alternative setups can be used:
- Purchase Orders only.
- Use if you do not perform any operations.
- Use if you want to track (consignment) inventory at a vendor's location.
- Manufacturing Orders and Purchase Orders combined.
- Use when vendors perform some operations within your production process.
- Use when there is a chain of several subcontractors, and you do not track inventory at the vendor's location.
- The progress of a multi-stage project can be tracked within a single MO by placing the vendor sequence in the routing.
Method 1. Using only Purchase Orders to order products and ship materials.
Summary
- A Purchase Order is created for the product(s).
- Materials are issued from stock by making a Shipment to the vendor.
- The product is received into stock with the receipt of the PO.
Use cases
- The vendor fully makes this product. You do not perform any operations.
- You buy and issue the materials to the vendor.
- Possibly, you track how much of your (consignment) inventory is at a vendor's location.
- A site is created for the vendor.
- You may be shipping items from one vendor to another.
- You use materials from one vendor's site and order the delivery to another vendor's site.
- Each stage of the product's completion must be a separate item:
- Each stage's BOM lists the items of the previous stage, plus additional parts you issue only for this stage.
Setup
- Save the Subcontractor as a Vendor at Procurement -> Vendors.
- Set up a procured item.
- Item setting: This is a procured item = Yes.
- Add a Bill of Materials.
- This is the list of materials you will send to the vendor for each product.
- Create Purchase Terms for this item.
- Enter the price that you are charged and the lead time.
- Connect the BOM with the purchase term by selecting it in the subcontracting BOM field.
Usage
- Create a new Purchase Order.
- Add the products to the purchase order.
- If you use the Multi-Stock functionality, you can select which site to book materials from.
- Save.
- The Materials and Shipments sections will appear.
- In the Materials section, click Book Materials.
- The available materials are reserved for this PO based on the products' BOMs.
- If you use the Multi-Stock functionality, you can select which site to book materials from.
- In the Shipments section, create a Shipment.
- Ship the materials.
- You can open the Shipment from the PO or Stock -> Shipments.
- Click Pick on an individual line, or Pick all items to pick all at once.
- Report PO receipt as usual.
Cost of products
The inventory cost of the final product will include:
- the purchase price on the Purchase Order,
- plus the cost of the materials that have been shipped.
Method 2. Assigning operations in Manufacturing Orders to vendors.
Summary
- A Manufacturing Order is created for the product.
- Some or all operations in the Routing are assigned to vendor(s).
- Materials are used from stock when they are reported as consumed in the MO.
- The product is received in stock when the MO is completed.
Use cases
- A subcontractor performs some operations during product production, e.g., finishing.
- A Purchase Order must be issued to the subcontractor for the services.
- You wish to consolidate all required services across several MOs into a single PO from a single vendor.
- There is variability in inputs (material usage) and outputs (products received), possibly compounded by vendor unit conversions.
- There may be materials required that were never initially in the BOM.
- The product is sent from one vendor to another.
- Possibly, you don't perform any operations yourself.
- Inside the MO is a good overview of the project's progress.
- Each stage of the product's completion does not need to be a separate item.
Important considerations:
- One MO is for one product only (in any quantity); different products need different MOs.
- It is impossible to create a Shipment document to send materials to your vendor. Materials can just be reported as consumed in the MO.
- An MO is only connected to one site.
- If there is a chain of several vendors, it is impossible to track (consignment) inventory at each vendor's location, if necessary.
- Materials are booked and used from the MO site.
- The product will come into stock at the MO site.
Setup
- Save the Subcontractor as a Vendor at Procurement -> Vendors.
- Create a manufactured item.
- Item setting: This is a procured item = No.
- Add a Bill of Materials.
- This is the list of materials that you will use to make the product.
- Create a Routing for this item. If a subcontractor performs an operation, then
- The Vendor should be selected as the Workstation group for the operation.
- The dates for the Purchase Order will be calculated based on the setup time and cycle time. For example:
- If your vendor has a 1-week lead time regardless of ordered quantity, then:
- if in your system settings, you have configured a 5-day workweek, 8-hours per day,
- then Setup time = 60min * 8h * 5d = 2400 minutes.
- If your vendor has a 1-week lead time regardless of ordered quantity, then:
- The prices for the Purchase Order will be either:
- Calculated using the fixed cost and variable cost.
- Or, if defined, taken from Purchase Terms.
- Optionally, add Purchase Terms for handling some special cases:
- (For adding purchase terms, temporarily configure the item as This is a procured item = Yes.)
- Use several purchase terms, depending on the quantity, if the vendor offers tiered pricing.
- Use purchase terms if a unit conversion is required for the PO. For example:
- Your product in your stock is counted in pcs, e.g., a single unit weighing approximately 12 oz due to variability in the filling.
- The vendor bills you in units of weight, e.g., lbs.
- The PO must also be in lbs.
- For every 33 pieces received, the vendor bills you for 25 lbs (not 24.75 lbs = 12 oz x 33 pcs).
- The vendor unit will be named "25 lbs," and the conversion rate would be 33 pcs = vendor UoM "25 lbs".
- If you make an MO for 33 and a PO for that vendor, the PO will show 1 x 25 lbs.
Using subcontracted services for assemblies in a multi-level MO
In practice, you could have a product with an assembly supplied by a subcontractor while you provide the materials.
- If the assembly is set as a procured item, you will see it in the MO's materials list but not its materials.
- The materials need to be booked separately in the PO for the assembly.
- This is Method 1 described above.
- If the assembly is set as a manufactured item, you will see subcontracted operations in the MO, and their parts are booked directly in the MO.
Usage
- Create a new Manufacturing Order.
- Save.
- Section Subcontracts will appear in the MO.
- The Operations section lists each operation assigned to a vendor.
- Create Purchase Orders for the outsourced operations, either from:
- The Subcontracts section of the MO.
- Or, from Procurement -> Requirements, which allows you to consolidate services for several MOs into one PO.
- Report the progress of subcontracted operations.
- The MO operation starts when the PO field 'Shipped' is filled in.
- The operation in the MO is finished when the PO is received.
- Report material consumption at any time.
- Finish the Manufacturing Order to get products into stock.
Cost of products
The cost of the subcontracting Purchase Order is added to the Manufacturing Order's manufacturing overhead.
Read also: Calculation of applied manufacturing overhead, direct labor, and materials costs.
Tiered Pricing
The Tiered pricing functionality allows you to use multiple price lists or configure prices per quantity levels. Without this feature, only one default price per item can be saved.
This functionality can be enabled at Settings -> System settings -> Professional functions -> Tiered pricing.
If this functionality is enabled, then:
- The CRM -> Pricelist section becomes available.
- It's possible to set different price levels based on the item's selling quantity on the item's details page.
- It is possible to set a default pricelist for a customer.
Prices from a pricelist have priority over prices from an item's details.
Jump to:
- How to set price breaks?
- How to create price lists?
- How to update one item in all price lists?
- How to update a pricelist?
- How to import a pricelist?
- Demo video: Tiered pricing.
Price based on a quantity: setting price breaks
When this function is enabled, then in the item's details at Stock -> Items is possible to :
- set several prices,
- and a minimum order quantity for each price to apply.
When creating a customer order or an invoice, the software will automatically select the correct price based on the quantity.
Custom pricelists
When this function is enabled, pricelists can be created at CRM -> Pricelists. Each pricelist consists of a number, a name, and a list of products with their prices.A default pricelist can be selected for any customer in CRM -> Customers -> The customer details -> Pricelist.
When a customer order or an invoice for this customer is created:
- MRPeasy tries to use prices from this customer's price list.
- If no price is defined in the pricelist, the default selling price from Stock -> Items -> The item details -> Selling price is used.
For changing an item’s selling prices (that do not have a “Min. quantity”) in several price lists at a time:
- Go to Stock -> Items -> The item details.
- Under the Selling price field, there is a list of all price lists that are defined in CRM -> Pricelists.
- Enter prices for any pricelist to add the product to it, or leave some prices empty to delete the product from it.
Prices from a pricelist have priority over selling prices from an item's details.
Unscheduled Manufacturing Orders
The Unscheduled Manufacturing Orders functionality allows production managers to remove planned manufacturing orders from the production schedule and add them back.
When a manufacturing order is unscheduled, workstation bookings are canceled. Thus, workstations can be used for other manufacturing orders.
When creating a new MO manually, it is possible to omit the MO from the production schedule and/or to skip part booking.
This functionality can be enabled at Settings -> System settings -> Professional functions -> Unscheduled manufacturing orders.
If the Unscheduled manufacturing orders functionality is enabled, then:
- The buttons Add to schedule and Remove from the schedule are displayed in the MO details under the Operations section.
- When creating a new manufacturing order, the option Do not book parts becomes available.
- When creating a new manufacturing order, the option Do not book workstations becomes available.
- A new MO status, Not Scheduled, has been introduced for manufacturing orders that are not on the production schedule.
- The Gantt chart displays the Not Scheduled column. This column lists unscheduled manufacturing orders that can be dragged to the chart for scheduling.
Manufacturing orders can be unscheduled only before they are started.
Enterprise Functions
You can turn on the Enterprise package functions in the Settings -> System settings -> Enterprise functions section.
The additional functions available in the Enterprise package are:
- Approval System - document approval by management before further processing;
- Backward Production Scheduling - backward production scheduling for Just-in-Time production;
- Barcode System - Barcode reader support, generation of barcodes;
- Maintenance Management System (MMS) - tracking maintenance cycles of machines;
- Master Production Schedule (MPS) - a powerful tool for long-term planning;
- Multi-Stock and Production Sites - several warehouses and production sites;
- Packing – support for packing products into production packages (e.g., boxes).
- Return Merchandise Authorization (RMA) - processing customer returns and repairs;
- Revision/Version Control System (VCS) - tracking revision changes of BOMs and Routings;
- Sales Forecasting - AI-assisted demand forecasting for products, with integration into the Master Production Schedule (MPS);
- Sales Management - performance reports of sales staff;
- Two-factor authentication (2FA) - a two-step login process for extra security.
Approval System
The Approval system functionality allows the manager to approve a document before it can be processed further.
When a document is approved
- the timestamp and the user who approved the document are saved in the document;
- the order can be processed further.
Enabling approvals:
- The Approval System functionality can be enabled at Settings -> System settings -> Enterprise settings -> Order Approval System: Yes.
Now, here, it is possible to choose which of the following new orders will require approval:
- Manufacturing Orders.
- Purchase Orders if these are over a certain value. - To approve documents, the user must have the corresponding "This user can approve ..." rights enabled at Settings -> Human Resources -> Users -> The user’s details.
- Indicators "Pending approval ..." are visible in the Dashboard when enabled.
Approving Purchase Orders
- When a new purchase order (PO) is created and yet unapproved, its status is New.
- Before approval, the button Send PO is disabled.
- Once the PO is approved, the status is changed to Approved.
- Approved purchase orders can be ordered from vendors.
- After the PO is approved and before it is ordered, the approval can be revoked. Then, the status is changed back to New.
- When an unordered purchase order changes after approval, it requires a new approval.
- PO cannot be changed (products, quantities, prices) after the order is sent if the user has not approved the PO.
Approving Manufacturing Orders
- When a new manufacturing order (MO) is created but unapproved, its status is New.
- Before approval, it is hidden from the worker at My Production Plan and Internet-kiosk.
- Once the MO is approved, the status is changed to Scheduled.
- The approval can be revoked until the MO is started. Then, the status is changed back to New.
Backward Production Scheduling
Backward production scheduling schedules production operations as late as possible before delivery.
- The software will find the latest possible time for the Manufacturing Order's operations before the delivery date.
- This is very important in just-in-time manufacturing and delivery, as it minimizes standing inventory.
- By default, Forward scheduling is used, meaning production is planned to finish as soon as possible at the first available time.
The backward scheduling feature is automatically available from the Enterprise plan. Functions that are enabled are the following:
- When creating a new Manufacturing Order, setting the Due date triggers backward scheduling.
- When setting a Due date in a Procurement Forecast:
- Backward scheduling will be used to find the latest start times for Manufacturing Orders,
- and the latest times for Purchase Orders to be placed.
- The Backward scheduling setting is available in Settings -> System settings -> Enterprise functions.
- When enabled, if Manufacturing Orders are automatically created from the Customer Order, then backward scheduling is used based on the Delivery dates in the Customer Order.
Jump to:
- Demo video: Backward scheduling.
- Backward scheduling when manually creating MOs.
- Backward production scheduling from COs.
Backward production scheduling
Starting from the Enterprise pricing plan, the software allows backward scheduling. For backward scheduling:
- Start adding a new Manufacturing Order at Production planning -> Manufacturing Orders.
- Set the Due date. As a result:
- The software will try to find the latest possible time to finish just in time before the Due date. Ideally, the Manufacturing Order would be finished on the previous day.
- Save the manufacturing order to put it on the schedule.
Backward Scheduling in Customer Orders
In customer orders, you can set a general delivery date or a separate delivery date for each line. This is the day when the customer's order should be ready for shipment.
Turning on the Settings -> System Settings -> Enterprise functions -> Backward scheduling setting enables backward scheduling for just-in-time delivery based on the Customer Order's delivery date when automatically scheduling Manufacturing Orders from a Customer Order.
Additionally, the sub-setting Buffer (days) enables configuring how many days before the CO’s delivery date the production should be finished.
For using backward scheduling from a Customer Order:
- Open the Customer Order
- Fill in the Delivery date(s).
- Click Check stock and book items.
- Check the option for "Create MOs for missing products."
- Click Book all items and confirm.
- The software tries to create Manufacturing Orders for missing products using backward scheduling so they are available just in time before the delivery date.
Barcode System
The Barcode system functionality enables barcode reader support for MRPeasy, barcode generation and printing from MRPeasy, and special functions after scanning a barcode.
Barcoding support can be enabled in Settings -> System settings -> Enterprise functions -> Barcodes.
When this functionality is enabled, then:
- It is possible to generate various barcodes.
- It is possible to scan barcodes, and depending on the function and the scanned barcode, an action will take place, e.g., selecting an item, navigating to a software section, reporting actions, etc.
Jump to:
- Demo video: Barcode system.
- Setting up:
- Usage:
Implementing the Barcode System
- Start using MRPeasy without the Barcode System.
- Only after MRPeasy has been successfully implemented in some business areas can we start implementing barcoding in those areas.
- Barcoding helps to perform various actions more quickly.
- Users must know what those actions are and how to perform them before enlisting barcoding.
- Read the documentation to learn about what features are available.
- Start experimenting and initial usage:
- Print barcodes with your regular printer.
- Perform actions using your phone camera as a scanner using the MRPeasy iOS/Android app.
- When experimenting is successful, and you want dedicated hardware (scanners, label printers, etc.), turn to your local barcoding hardware specialists.
Supported barcode readers and printers
- The MRPeasy iOS and Android apps allow the device's camera to be used as a barcode scanner.
- To open the scanner, tap the Scan barcode button at the top of the app.
- There may be some technical limitations compared to using a dedicated barcode reader. For example, QR Codes may be more reliable when scanned with a camera.
- Please download the MRPeasy app from the Apple or Google App Store:
- Please turn to your local specialists regarding the specific choice of label printers and scanners.
- Since MRPeasy is online software, and a barcode reader technically works as a keyboard, a compatible barcode reader should work with MRPeasy.
- Generally, barcode readers can be connected via USB (for computers) or Bluetooth (for tablets and smartphones).
- As MRPeasy generates PDFs, the label printer should be able to print PDFs.
Enabling and configuring the Barcode System
Demo video: Enabling barcodes.
For setting up barcodes in MRPeasy:
- Go to Settings -> System settings -> Enterprise functions
- Enable the functionality Barcodes: Yes.
- Select the type of barcode:
- EAN-13, 1D barcode, will be used for your products if your products have a Global Trade Item Number (GTIN) from GS1.
- CODE128 will be used on other types of labels and documents.
- UPC-A, 1D barcode, which will be used for your products if your products have a Global Trade Item Number (GTIN) from GS1.
- CODE128 will be used on other types of labels and documents.
- CODE128, a universal 1D barcode.
- QR, a universal 2D barcode. More reliable if, e.g., a cellphone's or tablet's camera is used for scanning.
- EAN-13, 1D barcode, will be used for your products if your products have a Global Trade Item Number (GTIN) from GS1.
- If you selected EAN-13 or UPC-A barcodes:
- Select how barcodes are assigned to stock items:
- Manually, by you.
- Automatically, by MRPeasy.
- If you selected an automatic assignment, enter your manufacturer code - a prefix obtained from GS1 comprising your country and company codes.
- Select how barcodes are assigned to stock items:
- Save the settings.
- If your products have specific EAN-13 or UPC-A barcodes that you need to assign:
- Go to the Stock -> Items -> Item details page and add the barcode to the field "Barcode UPC-A/EAN-13."
- Or upload these with the import items from CSV functionality.
- Regardless of your barcode type, if your vendors have EAN-13 or UPC-A barcodes:
- You can use the vendor's barcodes if you enter the vendor's barcode for the item in the "Barcode UPC-A/EAN-13" field.
- Now, the system will recognize the items when you scan the vendor-supplied barcode.
- Now you can:
- Print barcodes on labels and documents.
- Generate a page of 1D barcodes for each item.
- Perform actions by scanning the barcodes.
Printing barcodes
Jump to:
Labels and documents
Barcodes can be printed on the following labels and documents:
- Product/item labels.
- If QR and CODE128 type barcodes are configured in system settings, they encode the Part number.
- Stock lot labels.
- Serial number labels.
- Storage location labels.
- Manufacturing Order labels.
- Manufacturing Order PDFs.
- Manufacturing Order barcode: On all PDFs.
- Sub-assembly materials barcode: On wide, medium, and worksheet PDFs.
- Sub-assembly of all operations barcodes: On wide and worksheet PDFs.
- Individual operation barcode: On wide and worksheet PDFs.
- Material requisition PDFs.
- Manufacturing Order barcode.
- Sub-assembly materials barcode.
Important notes:
- Barcode values generally encode not only the specific object name but also internal identifiers and possibly other data. Data is separated by application identifiers (e.g., see https://www.gs1.org/standards/barcodes/application-identifiers).
- The labels can be edited with the Label editor.
- The PDFs can be edited with the PDF editor.
1D barcode generator
On each item's details page at Stock -> Items -> Item details, it is possible to generate a page full of 1D barcodes with the "Print barcode" function:
- EAN-13 or UPC-A type barcode will be generated if the corresponding type is selected in the system settings.
- If CODE128 or QR type is selected in the system settings:
- The barcode number will be taken from the item field "Barcode UPC-A/EAN-13".
- CODE128 type barcode will be generated
Scanning barcodes
If the barcode is scanned, the resulting action depends on the type of barcode and the page you are currently on. There could be several types of barcodes that can be scanned:
- Item barcode.
- Stock lot barcode.
- Storage location barcode.
- Serial number barcode.
- Manufacturing order barcodes.
- Notes.
Resulting actions for scanning item barcodes
Demo video: Item barcodes.
| Scanning item barcodes | |
| Scanning location | Resulting action |
| Any item or product choice field | The item is selected. |
| My production plan -> Manufacturing Order details |
If the item is on the materials list for this manufacturing order, the consume materials dialog box opens. The quantity to consume must be entered. If more is consumed than booked, the additional quantity is automatically booked from stock. |
| Stock -> Items | The item is displayed. |
| Stock -> Stock lots | All stock lots with this item are displayed. |
| Stock -> Shipments | All shipments with this item are displayed. |
| Stock -> Shipments -> Shipment details | The picking screen opens, allowing you to enter the quantity and confirm the item's picking. |
| Stock -> Transfer orders -> Creating a new transfer order | A new line for the item has been added. |
| Stock -> Transfer Orders -> Transfer Order details | The picking screen opens, allowing you to enter the quantity and confirm the item's picking. |
| Stock -> Inventory | The item is displayed. |
| Procurement -> Purchase orders | All purchase orders for this item are displayed. |
Resulting actions for scanning stock lot barcodes
Demo video: Stock lot barcodes.
| Scanning stock lot barcodes | |
| Scanning location | Resulting action |
| My production plan -> Manufacturing Order details | a) If the stock lot is booked for this manufacturing order, the consume materials screen will be opened for this lot. The quantity to consume must be confirmed. b) A notification is displayed if the stock lot is not booked for this manufacturing order. |
| Stock -> Transfer orders -> Creating a new transfer order | A new line for the stock lot has been added. If the "From" field is empty, the stock lot's site is selected. |
| Stock -> Transfer Orders -> Transfer Order details | The picking screen opens, allowing you to enter the quantity and confirm the item's picking. |
| Stock -> Stock lots -> Move stock item | The stock lot is selected for moving. |
| Stock -> Shipments | All shipments for items booked from this stock lot are displayed. |
| Stock -> Shipments -> Shipment details | A picking screen opens, allowing you to enter the quantity and confirm the shipment. |
| Any other page | The stock lot details page is opened (Stock -> Stock lots -> Stock lot details). |
Resulting actions for scanning storage location barcodes
Demo video: Storage location barcodes.
Storage location barcodes enable quick reporting and moving of items from one location to another. For example:
- Scan the lot barcode.
- (Scan old location barcode, optionally.)
- Scan the new location barcode.
- Save.
| Scanning storage location barcodes | |
| Scanning location | Resulting action |
| Stock -> Stock lots -> Stock lot details page | a) If the stock lot is already at this storage location, the Move product page opens with a predefined Old place in the stock field (with the scanned storage location). b) If the stock lot is not located at this storage location, the Move product page is opened with a predefined New place in the stock field (with the scanned storage location). |
| Stock -> Stock lots -> Move stock item | a) If the Old place in the stock field contains a scanned storage location, this storage location is selected. This means that this lot is already at this location. b) If not, the scanned location will be selected as the new place in the stock field. |
| Any other page | The stock lots list at the storage location is opened (Stock -> Stock lots). |
Resulting actions for scanning serial numbers
| Scanning serial numbers | |
| Scanning location | Resulting action |
| Stock -> Stock lots -> Serial numbers | The item serial number is saved. |
| Manufacturing Order -> Add a serial number for a product | The product serial number is saved. |
| Manufacturing Order -> Serial numbers' details -> Parts | The part's serial number is linked to the product's serial number. |
| My production plan -> Operation details -> Add a serial number for a product | The product serial number is saved. |
| My production plan -> Operation details -> Serial numbers' details -> Parts | The part's serial number is linked to the product's serial number. |
| Internet-kiosk -> Serial numbers -> Add serial number | The product serial number is saved. |
| Internet-kiosk -> Serial numbers -> Serial number's parts | The part's serial number is linked to the product's serial number. |
| Shipment -> Pick items -> Choose serial numbers | The shipment's serial number is saved. |
| Stock -> Transfer orders -> Creating a new Transfer Order | A new line containing this serial number is added to the stock lot. If the "From" field is empty, the stock lot's site is selected. |
| Any other page | The serial number details page is opened (Stock -> Serial numbers -> Serial number details). |
In order to use serial numbers:
- The serial numbers functionality must be enabled in Settings -> System settings -> Professional functions -> Serial numbers: Yes.
Resulting actions for scanning Manufacturing Order (MO) barcodes
Demo video: Manufacturing order barcodes.
| Scanning the general MO barcode (in the upper right corner of the PDF) | |
| Scanning location | Resulting action |
| My production planThe | MO details page is opened in My production plan. |
| Internet-kiosk | Only operations from this MO are displayed. Other operations are hidden. |
| Any other page.The | MO details page is opened at Production planning -> Manufacturing orders. If the user has no rights to view Production planning but has rights to view My production plan or Internet-kiosk, the user is redirected accordingly. |
| Scanning sub-assembly barcode | |
| Scanning location | Resulting action |
| My production planThe | MO details page is opened in My production plan; the browser window is scrolled down to the sub-assembly. |
| Internet-kiosk | Only operations for making the sub-assembly are displayed. Other operations are hidden. |
| Any other page | The MO details page is opened at Production Planning -> Manufacturing orders. The browser window is scrolled down to the sub-assembly. If the user has no rights to view Production planning but has rights to view My Production plan or the Internet kiosk, the user is redirected accordingly. |
| Scanning the manufacturing operation barcode | |
| Scanning location | Resulting action |
| My production plan | The MO details page is opened in My production plan, and the browser window is scrolled down to the operation, which is highlighted. |
| Internet-kiosk | Only operations for making the same sub-assembly are displayed. Other operations are hidden. The scanned operation is highlighted. |
| Any other page | The MO details page is opened at Production planning -> Manufacturing orders. The browser window is scrolled down to the operation, and it is highlighted. If the user has no rights to view Production planning but has rights to view My production plan or the Internet kiosk, the user is redirected accordingly. |
Notes
- If a barcode was scanned on a page with a table of entries, use the Clear Clear button to clear the filter and show the full list again.
- If your web browser has the "Search for text when I start typing" feature, turn it off. Otherwise, the barcode scanner may not work correctly.
- Barcode values generally encode not only the specific object name but also internal identifiers and possibly other data. Data is separated by application identifiers (e.g., see https://www.gs1.org/standards/barcodes/application-identifiers).
Troubleshooting
- The software does not react when a barcode is scanned.
One possible reason is that the browser is out of focus. Please click anywhere on the MRPeasy page with the mouse, then scan again. - The page refreshes after a barcode is scanned.
This may happen when a Bluetooth scanner wakes up after some time of inactivity. In this case, please scan the same barcode again. - Reading a barcode from a computer screen failed.
If you are trying to read a barcode on a computer screen, then yes, this is often unsuccessful because PDF viewers merge the small lines unless you zoom in really deeply. QR codes may provide better results. - The barcode is too dense (the label is small).
If the printer's resolution is too small to print the barcode properly, you could try to:
- increase the size of the barcode field using the label editor;
- increase the size of the label itself.
If you cannot increase the label size or change the printer, then QR codes may provide better results. - Scanning is unreliable in low light (or with a smartphone).
Very good lighting conditions and a very good camera are needed to consistently achieve good scanning results. Try making the barcode bigger. QR codes may provide better results.
Maintenance Management System
The Maintenance management system automatically tracks the maintenance cycles of workstations.
This functionality can be enabled in Settings -> System settings -> Enterprise functions -> Maintenance Management System.
If it is turned on, then:
- It is possible to set a maintenance cycle for a workstation in working hours, units of the product processed, or calendar days since the last maintenance at Production planning -> Workstations -> Workstation details.
- The Production Planning -> Workstations page displays columns Until maintenance (hours), Until maintenance (units), and Until maintenance (days). These counters indicate how much time, how many units have been produced, or how many calendar days remain until the next maintenance. They are automatically updated based on reported manufacturing operations or the number of days since the last maintenance.
- When service is performed, the counters are reset to zero.
- Maintenance can be performed on the workstation details page at Production Planning -> Workstations -> Workstation details.
- The maintenance history report is kept at Production Planning -> Workstations -> Workstation reports: Maintenance.
Jump to:
Master Production Schedule
The Master Production Schedule (MPS) at Production Planning -> MPS is a powerful inventory and production planning tool that focuses on medium and long-term demand projections.
It helps to
- make a period-by-period plan for the foreseeable future;
- plan production against a sales forecast and firm orders;
- plan material purchases;
- plan inventory levels;
- test what-if scenarios;
- perform rough cut capacity planning;
- separate the planning and scheduling processes.
The MPS functionality comprises three different views:
- The Master Production Schedule (MPS) is where the products and sales forecasts are entered, and a production plan is created.
- The Required Capacity (RC) shows how planned production quantities in the MPS affect the workloads of workstation groups.
- The Procurement Schedule (PS) provides a detailed overview of material demands by period.
Jump to:
- Demo video: Master Production Schedule
- Enabling the MPS functionality
- Master Production Schedule view
- Required Capacity view
- Procurement Schedule view
- Multi-level BOM in MPS
- Linking a sales forecast
- General notes
- Limitations
Enabling the MPS functionality
To enable the Master Production Schedule functionality, go to Settings -> System Settings -> Enterprise Functions -> Master Production Schedule and set the value to Yes.
The user must have the Read and Update rights for Production planning -> MPS to access and edit the MPS.
There are three additional settings for the MPS functionality:
- Timescale period: choose weekly, monthly, or quarterly.
- The production plan and sales forecast quantities will be recalculated if the period is changed from shorter to longer.
- If the period is shortened, all manually entered values will be evenly distributed across the remaining periods.
- Minimum workstation load - enter a minimum workstation group's load as a percentage, below which the required capacity value will be highlighted in light blue in the Required Capacity view.
- Maximum workstation load - enter a maximum workstation group's loads as a percentage, above which the required capacity value will be highlighted in orange in the Required Capacity.
Master Production Schedule view
The Production planning -> MPS -> Master production schedule (MPS) view is the primary sheet for master planning.
When opened for the first time, this view is empty.
- Add your products by pressing the "+" button in the top-left corner.
- The Starting inventory of the current period (on-hand inventory right now), the Firm orders (confirmed COs), and Scheduled already (MOs) are filled with current data in the system.
- Enter your product sales forecast in the Sales forecast row.
- Enter your planned total production output in the Production Plan row.
- Check the Ending inventory for each period and make up a production plan with satisfactory values.
For example, here’s a plan for a product with an issue in the third period due to a new large order.
|
|
|
Current period |
Period 2 |
Period 3 |
Period 4 |
|
Starting inventory |
|
10 |
5 |
5 |
-5 |
|
- max of |
Sales forecast |
N/A |
10 |
10 |
10 |
|
Firm orders |
10 |
8 |
20 |
0 |
|
|
+ max of |
Production plan |
N/A |
10 |
10 |
20 |
|
Scheduled already |
5 |
10 |
10 |
0 |
|
|
= Ending inventory |
|
10 – 10 + 5 = 5 |
5 – 10 + 10 = 5 |
5 – 20 + 10 = -5 |
-5 – 10 + 20 = 5 |
Master Production Schedule rows
The individual plan for each product in the MPS consists of 6 rows:
- Starting inventory – The starting inventory of this period.
- The current period shows the “In stock” number.
- In the next columns, the values are equal to the ending inventory of the previous period.
- Sales forecast - The forecasted sales for the product.
- Values can be entered manually or populated from a linked sales forecast if Sales Forecasting functionality is enabled (see "Linking a sales forecast" below).
- Not in use and not editable for the current period.
- Firm orders - Confirmed customer orders from the CRM module for which the delivery date falls within the period.
- The current period includes overdue customer orders that have not yet been delivered.
- All COs with a status of "Confirmed", “Waiting for production”, “In production” and “Ready for shipment” are considered.
- Production plan - The total planned production quantity (production forecast) for the period.
- Must be entered manually.
- If the production plan is not equal to the Scheduled already quantity, it will be highlighted in orange.
- Not in use and not editable for the current period.
- Scheduled already - The product quantity from manufacturing orders that are already scheduled in the Production Planning module.
- The current period includes overdue MOs that are still in progress.
- MOs with statuses “New”, “Scheduled”, and “In progress” are considered.
- Ending inventory - The projected ending inventory quantity for the period.
- Ending inventory = Starting inventory – GREATER OF(Forecast, Firm orders) + GREATER OF(Production plan, Scheduled MO)
- The GREATER OF means that the greater of the two values is used. For example, if there are more firm orders than forecast, they are considered.
- The current period does not consider the Forecast or the Production plan.
- Ending inventory (Current period) = Starting inventory - Firm orders + Scheduled MO.
- Color coding of ending inventory:
- Green, when equal to or greater than the product reorder point.
- Yellow, when between 0 and the reorder point.
- Orange, when negative.
Required Capacity view
The Production planning -> MPS -> Required Capacity (RC) view shows how many hours each workstation group has available in the period, and how many are required to fulfill the Production plan numbers from the MPS view.
To create a capacity plan:
- Add your manufactured products to the MPS view.
- Add the Production plan numbers for each product, corresponding to the desired manufacturing output, for each period.
- Check the Required Capacity view and compare the Total capacity (available working hours) with the calculated Required hours (hours of work needed to complete the production plan).
- To simulate increased or decreased capacity, manually overwrite the available hours for any period.
For example, here’s a plan for a workstation group where the capacity is manually reduced in the 2nd period (e.g., due to annual leaves), and there is little work planned for the 4th period:
|
|
Current period |
Period 2 |
Period 3 |
Period 4 |
|
Total capacity, hours |
45 |
15 |
45 |
45 |
|
Required hours |
40 |
15 |
40 |
15 |
Required Capacity rows
The individual capacity plan for each workstation group (WSG) consists of 2 rows:
- Total capacity, hours - The total working hours for the entire workstation group.
- The user can manually edit this to simulate a change in available capacity, in which case the number will be colored red. Empty the cell to recalculate the available hours.
- Calculated based on the weekly working hours of the WSG and the number of workstations, rounded down to the full hour. Idle times of workstations are ignored.
- Required hours - The total time required for operations across all products included in the MPS view where this WSG is present in the routing.
- Calculated as the hours in all listed products' routings multiplied by their Production plan quantity for the period, rounded up to the full hours. The setup time is ignored.
- The "Scheduled already" values from the MPS are ignored. This allows simulating what-if scenarios with lower loads than those already scheduled.
- Color coding of required hours:
- Light blue: When less than the minimum load value for the WSG set in the MPS Settings.
- Light green: When between the minimum and maximum load for the WSG set in MPS Settings.
- Orange: When greater than the maximum load value for the WSG set in MPS Settings.
Procurement Schedule view
The Production planning -> MPS -> Procurement Schedule (PS) is used for procurement planning. It differs from the MPS view, providing an overview of material demand rather than product demand.
When opened for the first time, this view is empty.
- Add your parts by pressing the "+" button in the top-left corner.
- The Starting inventory of the current period (on-hand inventory right now), the Demand from MPS (based on planned production in MPS view), and Ordered quantity (expected POs) are filled with current data in the system.
- Enter the amount you plan to procure in the Planned Quantity row.
- Check the Ending inventory and make up a procurement plan with satisfactory values.
For example, here’s a procurement schedule for a part where no POs have yet been created for future periods:
|
|
|
Current period |
Period 2 |
Period 3 |
Period 4 |
|
Starting inventory |
|
100 |
50 |
50 |
10 |
|
- |
Demand from MPS |
150 |
250 |
50 |
0 |
|
+ max of |
Planned quantity |
N/A |
210 |
10 |
0 |
|
Ordered quantity |
100 |
0 |
0 |
0 |
|
|
= Ending inventory |
|
100 – 150 + 100 = 50 |
50 – 250 + 210 = 10 |
50 – 50 + 10 = 10 |
10 – 0 + 0 = 10 |
Procurement Schedule rows
The individual plan for each part in the procurement schedule consists of 5 rows:
- Starting inventory – The starting inventory of this period.
- The current period shows the “In stock” number.
- In the next columns, the values are equal to the ending inventory of the previous period.
- Demand by MPS – The calculated material demand that is based on the MPS view.
- Demand by MPS = Sum of [Quantity from BOM x GREATER OF(Production plan, Scheduled already)] for all products where this material is in the BOM.
- The current period does not consider the Production plan; only scheduled MOs are considered:
- Demand by MPS = Sum of (Quantity from BOM x Scheduled already) for all products with this material in the BOM.
- Planned quantity - The quantity to be purchased.
- Must be manually entered.
- Not in use and not editable for the current period.
- Ordered quantity - The expected quantity to be received from created POs.
- According to the expected dates of the POs.
- Not received POs are considered.
- The current period includes items from actual purchase orders scheduled to arrive and overdue POs that have not yet been received.
- Ending inventory - The projected ending inventory quantity of the period.
- Ending Inventory = Starting Inventory - Demand by MPS + GREATER OF(Planned quantity, Ordered quantity).
- The current period does not consider the planned quantity; only created POs are considered:
- Ending Inventory (Current period) = Starting Inventory - Demand by MPS + Ordered quantity
- Color coding of ending inventory:
- Green for values equal to or above the item reorder point.
- Yellow for values between 0 and the reorder point.
- Orange for negative values.
Multi-level BOM in MPS
For products with a multi-level Bill of Materials (BOM), subassemblies are automatically considered part of the top-level product when added to the Master Production Schedule (MPS).
- The Required Capacity view shows the required capacity for subassemblies.
- The Procurement Schedule will show the required materials for the subassemblies.
The subassemblies should not be added separately, or they will result in duplicate capacity and material requirements.
Kits (bundles) are treated in the same way as when creating MOs for them:
- If the kit is the product that is added to the MPS:
- Multi-level BOM is not considered. The demand is generated only for procured materials in the kit's BOM.
- If any sub-assemblies or products must be manufactured as part of the kit, their production will not be considered.
- The subassemblies should be added to the MPS separately.
- If the kit is a subassembly in a product that is added to the MPS:
- Multi-level BOM is considered. All its parts and subassemblies will be included.
- Materials demand and capacity requirements will be created for all parts and subassemblies at all levels.
- The subassemblies in the kit should not be separately added to the MPS.
Linking a sales forecast
If the Sales Forecasting enterprise function is enabled, the MPS supports linking a sales forecast to a product to automatically populate the Sales Forecast row.
To link a sales forecast to a product in the MPS:
- Find the product in the MPS view.
- Next to the Sales forecast label, click the dropdown button.
- Select a forecast from the dropdown list. The list contains non-expired forecasts for the product with future end dates.
- The Sales forecast row is populated with the values from the selected forecast.
When a forecast is linked:
- The Sales forecast label is replaced with the forecast's name, and the link leads to the forecast's details page.
- If any forecast values in the MPS are manually changed, the forecast is unlinked.
General notes
- All the data is autosaved.
- Each time the MPS is opened, the data is refreshed.
- You can press the Refresh data button to reload the data at any time.
- The individual tables for products, parts, or workstations can be expanded and collapsed.
- The individual tables can be dragged up or down.
- The parts and products can be removed by clicking the “X” button.
- The first period in the view is the current period, stretching from this moment until the beginning of the next period.
- Users can scroll through the view from the current period to up to 5 years of future periods.
- The period column names reflect the corresponding period's start date.
Limitations
Parametric products with Matrix BOMs are partially supported:
- Variation part numbers must be enabled.
- BOMs with parameters that change quantity are supported.
- BOMs with relations are not supported. These are excluded from the material demand calculation.
Multiple Stocks and Production Sites
The Multiple stock and production sites functionality allows you to manage multiple physical stocks and/or production sites in different geographical locations.
There is a two-level system in MRPeasy for tracking the physical location of the goods:
- Storage locations are bins, shelves, racks, areas, or separate rooms inside one warehouse or site.
- Available by default.
- For a hierarchy inside storage locations, e.g., a bin location within a room, name the storage locations appropriately: "Room 1, A1", "Room 2, A1".
- Each item has a default storage location where it is automatically placed.
- Different units of the same item can be stored in different locations.
- Sites represent geographically separated production sites or warehouses.
- Enabled by this functionality.
- Each site has its own inventory management and storage locations, workstations, etc.
- Purchases can be ordered to specific sites.
- Customer orders can be filled from specific sites.
- Each site has its own (site-specific) workstations.
- With a transfer order, goods can be moved from one site to another. They cannot be booked or consumed directly on another site; they must be moved first.
- Generally, warehouses within a single complex should not be set up as separate sites in MRPeasy.
Jump to:
- Demo video: Multiple stocks and production sites.
- Enabling the multiple sites functionality.
- User access rights.
- Deleting a site.
Enabling multi-stock functionality
This functionality can be enabled in Settings -> System settings -> Enterprise functions -> Multiple stocks and production sites.
The following software sections become available:
- The Settings -> Production sites/Stocks page, where you can define the different sites and their addresses.
- The Stock -> Transfer Orders page becomes available, allowing shipments between locations, printing waybills, etc.
In the Stock section:
- A particular stock/site can be selected in all functions and reports, or an overview of all sites can be seen.
- The reorder point for an item can be defined for each stock location.
- A default storage location (bin) for every item in stock should be defined.
In the Procurement section:
- A site must be selected for each line when creating a purchase order.
- Items on one PO can be ordered to different sites.
- The site's "Ship To" address is printed on the PO PDF.
In the Production planning section:
- A production site can be selected for different functions and reports.
- When planning new manufacturing orders, a production site must be chosen. The products will be available on this site, and materials can only be booked from it.
- A production site must be selected for each workstation. One workstation can be on a single site; each site has its own workstations. One workstation group can have workstations on several sites.
In the CRM section:
- When booking goods for a customer order, a site must be chosen.
User access rights for multi-stock management
To add stocks/production sites (in Settings -> Production sites/Stocks) or create Transfer Orders, the user must have the appropriate rights set in Settings -> Human Resources -> User rights.
Deleting a site
Sites can be deleted at Settings -> Production sites/Stocks.
The first site/stock (displayed in italic font) cannot be deleted.
A site can be deleted when:
- The inventory levels are 0 at that site. There is no stock.
- Workstations are removed from the site.
It is possible to find and restore a deleted site:
- Go to Settings -> Production sites/Stocks.
- Deleted sites are hidden by default. Search for the deleted site by its name.
- Open its details.
- Click "Restore".
Packing
The Packing functionality supports product packing during manufacturing and shipping. It covers two options:
- Product packing during manufacturing.
- Records bulk packages (two or more units per package), when packed products are still tracked individually (piece-wise) in stock.
- The packaging material and quantity per package are defined in the product BOM, and packing is reported in the manufacturing order.
- Packages can only contain units of the same product.
- These packages can be shipped as is or repacked during shipment packing.
- Shipment packing during shipment.
- Records how products are grouped into shipping packages.
- After creating a shipment, products can be assigned to packages in the Shipment packing section.
- Mixed packages are possible, with different products.
The Packing functionality enables:
- Calculating the net and gross weight of shipments
- Planning and consuming packaging material
- Printing labels
- Accounting for packaging costs
Jump to:
- Demo video: Packing.
- Enabling the Packing functionality.
- Setting up packaging materials.
- Product packing.
- Shipment packing.
- Printing package labels.
- Weight calculation.
Enabling the Packing functionality
The functionality can be switched on in Settings -> System settings -> Enterprise settings -> Packing.
Enabling the Packing functionality activates several new fields, sections, and actions across the system. These are described below by area:
- Item details
- Weight field: Allows defining the weight of a single product unit (used for calculating shipment weight).
- Shipment details
- Shipment packing section: Enables adding and managing packaging directly on the Shipment details page.
- Stock items section:
- Weight column: Displays the net weight per line.
- Product packages column: Shows the number of packages (as defined in product packaging in BOMs).
- Buttons for printing package labels that are customizable in the Label Editor:
- Print product package labels: For labels based on product packaging.
- Print shipment package labels: For labels based on shipment packaging.
- Shipping documents
- Waybill, Packing list, and Picking list: Ability to include shipment weight and number of packages using the PDF Editor.
- BOM details
- Packing section: Allows specifying how products are grouped into packages during production.
- Stock pages
- Packaged column on Stock -> Items and Stock -> Stock lots pages: shows the number of products packaged into the product packaging.
Setting up packaging materials
A packaging item is created as a usual stock item. It:
- Must be an inventory item,
- and can be either procured or manufactured.
To use the item as a shipment package, it must not have serial numbers enabled.
Product packing
Product packaging refers to the packaging defined in the Bill of Materials (BOM) and used during Manufacturing Orders (MO). This type is commonly used to define how products are packed during production.
Adding packing information to the BOM
In the Packing section of the BOM:
- Select an item as the packaging material.
- Enter a quantity of ready products that fit into the package.
To disable packaging for a product, clear the “Product group” and “Packaging” fields in the BOM.
Please note:
- The Packing function is not required if each item is packaged individually. In this case, the packaging material is a usual raw material, and the packaging operation must be included in the routing.
Using packaging in Manufacturing Orders
When an MO is created, the required packaging quantity is calculated.
- The quantity of packaging is rounded up to the next whole number.
Packaging material is listed in the last row of the materials list.
If the packaging material is a manufactured item with a bill of materials:
- Its parts (and operations) are not included in this MO. It will not be considered as a nested sub-assembly, which will be assembled in the same MO.
- A separate MO must be created to manufacture the packaging material.
Reporting packing in My production plan
The packaging is not consumed automatically when using the “Consume parts for end-products” button.
The packaging must be consumed explicitly:
- Find the packaging material. It is the last row in the parts list.
- Click the Consume button.
- Enter the quantity that is consumed.
- As the packaging is consumed, the quantity of packaged products increases (in Stock -> Items and Stock -> Stock lots) immediately.
Reporting packing in the Internet-kiosk
When a worker reports the finish of the last operation of the MO, then:
- All booked packaging will be automatically consumed.
- The MO will be marked finished.
- Packaged products are counted as stock.
Shipment packing
Shipment packing allows the warehouse team to define how goods are packed into shipping units (e.g., boxes, pallets) during shipment preparation.
Adding packaging during shipment preparation
To add packaging to a shipment, click the + icon in the Shipment packing section. A pop-up window appears, allowing you to select the packaging material and assign the contents.
Packaging material must be a stock item without serial numbers.
When selecting the contents:
- Define the quantity of the product per package.
- Specify the total quantity to be packed using this packaging.
After confirming the selection, a new row will be added to the Shipment packing table.
Picking packaged goods
Products that were packaged in the shipment can only be picked from the Shipment packing table or using the Pick all items button.
If the contents of a shipment package include items with serial numbers:
- The user will be prompted to select all serial numbers on the picking screen.
- Partial picking or unpicking is not allowed; all packages in the packing entry have to be picked or returned to stock simultaneously.
Printing package labels
Package labels can be printed for both product and shipment packaging using the buttons Print product package labels and Print shipment package labels on the Shipment details page.
The layout and content of these labels can be customized in the Label Editor.
Use the following layout templates:
- Package label - for product packaging (defined in BOMs and Manufacturing Orders)
- Shipment package label - for shipment packaging (defined during shipment preparation)
The labels can include the weight information if the weights of the products and packaging materials are defined in the Item details.
Weight calculation
When Packing is enabled, the weight of each product can be defined in the Item details.
MRPeasy uses this information to calculate:
- Estimated weight of an item - the expected weight of a finished product based on the weights of its BOM components.
- Net weight - the total weight of the products, including product packaging, but excluding shipment packaging.
- Gross weight - the net weight plus the weight of all shipment packages.
Please note that MRPeasy does not automatically calculate or store the final product’s weight during manufacturing. The estimated weight is calculated on demand and is intended for planning and informational purposes.
Obtaining the estimated weight of items
The estimated weight can be calculated for items that have a BOM and is available in the following places:
- Item details - clicking the Estimated weight button calculates the estimated weight and allows viewing a detailed breakdown of the calculation.
- Stock → Items - an Estimated weight column can be added to the items table. Clicking the Estimated weight icon calculates the value. Clicking on the calculated value opens the calculation details.
If an item has multiple BOMs, the BOM with the lowest alphanumeric BOM number is used for the calculation.
If one or more components lack a defined weight, the estimated weight is still calculated. In this case, the list of components with missing weights is available in the calculation details.
Estimated weight does not affect shipment documents, inventory valuation, or production reporting.
Weights in shipment
Shipment weights are displayed:
- In Shipment details:
- Stock items section - shows the net weight for each line and the total.
- Shipment packing section - shows the gross weight of each shipment package.
- On shipment documents, if configured in the PDF Editor:
- Waybill - the Weight column in the main table displays the net weight, while the Weight field in the header shows the gross weight.
- Packing list: the Net weight and Gross weight fields show the corresponding weight in the header section.
- Picking list: both the Weight field and the column display the net weight of the products.
Return Merchandise Authorization (RMA)
The Return Merchandise Authorization (RMA) functionality allows you to manage customer returns.
When enabled, it introduces a new process in CRM -> Customer returns (RMAs) where you can:
- Record and track customer returns.
- Conduct inspections and define a per-line outcome for each returned item (e.g., repair, replace, credit, reject).
- Book and ship any outbound items as replacements.
- Create credit and regular invoices, along with service orders, directly from the RMA order.
Jump to:
- Demo video: Return Merchandise Authorization.
- Enabling RMA functionality.
- User access rights for RMA management.
- General RMA process.
Enabling RMA functionality
This functionality can be enabled in Settings -> System settings -> Enterprise functions -> RMA.
The following software sections become available:
- The CRM -> Customer returns (RMAs) page, where RMA orders can be created and managed.
- The Procurement -> Inspections page, where inspections can be conducted on returned items and their outcomes determined.
User access rights for RMA management
To work with RMA orders and Inspections, the user must have appropriate rights set in Settings -> Human Resources -> User rights.
General RMA process
Processing a customer return takes place in several steps:
- Create the RMA order for the customer and list all returned items.
- Receive the items into stock upon arrival.
- Items received for RMA inspection are not counted in inventory. However, they can be found in Stock -> Stock lots by statuses that start with “RMA”.
- Inspect the items and decide on the outcome for each line (e.g., repair, replacement, credit, or rejection).
- The decision can be made upfront by choosing the RMA type in the RMA's details.
- Carry out the chosen action, such as creating a service order, preparing a shipment, or issuing a credit invoice.
- Finalize the RMA when all items have been processed, and related actions are complete.
Revision/Version Control System (VCS)
The Revision control system allows you to save revisions of stock items and track all changes made to Bills of Materials (BOMs) and Routings.
Demo video: Revision/Version Control System.
This functionality can be enabled in Settings -> System settings -> Enterprise functions -> Version control system.
If this is turned on, then:
- A revision (version) can be stored in the stock item details.
- The stock lot details can store an item's revision. If a particular stock lot is reworked, the revision can be changed manually.
- When creating a manufacturing or purchase order, a revision is copied from the item to this document and to the target stock lot. When the revision is changed in the initial document, the new revision is copied to the target stock lot.
- When creating a transfer order, the revision is copied from the source stock lot to the target stock lot. Please note that changing the revision in the source stock lot after the transfer order was created does not affect the target stock lot.
- Every update to a BOM or a Routing creates a new document revision.
- On the BOM and Routing details pages, the list of previous versions includes the Created date, Notes, and User information.
- Restoring a previous version of the BOM or the Routing is possible.
- It is possible to view a PDF of the previous version.
- Notes can be edited. In the Edit mode, move the mouse over the notes to edit them.
- In the BOM and Routing subsections of Production Planning, under Versions, it is possible to search by number, date range, name, creator, and notes.
Sales Forecasting
The Sales forecasting functionality allows you to plan product demand over a defined future period. It combines AI-assisted forecast generation with manual input, providing a flexible tool for demand planning.
Sales forecasting allows:
- Creating AI-assisted demand forecasts for products based on historical customer order data.
- Reviewing forecast data grouped by configurable time periods.
- Comparing forecasted quantities with previous periods and previous year values.
- Linking forecasts to the Master Production Schedule (MPS) for production and procurement planning.
Jump to:
- Demo video: Sales Forecasting
- Enabling sales forecasting
- User access rights for sales forecasting
- General sales forecasting process
- Creating a sales forecast
- Adding items to the forecast
- Forecast overview
- Forecast input table
- Running an AI forecast
- General and Detailed views
- Linking a forecast to the MPS
- Sales forecasting limits
Enabling sales forecasting
This functionality can be enabled in Settings -> System Settings -> Enterprise Functions -> Sales forecasting.
The following software sections become available:
- The Production Planning -> Sales forecasting page, where it is possible to create and manage sales forecasts.
- The Sales forecast row in the Production Planning -> MPS view, where it is possible to link a sales forecast to a product for production and procurement planning.
User access rights for sales forecasting
To work with sales forecasts, the user must have appropriate rights set at Settings -> Human Resources -> Users -> Rights of individual user.
Please note that even without the Read right for Sales forecasting, the user can see an item's forecast values in the MPS tab, provided they have the right to access MPS.
General sales forecasting process
Working with a sales forecast takes place in several steps:
- Create a sales forecast by selecting the products and defining the forecast horizon.
- Run the AI forecast to automatically generate demand predictions based on historical customer order data.
- If a product lacks sufficient historical data, forecast values can be entered manually.
- Review and adjust the forecast values in the forecast input table, using the Detailed view to compare them with actuals and previous-year data.
- Review aggregated data in the Forecast overview section, using configurable period groupings.
- Link the forecast to the Master Production Schedule (MPS) to use the forecast values for production and procurement planning.
Creating a sales forecast
For creating a sales forecast:
- Go to Production Planning -> Sales forecasting and click the Create button.
- In the first pop-up ("Step 1 of 2: Create a new sales forecast"), enter the Name for the forecast.
- Select the First month - the starting month of the forecast period. The default is the current month. Months up to two years in the future can be selected.
- Select the Horizon - the number of months the forecast will cover. The available options are 3, 6, 12 (default), and 18 months.
- Click Continue.
- In the second pop-up ("Step 2 of 2: Select products"), select the products to include in the forecast.
- Click Create forecast.
The forecast is created and ready for editing.
Please note that up to 100 products can be included in a single forecast. A maximum of 20 products can be added at a time. For more details, see Sales forecasting limits below.
Adding items to the forecast
To add products to the forecast:
- Click the Add items + button above the input table.
- In the pop-up, select the products to add from the item selection table.
- Click Add.
Please note that up to 100 products can be included in a single forecast. A maximum of 20 products can be added at a time. For more details, see Sales forecasting limits.
When new products are added, the AI forecast is automatically queued for them.
Forecast overview
The forecast overview section in the forecast details provides summary statistics and a chart for a selected product.
To view the overview for a specific product, select it from the autocomplete field at the top of the section. The selection affects both the summary table and the chart.
The summary table displays aggregated forecast data, grouped by configurable time periods. The default grouping depends on the forecast horizon: 3 months for a 3-month horizon, 6 months for a 6-month horizon, etc.
The table shows:
- Forecast total – the sum of all monthly forecast values within the grouped period. Shown when a monthly grouping (3, 6, or 12 months) is selected.
- Estimated year total – replaces "Forecast total" when the calendar year grouping is selected. This metric provides a projected annual quantity by combining actual sales data for months that have already passed with forecasted values for the remaining months of the year. This allows comparing the full-year outlook across calendar years, even when some months have not yet elapsed.
- Change vs previous period – shows whether demand is increasing or decreasing between consecutive periods, expressed as an absolute quantity difference.
- Change vs previous period (%) – the same comparison expressed as a percentage, making it easier to assess the magnitude of change across products with different volumes.
For the first period, the change values are calculated using actual historical data, if available.
The chart displays historical sales data and forecasted values by month for the selected product.
Forecast input table
The forecast input table in the forecast details is where you enter the expected sales quantities for each product, month by month.
Each product is listed as a row, and each month of the forecast period is a column. To enter or edit a forecast value, click on the cell for the desired product and month.
The forecast input table supports two display modes, General view and Detailed view, which can be toggled using the tabs above the table. See General and Detailed views below for details.
Running an AI forecast
The AI forecast generates demand predictions for each product based on its historical customer order data. The system uses all available order history, specifically, the total ordered amounts and delivery dates of customer orders. Orders in statuses "Quotation" and "Cancelled" are excluded.
To run the forecast, click the Run forecast button above the input table. A loading alert is displayed while the values are being generated. Once complete, the forecast values are populated in the input table.
The Run forecast button replaces empty and previously AI-generated values with new predictions. Manually entered values are not overwritten.
Please note that if the forecast period is entirely in the past, the Run forecast button is disabled.
General and Detailed views
The forecast input table can be toggled between two views using the tabs above the table.
The General view shows only the forecast value row for each product.
The Detailed view shows additional rows for each product:
- Actual – the actual quantity of products sold in that month. Displayed for months that are in the past.
- Previous year – the sales quantity for the same month from the previous year's history.
- Year-on-year change (%) – shows how the forecasted quantity compares to what was actually sold in the same month last year, expressed as a percentage.
Linking a forecast to the MPS
Sales forecasts can be linked to the Master Production Schedule (MPS) to use forecast values for production and procurement planning. For details on how to link a forecast in MPS, see the Master Production Schedule (MPS) page.
Sales forecasting limits
Why is the maximum number of products in a forecast limited to 100?
Forecasting is a resource-intensive process. For every product, the system retrieves historical customer order data and runs AI-based calculations. Because of this, the maximum number of products per forecast is limited to 100, and a maximum of 20 products can be added at a time.
Why does a product show "Not enough historical data"?
The AI forecast requires a minimum of 3 months of historical sales data (from customer orders) to generate a prediction. If a product has fewer than 3 months of non-empty data points, the system cannot generate a forecast for it. In this case, the product row will be marked with a grey indicator and the tooltip "Not enough historical data to run a forecast with AI."
You can still manually enter forecast values for such products.
Sales Management
The CRM -> Sales management section displays reports on sales staff performance for each period. It can be used to calculate staff commissions.
- The reports can be selected from the drop-down menu.
- The user can be reported from the drop-down menu.
- The period of a report can be custom-defined or selected from pre-defined options.
- Reports can be saved in PDF or CSV.
There are three reports:
- Contacts - list customers who have been contacted (based on customer record updates).
- Changed statuses - number of customers' statuses that have been changed.
- Invoices - invoices that have been created.
Two-factor authentication
The Two-factor authentication functionality provides enhanced security when logging in by requiring the user to authenticate with two-step verification. Every time the user logs in, an additional code is generated and sent to them, which they should enter.
This functionality can be enabled at Settings -> System settings -> Enterprise functions -> Two-factor authentication (2FA).
If this function is enabled:
- It is possible to require 2-step verification when signing in (configured per user).
- Users must use their smartphones to generate and enter a special sign-in code.
Please do not try to switch that on without understanding how it works.
Enabling two-factor authentication (2FA) for logging in
- Enable it at Settings -> System settings -> Enterprise functions -> Two-factor authentication (2FA).
- Install an authenticator app on the user’s phone, such as Google Authenticator, Microsoft Authenticator, or another app that supports scanning a QR code and displaying one-time codes.
- Go to Settings -> Human Resources and open the user's details page.
- Enable Two-factor authentication (2FA) for the user and save changes.
- Click the link to show the 2FA key.
- Open the Google Authenticator app.
- Click Begin Setup or +.
- Click Scan barcode, then scan the QR code displayed.
or click Manual entry. - Enter the key to the field Key.
- The account can be your MRPeasy username.
- Time-based must be turned on.
If the 2FA box is checked for a particular user, the software will ask them to enter the authentication code once every seven days upon login. The user should:
- Open the authenticator app on their phone.
- Enter the code that is generated by the app.
Software Settings
The Settings -> System settings -> Software settings page allows you to set preferences that affect the software's behavior.
Demo video: Software settings.
The following settings can be set from this page:
- Edit mode - whether documents can be edited immediately after opening or require clicking the "Edit" button.
- The worker sees in "My production plan" the visibility settings of other operations for the worker in "My production plan".
- Different tax rates - the possibility of setting the tax rate for every item on an invoice.
- Flexible CO quantity - if a Manufacturing Order (MO) was automatically created from a Customer Order (i.e., make-to-order), then the Customer Order quantity will be updated if the final MO quantity changes.
- Materials requisition - the ability to create a materials requisition PDF in manufacturing order details.
- Several invoices per PO: the ability to create multiple incoming invoices for a single purchase order.
- Update purchase terms from PO – the ability to enable/disable automatic updating of an item’s price in its purchase terms when it is edited in a purchase order.
- MO partial completion - the ability to put ready products into stock in a partially completed MO when the last operation is paused.
- Use planned goods - the ability to consume parts with statuses ‘Planned’ and 'On hold' in manufacturing orders, and pick planned parts for shipments and transfer orders.
- Decimal places - the ability to set the number of decimal places in price fields.
- Update currency rates - if turned ON, the software will update currency rates automatically each night.
- Tracing - when tracing is disabled, the system automatically books available items into orders using the FIFO method in the background.
When enabled, bookings and stock lots are managed manually by the user, enabling stock lot tracking and tracing.
Edit mode
By default, Edit mode is off, so all documents are editable immediately when opened.
Enabling Settings -> System Settings -> Software settings -> Edit mode forces the user to click the Edit button in a document to update it.
If several users try to edit the same data simultaneously, they may overwrite each other’s changes. Turning this setting on locks the document for whoever opened its Edit mode first, thereby solving the problem.
Read also: What is the lock handler?
The worker sees in "My production plan"
The Settings -> System Settings -> Software settings -> Worker sees in "My production plan" allows choosing which operations from a Manufacturing Order are visible for the worker when looking at a Manufacturing Order in the "My production plan" section.
The worker can either see:
- All operations from a Manufacturing Order, where the worker has an operation to perform.
- The worker's operations plus the previous and the next.
- The worker's operations only.
If it is a multi-level manufacturing order:
- According to visibility restrictions, only the operation(s) and materials of the concerned assemblies are seen. For example, if the worker can see only one operation (his own), only the materials for this assembly are visible.
- If the user has access rights to Production planning and Workstations, the user will see all operations and materials in the Manufacturing Order, regardless of this setting.
Different Tax Rates
If the Settings -> System Settings -> Software settings -> Different tax rates option is enabled, a separate tax rate can be set for each product on an invoice.
Additionally, it is possible to define:
- A default tax rate for each customer at CRM -> Customers -> A customer's details page.
- A default tax rate for each item at Stock -> Items -> An item's details page.
If an invoice is created, the following tax rate will be used:
- The customer's custom tax rate.
- If the above is not defined, the item's custom tax rate.
- If the above is not defined, the tax rate is from Settings -> System settings -> Company details.
Flexible CO quantity
When booking products for a customer order, the software can automatically create manufacturing orders for missing products from the stock.
If the Settings -> System Settings -> Software settings -> Flexible CO quantity option is enabled and a manufacturing order created automatically is finished with a different quantity, the quantity in the customer order will be updated.
Materials requisition
When the Settings -> System Settings -> Software settings -> Materials requisition option is turned ON, the Materials requisition PDF can be created:
- for the entire manufacturing order (the button Materials PDF on the right top corner of the MO details page);
- for each sub-assembly in multi-level manufacturing order (buttons Materials PDF near each sub-assembly on the MO details page);
- for several manufacturing orders in bulk from the Production planning -> Manufacturing orders list view (select several lines and press the printer icon on the top right of the list).
Next to the Materials PDF button, the Materials CSV button exports the same list to a CSV file.
The Materials requisition sheet layout can be configured in the PDF Editor. In the Materials requisition layout, the Sort by field in the Main table section sets the order in which the materials are listed. For example, select Location to list the materials by storage location, or Stock item to list them by item. By default, the materials are sorted by location. The same order is applied to the CSV export.
The Combined materials requisition sheet can be prepared in two ways:
- Go to Production planning -> Manufacturing orders list view, select the desired MOs by checking the checkbox on each line, and click the printer icon at the top. When prompted to select the type of PDF to print, choose “Combined materials requisition sheet“.
- Go to CRM -> Customer orders, open a CO with the products booked from manufacturing orders, and click the “MO PDFs“ button in the top right corner. The system will create a PDF with the combined requisition list for all MOs sourced in that particular CO.
After the materials are consumed, the specifics of their lots are replaced with the status “Issued” in the Materials requisition PDF.
Several invoices per PO
By default, one purchase order can be associated with only one incoming invoice. Changing the Settings -> System Settings -> Software settings -> Several invoices per PO to Yes allows entering several invoices per purchase order.
Generally, the "Several invoices per PO = Yes" functionality is intended to be used:
- When there are several invoices per one PO. I.e. there are several different Invoice IDs.
- When there may be an additional invoice from another company, e.g., the delivery company.
After enabling this functionality:
- The Invoices section appears at the bottom of the PO.
- Additional fees are entered into invoices.
- Payments are entered into invoices.
- An invoice from another vendor (e.g., additional freight fees) can be added to the PO.
If the option "Separate invoices and deliveries" is set to "Yes," the Deliveries section appears at the bottom of the PO. The delivery must be entered to receive the goods into stock.
If the option "Separate invoices and deliveries" is set to "No," then an invoice must be entered for receiving the goods into stock.
After enabling the " Several invoices per PO functionality, it is not possible to add several invoices to pre-existing POs if they already:
- have an invoice number,
- have payments entered,
- have been received, in whole or in part.
Update purchase terms from PO
By default, the software updates the item’s price in its purchase terms when a purchase order with a different price is saved:
- A purchase term will be updated if only one has the same vendor part number.
- A purchase term will be created if no purchase terms have the same vendor part number.
To disable this functionality so purchase terms are not automatically updated, select NO at Settings -> System Settings -> Software settings -> Update purchase terms from PO.
MO partial completion
By default, products reported by a worker when pausing or finishing the last operation of an MO are immediately received into stock.
Each time a worker reports the results of the last operation, a separate stock lot is created and marked as Received (or On-hold if Quality Control is enabled). These products can be shipped to customers or used in other processes.
If products must be received into stock only after the MO is finished, set Settings -> System Settings -> Software Settings -> MO partial completion to No.
Please note that:
- While the MO is not yet completed, the cost of the earlier completed products is likely to change as further actions are taken under the MO.
- If any input (materials, overhead, or labor) or output (final quantity of products, additional products) changes, then the product cost will change because manufacturing costs in the MO are divided equally among all produced items (the unit cost is the same in all target lots).
- If you use the Standard Accounting module and MO partial completion is allowed, in-progress (not finished) MOs started before the “Books closing date” can be updated freely.
- Changing this setting does not affect existing MOs; they cannot be partially completed. An MO is created according to the setting at the time of its creation.
- Even if you enabled the ”Use Planned Goods” setting, not-ready products from MOs created with this option cannot be consumed until they are received in stock.
Use planned goods
By default, the software does not allow the use of stock items in the statuses Planned or On hold.
If there is a need to use planned goods, for example, to be consumed in manufacturing orders or picked in shipments and transfer orders, then it can be allowed by setting Settings -> System Settings -> Software settings -> Use planned goods to Yes.
The benefit of having this setting enabled is the following:
- If someone forgets to report a PO received or a finished MO, the next person can still record their actions. For example, the parts can be consumed in MOs or shipped to customers.
If this setting is enabled, you should be aware of the following:
- When planned goods are used, then when goods are finally received (e.g., PO is received, MO is finished), the financial transactions of usage of goods are done only retrospectively.
- Initially, the cost of all planned goods is set to 0.
- Once the products are finally received, the movements appear in the Stock -> Stock movements reports.
- The transactions are backdated according to the date they were reported.
- Once the products are finally received, financial transactions are updated in the Accounting module.
- When the user action is initially saved, a transaction with 0 value is recorded for that date because the items are not in stock.
- Once items are received, that value is updated. If books are closed, this action is blocked.
- If you use accounting integrations with balance synchronization, as MRPeasy does not post backdated journals, the transactions are posted as "adjustments to previous periods" with a value date set to when the synchronization occurs.
- If you do not physically track stock lots and record this information in MRPeasy, you may experience situations, e.g., where items from the MO or PO (their target stock lot) are consumed while the PO is actually not even physically received, and you are unable to edit the quantity of the MO or PO or cancel it.
Decimal places
The Settings -> System Settings -> Software settings -> Decimal places settings allow you to change the number of decimal places used for unit, subtotal, and total prices in the CRM, Procurement, Stock, and Production planning modules.
By default,
- prices have two decimal places,
- except for the price per unit in the CRM and procurement sections. These prices can have up to 4 decimal places.
No rounding is performed for numbers less than 0.1, and they are displayed with full internal precision, that is, 10 decimal digits.
General rounding rules
With the above exception, MRPeasy uses a uniform rounding approach almost everywhere in the system:
- Numbers above 0.1 are rounded to show 2 decimal digits.
- Numbers below 0.1 are not rounded and are shown with all available decimal digits (up to 10).
Update currency rates
MRPeasy allows you to add additional currencies to your account. By default, the currency rate you entered is not updated automatically. To enable automatic updates, set Settings -> System Settings -> Software settings -> Update currency rates to Yes.
This function requires that all currencies be defined using 3-letter codes according to international standards (e.g., USD, GBP, AUD, EUR). See: https://en.wikipedia.org/wiki/ISO_4217
Openexchangerates.org provides the real-time rates. The rates are mid-market rates derived from the midpoint between the "buy" and "sell" transactional rates in global currency markets.
Tracing
The Tracing functionality enables precise tracking of goods and materials by stock lots throughout the purchase, production, and distribution processes.
Caution:
- Some automatic actions may happen immediately after Tracing is turned off.
- You are advised to download a database backup before changing the settings.
Tracing turned off
- Available goods are automatically distributed among orders where they are needed.
- Order part/product statuses are calculated based on item availability, prioritized by each item's required date.
- Whenever the availability of goods or their demand changes, this process runs in the background.
- Items can be consumed (picked) from all stock.
- When an item is consumed (picked), the stock lot is chosen according to the FIFO principle.
- The user is never asked to, nor can they select a stock lot.
- Customer Orders:
- Customer Order status must be Confirmed to generate demand and automatically book the goods.
- Customer Orders without delivery dates are prioritized before orders with delivery dates.
- Orders with an earlier delivery date are before orders with a later delivery date.
- Manufacturing Orders are prioritized by start date.
Tracing turned on
- Goods for an order are booked (reserved) from specific stock lots.
- Existing bookings can only be manually changed by the user’s actions.
- If the availability of goods, demand, or the order of consumption changes, the user must manually update the bookings.
- It is possible to reserve specific goods for a specific order; they cannot be used for any other purpose.
- Order part statuses are calculated based on the allocated stock lots.
- Items can only be consumed (picked) from the booked stock lot.
- The user can keep track of physical goods by labeling them with stock lot numbers and recording which lot was used in which order.
- Customer Orders:
- Goods must be booked via the Check Stock and Book Items function.
- Stock lots are shown in Shipments and can be shown on shipping documents.
- Manufacturing Orders:
- Stock lots are shown line by line in the Parts section and can be managed individually.
- Bulk actions are available to unbook or rebook materials for a single MO, and to rebook all materials to planned MOs in FIFO order.
Expiry date and Quality control functions require Tracing turned on.
Usability Settings
The Settings -> System settings -> Usability settings page configures the user interface.
The following settings are available:
- Dashboard as the homepage: if enabled, you will see the dashboard immediately after you sign in.
- Color scheme: choose the software color scheme.
Notifications
The Settings -> System settings -> Notifications page allows each user to configure which events to receive email notifications about. The emails are sent to the user’s username.
The following notifications can be used:
- I have a new task assigned.
- New items appeared on the Critical on-hand list - such a list is sent once an hour.
- My approval has been requested - visible when the Enterprise function Approval System is turned on.
- My weekly production schedule is sent - your weekly production plan is sent one hour before the start of your business week.
- The workstation needs to be serviced - visible when the Enterprise function Maintenance Management System is turned on.
- A new item appeared in the Inspections list; this list is sent once an hour. Visible when the Professional function Quality Control is turned on.
- Changes to the status of a customer, manufacturing, or purchase order. It is possible to select all statuses or specific ones.
Disclaimer
Email is not a 100% reliable channel of communication. Emails can be marked as spam, delayed, lost along the way, or on the receiving mail server side.
MRPeasy sends emails, but cannot be held responsible for their delivery to the addressee.
Additional Currencies
The Settings -> System settings -> Additional currencies page allows you to define additional currencies and their exchange rates to the system’s base currency.
- Please note—the system uses only one base currency in stock, which the additional currencies relate to. The base currency is defined at Settings -> System settings -> Regional settings -> Currency sign.
- The idea of different currencies is to display them on purchasing/sales documents—Purchase orders (PO), Customer orders (CO), Invoices/Quotations, etc.
- It is also possible to set default currencies for customers and vendors.
- The price of every stock lot is displayed in the base currency. Even if a different currency is used when making a PO, the stock lot will still be displayed in the base currency, considering its exchange rate.
- When creating a document, the currency exchange rate is taken from the list of additional currencies. It is possible to change the rate in the particular document after.
- Important! Changing the currency sign in the System setting -> Regional Settings (in a live database) will not result in any changes in financial values or recalculation of documents and exchange rates; only the sign is changed.
Update rates automatically
MRPeasy can automatically update currency rates each night. To enable this functionality, please change the value of Settings -> System Settings -> Software settings -> Update currency rates to Yes.
This function requires that all currencies are defined as 3-letter codes according to international standards (USD, GBP, AUD, EUR, etc.). See: https://en.wikipedia.org/wiki/ISO_4217
Openexchangerates.org provides the real-time rates. The rates are mid-market rates derived from the midpoint between the "buy" and "sell" transactional rates in global currency markets.
Allowed IPs
The Settings -> System settings -> Allowed IPs page allows you to define the IP addresses from which you can sign in to your account at MRPeasy.
- The IP address limits apply only to users for whom the Access limited setting is enabled in the user's settings at Settings -> Human resources -> user's rights. All other IP addresses will be blocked.
- Access cannot be limited to the account administrator.
- Please note that if your company does not have an Internet connection with a static IP, better not to use this function because your IP can change. For more information about static IPs please consult your Internet service provider (ISP).
Integrations
The Settings -> System settings -> Integrations page allows the setting up and managing the integrations with MRPeasy.
The following integrations are currently available:
- Amazon
- BigCommerce
- EDI
- External files - Google Drive, OneDrive, Dropbox
- HubSpot
- Magento
- Microsoft Power BI
- Pipedrive
- QuickBooks Online
- Salesforce
- Shipstation
- Shopify
- SolidWorks
- Ware2Go
- WooCommerce
- XERO
- Zapier
- Application Programming Interface (API) (for paid Unlimited accounts only)
Amazon
MRPeasy can be integrated with Amazon via Zapier.
Such an integration can import orders from Amazon Seller Central to MRPeasy.
Fulfillment by Amazon
The Fulfillment by Amazon integration on Zapier is no longer available, as Amazon has deprecated the API powering the integration. Sadly, this is outside of our control.
At this time, a direct replacement is unavailable.
BigCommerce
BigCommerce is a powerful e-commerce platform. BigCommerce and MRPeasy work seamlessly together so that sales are done in BigCommerce and products are manufactured, materials are handled, production is planned, and purchasing managed in MRPeasy.
Jump to:
Synchronization of orders
Orders valid for import from BigCommerce
1. When you establish the integration, orders that are already in BigCommerce will not be sent to MRPeasy until they are updated (opened and saved).
- This allows the user to re-import orders if needed.
2. Orders that satisfy one of the following conditions can be imported from BigCommerce:
- not fulfilled or
- created within the last 30 days.
3. Only paid orders can be imported from BigCommerce.
4. Products must be pre-defined in MRPeasy.
- Products are matched by the SKU field in BigCommerce and the Part Number field in MRPeasy.
- If some products must not be sent to MRPeasy (for example, a service), they must have no SKU value or an SKU that does not match any part number in MRPeasy.
- If the order has no products with matching SKUs:
- It is not imported to MRPeasy.
- A note is attached to the order.
5. Additional notes:
- POS orders should also be imported.
- If some plugin updates all orders, then orders that are too old will be ignored.
- If the integration was configured more than 30 days ago, then all valid orders are imported already.
Step 1. Posting an order from BigCommerce to MRPeasy
- An order is imported to MRPeasy as a Customer Order at CRM -> Customer Orders.
- A note "In production" is added to the order in BigCommerce.
- The BigCommerce order number is copied to the Reference field in the MRPeasy Customer Order.
Step 2. Booking products for the order in MRPeasy
When an order has been imported into MRPeasy from BigCommerce:
- The software tries to book products. Available products are booked immediately.
- If there are products which couldn't be automatically booked, then:
- The Customer Order status will be Confirmed.
- The Product status will be Not booked.
- To book these parts, please see the instructions: How to check stock and book products for a customer order?
- Demand for these items is created automatically. If items have a Reorder point value set, then these will already be displayed on the Critical On-hand report, which shows shortages.
Step 3. Notification when products are available for shipment
When all products are ready:
- The MRPeasy Customer Order’s status is changed to Ready for shipment.
- In BigCommerce, the order status is changed to Awaiting shipment, and a note "Ready for shipment" is added to the order details, indicating that this order can be fully fulfilled.
Step 4. Shipping the items and subtracting the stock from MRPeasy
For shipping the items, there are two alternative options:
- Create a shipment in MRPeasy and pick all items. If the shipment contains items from one customer order, then the shipment will be posted to BigCommerce. When the tracking information is updated in MRPeasy, it will be posted to BigCommerce.
When the order is fully shipped in MRPeasy, its status in BigCommerce will change to Shipped. - Change the status of the order to Shipped in BigCommerce. A shipment will be created in MRPeasy, and all items will be automatically marked picked to deduct products from the inventory.
Taxes
All prices in the imported Customer Order are without tax.
- All sales prices in MRPeasy are tax-exclusive. If an item's price in BigCommerce is tax-inclusive, then its net sales price is derived.
- Taxes are added to invoices, not orders in MRPeasy.
If invoices are created (option "Mark orders as paid" is enabled):
- Taxes are added to sales invoices.
- Tax is calculated and rounded per line.
Synchronizing inventory levels from MRPeasy to BigCommerce
MRPeasy can update available quantities of products in BigCommerce.
If this function is enabled:
- Once per hour, MRPeasy will update the available quantities of products in BigCommerce with the quantities available from MRPeasy.
See also: How to read the inventory numbers - in stock, available, expected? - Products are matched by "Part number" in MRPeasy and "SKU" in BigCommerce.
- If some product does not exist in BigCommerce or its’ inventory is not tracked in BigCommerce, then this product is ignored during the synchronization.
To enable this functionality:
- Go to Settings -> System settings -> Integrations -> BigCommerce.
- Click the "Edit" button next to your shop.
- Select the option "Sync inventory levels."
- If you have several sites in MRPeasy, choosing what sites to synchronize will be possible.
Setting up the BigCommerce integration
To set up the integration between BigCommerce and MRPeasy:
- Go to https://www.bigcommerce.com/apps/MRPeasy/ and click Get This App.
- Sign up or sign in to your MRPeasy account.
- Fill in the required information:
- Select whether to import customer information or to use a generic customer.
- If you do not import customer information, optionally select to import shipping address only.
- Select whether to import shipping costs or not.
- Select whether to mark customer orders as paid or not.
- Select the site for booking products if the Enterprise functionality "Multi-Stock and Production Sites" is enabled.
- Select whether to synchronize inventory levels from MRPeasy to BigCommerce.
- Click the Save button.
- Set up products in MRPeasy.
- Optionally, add another BigCommerce store.
Importing customer information from BigCommerce
Depending on your business specifics, you may want to import customer information from BigCommerce to MRPeasy.
For privacy and data consistency reasons, it is advised to have customer information in one place only. If a customer signs up in BigCommerce, it is better to have his contact details in BigCommerce only.
You can set up the integration in one of the following ways:
- Use a generic customer in MRPeasy without importing any customer information.
- Do not select the option "Import customers."
- Do not select the option "Import shipping address."
- In this case, MRPeasy will create one generic customer in MRPeasy CRM and use it for all orders imported from BigCommerce. The customer's domain name will contain the domain name of your BigCommerce store.
- Import the customer.
- Select the option "Import customers".
- When importing an order, MRPeasy looks for a customer with the same e-mail address.
- MRPeasy searches by the customer's general email first. If no customer is found, MRPeasy searches by the customer's contacts' email. If there are several records with the same email, any record can be selected—it is not possible to predict which record will be used.
- If the customer exists, it will be used to create the order.
- If no customer is found, a new customer will be created.
- The shipping address will be added to the customer's details.
- Only import the shipping address while using a generic customer in MRPeasy.
- Do not select the option "Import customers".
- Select the option "Import shipping address".
- When importing an order, the shipping address is imported, saved in the generic customer’s details, and selected in CO.
- Do not select the option "Import customers".
Please note that BigCommerce allows updating the shipping address after placing the order. In this case, MRPeasy tries to update the address in the customer's details in MRPeasy. Nevertheless, please check that the addresses match in both systems.
Importing shipping costs
To import shipping costs from BigCommerce to MRPeasy:
- Go to your BigCommerce account -> Apps.
- Configure the integration between BigCommerce and MRPeasy.
- Select the option "Import shipping costs."
- Select the stock item to save shipping costs.
When an order is imported from BigCommerce, a new line with this item and the shipping cost is added to the order in MRPeasy.
Shipping costs will be imported from BigCommerce without tax.
Marking customer orders as paid
To mark customer order as paid:
- Go to your BigCommerce account -> Apps.
- Configure the integration between BigCommerce and MRPeasy.
- Select the option "Mark orders as Paid."
When an order is imported from BigCommerce, a new invoice with all products and shipping costs is created in MRPeasy. The invoice is created with tax included. Full payment is added to the invoice.
Configuring products in MRPeasy and BigCommerce
Products must be set up separately in MRPeasy and BigCommerce.
The SKU field in BigCommerce must match the Part Number field in MRPeasy. Otherwise, the product's order will not be imported to MRPeasy.
Please see:
- Demo video: Inventory management in MRPeasy.
- Demo video: Setting up procured items.
- Demo video: Setting up manufactured items.
- Demo video: Setting up inventory levels.
- Setting up new items.
- Import items.
- Enter initial inventory values.
Connecting several BigCommerce stores with MRPeasy
It is possible to integrate multiple BigCommerce stores with MRPeasy.
To do that:
- Please go to Settings -> System Settings -> Integrations.
- At the BigCommerce section, click the "+" button to add an additional BigCommerce store.
If you do not import customer information, then every BigCommerce store has its own generic customer. It contains the domain name of your store.
Support
MRPeasy maintains the integration between BigCommerce and MRPeasy. If you have any technical questions about the integration, please contact MRPeasy support.
Electronic Data Interchange (EDI)
EDI is a standardized communication protocol used for exchanging business documents and data between different computer systems or networks.
It enables the quick, seamless electronic transfer of business documents such as purchase orders, invoices, and shipping notices, enhancing efficiency, accuracy, and speed in business processes.
Our technology partner, Crossfire, provides EDI integrations to MRPeasy. Please get in touch with them here: https://www.crossfireintegration.com/
The reason for using a technology partner is that almost every EDI integration is unique.
External files
MRPeasy allows files to be attached to various documents and objects from external cloud storage.
The files could be used for
- displaying the company logo on documents,
- attaching drawings and images to items, which can be viewed from the MRPeasy screen by the worker,
- attaching certificates to stock lots,
- attaching work instructions to routings,
- etc.
The following external storage solutions are supported for adding documents and attachments:
Jump to:
- Document system in MRPeasy, attaching files.
- Preview images, PDFs, and CAD models inside MRPeasy.
- Add your company logo to documents.
- Attachments to items.
- Item icons.
- Automatically add item files to Purchase Order PDFs.
- File hosting.
- Can another user access what I have on my Google Drive / OneDrive / Dropbox?
Document system, attaching files
Links to files could be attached to stock items, stock lots, shipments, transfer orders, write-offs, customers, customer notes, customer orders (COs), customer returns (RMAs), manufacturing orders (MOs), workstations, workstation groups, bills of materials (BOMs), routings, vendors, purchase orders (POs), QC inspections, incoming invoices, and deliveries.
For attaching a file:
- Open the document to which you wish to add the file.
- In the Files section, press the button of the respective service/method: Dropbox, Google Drive, OneDrive, or Direct link.
- For cloud services:
3.1. Log in to the cloud hosting service if you haven't done so earlier.
3.2. Choose the file.
3.3. Confirm. - Click Save in MRPeasy.
Previewing images, PDFs, and CAD files
If images (PNG, JPG, GIF, SVG, WEBP) or PDFs are attached:
- A button called "Show images" is displayed on the right side of the screen.
- When this button is clicked, an area with attached images is expanded. This area can be moved to a new location or resized by dragging the borders. The last setting for displaying images will be saved and used for the same user.
Viewing 3D CAD models inside MRPeasy:
- 3D models are displayed in MRPeasy if the attached models are in Collada (.DAE) or XML3D format and if your browser supports WebGL (Google Chrome, probably Safari, Internet Explorer 11, and maybe Firefox).
- Most 3D CAD software packages can export models to Collada format.
Attachments to items
You can attach files (e.g., documents, drawings, specifications) to items, which can be accessed from various locations inside the software (e.g., in Manufacturing Orders, My Production Plan, or the Internet kiosk).
For attaching documents to items:
- Upload it to cloud storage or your local file server.
- Attach it to the item at Stock -> Items -> Item details in the Files section.
- Optionally, mark checkboxes for the following options:
- Icon - if this is the icon of the item.
- PO - if this file should be automatically added to a Purchase Order PDF as a link.
Stock item icons
Stock item icons can be displayed:
- In the list of items at Stock -> Items. Add the column Icon to the table to see icons.
- When selecting items (e.g., when adding items to COs or POs), when an item selection drop-down menu is opened, the icon is displayed when the cursor hovers over an item.
- In PDFs: Quotation, Invoice, Order confirmation, Prepayment Invoice. Use the PDF editor to enable icons in the layouts of the documents.
- In the Customer Portal, as an image of an item for sale.
Icons for the Customer Portal can be added from OneDrive and Dropbox integrations or as Direct links.
Icons stored in Google Drive will not be visible in the Customer Portal.
To add an icon to an item:
- Attach an image to a stock item.
- The file must be publicly shared.
- GIF, JPEG, or PNG up to 50 KB.
- The preferred size of the file is 160x120 px for the best visual and printing quality.
- For this file, check the Icon checkbox.
The size of the icon on the screen and PDF is 9x7 mm.
Attaching files to Purchase Order PDFs
The files attached to stock items can be automatically added as links to Purchase Orders PDFs. To set this up:
- Attach a file to the item.
- Check the PO checkbox for the file.
File hosting
Jump to:
- Dropbox.
- Google Drive.
- Microsoft OneDrive.
- Direct link (URL) from any file hosting service (e.g., a local fileserver).
- Can another user access what I have on my Google Drive / OneDrive / Dropbox?
Dropbox integration
Dropbox is a very convenient way to synchronize files between multiple devices while also keeping them in cloud storage. To attach files from Dropbox, first create an account. Dropbox software can be installed on your computer, but it is not required.
Google Drive integration
Google Drive is a very convenient way to synchronize your files between multiple devices while also keeping these in cloud storage. To attach files from Google Drive, first create an account at Google. Google Drive software can be installed on your computer, but it is not required.
The integration with Google Drive can be configured at Settings -> System Settings -> Integrations -> Google Drive.
Each user signs in to their own Google account when choosing files. The first time you attach a file from Google Drive, a Google sign-in window opens, where you sign in and choose the file. After this, you are not asked to sign in again while you are working in MRPeasy. You might need to sign in again later, for example after some time has passed or after you reload the page.
For the connection between MRPeasy and Google Drive, please allow pop-up windows.
Disconnecting from Google Drive does not delete your existing attachments. However, until you reconnect, files attached from Google Drive can no longer be previewed inside MRPeasy, and a company logo stored in Google Drive is not shown on PDFs.
Limitations:
- Google provides the interface for attaching files. If it does not display some files or folders in your Google Drive, we cannot help.
- Alternatively, you could save the file's link from Google Drive as a Direct link to bypass this.
Microsoft OneDrive integration
Microsoft OneDrive is a very convenient way to synchronize your files between multiple devices while also keeping them in cloud storage. To attach files from OneDrive, first create an account. OneDrive software can be installed on your computer, but it is not required. Files can be uploaded at http://onedrive.live.com.
To use OneDrive for Business, external file sharing must be enabled at https://admin.onedrive.com/?v=SharingSettings:
| Let users share SharePoint content with external users: | Anyone, including anonymous users |
| Let users share OneDrive content with external users: | Anyone, including anonymous users |
| Default sharing links: | Anonymous access - anyone with the link |
| Links expire within: | 0 days |
Direct link
If your company uses local file storage (a vault or a file server), you can save direct Internet links (URLs) to files if these URLs are visible via the Internet. MRPeasy will use these files in the same way as files selected from external cloud storage.
The workflow is as follows:
- Copy the URL of your file.
- Click the blue button with the chain icon in the file attachment section.
- In the opened field, paste the URL.
- Save.
Please note that the link must be a URL (a web address). You can check your file accessibility using your browser in incognito mode.
Using paths to files in your local filesystem/network is impossible, e.g., "C:\...". Opening such a path is usually automatically blocked by web browsers because of security concerns.
So, to use direct links, your file server should be able to generate a URL link to the file you wish to access.
Can another user access what I have on my Google Drive / OneDrive / Dropbox?
To choose files from a cloud service, each user signs in to their own account for that service in their web browser. One user does not get access to another user's cloud storage.- Dropbox: everyone must separately sign in to a Dropbox account in their web browser to choose files.
- Google Drive: everyone must separately sign in to their own Google account in their web browser to choose files. Previewing files that are already attached, and a company logo on PDFs, work for all users without signing in. MRPeasy reads each file using the Google account used to attach it, so previews and the logo keep working as long as Google Drive stays connected.
- OneDrive (personal): to choose files, everyone must sign in separately to a OneDrive account in their web browser.
- OneDrive (business): everyone must separately sign in to a OneDrive account in their web browser. Directory rights are defined inside the company account.
HubSpot
HubSpot is a powerful CRM system that offers great capabilities for managing your sales process. HubSpot and MRPeasy can work seamlessly together via Zapier so that sales are handled in HubSpot and production, inventory, purchasing management, and order fulfillment are handled in MRPeasy.
How do you import deals from HubSpot to MRPeasy?
Integration between HubSpot and MRPeasy must be configured in Zapier.
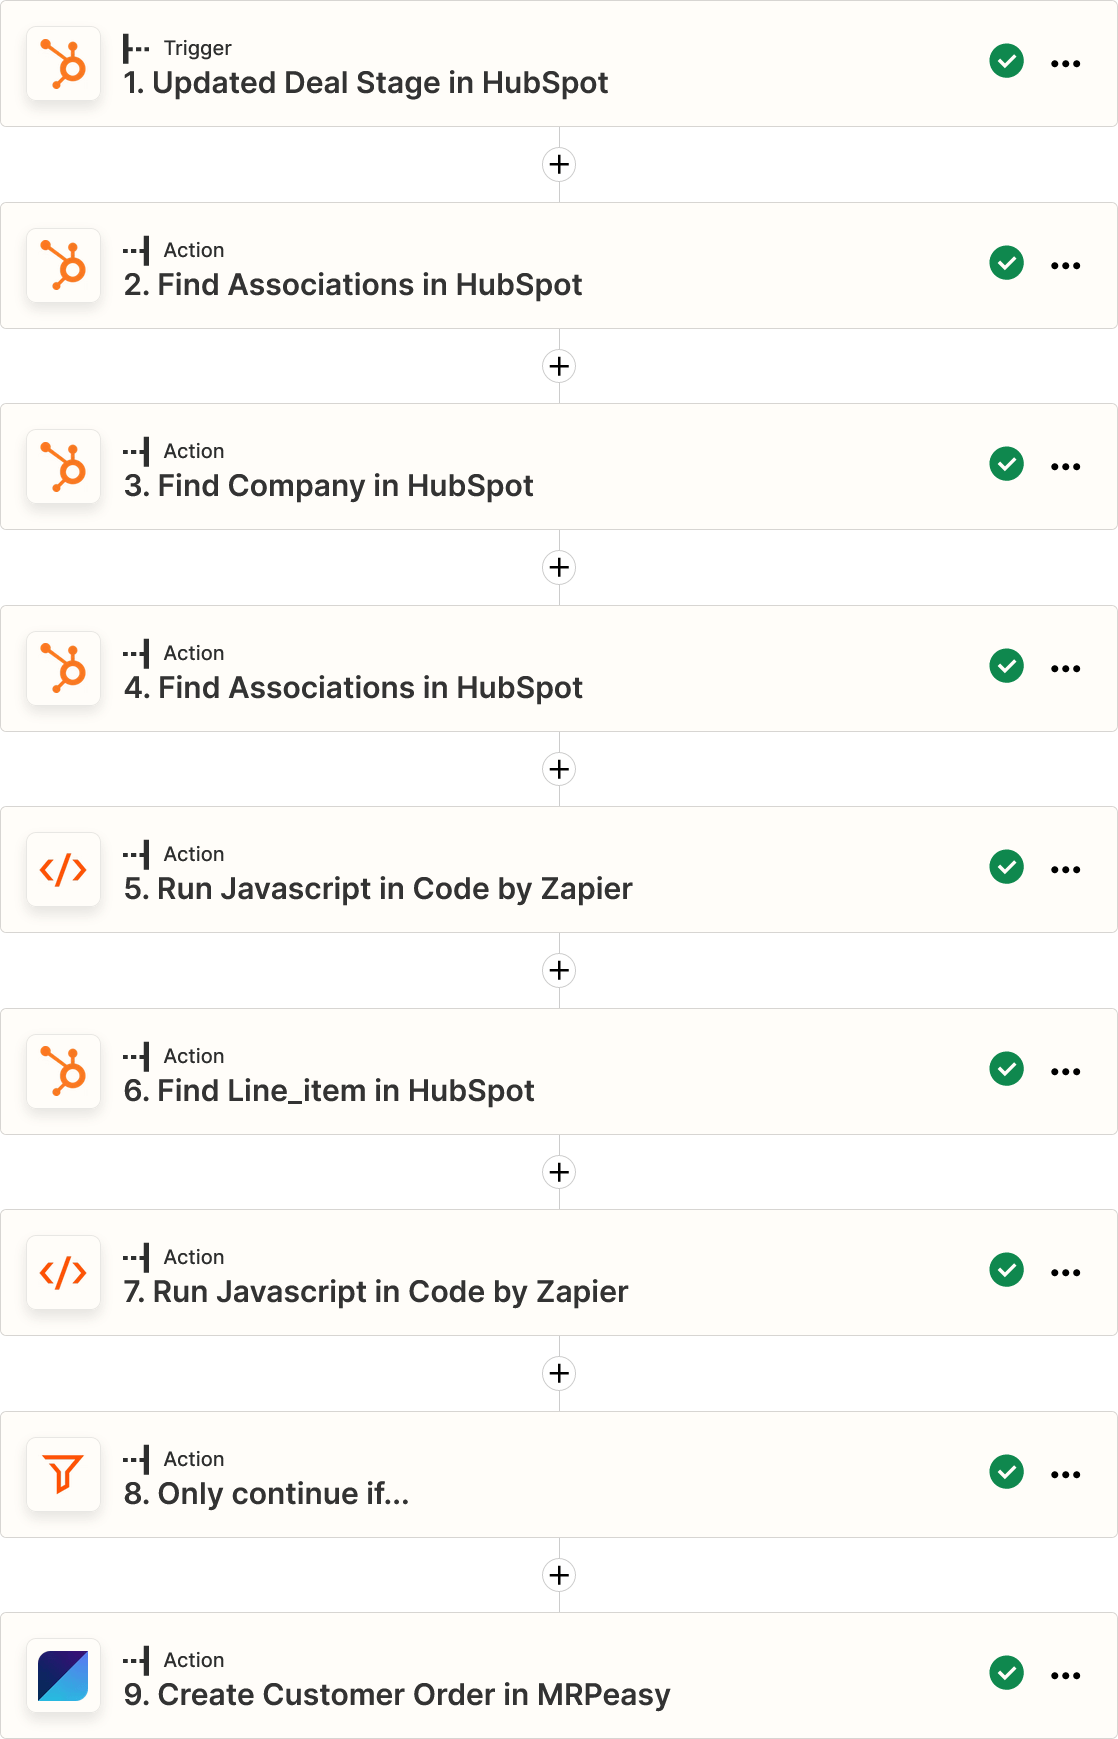
1. Set up the trigger
- Choose the HubSpot app and select the event Updated Deal Stage.
- Select your HubSpot account.
- Select the pipeline and stage.
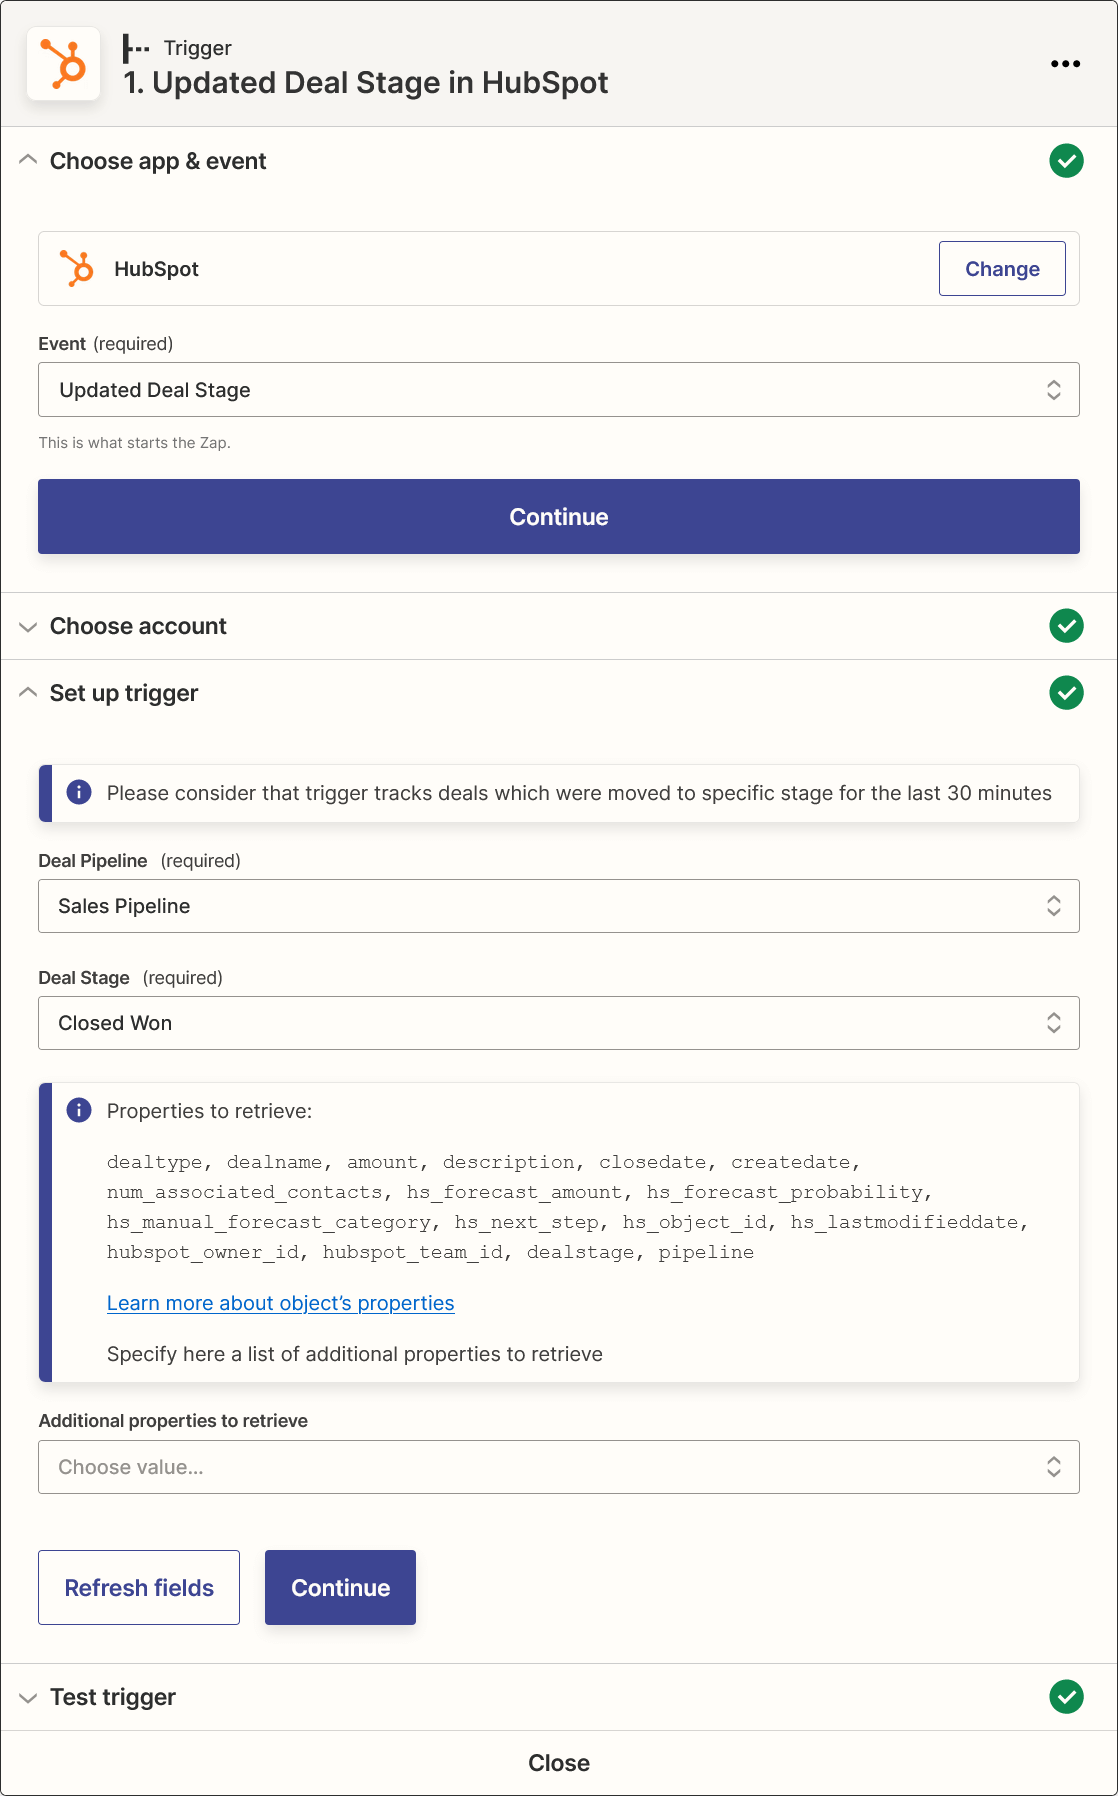
2. Load customer details
2.1. First, it is necessary to get the ID of the client's company.
- Choose the app HubSpot and select the action Find Associations.
- Select your HubSpot account.
- Enter the ID of the object you want to search: Deal ID.
- Select the type of the object: Deal.
- Select the number of associations: One.
- Select the object being associated: Company.
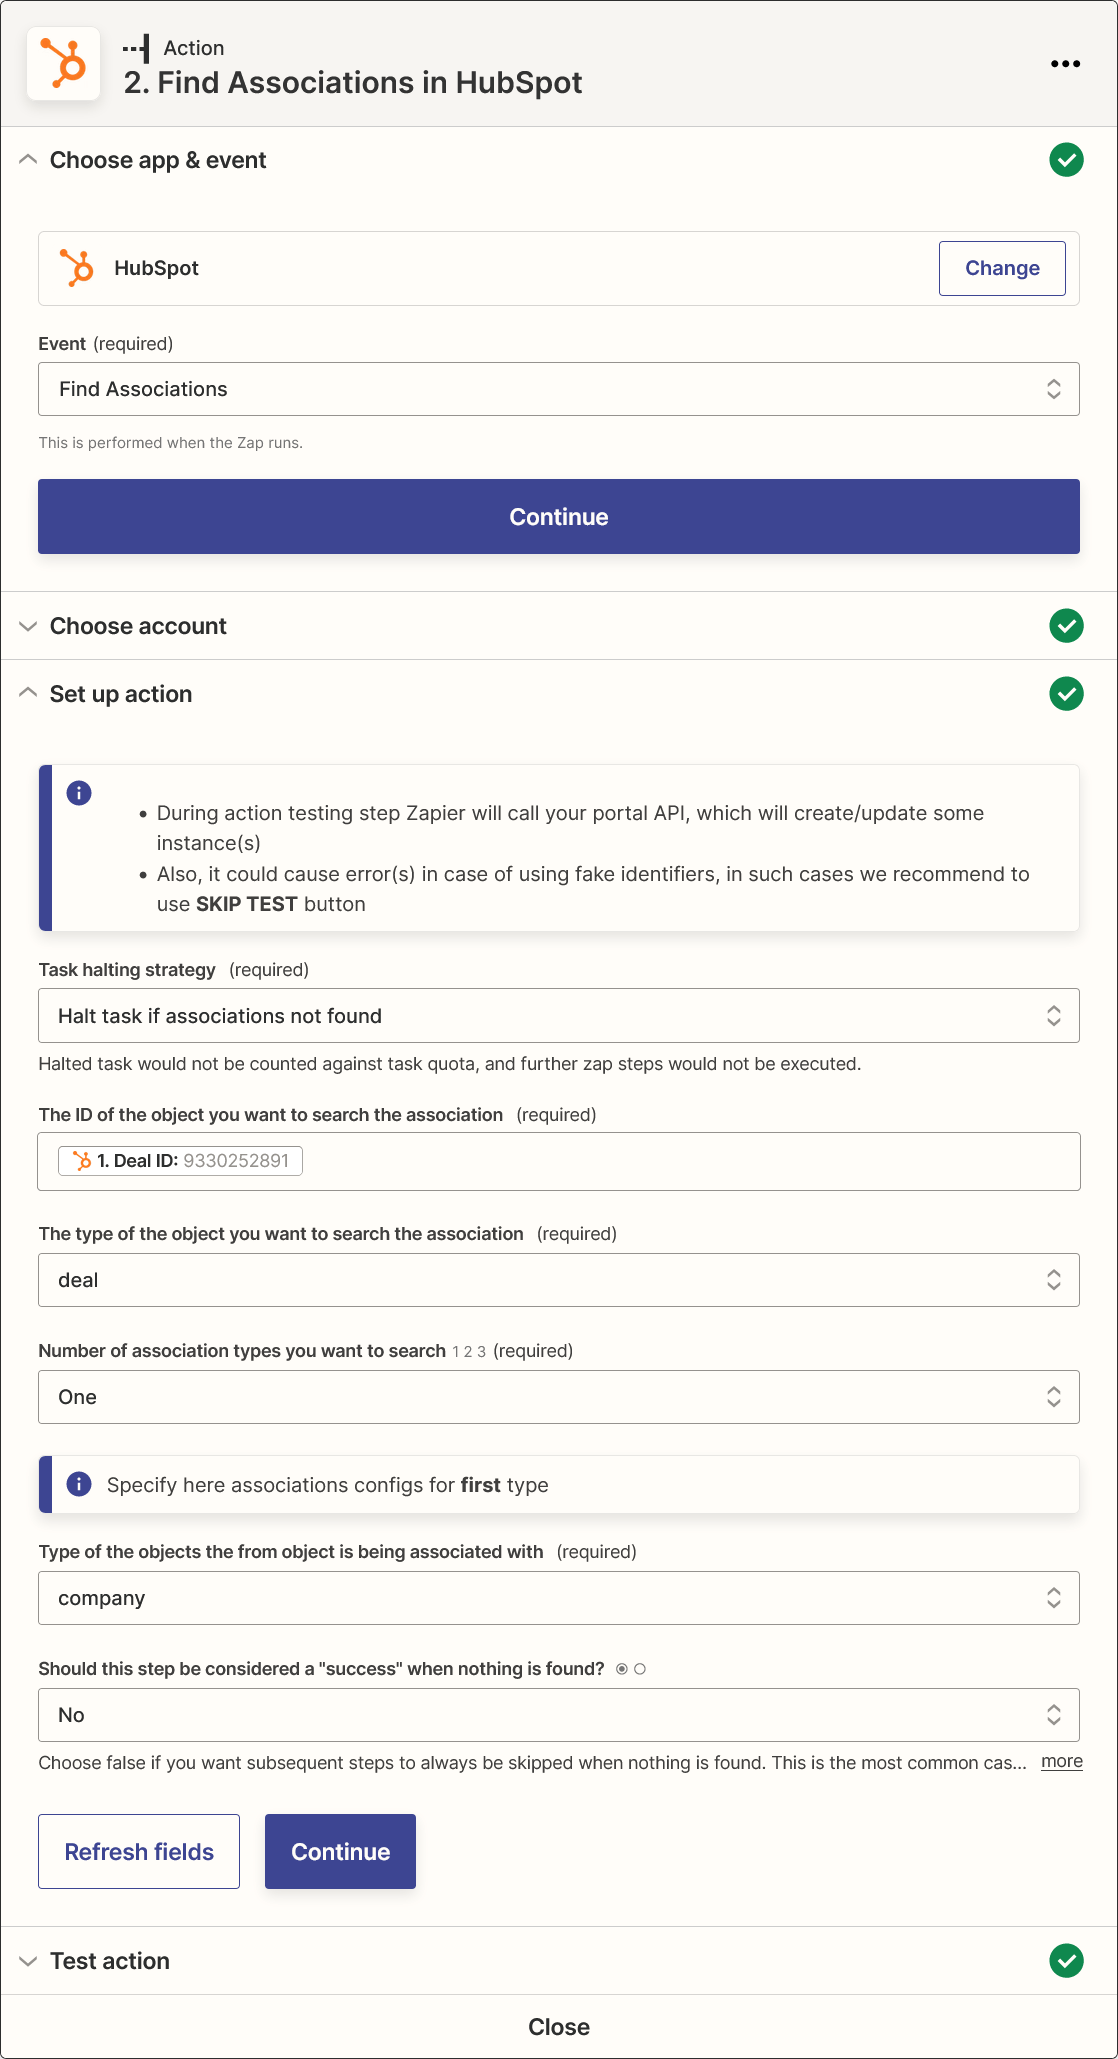
2.2. Next, get company details.
- Choose the app HubSpot and select the action Find Company.
- Select your HubSpot account.
- Enter the first search property name Company information: Record ID (hs_object_id).
- Enter the first search property value Deal to Company.
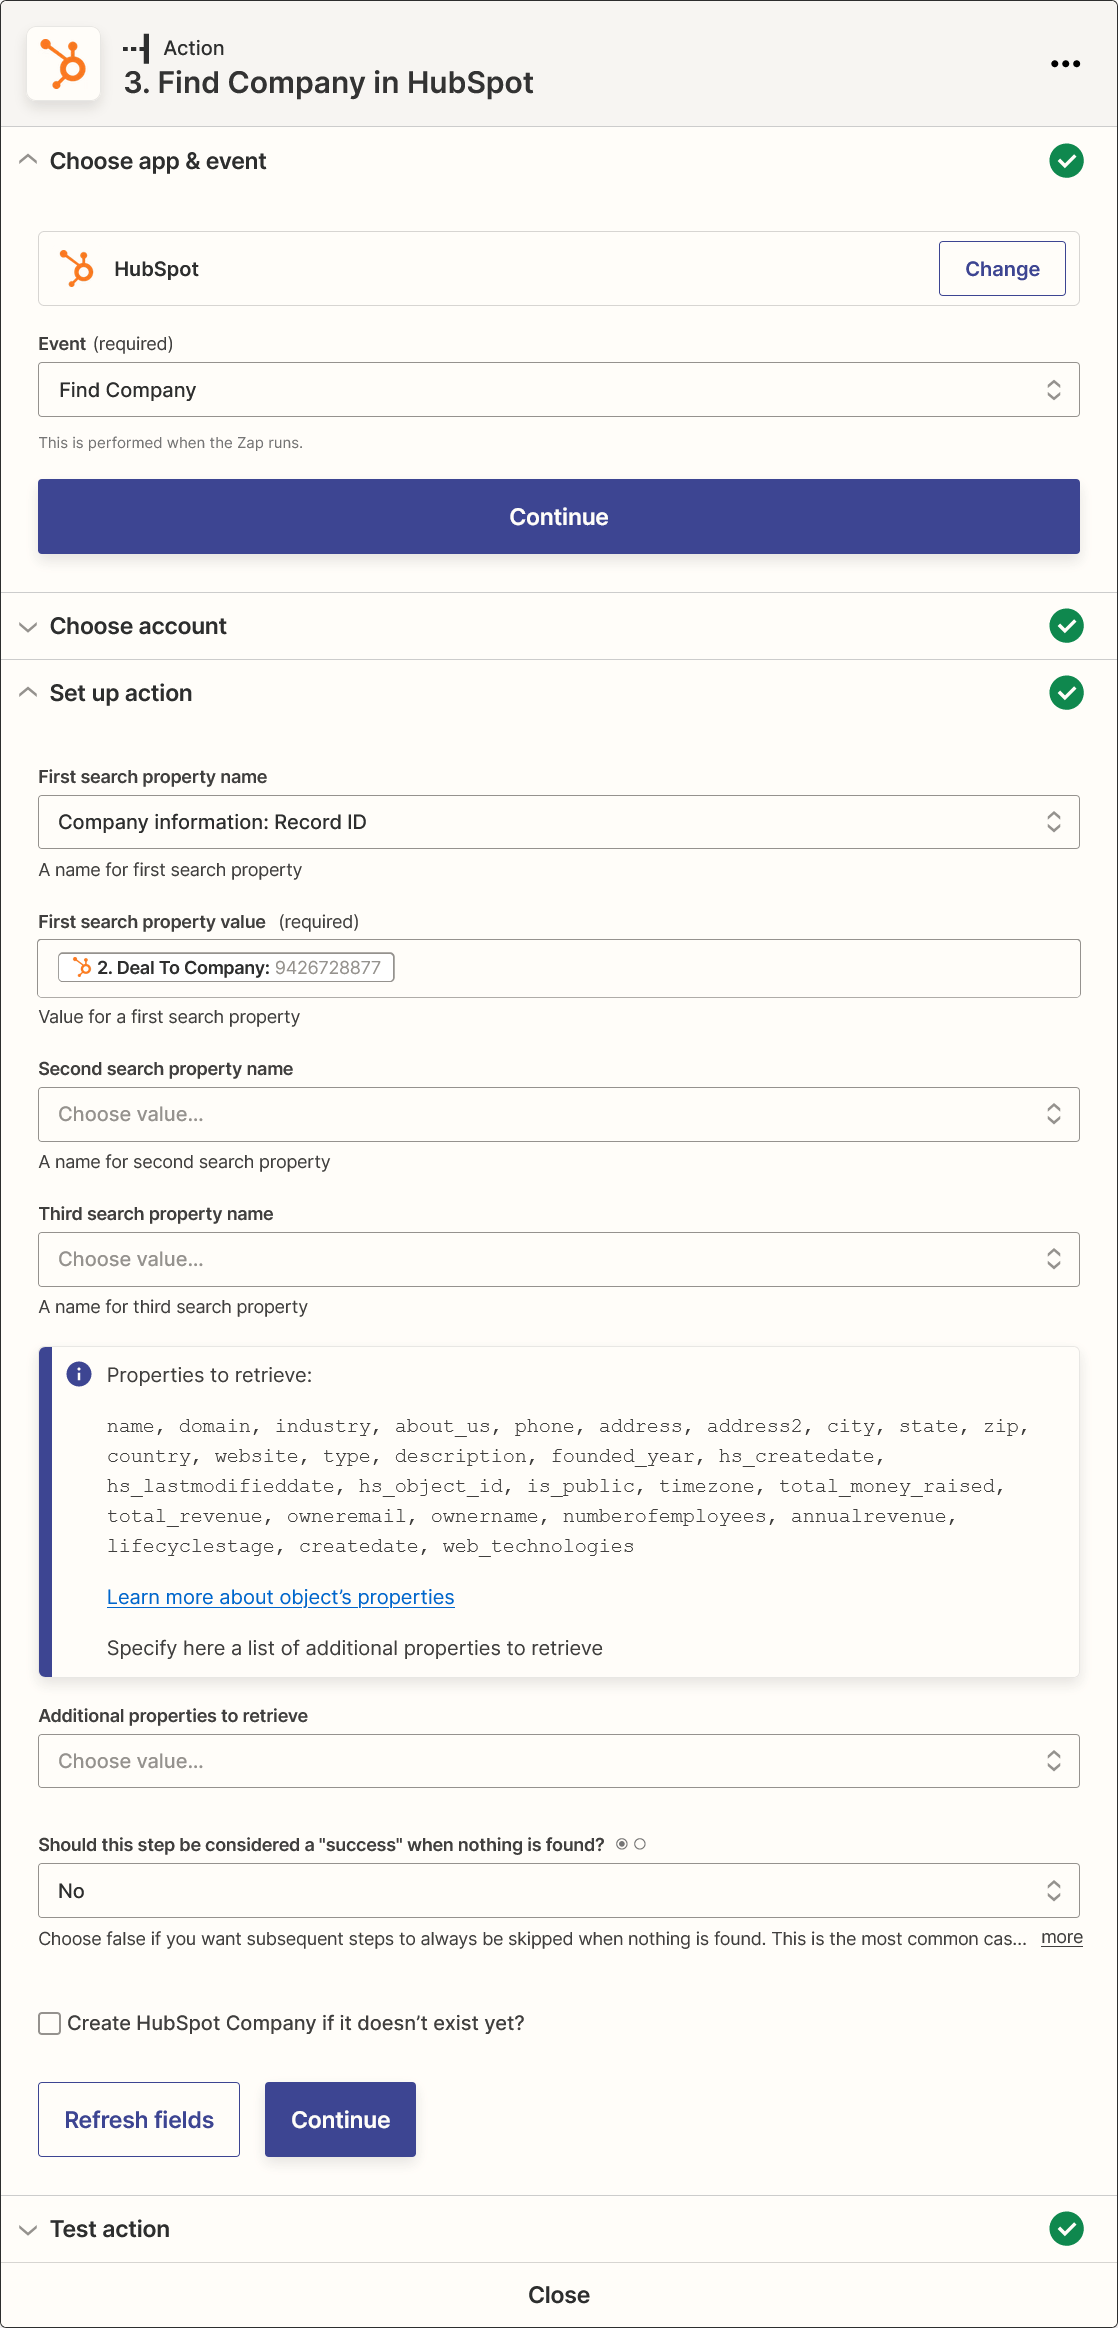
3. Get the list of products
3.1. First, getting the IDs of the products is necessary.
- Choose the app HubSpot and select the action Find Associations.
- Select your HubSpot account.
- Enter the ID of the object you want to search: Deal ID.
- Select the type of the object: Deal.
- Select the number of associations: One.
- Select the object being associated: Line Item.

3.2. Next, prepare IDs of products to request product details.
- Choose the app Code by Zapier and select the action Run Javascript.
- Enter the input data line_items: Deal To Line Item.
- Ask for code from MRPeasy Support by opening a support ticket.
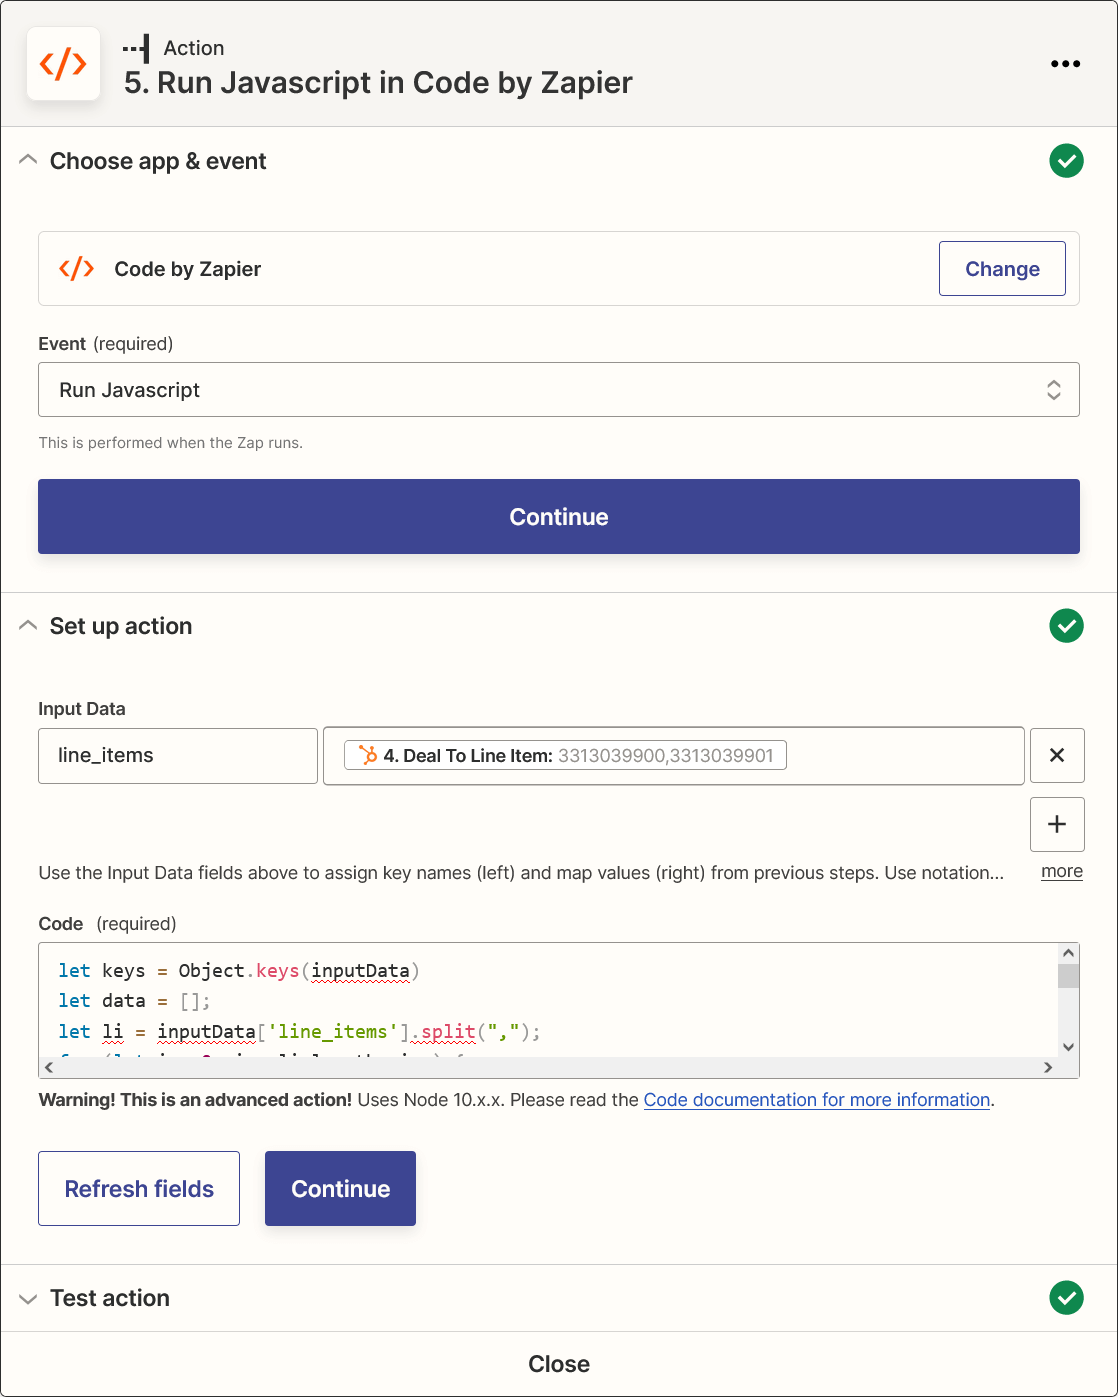
3.3. Load product details.
- Choose the app HubSpot and select the action Find Line_item in HubSpot.
- Select your HubSpot account.
- Enter the first search property name Record ID (hs_object_id).
- Enter the first search property value Hs Line Id.
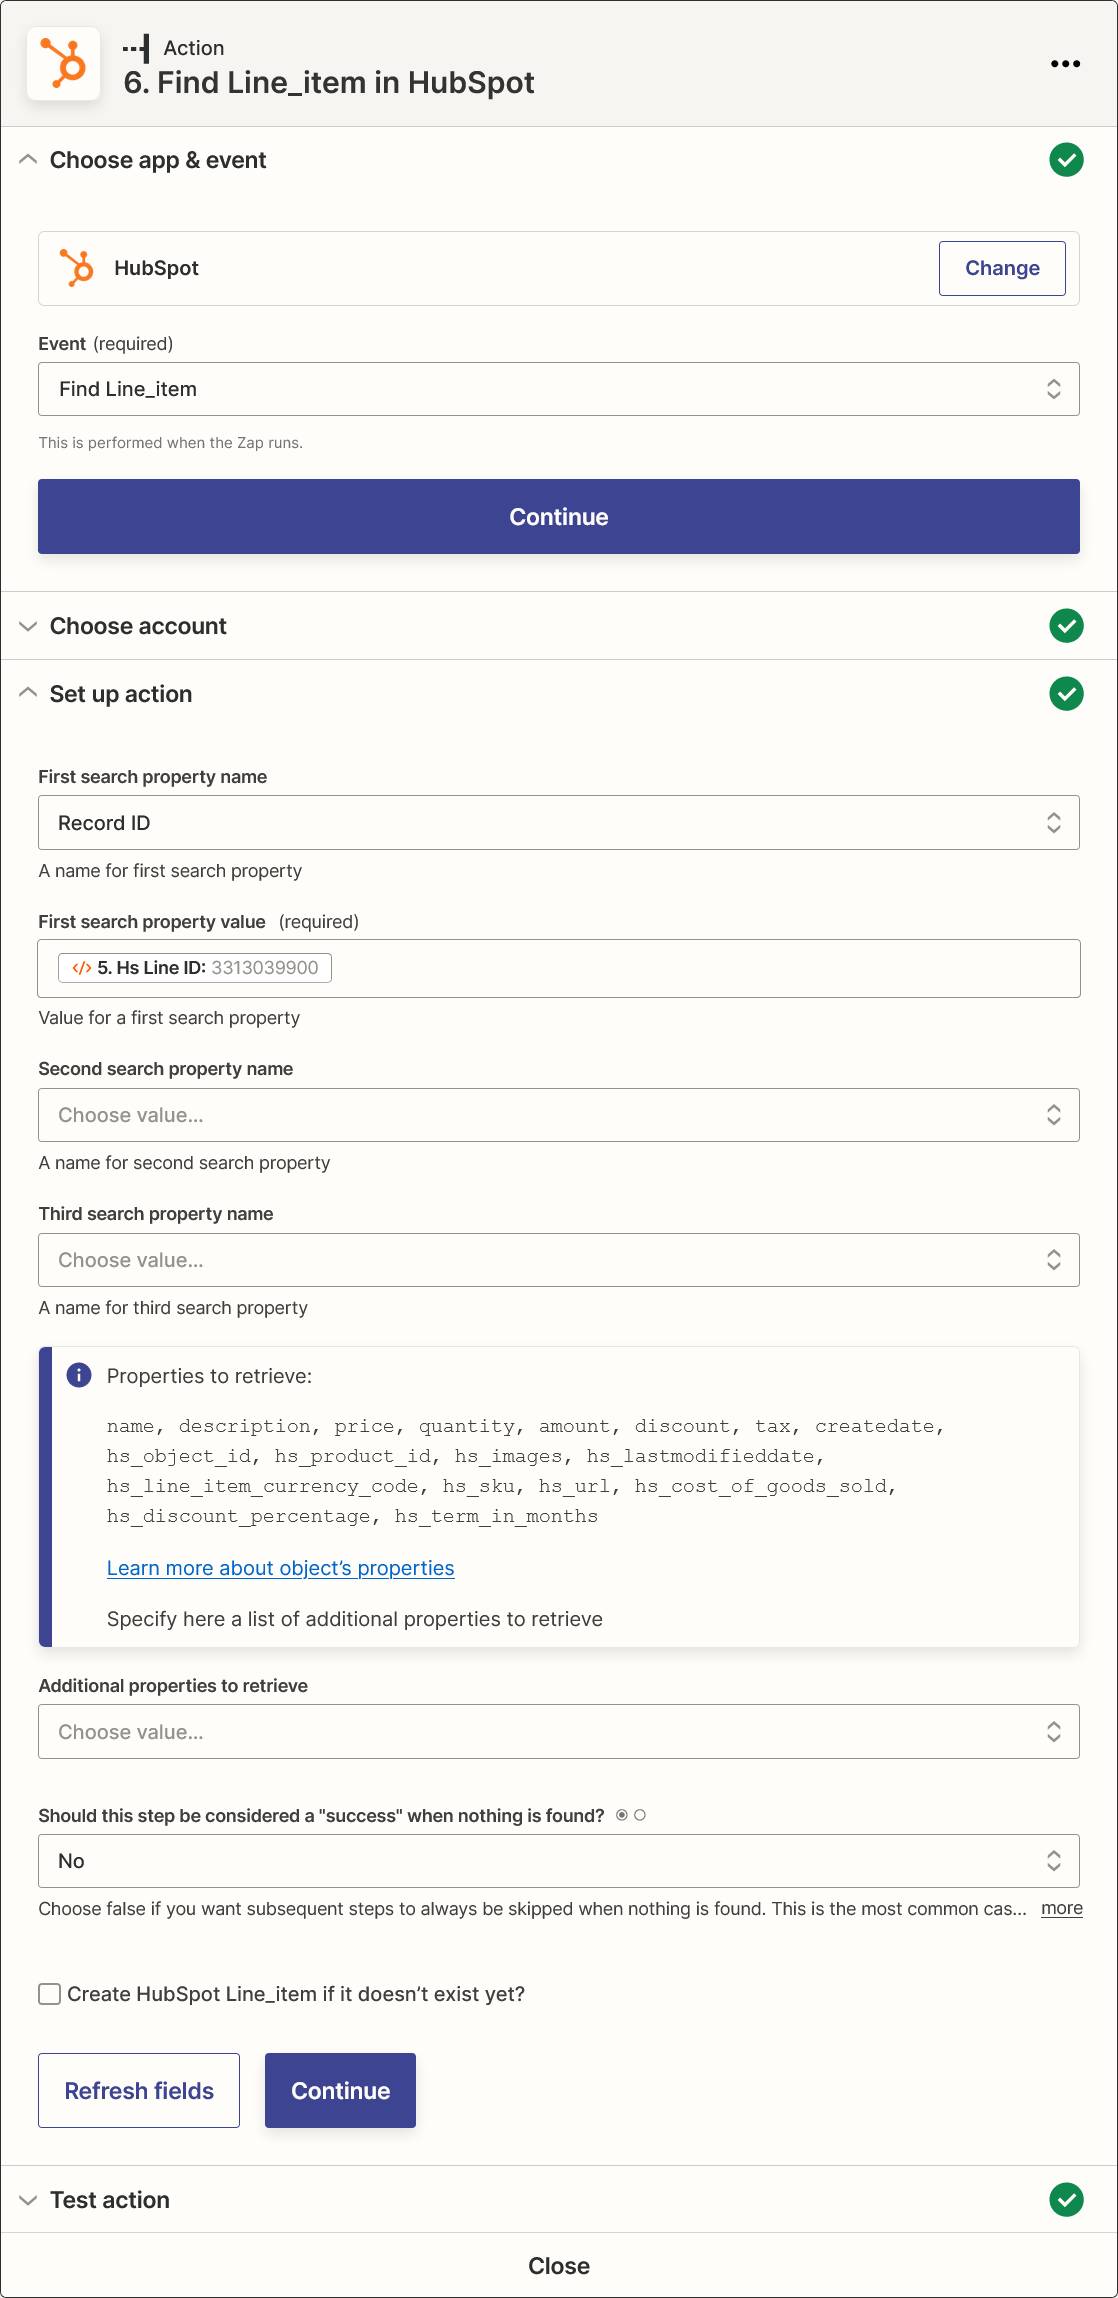
3.4. Temporarily save details of all products.
- Choose the app Code by Zapier and select the action Run Javascript.
- Enter the input data
sku: Line item information: SKU
quantity: Price: Quantity
price: Price: Net price
deal_id: Deal ID
line_item_ids: Deal to Line Item - Ask for code from MRPeasy Support by opening a support ticket.
- In Code, enter a unique STORE_KEY. Please copy a unique UUID version 4 from https://www.uuidgenerator.net/version4.
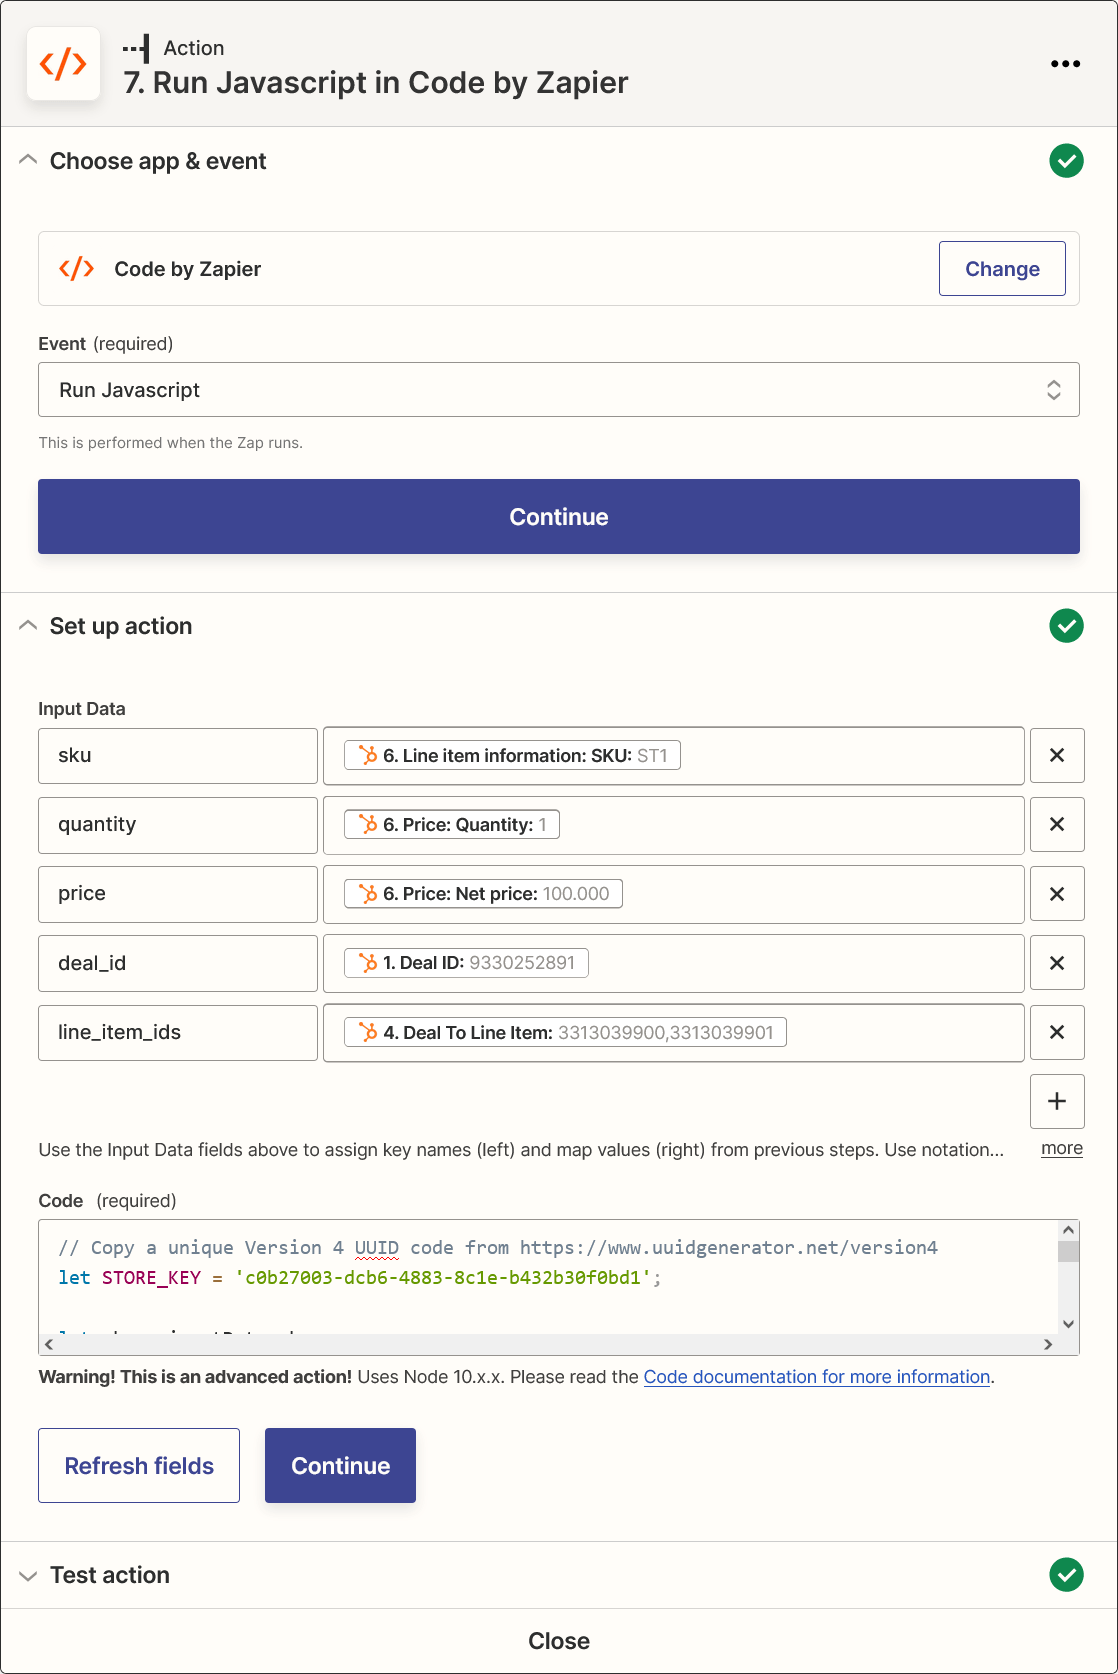
3.5. Pass products to the next stage.
- Choose the app Filter by Zapier.
- Configure the following condition: Only continue if ID exists.

4. Create a customer order
- Choose the app MRPeasy and select the action Create Customer Order.
- Select your MRPeasy account.
- Enter the input data:
Reference: Deal information: Deal Name
Customer Name: if you want to import customer details, use Company information: Name. If you want to import orders anonymously, please enter any text (e.g. HubSpot customer).
Shipping - Company: Company information: Name
Shipping - Street Line 1: Company information: Street Address
Shipping - Street Line 2: Company information: Street Address 2
Shipping - City: Company information: City
Shipping - State: Company information: State/Region
Shipping - Postal Code: Company information: Postal Code
Shipping - Country Code: Company information: Country/Region
Shipping - Phone: Company information: Phone Number
Lines - SKU: Lines Sku
Lines - Quantity: Lines Quantity
Lines - Total Price: Lines Price
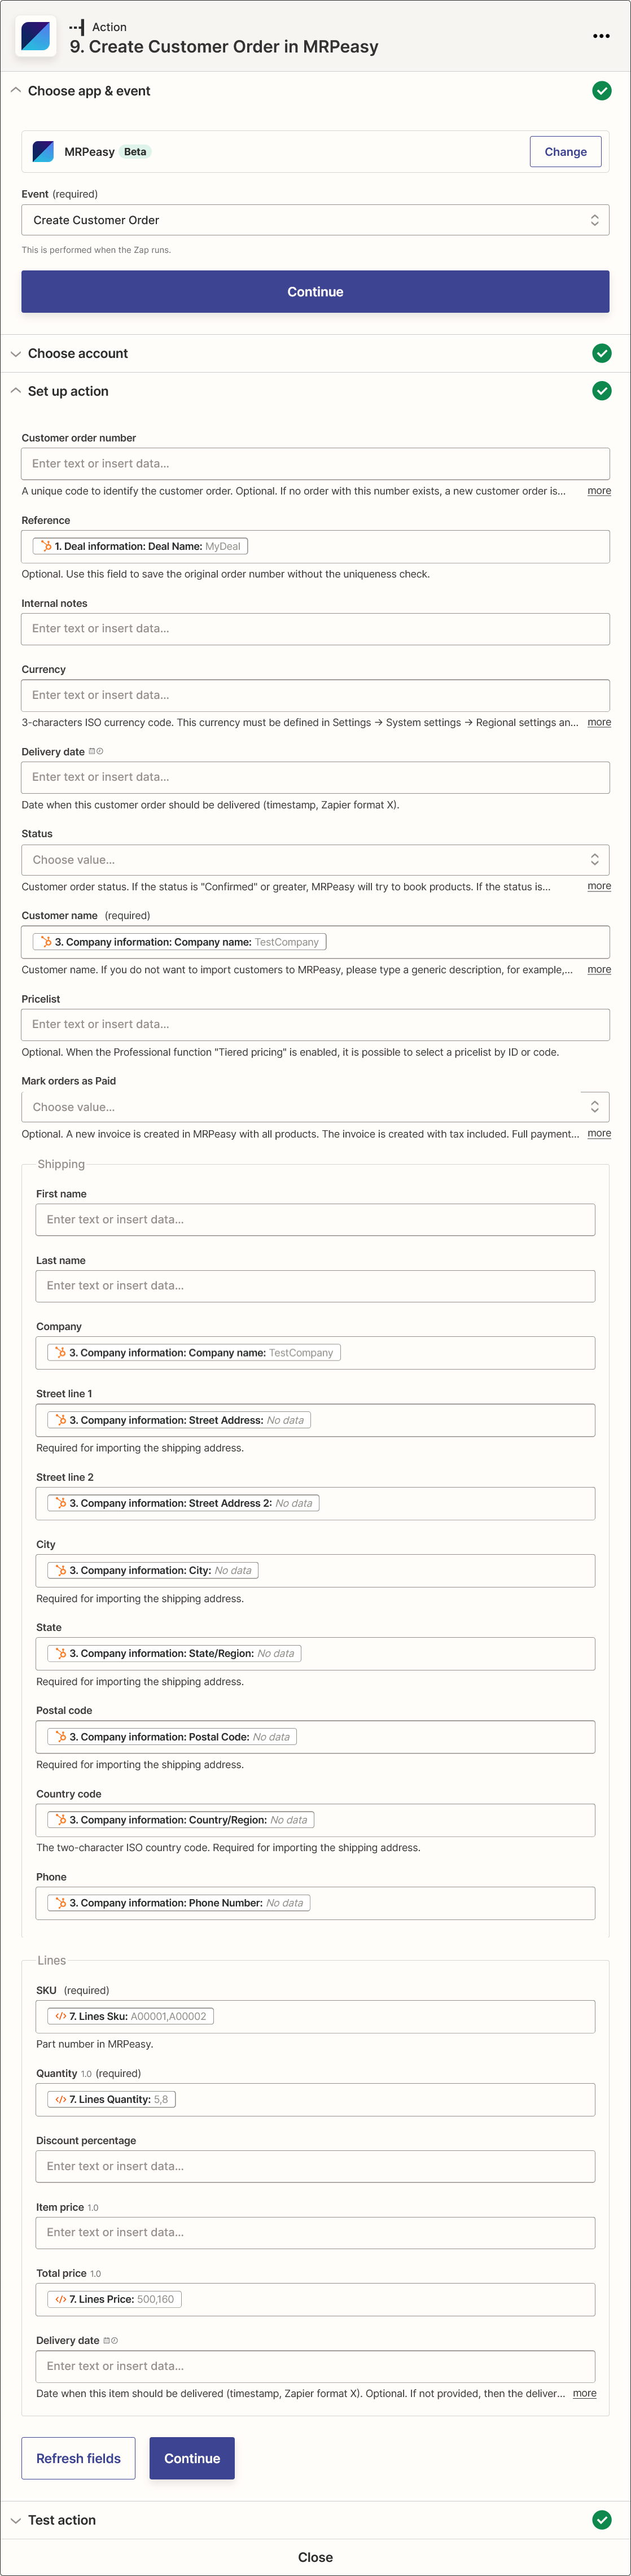
When testing the Zap in the Zapier test environment, please note:
- If the HubSpot test deal has multiple lines, the first line of the deal will be repeated in MRPeasy test CO as often as there are products in the deal. This is OK. This is a feature of the Zapier test environment.
- Please enable this ZAP and create a new deal in Hubspot to test the live environment. You should then receive a correct customer order in MRPeasy.
- It may take up to 15 minutes before MRPeasy receives the deal from HubSpot and Zapier.
Update a customer order
Set up another ZAP using the "Update Customer Order" action instead of "Create Customer Order." In both ZAPs, be sure to pass the same order number in the "Customer Order Number" field (not "Reference") to update the correct order.
Magento
Magento is a powerful e-commerce platform. Magento and MRPeasy work seamlessly together, so sales are handled in Magento, products are manufactured, materials are handled, production is planned, and purchasing is managed in MRPeasy.
Jump to:
- Synchronization of orders:
- Synchronization of inventory levels.
- Setting up the integration:
- Support for integration.
Synchronization of orders
Orders valid for import from Magento
1. Orders that are already in Magento when you establish the integration will not be sent to MRPeasy until they are updated (opened and saved).
- This allows the user to re-import orders if needed.
2. Orders that satisfy one of the following conditions can be imported from Magento:
- not fulfilled or
- created within the last 30 days.
3. Only paid orders can be imported from Magento.
4. Products must be pre-defined in MRPeasy.
- Products are matched by the SKU field in Magento and the Part Number field in MRPeasy.
- If some products must not be sent to MRPeasy (for example, a service), they must have no SKU value or an SKU that does not match any part number in MRPeasy.
- If the order has no products with matching SKUs:
- It is not imported to MRPeasy.
- A note is attached to the order.
5. Additional notes:
- POS orders will be imported.
- If some plugin updates all orders, then orders that are too old will be ignored.
- If the integration was configured more than 30 days ago, then all valid orders are imported already.
Step 1. Posting an order from Magento to MRPeasy
- An order is imported to MRPeasy as a Customer Order (CO).
- A note "In production" is added to the order in Magento.
- The Magento order number is copied to the Reference field in the MRPeasy CO.
Step 2. Booking products for the order in MRPeasy
When an order has been imported into MRPeasy from Magento:
- The software tries to book products. Available products are booked immediately.
- If there are products which couldn't be automatically booked, then:
- The Customer Order status will be Confirmed.
- The Product status will be Not booked.
- To book these parts, please see the instructions: How to check stock and book products for a customer order?
- Demand for these items is created automatically. If items have a Reorder point value set, then these will already be displayed on the Critical On-hand report, which shows shortages.
Step 3. Notification when products are available for shipment
When all products are ready:
- The MRPeasy Customer Order’s status is changed to Ready for shipment.
- In Magento, the note "Ready for shipment" is added to the order details, indicating that the order can be fully fulfilled.
Step 4. Shipping the items and subtracting the stock from MRPeasy
For shipping the items, either:
- Create a shipment in MRPeasy and pick all items. The status of the order in Magento will be changed to Completed,
- Or, change the order status to Completed in Magento. A shipment will be created in MRPeasy, and all items will be automatically marked picked so that products are deducted from the inventory.
Taxes
All prices in the imported Customer Order are without tax.
- All sales prices in MRPeasy are tax-exclusive. If an item's price in Magento is tax-inclusive, then its net sales price is derived.
- Taxes are added to invoices, not orders in MRPeasy.
If invoices are created (option "Mark orders as paid" is enabled):
- Taxes are added to sales invoices.
- Tax is calculated and rounded per line.
Synchronizing inventory levels from MRPeasy to Magento
MRPeasy can update the available quantities of products in Magento.
If this function is enabled:
- Once per hour, MRPeasy will update the available quantities of products in Magento with the quantities available from MRPeasy.
See also: How do you read the inventory numbers - in stock, available, expected? - Products are matched by Part number in MRPeasy and SKU in Magento.
- If some product does not exist in Magento or its’ inventory is not tracked in Magento, then this product is ignored during the synchronization.
To enable this functionality:
- Go to Settings -> System settings -> Integrations -> Magento.
- Click the Edit button next to your shop.
- Select the option Sync inventory levels.
- If you have several sites in MRPeasy or inventory sources in Magento, choose which sites and inventory sources to synchronize.
If you are updating the existing integration, please check that MRPeasy can access inventory sources via API at Magento -> System -> Integrations -> MRPeasy Integration -> API -> Stores -> Inventory -> Sources.
Setting up the Magento integration
Requirements
- Magento 2.2 or newer
- Mageplaza Webhook plugin
Connecting Magento and MRPeasy
- Go to MRPeasy -> Settings -> System settings -> Integrations -> Magento.
- Click the Connect to Magento button.
- Follow the instructions on that page.
Importing customer information from Magento
Depending on your business specifics, you may want to import customer information from Magento to MRPeasy.
For privacy and data consistency reasons, it is advised to have customer information in one place only. For example, if a customer signs up in Magento, his contact details should be in Magento only.
You can set up the integration in one of the following ways:
- Use a generic customer in MRPeasy without importing any customer information.
- Do not select the option "Import customers."
- Do not select the option "Import shipping address."
- In this case, MRPeasy will create one generic customer in MRPeasy CRM and use it for all orders imported from Magento. The customer's domain name contains the domain name of your Magento store.
- Import the customer.
- Select the option "Import customers".
- When importing an order, MRPeasy looks for a customer with the same e-mail address.
- MRPeasy searches by the customer's general email first. If no customer is found, MRPeasy searches by the customer's contacts' email. If there are several records with the same email, any record can be selected—it is not possible to predict which record will be used.
- If the customer exists, it will be used to create the order.
- If no customer is found, a new customer will be created.
- The shipping address will be added to the customer's details.
- Only import the shipping address while using a generic customer in MRPeasy.
- Do not select the option "Import customers."
- Select the option "Import shipping address".
- When importing an order, the shipping address is imported, saved in the generic customer’s details, and selected in CO.
Please note that Magento allows updating the shipping address after placing the order. In this case, please check that the addresses match in both systems.
Importing shipping costs
To import shipping costs from Magento to MRPeasy:
- Configure the integration between Magento and MRPeasy.
- Select the option "Import shipping costs."
- Select the stock item to save shipping costs.
When an order is imported from Magento, a new line with this item and the shipping cost is added to the order in MRPeasy.
Shipping costs will be imported from Magento without tax.
Marking customer orders as paid
To mark customer order as paid:
- Configure the integration between Magento and MRPeasy.
- Select the option "Mark orders as Paid".
When an order is imported from Magento, a new invoice with all products and shipping costs is created in MRPeasy. The invoice is tax-inclusive, and full payment is added to it.
Configuring products in MRPeasy and Magento
Products must be set up separately in MRPeasy and Magento.
The SKU field in Magento must match the Part Number field in MRPeasy. Otherwise, the product's order will not be imported to MRPeasy.
Please see:
- Demo video: Inventory management in MRPeasy.
- Demo video: Setting up procured items.
- Demo video: Setting up manufactured items.
- Demo video: Setting up inventory levels.
- Setting up new items.
- Importing items.
- Entering initial inventory values.
Connecting several Magento stores with MRPeasy
It is possible to integrate multiple Magento stores with MRPeasy.
To do that:
- Please go to Settings -> System Settings -> Integrations.
- At the Magento section, click the "+" button to add an additional Magento store.
If you do not import customer information, every Magento store has its own generic customer, which contains the domain name of your Magento store.
Support
MRPeasy maintains the integration between Magento and MRPeasy. If you have any technical questions about the integration, please contact MRPeasy support.
MS Power BI Service
Microsoft Power BI is a business analytics tool that enables users to visualize data, create interactive reports, and gain insights through real-time dashboards and data-driven decision-making.
By integrating MRPeasy with Power BI Service, businesses can seamlessly visualize and analyze their MRPeasy data, creating dynamic reports and dashboards to gain valuable insights into their operations.
Jump to:
Setting up the Power BI integration
- You must have an active Microsoft account with Power BI.
- Log in to your MRPeasy account, go to Settings -> System settings -> Integrations.
- Click the “Connect to Microsoft Power BI” button.
- When redirected to the Microsoft login page, log in to your Power BI account.
- Return to MRPeasy and select the data tables you want to populate in Power BI.
- All available tables will be created in Power BI, but only the tables selected in the integration configuration will contain data — unselected tables will remain empty.
- Click “Save” to finalize the integration setup.
Power BI Service vs Power BI Desktop
MRPeasy integrates with the Power BI Service, which differs from the Power BI Desktop:
- Power BI Service is a cloud-based platform where users can view, share, and collaborate on reports and dashboards online. It supports real-time data import via Push Datasets, which is the method used by the MRPeasy integration.
- Power BI Desktop is a Windows application used for creating complex reports, transforming and modeling data, and building visual dashboards locally. The MRPeasy integration does not connect directly to Power BI Desktop. To use Power BI Desktop’s advanced features, you must first connect to Power BI Service and import data from your workspace.
Please note that the availability of Power BI features depends on your Microsoft licensing plan.
Data sent to Power BI
Data Model overview
- The data collection window is 12 months.
- The integration predefines the structure of the dataset in Power BI.
- The relationships between the tables are pre-configured.
List of available tables
The following tables can be populated with data from MRPeasy. Each table corresponds to a specific report in the MRPeasy interface:
- Customer Orders – contains data from CRM → Customer Orders page.
- Customers – contains data from CRM → Customers page.
- Goods shipped – contains data from CRM → Statistics report Goods shipped.
- Inspections – contains data from Procurement → Inspections page.
- Invoiced items – contains data from CRM → Invoices tab Items.
- Manufacturing efficiency – contains data from Production Planning → Statistics report Manufacturing efficiency.
- Purchase Orders – contains data from Procurement → Purchase Orders page.
- Revenue – contains data from CRM → Statistics report Customer orders.
- RMA – contains data from CRM → RMA page.
- Stock – contains data from Stock → Inventory page.
- Stock movement – contains data from Stock → Stock movement report Total movements.
Using the Power BI Service integration
Uploading data to Power BI
Each data upload overwrites the existing contents of the dataset.
- To prevent accidental data loss, rename the existing dataset before triggering a new upload. The integration identifies datasets by name, so a new dataset will be created if a matching name is not found.
- In Power BI, the “Refreshed” field of the dataset reflects the time of the first dataset upload.
To upload data to Power BI:
- Navigate to Settings -> System settings -> Integrations and scroll to the "Microsoft Power BI" section.
- Click the “Upload now” button to upload the data to Power BI.
- The upload progress will be displayed above the button.
- Once the upload is complete, the “Last upload” field (in the same section) will show the updated timestamp.
The uploaded dataset will appear in My workspace as a Semantic model object.
Creating reports and dashboards
Once the data is uploaded to Power BI, you can start building reports and dashboards directly in Power BI Service:
- Go to My Workspace and click on the dataset created by MRPeasy.
- Click “Explore this data“ or “Create a blank report“ to open the report editor.
- Use the available fields and tables to build visuals (e.g., tables, charts, KPIs).
- Save the report when it is finished.
To create a dashboard:
- Open a saved report.
- Click the pin icon (“Pin to the dashboard“).
- Choose whether to pin it to an existing dashboard or create a new one.
Data Synchronization
The reasons why only manual data upload is supported for the Power BI integration are the following:
- Data overwrite risk: Each data upload fully overwrites the previously imported data. The upload process is designed to be manually triggered to prevent accidental data loss.
- Performance considerations: The volume of data sent to Power BI can be substantial. Manual uploads help to prevent overloading our integration service and ensure system stability.
Pipedrive
Pipedrive is a powerful, user-friendly CRM system that provides great capabilities for managing your sales process. Pipedrive CRM and MRPeasy can work seamlessly together so that sales are done in Pipedrive and production, inventory, purchasing management, and order fulfillment are done in MRPeasy.
Jump to:
- Demo video: Pipedrive integration.
- How does the integration between MRPeasy and Pipedrive work?
- Configuring the integration.
- Importing customers' information.
- Matching customers in MRPeasy and Pipedrive.
- Importing items between MRPeasy and Pipedrive.
How does the integration between MRPeasy and Pipedrive work?
The integration gaps different operational roles in a company so that all sales activities can occur in Pipedrive, and all manufacturing and fulfillment activities - order fulfillment, production planning and reporting, inventory control, and procurement - take place in MRPeasy.
It works like this:
- When a deal in Pipedrive reaches a specified stage, it will be automatically imported to MRPeasy as a Customer Order (CO).
- Deals created within the last 365 days can only be imported into MRPeasy. - Once the customer order is imported to MRPeasy, then
- the deal in Pipedrive can be automatically moved to the next stage,
- It is possible to book goods manually or automatically in MRPeasy. - If in MRPeasy, the products become available and the order is ready for shipment or is shipped, then
- the corresponding deal in Pipedrive can be automatically moved to the next stages,
- Notes about the events can be added automatically to the deals.
Particular actions (stages and notes) are configured during the setup and can be customized later.
Setup of the integration between MRPeasy and Pipedrive
Before configuring the integration between Pipedrive and MRPeasy, please check the following:
- Additional "Products" feature is turned ON in Pipedrive -> Tools and apps -> Products.
- If there are products in Pipedrive and stock items in MRPeasy, the Product code of products in Pipedrive must match the Part number of stock items in MRPeasy.
- You are a power user in Pipedrive and can view all deals.
To connect Pipedrive and MRPeasy, please do the following:
- Go to MRPeasy -> Settings -> System settings -> Integration -> Pipedrive and click the button Connect to Pipedrive.
- Log in to your Pipedrive account.
- Allow MRPeasy to access the required data.
- For every pipeline, select which deals to import into MRPeasy.
- Choose whether to book products in MRPeasy for imported deals automatically or not.
- Select whether to import customer addresses or not.
- Select what to do in Pipedrive with deals that were just imported, deals that are ready for shipment, and deals that are shipped. It's possible to
- move the deal to some other stage,
- create a note in Pipedrive. - Save.
Import customer information from Pipedrive
For privacy and data consistency reasons, it is advised to have customer information in one place only. If the main CRM is Pipedrive, it is better to have his contact details in Pipedrive only. In this case, MRPeasy will create a customer with the name only in MRPeasy CRM and use it for all orders that are imported from Pipedrive.
Depending on your business specifics, you may want to import customer information from Pipedrive to MRPeasy.
To import customer address from Pipedrive to MRPeasy:
- Go to Settings -> System settings -> Integrations -> Pipedrive.
- Configure the integration between Pipedrive and MRPeasy.
- Select the option "Import addresses".
When a new customer is created:
- Pipedrive "Company" or "Person" -> MRPeasy customer "Name".
- If the customer has several addresses in Pipedrive, the first one will be imported to MRPeasy.
To import more customer information, select the "Synchronize Customers" option. The software will show all possible fields for organizations and people from Pipedrive, and you can choose which information to import.
Synchronization is one way to avoid collisions. When information changes in Pipedrive, it is automatically updated in MRPeasy, not vice versa.
Matching customers in MRPeasy and Pipedrive
When importing an order from Pipedrive, MRPeasy tries to find an existing customer. If it is not found, a new customer is created.
When trying to match an existing customer in MRPeasy to the company or person in Pipedrive, the following lookup methods are tried:
- Pipedrive "Company name" -> MRPeasy customer "Name."
- Pipedrive "Person" -> MRPeasy customer "Name."
- Pipedrive ID number ("NNNN") -> MRPeasy customer "Number" ("0PDONNNNN" or "0PDPNNNNN").
- Pipedrive e-mail -> MRPeasy customer e-mail.
Importing products between MRPeasy and Pipedrive
Both Pipedrive and MRPeasy allow the export and import of products using CSV files:
- in Pipedrive, please go to Settings -> Export data or Import data;
- in MRPeasy, please go to Stock -> Stock items and click on CSV to export data or Import from CSV to import data.
Please note that products are matched by Product code in Pipedrive and Part number in MRPeasy.
Read also: How to import the list of articles into MRPeasy?
QuickBooks Online
QuickBooks Online is powerful online accounting software with localizations for many countries. MRPeasy focuses on manufacturing resource planning, reporting, inventory management, sales, and procurement. Together with QuickBooks accounting, MRPeasy creates a very powerful ERP system. We strongly recommend performing all business operations in MRPeasy and only accounting activities in QuickBooks Online.
Jump to:
- Demo video: QuickBooks Online integration
- Scope of the integration.
- Purchase Orders, Bills, and Invoices.
- Inventory and manufacturing transactions.
- Table of events and transactions, MRPeasy <-> QuickBooks Online.
- Setting up the integration with QuickBooks Online.
- Troubleshooting and synchronization logs.
- Support.
Scope of the integration
1. The core integration includes synchronization of purchasing and sales documents.
- Invoices, Credit Invoices, Prepayment invoices, Purchase Orders, Purchase Invoices, Vendor Credit Invoices, Vendor Prepayment Invoices.
- Items can have different purchases and sales accounts.
- Accounting transactions are created using QuickBooks documents.
- Automatic synchronization of payments.
2. Optionally, an advanced in-depth integration can be configured that adds the synchronization of inventory transactions.
- In addition to the core integration, all inventory and manufacturing transactions of each day are posted to QuickBooks with a manual journal entry.
- These journals include balance changes of:
- Inventory.
- Items can have different inventory accounts.
- Cost of Goods Sold (COGS).
- Items can have different COGS accounts.
- Work in Progress (WIP).
- Applied expenses in the manufacturing of products - direct materials cost, direct labor cost, applied manufacturing overhead (factory burden) cost.
- Applied transfer order expenses to products.
- Inventory.
Purchase Orders, Bills, and Invoices
Posting new items, customers, and vendors to QuickBooks
Items, vendors, and customers are not automatically synchronized when the integration is established.
When posting invoices and purchase orders to QuickBooks, MRPeasy will create stock items, customers, and vendors in QuickBooks if they do not exist.
It is possible to import these from QuickBooks to MRPeasy in bulk at MRPeasy -> Settings -> System settings -> Integrations -> QuickBooks using the respective buttons.
- Stock items are matched by SKU in QuickBooks and Part number field in MRPeasy.
- QuickBooks SKU = MRPeasy Part No.
- QuickBooks Name = MRPeasy Part description.
- According to the integration configuration, an Expense and a Sales account will be configured for every item created in QuickBooks by MRPeasy.
- For matching customers and vendors, MRPeasy looks for the MRPeasy Name field value in the QuickBooks Company Name and Display Name fields. Please note that matching is case-sensitive!
- When a new contact is created in QuickBooks:
- QuickBooks DisplayName = MRPeasy Number + MRPeasy Name
- QuickBooks CompanyName = MRPeasy Name
- When a new contact is created in QuickBooks:
Purchase Orders, Purchase Invoices, Bills
During integration setup, you must choose if Purchase Orders in MRPeasy are posted to QuickBooks as Bills or Purchase orders.
- Once the Invoice ID has been entered on Purchase Orders or Invoices in MRPeasy, they will be synchronized to QuickBooks.
- At Procurement -> Invoices, the column QuickBooks shows if the bill is sent to QuickBooks.
- See also: Synchronization of payments.
Additional fees
If Additional fees are entered on a Purchase Order in MRPeasy, then this is posted as a line item to QuickBooks.
If "Inventory transactions" are synchronized:
- Additional fees must be posted to the integration default account (Purchases). These fees are expenses added to inventory valuation. They will be expensed when finished goods are sold and included in COGS.
- If additional fees are expensed immediately and are not part of inventory valuation, non-inventory items in MRPeasy can be used for them. The desired expense account can be selected for the item in the QuickBooks Online Bill or product configuration page if necessary.
Please note: this specific recommendation is only valid for purchase orders, not for customer orders.
Vendor Credit Invoices
Vendor Credit Invoices are posted to QuickBooks Online as Vendor Credits.
- Once the Invoice ID has been entered on the Vendor Credit Invoice in MRPeasy, it will be sent to QuickBooks.
- The overall process for sending Vendor Credit Invoices to QuickBooks Online mirrors that of Bills.
The following preconditions must be met for the ability to send vendor credits to QuickBooks:
- The system setting “Several invoices per PO” is enabled and configured as “Separate invoices and deliveries = Yes”.
- The credit account for purchase credit invoices must be defined in the integration configuration at Settings -> System settings -> Integrations -> QuickBooks -> Change accounts.
Vendor Prepayment Invoices
Vendor Prepayment Invoices are posted to QuickBooks as Checks.
- The Vendor Prepayment Invoice in MRPeasy must be fully paid.
- On the final invoice, a negative value prepayment line is added.
The following precondition must be met for the ability to send vendor prepayments to QuickBooks:
- The system setting “Several invoices per PO” is enabled and configured as “Separate invoices and deliveries = Yes”.
Sales invoices
- Once the invoice type in MRPeasy is marked as Invoice or Credit invoice, and the status is not Dummy, it is sent to QuickBooks.
- At CRM -> Invoices, the column QuickBooks shows if the invoice is sent to QuickBooks.
- See also: Synchronization of payments.
Discounts
- If the discount is applied for the full invoice, then this will be posted to QuickBooks Online as a discount.
- If the discount is added for a line item, MRPeasy applies the discount to the item price before sending the invoice to QuickBooks Online. This is because QuickBooks Online does not allow adding discounts per line item.
Prepayments
Prepayment invoices are posted to QuickBooks as Sales Receipts.
- The Prepayment Invoice in MRPeasy must be fully paid.
- A Customer prepayments service is created if it was not created by MRPeasy earlier.
- On the final invoice, a negative value prepayment line is added.
Synchronization of payments
Purchase invoices, sales invoices, and credit invoices:
- Payments are automatically synchronized according to the synchronization schedule.
- Payments for purchase invoices are synchronized only if PO-s are sent to QuickBooks Online as bills.
Vendor prepayments and customer prepayments can only be sent one-way from MRPeasy to QuickBooks Online.
Tax rates
The synchronization of tax rates works as follows:
- MRPeasy operates with tax percentages only; no 'named' tax rates exist.
- When a document with tax is sent to QuickBooks, the tax rate with the same percentage is automatically chosen. If several tax rates have the same percentage, then the correct tax rate must be chosen in QuickBooks.
- If you need a 'No tax' invoice, please leave the tax percentage field empty in MRPeasy.
- If you need a 0% tax, please enter tax as '0%' in MRPeasy.
- Unfortunately, MRPeasy cannot post 'Tax included' invoices. If this is important, please update these invoices in QuickBooks.
Additional currencies
If several currencies are used in order to send invoices, POs, or bills to QuickBooks, standard 3-character currency codes (USD, GBP, EUR, etc., according to ISO 4217) should be used for
- the system's base currency in MRPeasy.
- additional (foreign) currencies in MRPeasy.
MRPeasy sends the exchange rate together with each invoice/PO/bill in foreign currency.
Note that QuickBooks has two important limitations:
- Invoices to a customer and bills from a supplier must be in the same currency as his default currency in QuickBooks Online.
- Once created, it is not possible to change a customer's/supplier's currency in QuickBooks Online.
For example, if a customer's currency in QuickBooks Online should be changed, go to your QuickBooks account, find that customer, and make it inactive. After that, please post an invoice to QuickBooks Online.
Inventory and manufacturing transactions
For an in-depth integration, "Inventory transactions" can be synchronized.
This means that a summary of inventory and manufacturing transactions is posted to QuickBooks with a manual journal once per day.
Transactions corresponding to the following events are recorded:
- Purchased goods are received to stock.
- Materials are consumed in manufacturing.
- Workers start and finish operations.
- Manufacturing is finished, and products are put into stock.
- Goods are shipped to customers.
- Positive and negative manual inventory adjustments.
- Fees are applied when goods are transported to another warehouse.
- Parts are shipped to subcontractors.
- Subcontractors perform operations with a product.
Detailed descriptions can be found in the section "Events and transactions".
Inventory tracking in MRPeasy
In MRPeasy, the principles of inventory tracking are the following:
- MRPeasy uses stock lot tracking.
- Each batch of physical items is accounted for separately.
- All costs are based on specific stock lots.
- Average costing is not used.
- MRPeasy uses FIFO by default (or FEFO, when Expiry dates are used).
- It is also possible to manually manage inventory, e.g. for actual costing and/or for very detailed tracking and traceability.
- Read about bookings and consumption of goods.
- Financial transactions are automatically created when specific events happen with the inventory.
- MRPeasy is a "Perpetual inventory system".
- If you use the periodical method for inventory valuation (and Cost of Goods Sold calculation) (in QuickBooks Online), then synchronization of inventory transactions should be disabled.
Events and transactions
The following tables describe all events and transactions which are synchronized.
Events in MRPeasy and the resulting events in QuickBooks Online:
| # | MRPeasy document | MRPeasy event | QuickBooks event | QuickBooks Debit account | QuickBooks Credit account |
| Purchasing | |||||
| 1 | Purchase Order | Purchase Order is created. | No event. | ||
| 1.1 | Purchase Order / Purchase Invoice | The 'Invoice ID' is saved. | PO or Bill is created*. | 'Purchases' | QuickBooks controlled (eg, Accounts Payable) |
| 1.2 | Purchase Order / Purchase Invoice | PO is updated. | PO or Bill is updated*, if QuickBooks accepts the update. | According to 1.1 | |
| 1.3 | Purchase Order / Purchase Invoice | PO is received. | Journal is made***. (Exceptions: 2.2, 3.1) |
'Materials on Hand' | 'Purchases' |
| 1.4 | Purchase Order / Purchase Invoice | Payment is saved. | Payment is saved for Bill**. (Payment is created according to the difference in the sum of saved payments in MRPeasy and QuickBooks.) | QuickBooks controlled (eg, Accounts Payable) | 'Bank' |
| 1.5 | Purchase Invoice | Prepayment is applied. | The line "Vendor Prepayments" with the negative prepayment amount is added to the bill*. | 'Purchases' | 'Purchases' |
| 1.6 | Purchase Order / Purchase Invoice | Payment is deleted. | No event; payment must be deleted manually. | ||
| 1.7 | Purchase Order / Purchase Invoice | PO is deleted. | 1. If the PO had additional transactions associated, a new journal is made with net adjustments***. | According to 1.3, 2.2, 3.1 | |
| 2. PO/Bill is not deleted; it must be deleted manually. | |||||
| 1.8 | Vendor Credit Invoice | "Invoice ID" is saved. | Vendor Credit is created*. | QuickBooks controlled (eg, Accounts Payable) | 'Purchase Credits' |
| 1.9 | Vendor Credit Invoice | Document is updated. | Vendor Credit is updated*if QuickBooks accepts the update. | According to 1.8 | |
| 1.10 | Vendor Credit Invoice | Prepayment is applied (for a refund). | A line "Prepayment" with the positive prepayment amount is added to the Vendor Credit* | QuickBooks controlled (eg, Accounts Payable) | 'Purchases' |
| 1.11 | Vendor Credit Invoice | Payment is saved. | Deposit is created and assigned to the Vendor Credit by Bill Payment (Check)**. (Payment is created according to the difference in the sum of saved payments in MRPeasy and QuickBooks.) | 'Bank' | QuickBooks controlled (eg, Accounts Payable) |
| 1.12 | Vendor Credit Invoice | Payment is deleted. | No event, payment must be deleted manually. | ||
| 1.13 | Vendor Credit Invoice | Document is deleted. | No event, Vendor Credit must be deleted manually. | ||
| 1.14 | Vendor Prepayment Invoice | 'Invoice ID' is saved. | No event. | ||
| 1.15 | Vendor Prepayment Invoice | Payment is saved. | Check is created*. | 'Purchases' | 'Bank' |
| 1.16 | Vendor Prepayment Invoice | Payment is deleted. | No event, Check must be deleted manually. | ||
| Purchasing - additional transactions of Subcontracting Purchase Orders | |||||
| 2 | Shipment (for a Purchase Order.) | Shipment is created for shipping parts to vendor | No event. | ||
| 2.1 | Shipment | Goods are picked from stock. | Journal is made***. | 'Work in Progress' | 'Materials on Hand' |
| 2.2 | Purchase Order | PO is received. | Journal is made***. (This is an exception to 1.3) | 'Finished Goods' | 'Work in Progress' 'Purchases' |
| 3 | Purchase Order (for an operation in a MO.) | "Shipment date" is saved. | Journal is made***. | 'Work in Progress' | 'Purchases' |
| 3.1 | Purchase Order | PO is received. | No event. (This is an exception to 1.3) | ||
| Manufacturing | |||||
| 4 | Manufacturing Order | Manufacturing Order is created | No event. | ||
| 4.1 | Manufacturing Order | Parts are consumed. | Journal is made***. | 'Work in Progress' | 'Materials on Hand' |
| 4.2 | Manufacturing Order | Operations are started. | 1. Journal is made with full planned manufacturing overhead cost***. | 'Work in Progress' | 'Applied manufacturing overhead' |
| 2. Journal is made with full planned labor cost***. | 'Work in Progress' | 'Payroll/Direct labor' | |||
| 4.3 | Manufacturing Order | Manufacturing Order is finished. | 1. Journal is made***. | 'Finished Goods' | 'Work in Progress' |
| 2. Journal is made to adjust manufacturing overhead and labor cost***. | According to 4.1, 4.2. | ||||
| Sales | |||||
| 5 | Customer Order | Customer Order is created | No event. | ||
| 6.1 | Invoice | Invoice status is changed from 'Dummy' to 'Unpaid'. | Invoice is created*. | QuickBooks controlled (eg, Accounts Receivable) | 'Sales' |
| 6.2 | Invoice | Invoice is updated. | Invoice is updated*, if QuickBooks accepts the update. | According to 6.1 | |
| 6.3 | Invoice | Payment is saved. | Receive Payment is created**. (Payment is created according to the difference in the sum of saved payments in MRPeasy and QuickBooks.) |
'Bank' | QuickBooks controlled (eg, Accounts Receivable) |
| 6.4 | Invoice | Payment is deleted. | No event, payment must be deleted manually. | ||
| 6.5 | Invoice | Invoice is deleted. | No event, invoice must be deleted manually. | ||
| 7.1 | Credit-invoice | Credit-invoice status is changed from 'Dummy' to 'Unpaid'. | If posted as Credit note: Credit Note is created*. |
'Sales' | QuickBooks controlled (eg, Accounts Receivable) |
| If posted as Refund receipt: Refund Receipt is created*. |
'Sales' | 'Bank' | |||
| 7.2 | Credit-invoice | Credit-invoice is updated. | Credit Note or Refund Receipt is updated*, if QuickBooks accepts the update. | According to 7.1 | |
| 7.3 | Credit-invoice | Payment is saved. | If posted as Credit note: Receive Payment is created**. (Payment is created according to the difference in the sum of saved payments in MRPeasy and QuickBooks.) |
QuickBooks controlled (eg, Accounts Receivable) | 'Bank' |
| If posted as Refund Receipt: No event. |
|||||
| 7.4 | Credit-invoice | Credit-invoice is deleted. | No event, Credit Note or Refund Receipt must be deleted manually. | ||
| 8.1 | Prepayment invoice | Invoice status is changed from 'Dummy' to 'Unpaid'. | No event. | ||
| 8.2 | Prepayment invoice | Payment is saved. | Sales Receipt is created*. | 'Bank' | 'Customer Prepayments' |
| 8.3 | Prepayment invoice | Payment is deleted. | No event, Sales Receipt must be deleted manually. | ||
| 8.4 | Invoice | Prepayment is applied to an invoice. | A line "Customer prepayment" with the negative prepayment amount is added to the invoice*. | 'Customer Prepayments' | 'Sales' |
| 8.5 | Credit-invoice | Credit-invoice is created for a refund of prepayment. | If posted as Credit note: Credit Note is created*. Line "Customer prepayments" is added to the Refund receipt. |
'Customer Prepayments' | QuickBooks controlled (eg, Accounts Receivable) |
| If posted as Refund receipt: Refund Receipt is created*. Line "Customer prepayments" is added to the Refund receipt. |
'Customer Prepayments' | 'Bank' | |||
| 8.6 | Credit invoice | Payment is saved for credit-invoice for a prepayment refund. | If posted as Credit note: 1. Cheque Expense is created** with category "Accounts Receivable (A/R)" 2. Receive Payment is created**, which automatically links the Cheque Expense and Credit Note. (Payment is created according to the difference in the sum of saved payments in MRPeasy and QuickBooks.) |
QuickBooks controlled (eg, Accounts Receivable) | 'Bank' |
| If posted as Refund receipt: No event. |
|||||
| 9 | Shipment (for a Customer Order.) | Shipment is created | No event. | ||
| 9.1 | Shipment | Goods are picked from stock. | Journal is made***. | 'Cost of Goods Sold' | 'Finished Goods' |
| Other inventory transactions | |||||
| 10 | Manual stock lot | A manual stock lot is created in MRPeasy during the stock-taking. | Journal is made***. | 'Materials on Hand' / 'Finished Goods' | 'Inventory gain' |
| 11 | Write-off | A manual write-off is created in MRPeasy during the stock-taking. | Journal is made***. | 'Inventory loss' | 'Materials on Hand' / 'Finished Goods' |
| 12 | Transfer Order | Transport fees are applied to a Transfer Order, and Transfer Order is received. | Journal is made***. | 'Materials on Hand' / 'Finished Goods' | 'Transfer orders liability' |
| Other transactions | |||||
| 13 | Purchase Order, Purchase Invoice, Manufacturing Order, Manual stock lot, Write-off, Transfer Order, Shipment | Document is changed and inventory cost or balances change. | If the original transaction, that is adjusted, is less than 3 months old, a journal is made with net adjustment***. If transactions older than 3 months are adjusted, then this adjustment will not be posted to QuickBooks Online automatically. You can find and post old transactions from here: https://app.mrpeasy.com/accounting/integrations/old-adjustments/quickbooks Adjustments for past periods can be restricted by setting the "Books closing date" in the MRPeasy Standard Accounting module. |
According to the transactions, which are updated. | |
Events in QuickBooks Online and the resulting events in MRPeasy:
| # | QuickBooks document | QuickBooks event | MRPeasy event |
| Payments | |||
| 1 | Bill, Invoice, Credit Note, Vendor Credit | Payment is saved. | Payment is saved in the corresponding document in MRPeasy.** (Payment is created according to the difference in the sum of saved payments in MRPeasy and QuickBooks.) |
| 2 | Bill, Invoice, Credit Note, Vendor Credit | Payment is deleted. | No event, payment must be deleted manually. |
- *) New invoices and purchase orders are sent to QuickBooks once per 5 minutes. Alternatively, it is possible to send a particular document to QuickBooks immediately by clicking the button Add to QuickBooks on the document's details page.
- **) The synchronization of payments happens in the following cases:
a. When a new invoice or a purchase order is sent to QuickBooks from MRPeasy*.
b. When an invoice or a purchase order is opened in MRPeasy and the button Update in QuickBooks is pressed.
c. If payments are added to QuickBooks Online, they are synchronized to MRPeasy once per day in the evening. - ***) Inventory transactions are synchronized once per day, during the evening (usually between 9 p.m. and 11 p.m.).
This can be run manually by clicking the button Synchronize now at Settings -> System settings -> Integration -> QuickBooks. Manual synchronization can be performed once per 5 minutes.
Setup of the integration between MRPeasy and QuickBooks Online
Jump to:
- Before you start.
- Connect MRPeasy and QuickBooks Online.
- Select what to synchronize.
- Choose how Purchase Orders / Purchase Invoices and Credit-invoices are synchronized.
- Select accounts for the integration.
- Custom accounts for products.
- QuickBooks Online projects.
- Check products' Expense and Income accounts in QuickBooks Online.
- Get balances in MRPeasy and QuickBooks Online in sync.
- Import customers, vendors, and items from QuickBooks Online.
- Review, change or disconnect the integration.
Before you start
Warning: disable inventory tracking in QuickBooks Online
Inventory (stock) tracking should not be used in QuickBooks Online for items that are managed in MRPeasy. QuickBooks makes some automatic inventory transactions for these items, e.g. when they are bought or sold, which MRPeasy does not control.
Base currencies
The same base currency must be used in both systems.
The base currency in MRPeasy is defined in the Regional settings of MRPeasy. It must be the same currency as in your QBO account.
Technically, if you have different base currencies in two systems, this is what happens:
- When an invoice with [MRPeasy] base currency is sent to QuickBooks Online, then no information about currency conversion is sent, as there is no conversion rate for the base currency to itself.
- As a result, such invoices would have QBO's base currency, as QBO does not receive any currency conversion information.
- Also, inventory transactions are sent to QBO only in absolute values, which would be misinterpreted (e.g., a value of 100 will be interpreted as USD by MRPeasy but as GBP by QBO).
Connect MRPeasy and QuickBooks Online
Step 0. Stop all activity
You should cease all activity in MRPeasy and QuickBooks Online while setting things up.
Step 1. Connect MRPeasy and QuickBooks Online
- Log in to MRPeasy.
- Navigate to Settings -> System settings -> Integrations.
- Click on Connect to QuickBooks to connect MRPeasy and QuickBooks.
Step 2. Choose what to synchronize
It is possible to choose the synchronization of the following:
- Sales
- Sales documents are sent to QuickBooks automatically.
- If not selected, sales invoices can be sent manually.
- Procurement
- Purchasing documents are sent to QuickBooks automatically.
- If not selected, purchase orders or invoices can be sent manually.
- Inventory transactions
- The inventory and manufacturing transactions that are recorded in MRPeasy are automatically posted to QuickBooks Online with manual journal entries.
- Several additional accounts must be mapped.
- These entries are shown in detail at MRPeasy -> Settings -> System settings -> Integrations -> QuickBooks -> Synchronization logs.
- The syncing of inventory transactions should be disabled:
- If you use tracked inventory in QuickBooks.
- If the periodic inventory system is used in your accounting (in QuickBooks Online). MRPeasy is a perpetual inventory system.
- If not selected, posting inventory transactions with journals is completely disabled. Cannot be done manually.
Considerations when syncing inventory transactions when the use of planned goods is allowed
The software allows the use of stock items in status Planned or On hold, if the setting Settings -> System Settings -> Software settings -> Use planned goods is enabled.
If this setting is enabled, the following should be considered:
- The cost of all planned goods used is considered to be 0 at the time when the goods are used.
- When goods are finally received (e.g., PO is received, MO is finished), financial transactions regarding the usage of goods are posted only retrospectively, with the value date of the next synchronization after the goods are received.
- As MRPeasy does not post backdated journals, the transactions are posted as "adjustments to previous periods".
- The integration does not automatically synchronize transactions that are older than 3 months.
- This means that if goods were used more than 3 months ago, the "adjustment for previous periods" will not be posted automatically.
- It is possible to look up old transactions and synchronize them from here: https://app.mrpeasy.com/accounting/integrations/old-adjustments/quickbooks
Step 3. Choose how Purchase Orders and Credit invoices are sent to QuickBooks Online
Purchase Orders from MRPeasy can be posted as:
- Purchase Orders in QuickBooks.
- If Several invoices per PO are enabled, then POs are not posted to QuickBooks. Purchase Invoices are posted as Bills.
- Bills in QuickBooks.
- Payments for bills are synchronized only if purchase orders are posted to QuickBooks Online as Bills.
Credit invoices from MRPeasy can be posted as:
- Credit Notes in QuickBooks, or
- Refund Receipts in QuickBooks.
Step 4. Select accounts for the integration with QuickBooks Online
- A default Purchases (Current Asset) account.
- This is the product's Expense account on the QuickBooks Online Bill.
- MRPeasy uses this account when creating new items in QuickBooks Online.
- If inventory transactions are synchronized, this account holds the billed value but has not received the goods. The PO receipt transaction (credit) is posted in a journal on this account. - A Purchase credits (Current Asset) account.
- This account is for items in the QuickBooks Online Vendor Credit document, which is created when a Vendor Credit Invoice from MRPeasy is posted to QuickBooks Online.
- Credits received from vendors accumulate on this account. - A Bank (Current asset) account.
- An account where payments are saved if entered in MRPeasy. - A Customer Prepayments (Current Liability) account.
- It is used when a customer pays a prepayment invoice. - A default Sales (Revenue) account.
- This is the Income account on the QuickBooks Online Invoice.
- MRPeasy uses this account when creating new items in QuickBooks Online.
If inventory transactions are not synchronized, skip to selecting custom accounts for your products.
If synchronization of inventory transactions is enabled, additionally select:
- Default Finished goods (Current asset) and Materials on hand (Current asset) inventory accounts.
- By default, all items with a BOM are considered finished goods; items without a BOM are considered materials.
- Inventory/Stock tracking must not be used for items in QuickBooks Online. - A Work in progress (Current asset) account.
- An account for holding the value of currently unfinished goods and open manufacturing orders. - An Applied manufacturing overhead (Current liability) account.
- An account for posting manufacturing overhead costs, which are applied to the product's cost (to work in progress).
- If the allocation of manufacturing overhead is not desired, then workstations’ hourly rates and fixed and variable costs in routings must be defined as 0 in MRPeasy. - A Direct labor (Current liability) account.
- An account for posting direct labor costs, which are applied to the product's cost (to work in progress) according to time worked on a job.
- If the allocation of direct labor is not desired, then users’ hourly labor rates must be defined as 0 in MRPeasy. - A default Cost of goods sold (Expense) account.
- Inventory Adjustments (Expense/Revenue) accounts.
- A Transfer orders liability (Current liability) account.
If you move items between several sites, transfer fees, which are applied to inventory, are posted on this account.
If inventory transactions are not synchronized, save the account mapping, and the integration is set up! Then, continue to sync MRPeasy and QuickBooks Online.
If inventory transactions are synchronized, continue to check your product's Expense accounts in QuickBooks Online.
Step 5. Select custom accounts for products
Optionally, in the "Custom accounts" section on the integration configuration page, you can define custom accounts per product group:
- A Purchases (Current asset) account.
- This is the product's Expense account on the QuickBooks Online Bill.
- MRPeasy uses this account when creating new items in QuickBooks Online.
- If inventory transactions are synchronized, this account holds the value of billed but not received goods. The PO receipt transaction's credit is posted in a journal on this account. - A Sales (Revenue) account.
- This is the product's Income account on the QuickBooks Online Invoice.
- MRPeasy uses this account when creating new items in QuickBooks Online. - An Inventory (Current asset) account.
- Inventory/Stock tracking must not be used for items in QuickBooks Online.
- Used only if inventory transactions are synchronized. - A Cost of Goods Sold (Expense) account.
- Used only if inventory transactions are synchronized.
If inventory transactions are not synchronized, save the account mapping, and the integration is set up! Then, continue to sync MRPeasy and QuickBooks Online.
If inventory transactions are synchronized, continue to the next step.
Step 6. Map QuickBooks Online projects
If you use projects in QuickBooks Online, you can match them with Custom fields of Purchase Orders and Customer Orders in MRPeasy.
To configure the mapping of QuickBooks Online’s projects:
- Create the required projects in QuickBooks Online.
- Set up custom fields in MRPeasy:
- Purchase Order and Customer Order custom fields are supported.
- The custom field type must be "Dropdown".
- Each dropdown value must exactly match the corresponding project's name in QuickBooks Online.
- In the integration settings under the “Projects” section, select the relevant MRPeasy custom fields for mapping.
After configuration, transactions are mapped to QuickBooks Online projects based on the selected custom field values in Purchase Orders and Customer Orders.
If the Purchase Order’s custom field value matches a QuickBooks Online project name, that project is assigned to each line item in the corresponding QuickBooks Online document.
If the Customer Order’s custom field value matches a QuickBooks Online project name and the customer in the Customer Order matches the customer linked to that project in QuickBooks Online, the project is assigned as the customer in the corresponding QuickBooks Online document.
Invoices covering multiple customer orders
For invoices covering multiple customer orders, a project is passed to QuickBooks Online only if all of the following conditions are met:
- All customer orders on the invoice are associated with the same QBO project.
- All customer orders on the invoice belong to the same customer.
- That customer matches the customer linked to the project in QuickBooks Online.
If any of these conditions are not met, no project is included when the invoice is sent to QuickBooks Online.
Step 7. Check products' Expense and Income accounts in QuickBooks Online
Important notes about the Purchases and Sales accounts:
- The Purchases and Sales accounts from the integration configuration are used only in two cases:
- When creating new products in QuickBooks.
- Purchases -> Expense account.
- Sales -> Income account.
- When posting manual journals about inventory movements (if inventory transactions are synchronized).
- When creating new products in QuickBooks.
- QuickBooks chooses the accounts on purchase orders, bills, and invoices from the details of the product in QuickBooks.
If inventory transactions are not synchronized, the Expense account in the QuickBooks product does not need to match its integration configuration.
If inventory transactions are synchronized for all existing products in QuickBooks Online, you must verify that the Expense account matches the integration configuration.
- Go to QuickBooks Online -> Sales -> Products and Services.
- Open a product.
- Check that the Expense account in QuickBooks product details matches the Purchases account defined in the integration configuration.
- Repeat for all products.
- Once done, save the integration configuration.
After the mapping of accounts is saved, the integration is set up! Continue to get MRPeasy and QuickBooks Online in sync.
Step 8. Get MRPeasy and QuickBooks Online in sync
When the integration is first established, it is important that data in both of the systems match.
First synchronization
The first time when the connection between MRPeasy and QuickBooks Online is established:
- The earlier input POs and Invoices are posted only after you open and save them. If you do not make changes to old documents, they are not posted to QuickBooks Online.
- If you already have some invoices, POs, or bills in QuickBooks Online, you should not send these from MRPeasy to QuickBooks Online again. You will risk having duplicates in QuickBooks Online. - The inventory transactions from that day are posted to QuickBooks Online during the next nightly synchronization.
Get starting account balances in sync
If you are synchronizing inventory transactions, you must ensure that the total value of goods in MRPeasy and on the corresponding QuickBooks Online accounts match.
This is easiest if there are no in-progress Manufacturing Orders and no invoiced-and-not-received Purchase Orders in MRPeasy.
Generally, the following steps should be taken:
- Establish the correct (desired) balances for all of your accounts.
- Make sure that the inventory counts and values are correct in MRPeasy.
- Send data from MRPeasy to QuickBooks Online:
- Post any balance changes during this day with a journal entry by clicking "Synchronize now" in Settings -> System settings -> Integrations -> QuickBooks Online.
- Optionally, sales invoices by opening them and sending them to QuickBooks Online.
- Optionally, purchase invoices by opening them and sending them to QuickBooks Online. - Check if the inventory value in MRPeasy matches the balance in QuickBooks Online.
- You may need to adjust the manual journal, which was just created.
If you have in-progress Manufacturing Orders in MRPeasy, consider the following:
- If MO was started:
- Before the integration is initialized, its WIP account in QuickBooks Online should reflect the value of consumed materials from previous days.
- On the day of initializing the integration, its transactions are posted with the first synchronization. No manual action is necessary. - Alternatively:
a) You may want to finish all in-progress Manufacturing Orders before initializing the integration.
b) If there is still in-progress manufacturing, you could also:
- Manually create a stock lot for the finished goods in MRPeasy. Do not create a MO in MRPeasy.
- Or, re-create the situation in MRPeasy and QuickBooks Online as if the manufacturing had not started. Start the MO only after step (5) above.
If there are invoiced and not received Purchase Orders in MRPeasy:
- The value of these POs should be reflected on the account in QuickBooks Online, which was configured as the Purchases account for the integration. I.e. these Bills should use that account.
Import stock items, customers, and vendors from QuickBooks Online
It is not mandatory to import items, customers, and vendors, as these will be created automatically in QuickBooks when documents are synchronized.
Optionally, you can import stock items, customers, and vendors from QuickBooks to MRPeasy by using the respective buttons at MRPeasy -> Settings -> System settings -> Integrations -> QuickBooks.
This will import new objects only. If some objects were imported before, these will be skipped and not imported twice.
Update or disconnect the integration
If you wish to review the chosen integration settings or make any changes to the integration, you can do this at Settings -> System settings -> Integrations -> QuickBooks -> Change accounts.
Please note that when you change accounts, then the next transactions are posted to the new accounts. No changes are made to any historical data already posted to QuickBooks.
The integration can be disconnected at Settings -> System settings -> Integrations -> QuickBooks -> Disconnect.
Troubleshooting
Issues:
- I don't understand why some manual journal entries have been posted to QuickBooks or how these are calculated.
- To see detailed information about all manual journals that have been sent to QuickBooks, please go to Settings -> System settings -> Integrations -> QuickBooks -> Synchronization logs.
- Please check the list of events and transactions to understand when certain transactions are recorded.
- Note that MRPeasy posts journals always with the current date of the synchronization, which only happens after the action is actually performed in MRPeasy.
- MRPeasy does not backdate any transactions in QuickBooks, but in MRPeasy, stock movements can be backdated or historical transactions changed in certain cases.
- The invoice has not been posted to QuickBooks Online.
- To quickly find the reason, please click the Add to QuickBooks button. You should then see a relevant error message.
- There may be several reasons:
- Invoices are posted once per 5 minutes. To synchronize immediately, click Add to QuickBooks on the Invoice details page.
- MRPeasy only posts invoices in the statuses 'Unpaid,' 'Paid partially,' or 'Paid' and the types 'Invoice' or 'Credit invoice.' Invoices in other statuses or types are not posted. Please check the status and type of the invoice.
- QuickBooks requires that all item names be unique. Please check that there are not several different items with the same name (item description).
- The invoice was created before the integration was initialized. Please open and save it.
- The purchase order has not been posted to QuickBooks Online.
- To quickly find the reason, please click the Add to QuickBooks button. You should then see a relevant error message.
- There may be several reasons:
- a) Purchase Orders are posted once per 5 minutes. To synchronize immediately, click Add to QuickBooks on the Purchase Order details page.
- Before the purchase order is posted, the "Invoice ID" must be saved in the Purchase Order details in MRPeasy. Please check that this is done and that the PO is saved.
- In MRPeasy, you have enabled the software setting "Several invoices per PO = Yes", in which case POs are not sent to QuickBooks. Please open the PO and create an incoming invoice to send a bill to QuickBooks.
- The PO was created before the integration was initialized. Please open and save it.
- Error messages when sending an invoice to QuickBooks Online after applying a tax.
- When posting invoices to QuickBooks Online, the applied tax rates must exist in QuickBooks Online beforehand.
- Please pre-configure these tax rates in QuickBooks Online or update these invoices and then try to post them again.
- Error message "Business Validation Error: You must select an account for this transaction." when trying to post an Invoice or PO to QuickBooks Online.
- Please go to QuickBooks -> Products and check that every product in the document has both income and expense accounts set.
- Error message "Invalid Reference Id: Accounts element id *** not found" when trying to synchronize inventory transactions.
- Please go to MRPeasy -> Settings -> System settings -> Integrations -> QuickBooks -> Change accounts, and check that all accounts are selected.
- Error message "Duplicate Document Number Error."
- This means that there is already a document in QuickBooks Online with this number.
- This may happen when you delete a document in MRPeasy; do not delete it in QuickBooks Online, and re-create the document in MRPeasy. MRPeasy does not automatically delete documents in QuickBooks Online. If a document has been posted to QuickBooks Online and it is needed to delete, please delete it manually in both systems. The software works like that to avoid a conflict when a document is posted to QuickBooks Online, and your accountant starts to process it, and at the same time, somebody deletes this document in MRPeasy.
- When sending a document to QuickBooks Online, an error message appears: "[Item]: Parent Reference invalid: This selection can only be a Category."
- To import an invoice with this item from MRPeasy to QuickBooks Online, you have to remove the colon from the Part description.
- When an item is imported to QuickBooks, and it includes ":" (colon) in its Part description, then QuickBooks Online handles this item name as follows:
- Information before the colon (:) in the Part description is imported as a Product Category in QuickBooks Online.
- Information after the colon (:) in Part description is imported as Product "Name" in QuickBooks Online.
- When trying to send an invoice for a purchase order to QuickBooks Online, it returns an error message stating "Invalid reference ID"
- Please check that your QuickBooks Online account has a tax rate configured like the one in the MRPeasy invoice. If not, please configure it and then try to post this incoming invoice to QuickBooks Online again.
- When trying to send an update to QuickBooks Online for an invoice for a purchase order, it returns an error message stating "The purchase cannot be deleted as it would make the invoice, it is linked to, invalid."
- The error occurs when you have an invoice linked to billable items on a bill in QuickBooks Online. QuickBooks Online does not let you update bills that have invoices linked to the items on the bill.
- To fix this, you have to either:
- update the bill and the connected invoice in QuickBooks Online manually,
- or delete the connected invoice in QuickBooks Online, update the bill by pressing the "Update in QuickBooks" button in MRPeasy, and then recreate the invoice for the billable line item.
- When trying to send an invoice to QuickBooks Online it returns an error message stating "Invalid bundle id ... passed to SalesItemLineDetail.ItemRef. Please use GroupLineDetail with bundles."
- This error occurs when some item type on the invoice is set to Bundle in QuickBooks Online. The item reference cannot be for a bundle or group.
- To fix this, locate the item in QuickBooks Online -> Products and services and change the type to "Product" or "Service".
- When trying to send an invoice/PO/bill to QuickBooks Online it returns an error message stating "The name supplied already exists: Another product or service is already using this name. Please use a different name."
- This error occurs if the document you are trying to post has several different products with the same part description.
- The reason is that QuickBooks does not allow different products to have the same part description, even if part numbers (SKU) are different.
- Please change the description of these products so that they all appear differently when this document is posted to QuickBooks Online.
Support
MRPeasy maintains the integration between QuickBooks Online and MRPeasy. If you have technical questions about the integration, please turn to MRPeasy support. However, our Support team cannot consult you regarding setting up your accounting in QuickBooks Online.
Salesforce
MRPeasy can be integrated with Salesforce via Zapier.
Sales can be imported from Salesforce to MRPeasy as a customer order.
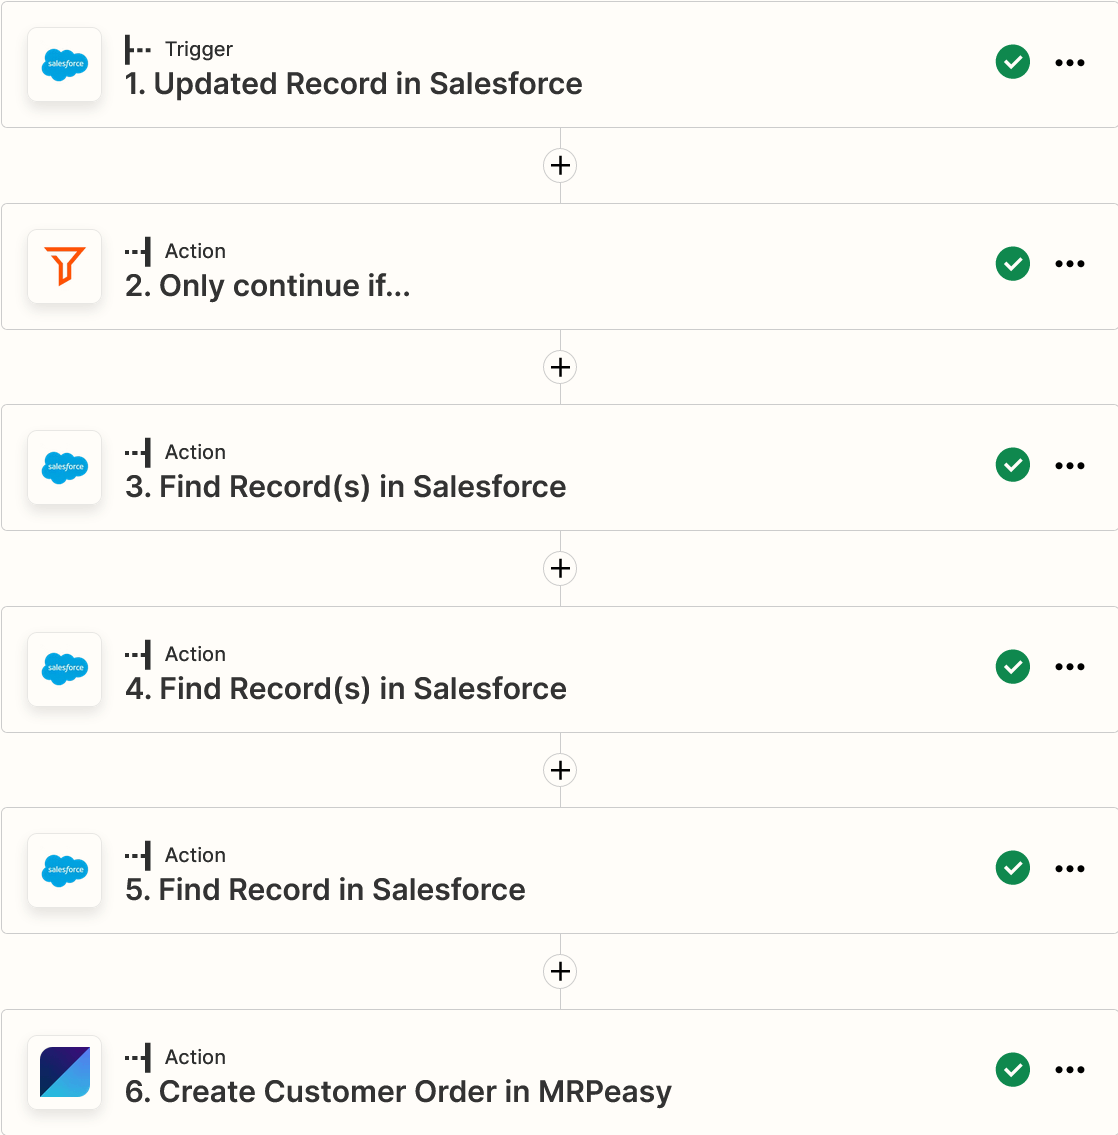
1. Set up the trigger
- Choose the Salesforce app and select the event Updated Record.
- Select your Salesforce account.
- Select the object: Order.
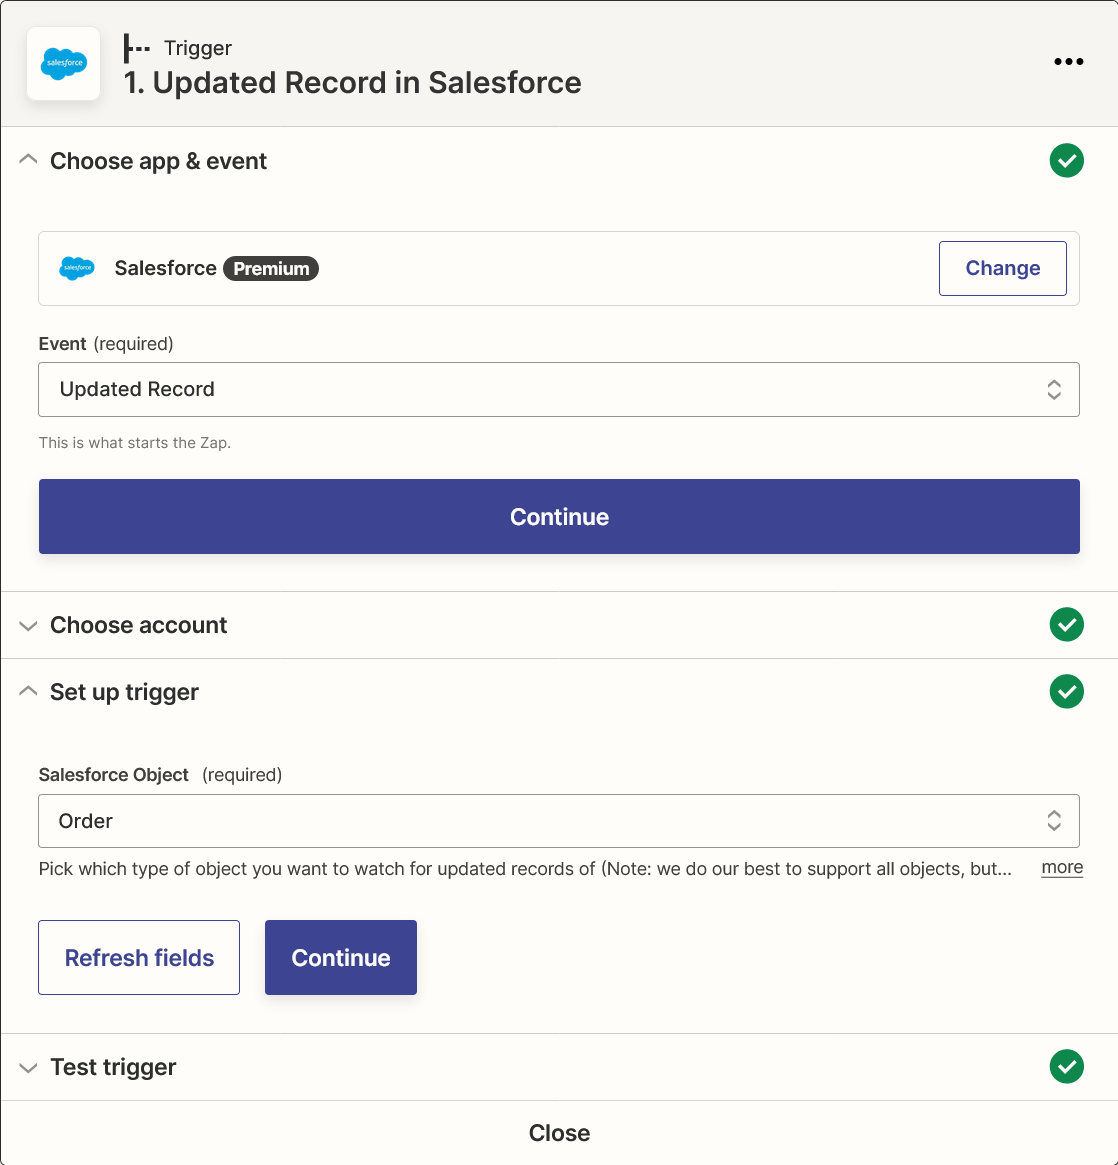
2. Filter orders (optionally)
To import active orders only, configure this step:
- Choose the app Filter by Zapier.
- Only continue if Status exactly matches Activated.
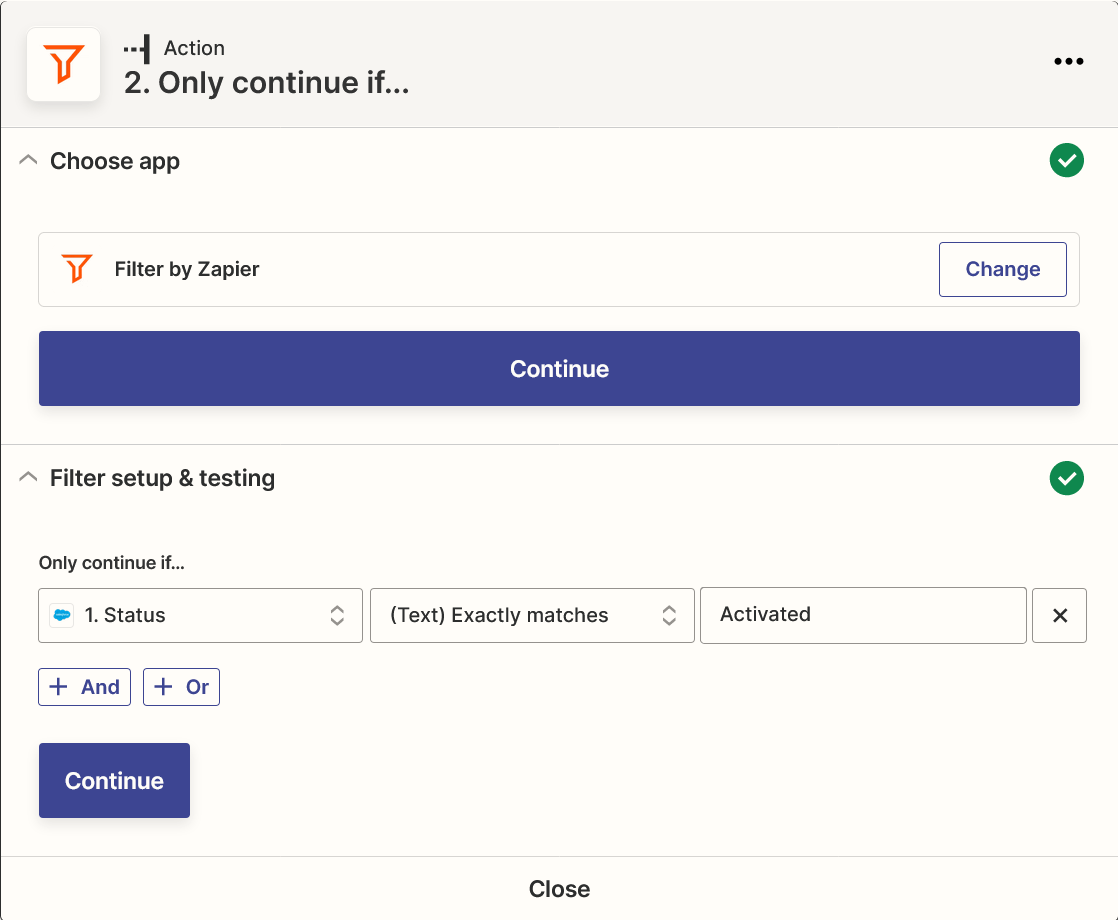
3. Get the list of products
- Choose the app Salesforce and select the action Find Record(s).
- Select your Salesforce account.
- Enter the input data:
Salesforce Object: Order Product
Search Results: Return all matching record(s)
Field to Search By: Order ID
Search value: Object ID
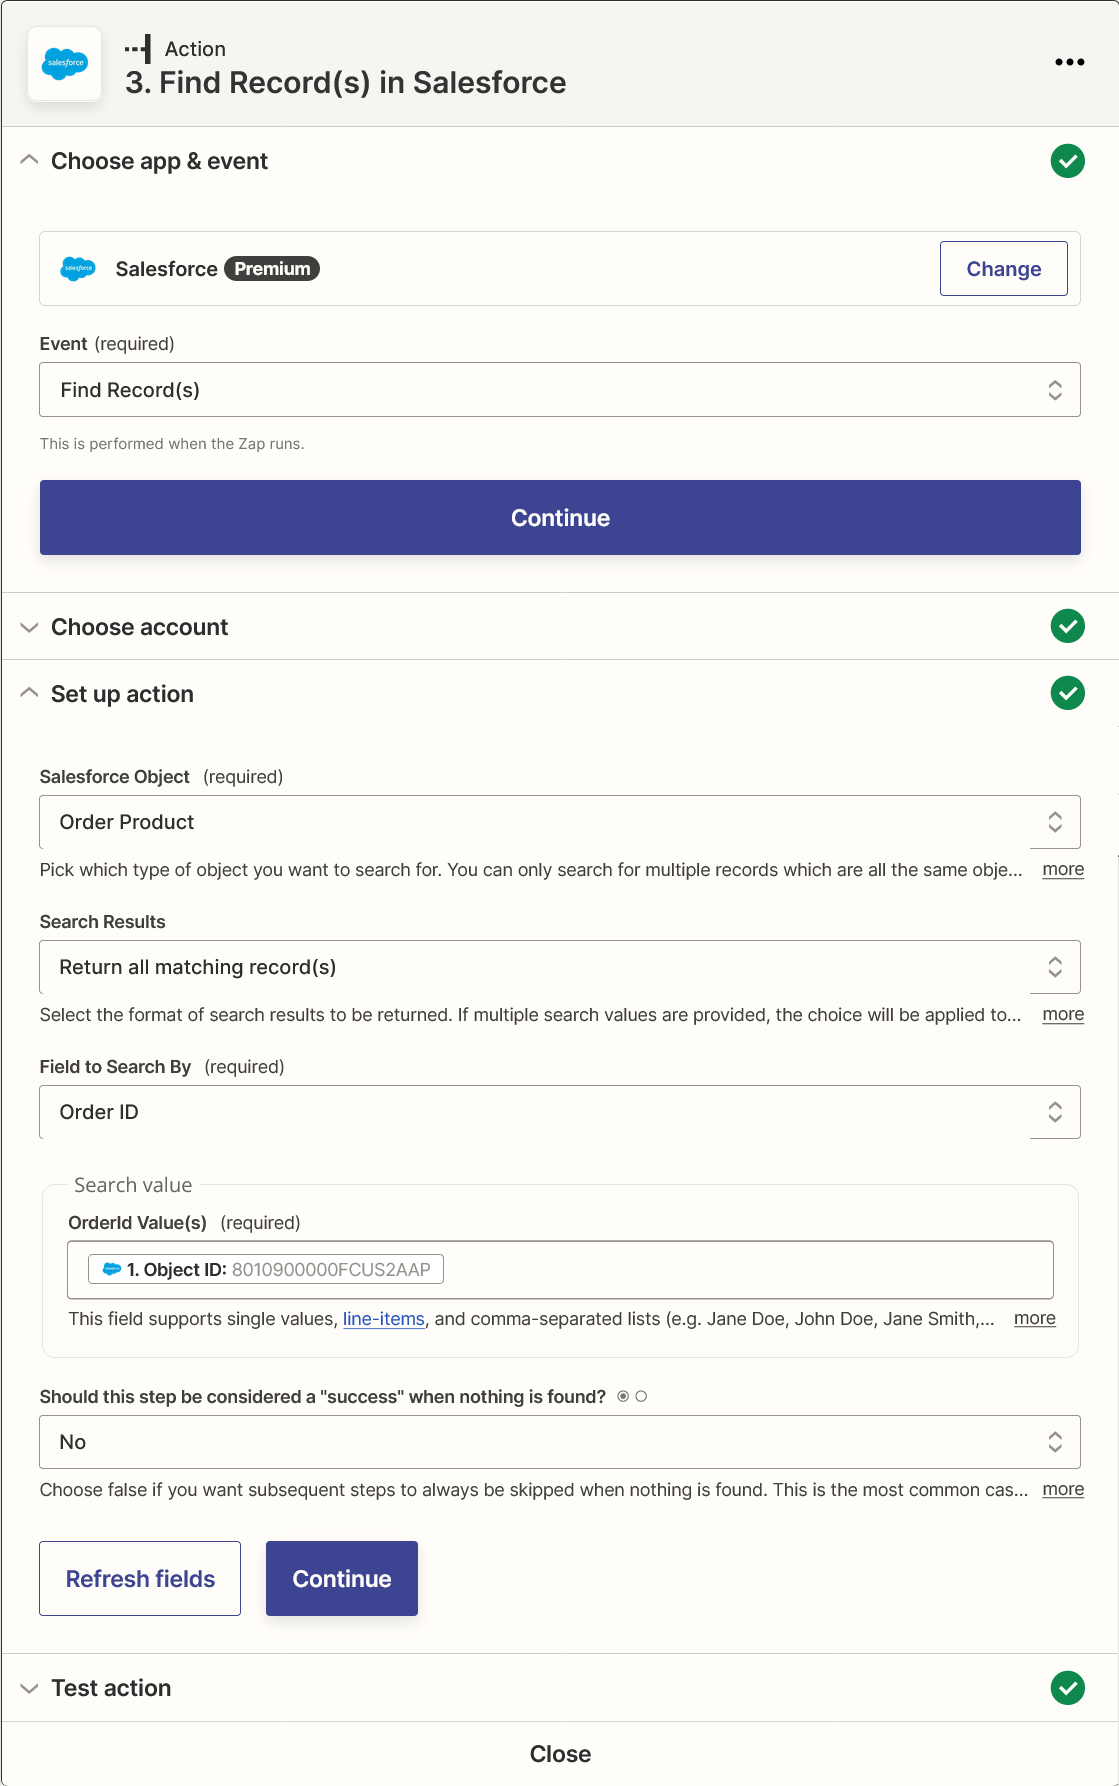
4. Load product details
- Choose the app Salesforce and select the action Find Record(s).
- Select your Salesforce account.
- Enter the input data:
Salesforce Object: Product
Search Results: Return all matching record(s)
Field to Search By: Product ID
Search value: Records Product 2 ID
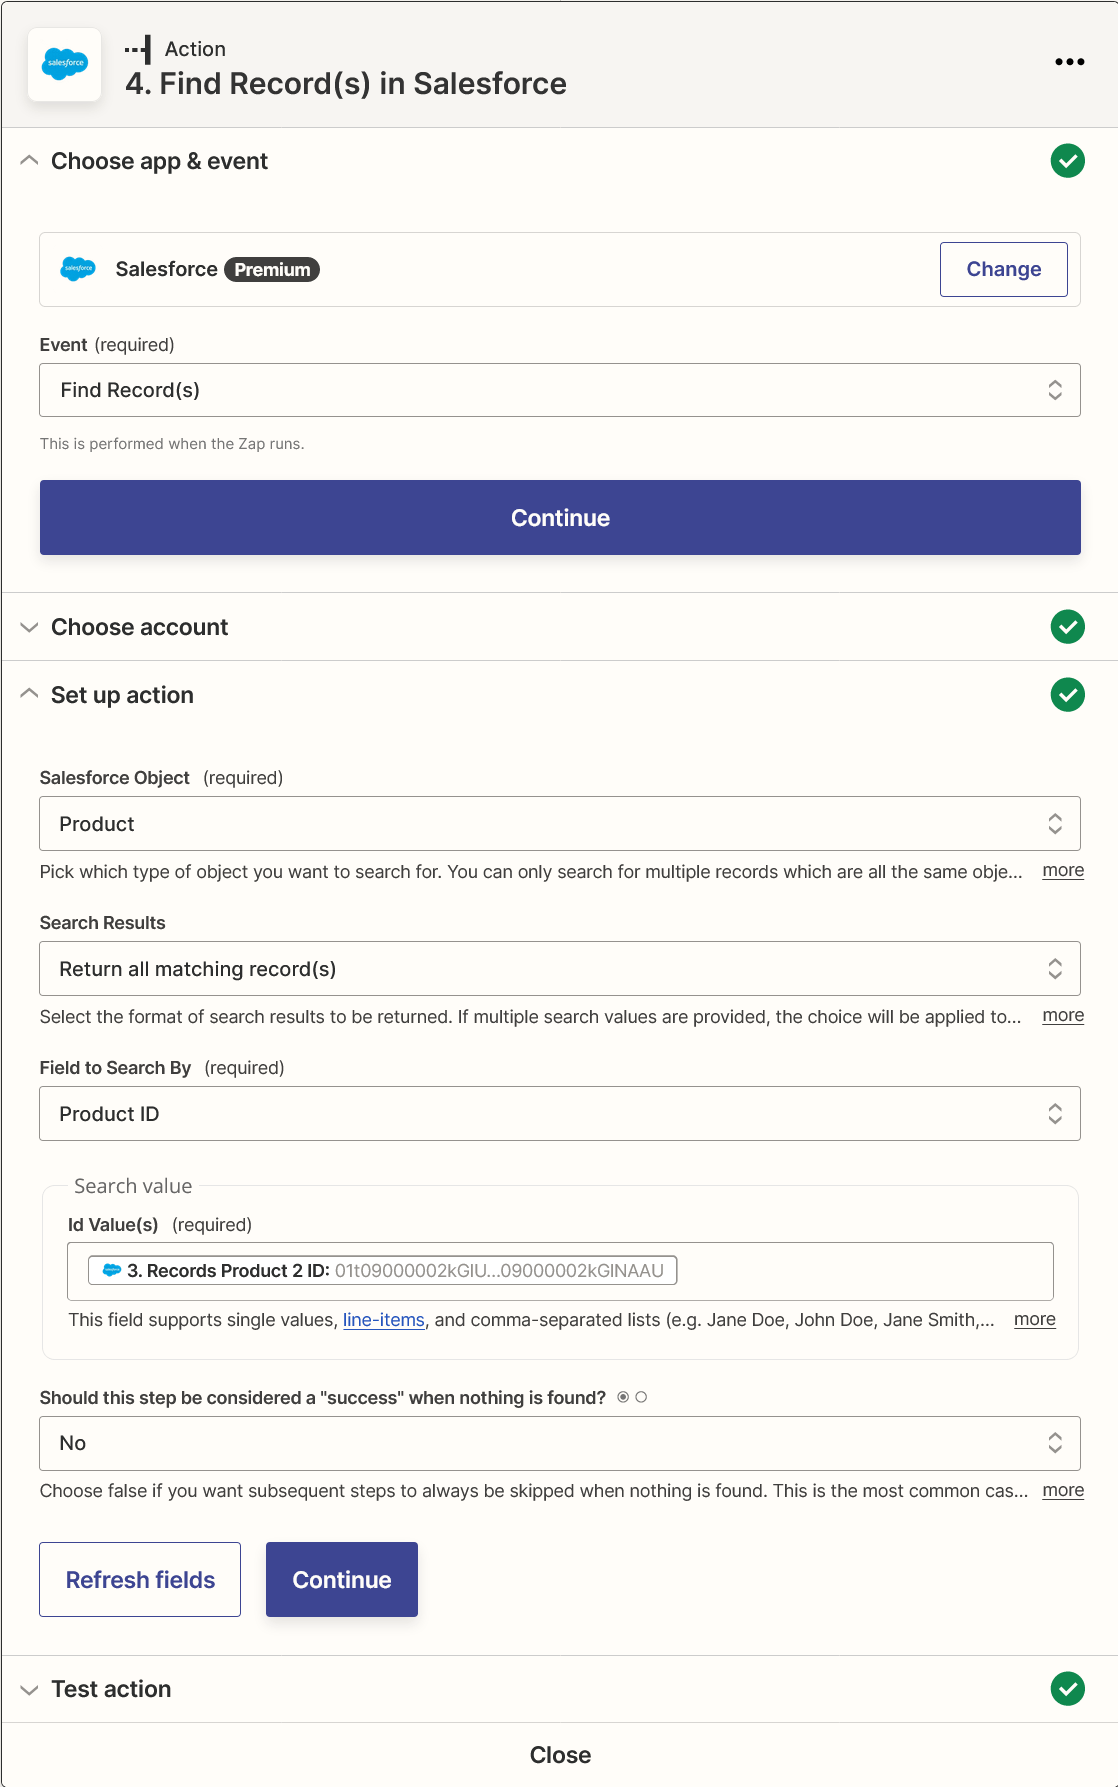
5. Load customer details
- Choose the app Salesforce and select the action Find Record.
- Select your Salesforce account.
- Enter the input data:
Salesforce Object: Account
Field to Search By: Account ID
Search value: Account ID
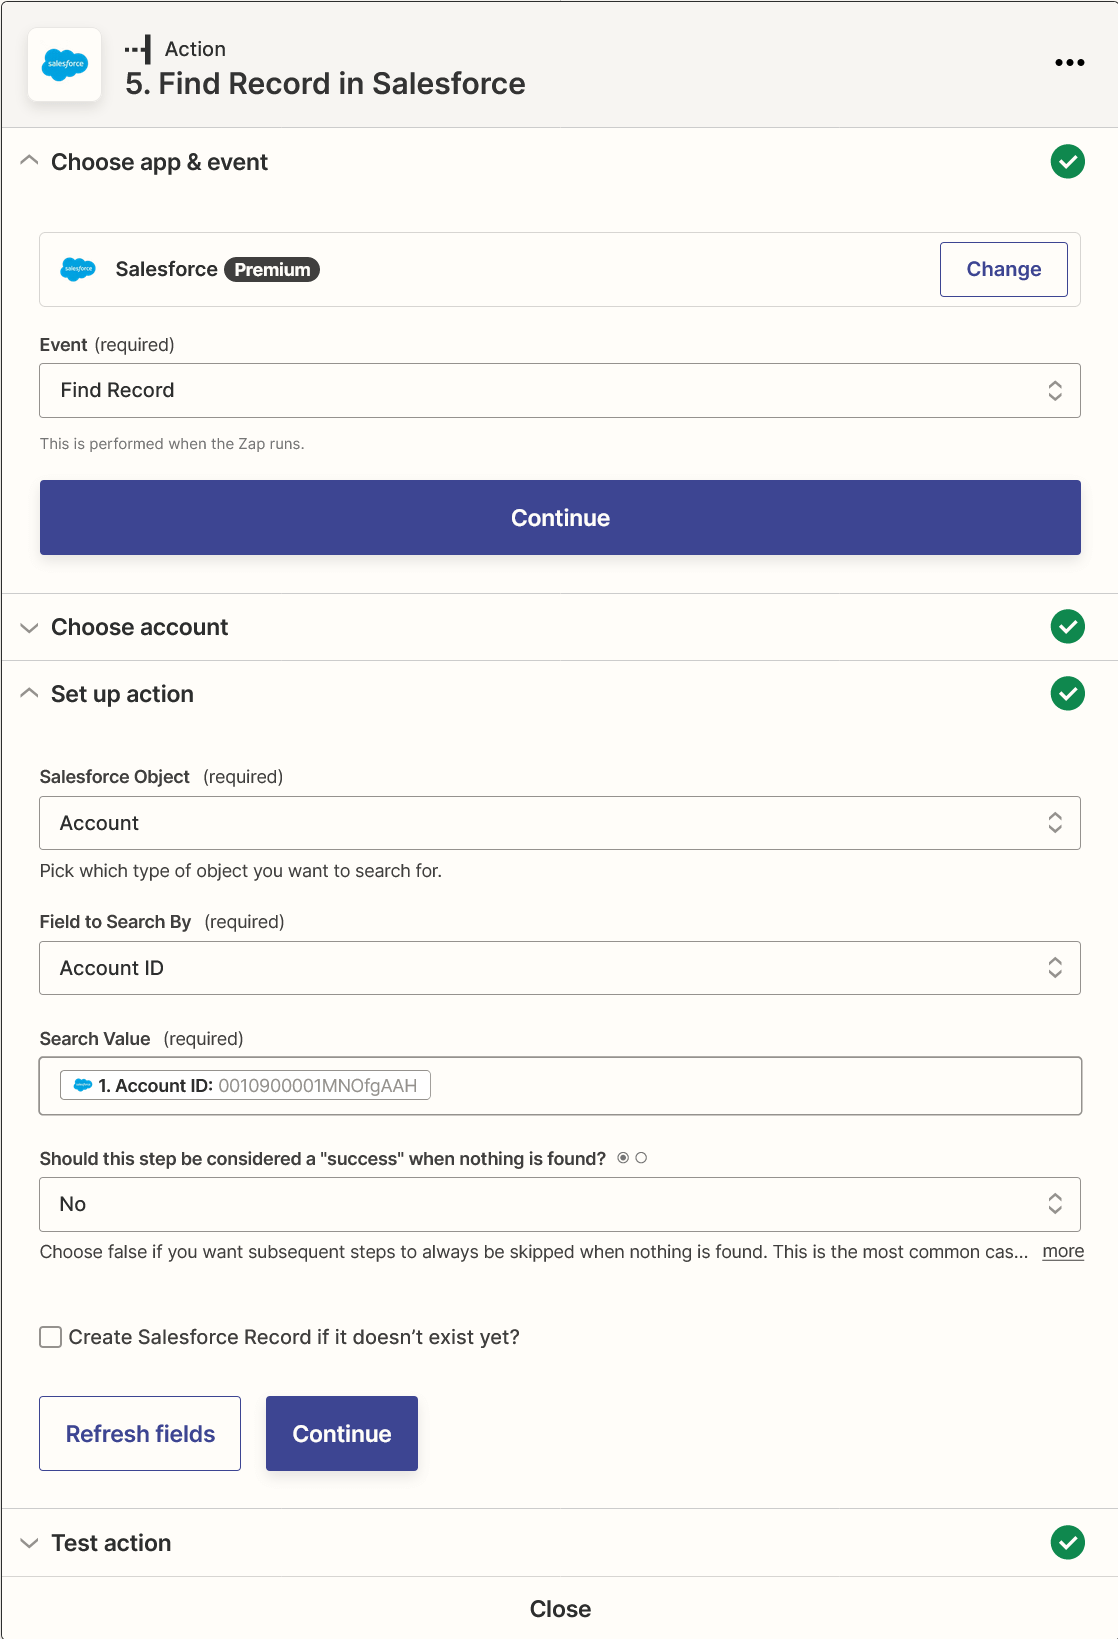
6. Create a customer order
- Choose the app MRPeasy and select the action Create Customer Order.
- Select your MRPeasy account.
- Enter the input data:
Reference: Order Number
Customer Name: if you want to import customer details, use Name. If you want to import orders anonymously, please enter any text (e.g., Salesforce customer).
Shipping - Company: Name
Shipping - Street Line 1: Shipping Address Street
Shipping - City: Shipping Address City
Shipping - State: Shipping Address State
Shipping - Postal Code: Shipping Address Postal Code
Shipping - Country Code: Shipping Address Country
Lines - SKU: Records Product Code
Lines - Quantity: Records Quantity
Lines - Total Price: Records Total Price

Update a customer order
Set up another ZAP using the "Update Customer Order" action instead of "Create Customer Order". In both ZAPs, be sure to pass the same order number in the "Customer Order Number" field (not "Reference") to update the correct order.
ShipStation
ShipStation is a web-based, multi-carrier shipping solution for eCommerce retailers. Designed to streamline the fulfillment process, this software offers many integrations that allow you to import and process orders.
ShipStation and MRPeasy can work seamlessly together, so orders are prepared in MRPeasy and shipped from ShipStation using a wide selection of available carriers.
Jump to:
Connecting MRPeasy and ShipStation
- You must have an active account in ShipStation.
- ShipStation V1 API must be available in your ShipStation plan.
- From May 2025, the ShipStation V1 API will no longer be available on all ShipStation plans. More information from ShipStation: https://help.shipstation.com/hc/en-us/articles/360025856212-ShipStation-API
- Log in to your ShipStation account, go to Settings -> Account -> API settings:
- Now press the green button “Generate API keys” if the keys have not been generated earlier or “Regenerate API keys” if they have been generated earlier.
- ShipStation generates two keys: API Key and API Secret. Example:
- API Key: 0b7ae06eb123456789f60d00f3454052
- API Secret: 22f2b1234a5a678eaef19bd60d466ef4
- Log in to your MRPeasy account, go to Settings -> System settings -> Integrations:
- Press the button “Connect to ShipStation” in the section “ShipStation.”
- In the opened window, Input the ShipStation API Key and API Secret into the relevant fields and press “Save.”
General information
General principles
The integration between MRPeasy and ShipStation is mostly a one-way integration:
- Shipments are prepared in MRPeasy and sent to ShipStation for shipment.
- Carrier selection, label printing, package shipping, and tracking are performed in ShipStation.
- When an order is shipped in ShipStation, a tracking number is imported from ShipStation to the shipment details in MRPeasy.
Data sent to ShipStation
The following data is sent to ShipStation
- The order number.
- The order date.
- The order status.
- Customer email.
- SKU, part name, quantity, weight, price, and tax for each shipment row.
- Address.
Shipment’s weight
If Packing is enabled in MRPeasy, the shipment's weight will be sent to ShipStation.
Selling prices, taxes, discounts
- The price and tax are sent to ShipStation for Shipments originating from Customer Orders.
- Customer returns (Return Merchandise Authorization) and Purchase Order (Subcontracting) shipments are sent without prices.
- Prices are taken directly from the Customer Order, incorporating any applied discounts.
- ShipStation lacks a separate discount field. Therefore, prices sent to ShipStation already reflect any discounts applied in MRPeasy.
- Taxes are derived from invoices linked to the Shipment:
- If an invoice is linked to the shipment, taxes are taken from that invoice.
- If no linked invoice exists, but an invoice with the same items is found in the Customer Order, taxes are taken from that invoice.
- Only invoice type “Invoice” is considered, excluding prepayment or credit invoices.
- MRPeasy cannot send the currency information to ShipStation. Therefore, the prices will be displayed in the default ShipStation currency even when it differs from the Customer Order’s currency.
Addresses
Structured addresses must be used for customers or vendors to be able to send them to ShipStation.
- The shipping address must include a valid postal code.
- Free-text addresses are not supported.
Important limitations
- Minor price discrepancies:
- If the same product appears on multiple lines in a customer order with different prices, the prices in ShipStation may differ from those in MRPeasy.
- If a discount is not an integer, the resulting prices in ShipStation may differ slightly from those calculated in MRPeasy.
- Also, due to rounding, a 1-cent difference may occur between MRPeasy and the total displayed in ShipStation.
- Shipments cannot be sent if any item has a decimal quantity.
- When updating a Shipment, discount or tax updates may not be reflected correctly in ShipStation.
Using the ShipStation integration
Sending a shipment to ShipStation
- Create a Shipment for a customer order, RMA return, or subcontracting PO.
- Press the “Send to ShipStation” button.
- If the shipment status in MRPeasy is “New,” then the ShipStation order will have the status “On hold.”
- If the shipment status in MRPeasy is “Ready for shipment” or “Shipped,” then the ShipStation order will have the status “Awaiting shipment.”
- If the shipment is modified in MRPeasy, then after saving changes, you can press the “Send to ShipStation” button to update the order in ShipStation.
- Changes cannot be made if the ShipStation order has the status “canceled” or “shipped.”
- Note that discount or tax updates must be verified manually in ShipStation.
- When an order is shipped in ShipStation, a tracking number is imported from ShipStation to the shipment details in MRPeasy.
Deleting a shipment already sent to ShipStation
When you delete a shipment in MRPeasy, MRPeasy checks if it had been sent to ShipStation earlier:
- If yes, then MRPeasy asks if you want to delete it in ShipStation.
- If you select that you wish to delete it in ShipStation, it will be canceled in ShipStation.
- ShipStation orders cannot be canceled if their ShipStation status is “canceled” or “shipped.”
Shopify
Shopify is a powerful e-commerce platform. Shopify and MRPeasy work seamlessly together, so sales and shipments are handled in Shopify, products are manufactured, materials are handled, production is planned, and purchasing is managed in MRPeasy.
Jump to:
- Demo video: MRPeasy and Shopify integration
- Sychronization modes: individual orders vs bulk import
- Synchronization mode: individual orders
- Synchronization mode: bulk synchronization
- Synchronization of inventory levels
- Setup:
- Synchronizing inventory
- Connecting several stores
- Support for integration
Sychronization modes: individual orders vs bulk import
There are two alternative synchronization modes that you must choose from.
- Individual orders mode: Each order is imported individually into MRPeasy and can be tracked through its lifecycle in MRPeasy.
- You can configure whether customer details are imported, what payment status orders are imported, can push inventory levels from MRPeasy to Shopify, etc.
- Bulk import mode: Fulfilled items from Shopify are imported once per hour and consolidated into a single Customer Order in MRPeasy, which the system tries to mark as picked and shipped immediately.
- This mode is intended for businesses with high sales volumes, where sales should not be interrupted when inventory is temporarily not available. No customer details are imported, inventory levels are not synchronized.
- If your e-shop receives a large number of orders (thousands per month), we strongly recommend importing orders in bulk instead of synchronizing individual orders.
Synchronization mode: individual orders
This section applies only for the configuration where individual orders are synchronized.
Orders valid for import from Shopify
1. Orders that are already in Shopify when you establish the integration will not be sent to MRPeasy until they are updated (open and make some insignificant change - e.g. add and remove a tag).
- This allows the user to re-import orders if needed.
2. Orders that satisfy one of the following conditions can be imported from Shopify:
- not fulfilled, or
- created within the last 30 days.
3. Unpaid, partially paid, and fully paid orders can be imported from Shopify.
- The order is imported once it reaches the minimum payment state that is selected in the integration configuration.
4. Products must be pre-defined in MRPeasy and Shopify.
- Products are matched by the SKU field in Shopify and the Part Number field in MRPeasy.
- If some products must not be sent to MRPeasy (for example, a service), they must have no SKU value or an SKU that does not match any part number in MRPeasy.
- A note is saved to the "Additional details" field of the Shopify order.
- If the order has no products with matching SKUs:
- It is not imported to MRPeasy.
- A note is added to the "Additional details" field of the Shopify order.
- The tag "Ready for shipment" is attached to the order.
5. Additional notes:
- Shopify POS orders will be imported.
- If some plugin updates all orders, then orders that are too old will be ignored.
- If the integration was configured more than 30 days ago, then all valid orders are imported already.
- MRPeasy cannot access orders that were created more than 60 days ago in Shopify.
- Even if the order was already imported earlier, updates cannot be synchronized once it is over 60 days old.
Step 1. Posting an order from Shopify to MRPeasy
- An order is imported to MRPeasy as a Customer Order at CRM -> Customer Orders.
- The tag "In production" is attached to the order in Shopify.
- The Shopify order number is copied to the Reference field in the MRPeasy Customer Order.
- The MRPeasy order number is saved to the Additional details field of the Shopify order.
Step 2. Booking products for the order in MRPeasy
When an order has been imported into MRPeasy from Shopify:
- The software tries to book products. Available products are booked immediately.
- If there are products which couldn't be automatically booked, then:
- The Customer Order status will be Confirmed.
- The Product status will be Not booked.
- To book these parts, please see the instructions: How to check stock and book products for a customer order?
- Demand for these items is created automatically. If items have a Reorder point value set, then these will already be displayed on the Critical On-hand report, which shows shortages.
Step 3. Notification when products are available for shipment
When all products are ready:
- The MRPeasy Customer Order status is changed to Ready for shipment.
- In Shopify, the tag "In production" is replaced with "Ready for shipment" in the order’s details, indicating that this order can be fully fulfilled.
Step 4. Shipping the items and subtracting the stock from MRPeasy
For shipping the items:
- The order must be marked fulfilled (shipped) in Shopify.
- As a result, a Shipment is created in MRPeasy, and all items are automatically marked picked so that products are deducted from the inventory.
- If MRPeasy can pick all items, the tag "Ready for shipment" is removed in Shopify.
- If MRPeasy cannot pick all items for some reason, a message is added to the "Additional details" field of the order in Shopify.
- If shipped items have serial numbers, you must manually pick the items in the Shipment in MRPeasy, at this point, the system asks which serial numbers were shipped.
Taxes
All prices in the imported Customer Order are without tax.
- All sales prices in MRPeasy are tax-exclusive. If an item's price in Shopify is tax inclusive, then its net sales price is derived.
- Taxes are added to invoices, not orders in MRPeasy.
If invoices are created (option "Mark orders as paid" is enabled):
- Taxes are added to sales invoices.
- Tax is calculated and rounded per line.
Discounts
Discounts are imported to MRPeasy as line item discounts, as a percentage for each line separately.
Canceled orders
If an order that was imported to MRPeasy is canceled in Shopify, MRPeasy can try to cancel the customer's order.
To enable this functionality:
- In the integration settings, select the option "When an order is canceled in Shopify: "Cancel in MRPeasy."
Please note:
- Manufacturing Orders (MO) and/or Purchase Orders (PO) will not be canceled,
- If a shipment has been created for a customer order, the customer order cannot be canceled.
If a customer order cannot be canceled automatically by MRPeasy, a message is added to the "Additional details" field of the order in Shopify.
Returns and refunds
The integration automatically imports processed returns from Shopify to MRPeasy.
For the return to be imported, the following conditions must be met:
- RMA functionality is enabled.
- The original Shopify customer order has been imported.
- Returned items in Shopify have the corresponding products in MRPeasy with the matching SKUs.
- The same applies to exchange items if you want them to be imported, booked, and shipped in MRPeasy.
When a return is closed in Shopify, MRPeasy creates an RMA order for the same customer as the original customer order:
- All products from the Shopify return are received into stock upon import.
- If the return has any exchange items, MRPeasy tries to book them and create a shipment automatically.
- If booking fails for any item, please complete the booking and shipping process for the RMA order manually.
If the Shopify return includes refunds, MRPeasy creates a credit invoice for the refunded items and marks it paid. A credit invoice is created even when the refund total is zero (no monetary refund).
If Multiple stock and production sites are used, the RMA order inherits the site from the original customer order.
Useful tips
We advise creating a custom search in Shopify to find ready-for-shipment orders faster:
- Go to Shopify -> Orders.
- Click Filter orders.
- Select a filter: Tagged with.
- Enter the tag Ready for shipment.
- Click the Add filter button.
- Click the Save this search button.
- Enter the name of the search: Ready for shipment.
- Save the custom search.
This makes it possible to find ready-for-shipment orders with a single click.
Synchronization mode: bulk synchronization
This section applies only for the configuration where orders are imported in bulk.
In bulk synchronization mode, MRPeasy checks Shopify once per hour for products that have been shipped since the previous synchronization. It then creates customer orders that aggregate these shipped products. A separate customer order is created for each location and currency combination.
Because bulk synchronization can be delayed by up to one hour, automatic inventory level synchronization is disabled in this mode. This mode is intended for businesses with high sales volumes, where sales should not be interrupted when inventory is temporarily not available. Products can continue to be sold, manufactured, and shipped while inventory levels are adjusted through normal production and fulfillment processes.
If you switch from individual order synchronization to bulk synchronization, products included in orders that have already been imported into MRPeasy will be ignored during bulk imports. Existing imported orders will continue to be processed normally for up to two weeks after the switch. If any of these orders remain unfulfilled in Shopify after two weeks, they must be processed manually.
Synchronizing inventory levels from MRPeasy to Shopify
MRPeasy can update available quantities of products in Shopify, if orders are imported individually. This does not apply to the bulk mode.
If this function is enabled:
- Once per hour, MRPeasy will update the available quantities of products in Shopify with the quantities available from MRPeasy.
See also: How to read the inventory numbers - in stock, available, expected? - Products are matched by "Part number" in MRPeasy and "SKU" in Shopify.
- If some product does not exist in Shopify or its’ inventory is not tracked in Shopify, then this product is ignored during the synchronization.
To enable this functionality:
- Go to Settings -> System settings -> Integrations -> Shopify.
- Click the Edit button next to your shop.
- Select the option "Sync inventory levels".
- If you have several sites in MRPeasy or several locations in Shopify, choosing what sites and locations to synchronize will be possible.
- The bookings for customer orders in MRPeasy will be made based on how the sites and locations are mapped.
- Note the difference in terminology: Shopify's "location" is equivalent to MRPeasy's "site" (not "storage location").
Setting up the Shopify integration
To configure the integration between Shopify and MRPeasy:
- Go to MRPeasy -> Settings -> System settings -> Integrations -> Shopify.
- Click the "Connect to Shopify" button.
- Fill in the required information:
- Enter the store domain.
- Select the synchronization mode: Individual orders or Bulk synchronization.
- Click the "Install app" button.
- Import new products and inventory levels from Shopify or set them up separately in MRPeasy.
- Optionally, set up a custom search in Shopify.
- Optionally, add another Shopify store.
Individual order mode synchronization settings
- Select which orders to import:
- Paid orders only.
- Paid and partially paid orders.
- Paid, partially paid, and unpaid orders.
- Unpaid are considered orders with Shopify payment statuses Unpaid, Payment pending, and Authorized.
- Select what to do when an order is canceled in Shopify: cancel in MRPeasy or do nothing.
- Select whether to import customer information or to use a generic customer.
- Select whether to import shipping costs or not.
- Select whether to mark customer orders as paid or not.
- Select the site for booking products if the Enterprise functionality "Multi-Stock and Production Sites" is enabled.
- Select whether to synchronize inventory levels from MRPeasy to Shopify.
- Select whether to import the "Notes" from the Shopify order to the "Internal notes" of the MRPeasy Customer Order.
Importing customer information from Shopify
Applies to the individual order import mode only. This does not apply to the bulk mode.
Depending on your business specifics, you may want to import customer information from Shopify to MRPeasy.
For privacy and data consistency reasons, it is advised to have customer information in one place only. For example, if a customer signs up on Shopify, his contact details should be in Shopify only.
You can set up the integration in one of the following ways:
- Use a generic customer in MRPeasy without importing any customer information.
- Do not select the option "Import customers."
- Do not select the option "Import shipping address."
- In this case, MRPeasy will create one generic customer in MRPeasy CRM and use it for all orders imported from Shopify. The customer's domain name contains the domain name of your Shopify store.
- Import the customer.
- Select the option "Import customers".
- Now, when importing an order, MRPeasy looks for a customer with the same e-mail address.
- MRPeasy searches by the customer's general email first. If no customer is found, MRPeasy searches by the customer's contacts' email. If there are several records with the same email, any record can be selected—it is not possible to predict which record will be used.
- If the customer exists, it will be used to create the order.
- If no customer is found, a new customer will be created.
- The shipping address will be added to the customer's details.
- Only import the shipping address while using a generic customer in MRPeasy.
- Do not select the option "Import customers."
- Select the option "Import shipping address".
- Now, when importing an order, the shipping address is imported, saved in the generic customer’s details, and selected in CO.
Please note that Shopify allows updating the shipping address after placing the order. In this case, MRPeasy tries to update the address in the customer's details in MRPeasy. Nevertheless, please check that the addresses match in both systems.
Importing shipping costs
Applies to the individual order import mode only. This does not apply to the bulk mode.
To import shipping costs from Shopify to MRPeasy:
- Go to Settings -> System settings -> Integrations -> Shopify.
- Configure the integration between Shopify and MRPeasy.
- Select the option "Import shipping costs."
- Select the stock item to save shipping costs.
When an order is imported from Shopify, a new line with this item and the shipping cost is added to the order in MRPeasy.
Shipping costs will be imported from Shopify without tax.
Marking customer orders as paid
Applies to the individual order import mode only. This does not apply to the bulk mode.
To mark customer order as paid:
- Go to Settings -> System settings -> Integrations -> Shopify.
- Configure the integration between Shopify and MRPeasy.
- Select the option "Mark orders as Paid".
When an order is imported from Shopify:
- A new invoice is created in MRPeasy with all products and shipping costs included, as well as tax.
- Full payment is added to the invoice when the order is fully paid.
- If the order is unpaid or partially paid, the invoice is created immediately, but payment is only saved when the full payment is received.
Configuring products in MRPeasy and Shopify
In order to send orders from Shopify to MRPeasy, the products must be set up in both systems beforehand.
For each of your products, the "SKU" field in Shopify must match the "Part Number" field in MRPeasy.
Importing new products and inventory levels from Shopify
To import new products from Shopify:
- Connect MRPeasy and Shopify.
- Go to Settings -> System settings -> Integrations -> Shopify.
- Click the button "Import stock items".
If there are existing products whose Shopify SKU and MRPeasy Part number match, these will be skipped. You can use this import several times whenever you add new products to Shopify.
If in Shopify, there are products with Variations:
- These variations are imported and have a Shopify SKU defined.
- If Matrix BOM is
- disabled, a separate item will be created for each variation;
- enabled, parameters are imported, and a single item with variations is created.
The data is mapped as follows:
| Field in Shopify | Field in MRPeasy |
| Title | Part description |
| SKU | Part number |
| Price | Selling price |
| Quantity available | In stock, available |
| Cost per item | Cost per item in a new lot, if available quantity > 0 |
Setting up products and inventory levels in MRPeasy
Please see:
- Demo video: Inventory management in MRPeasy.
- Demo video: Setting up procured items.
- Demo video: Setting up manufactured items.
- Demo video: Setting up inventory levels.
- Setting up new items.
- Import items.
- Enter initial inventory values.
Connecting several Shopify stores with MRPeasy
It is possible to integrate multiple Shopify stores with MRPeasy.
To do that:
- Please go to Settings -> System Settings -> Integrations.
- Click the "+" button at the Shopify section to add an additional Shopify store.
If you do not import customer information, every Shopify store has its own generic customer, which contains the domain name of your Shopify store.
Support
MRPeasy maintains the integration between Shopify and MRPeasy. If you have technical questions about the integration, please contact MRPeasy support.
Macro for modifying SolidWorks BOM for MRPeasy BOM import
Purpose: This macro will help you make your SolidWorks exported Bill of Materials suitable for MRPeasy. It will show the parent assembly article code of every part on its line. Otherwise, MRPeasy import wouldn't know which BOM to place this part in.
Steps for importing a Solidworks BOM via CSV:
- Export the indented BOM from SolidWorks to Excel.
- The hierarchy needs to be represented by decimal numbers. (e.g. A direct part of the main assembly is 7, and sub-assembly component items are 7.1, 7.2, 7.3, 7.3.1, 7.3.2, etc.).
- Modify it with the macro code (see below).
- Each line must have a direct parent part number to which the specific child part number refers.
- Save it as a CSV file.
- If some parts do not exist as items in MRPeasy, create these items first.
- Before the BOM can be imported, all part numbers, including sub-assemblies, need to be created or imported into MRPeasy.
- Read: How to import items?
- Import the BOM structure into MRPeasy at Production planning -> Bills of materials -> Import from CSV.
Formatting of the spreadsheet for this macro:
- No headers.
- Each line represents one part.
- The first column (A) shows the code of the part's parent assembly.
- The second column (B) shows the hierarchy of parts (1, 2, 3, 3.1, 3.2, 3.3, 4, etc.).
- The third column (C) shows the part number.
- The fourth column (D) shows the quantity of the part.
Usage:
- Into cell A1, enter the article number of the final assembly (the article number this BOM refers to)
- Into cell A2, copy the macro formula (see below).
- Drag-copy A2 until the end of parts.
This way, Excel will modify the macro according to each line and fill the cell with the code for the part's direct parent item. - If there are BOMs (of sub-assemblies), which appear several times in different branches, then such duplicates must be removed manually.
- Export it as CSV and import it to MRPeasy at Production planning -> Bills of materials -> Import from CSV.
Macro code:
Which macro will work depends on the configuration of your PC and Excel.
If you use full stop as a decimal separator (i.e., sub-assembly code is "7.2"):
Comma delimited (commas used inside Excel formulas):
=IFERROR(IF(IFERROR(LEFT(B2,FIND("^^",SUBSTITUTE(B2,".","^^",LEN(B2)-LEN(SUBSTITUTE(B2,".",""))))-1), "error1") = "error1",A$1,TRIM(VLOOKUP(LEFT(B2,FIND("^^",SUBSTITUTE(B2,".","^^",LEN(B2)-LEN(SUBSTITUTE(B2,".",""))))-1),B:C, 2, FALSE))), TRIM(VLOOKUP(VALUE(LEFT(B2,FIND("^^",SUBSTITUTE(B2,".","^^",LEN(B2)-LEN(SUBSTITUTE(B2,".",""))))-1)),B:C, 2, FALSE)))
or
Semicolon delimited (semicolons used inside Excel formulas):
=IFERROR(IF(IFERROR(LEFT(B2;FIND("^^";SUBSTITUTE(B2;".";"^^";LEN(B2)-LEN(SUBSTITUTE(B2;".";""))))-1); "error1") = "error1";A$1;TRIM(VLOOKUP(LEFT(B2;FIND("^^";SUBSTITUTE(B2;".";"^^";LEN(B2)-LEN(SUBSTITUTE(B2;".";""))))-1);B:C; 2; FALSE))); TRIM(VLOOKUP(VALUE(LEFT(B2;FIND("^^";SUBSTITUTE(B2;".";"^^";LEN(B2)-LEN(SUBSTITUTE(B2;".";""))))-1));B:C; 2; FALSE)))
If you use a comma as a decimal separator (i.e., sub-assembly code is "7,2"):
=IFERROR(IF(IFERROR(LEFT(B2;FIND("^^";SUBSTITUTE(B2;",";"^^";LEN(B2)-LEN(SUBSTITUTE(B2;",";""))))-1); "error1") = "error1";A$1;TRIM(VLOOKUP(LEFT(B2;FIND("^^";SUBSTITUTE(B2;",";"^^";LEN(B2)-LEN(SUBSTITUTE(B2;",";""))))-1);B:C; 2; FALSE))); TRIM(VLOOKUP(VALUE(LEFT(B2;FIND("^^";SUBSTITUTE(B2;",";"^^";LEN(B2)-LEN(SUBSTITUTE(B2;",";""))))-1));B:C; 2; FALSE)))
Example
Step 1. Export a BOM from Solidworks.
It will have the following format:
| Level | Part # | Quantity |
| 1 | Part #1 | 1 |
| 2 | Assembly #2 | 3 |
| 2.1 | Part #2 | 5 |
| 3 | Part #3 | 7 |
Step 2. Modify the Solidworks BOM in Excel.
For MRPeasy to be able to import a multi-level BOM structure, the BOM will need to be modified so that the first column will indicate each part's and assemblies' direct parent part number. It must be in the following format.
| Parent part # | Level | Part # | Quantity |
| Assembly #1 | 1 | Part #1 | 1 |
| Assembly #1 | 2 | Assembly #2 | 3 |
| Assembly #2 | 2.1 | Part #2 | 5 |
| Assembly #1 | 3 | Part #3 | 7 |
Step 2.1. Delete the header row.
Step 2.2. Use the macro.
| Write the main assembly part # here | 1 | Part #1 | 1 |
| Copy the macro to here | 2 | Assembly #2 | 3 |
| Drag-copy macro from above | 2.1 | Part #2 | 5 |
| Drag-copy macro from above | 3 | Part #3 | 7 |
Step 3. Save the file in CSV format.
Step 4. Import the CSV file to MRPeasy.
Important notes:
- Choose "Do not import" for the "Level" column.
- Choose the "Product nr" column for the "Parent part #" column that was filled with the macro code.
- Choose the "Part nr" column for the "Part #" column.
- Choose the "Quantity" column for the "Quantity" column.
- Items with all the part numbers must be created beforehand; otherwise, the import will fail.
- Duplicate subassemblies must be manually removed from the file; otherwise, the subassembly's BOM will be corrupted.
Ware2Go
Ware2Go provides on-demand fulfillment and warehousing, making 1-2 day delivery easy and affordable for all merchants. Ware2Go and MRPeasy can work seamlessly together to import orders to MRPeasy when they are shipped in Ware2Go.
How to set up the integration between MRPeasy and Ware2Go
1. You must have an active account in Ware2Go.
2. Log in to your MRPeasy account, go to Settings -> System settings -> Integrations:
- Press the button Connect to Ware2Go in the section Ware2Go.
3. Fill in the form:
- Access token: your username in Ware2Go,
- Secret: your password in Ware2Go,
- Merchant ID: you can find it in Ware2Go -> Merchant Profile -> Company Information.
Press Save.
4. Configure the integration parameters. When done, press Save again.
How the integration between MRPeasy and Ware2Go works
Integration between MRPeasy and Ware2Go is a one-way integration.
When an outbound order is marked as shipped in Ware2Go in MRPeasy:
- An existing Customer Order (CO) is looked up by the order number.
If it is not found, a new CO is created. - Products are booked.
- A Shipment is created and picked.
It may take up to two hours for a new shipped order to be imported from Ware2Go to MRPeasy.
If the order in Ware2Go contains information regarding stock lots (lot number and number of items booked from that lot):
- MRPeasy tries to book products from these stock lots.
- If this is impossible, products are not booked, and an important note is added to the customer order.
- Customer orders with important notes are highlighted with a red flag in the list at CRM -> Customer orders.
Xero
Xero is powerful online accounting software that is localized for many countries. MRPeasy focuses on manufacturing resource planning, reporting, inventory management, sales, and procurement. Together with Xero accounting, MRPeasy creates a very powerful ERP system. We strongly recommend performing all business operations in MRPeasy and accounting in Xero.
Jump to:
- Demo video: Xero integration
- Scope of the integration.
- Purchase Orders, Bills, and Invoices.
- Inventory and manufacturing transactions.
- Transactions and synchronization schedule.
- Setting up the integration with Xero.
- Troubleshooting and synchronization logs.
- Support.
Scope of the integration
1. The core integration includes synchronization of purchasing and sales documents.
- Invoices, Credit Invoices, Prepayment invoices, Purchase Orders, Purchase Invoices, Vendor Credit Invoices, Vendor Prepayment Invoices.
- Items can have different purchases and sales accounts.
- Accounting transactions are created using the documents in Xero.
- Automatic synchronization of payments.
2. Optionally, an advanced in-depth integration can be configured that adds the synchronization of inventory transactions.
- In addition to the core integration, all daily inventory and manufacturing transactions are posted to Xero with a manual journal entry.
- These journals include balance changes of:
- Inventory.
- Items can have different inventory accounts.
- Cost of Goods Sold (COGS).
- Items can have different COGS accounts.
- Work in Progress (WIP).
- Applied expenses in the manufacturing of products - direct materials cost, direct labor cost, applied manufacturing overhead (factory burden) cost.
- Applied transfer order expenses to products.
- Inventory.
Purchase Orders, Bills, and Invoices
Creating new items, customers, and vendors in Xero
- Stock items are matched by Item Code in Xero and Part Number in MRPeasy.
- Customers and Vendors are matched according to the Name, which is case-sensitive.
- When posting invoices, purchase orders, or bills to Xero, MRPeasy will create stock items, customers, and vendors in Xero if they do not exist.
- According to the integration configuration, a Purchases and Sales account will be configured for the newly created item in Xero.
- If a part number is longer than 30 characters, then the item is not transferred to Xero as a product. The part number is combined with the description in the description field.
Purchase Orders, Purchase Invoices, and Bills
During integration setup, you must choose if Purchase Orders in MRPeasy are posted to Xero as Bills or Purchase orders.
- Once the Invoice ID has been entered on Purchase Orders or Purchase Invoices in MRPeasy, they will then be synchronized with Xero as drafts.
- If a payment has been saved in MRPeasy, the document in Xero will automatically become approved.
- After a Bill / Purchase order has been approved in Xero, it is not possible to update it via the integration from MRPeasy.
- At Procurement -> Invoices, the column Xero shows if the bill is sent to Xero.
- See also: Synchronization of payments.
Additional fees
If Additional fees are entered on a Purchase Order in MRPeasy, they are posted as a line item to Xero.
If "Inventory transactions" are synchronized:
- Additional fees must be posted to the integration default account (Purchases). These fees are expenses added to inventory valuation. They will be expensed when finished goods are sold and included in COGS.
- If additional fees are expensed immediately and are not part of inventory valuation, non-inventory items in MRPeasy can be used for them. The desired expense account can be selected for the item in Xero.
Please note: this specific recommendation is only valid for purchase orders, not for customer orders.
Vendor Credit Invoices
Vendor Credit Invoices are posted to Xero as Credit Notes.
- Once the Invoice ID has been entered on the Vendor Credit Invoice in MRPeasy, it will be sent to Xero.
- The process for sending Vendor Credit Invoices to Xero mirrors that of Bills.
The following preconditions must be met to post a Vendor Credit Invoice to Xero:
- The system setting “Several invoices per PO” is enabled and configured as “Separate invoices and deliveries = Yes”.
- The vendor credits account must be defined in the integration settings at Settings -> System settings -> Integrations -> Xero -> Change accounts.
Vendor Prepayment Invoices
Vendor Prepayment Invoices are posted to Xero as direct payments with Transaction: Spend Money.
- The Vendor Prepayment Invoice in MRPeasy must be fully paid.
- On the final invoice, a negative value prepayment line is added.
- The prepayments can be found in Xero at Accounting -> Bank accounts -> Open your bank account -> Account transactions.
- Though Xero has a dedicated Prepayment functionality, it is not possible to update a Prepayment via API after it has been created. Because of that limitation, the integration with Xero does not use that document.
The following precondition must be met to post a prepayment to Xero:
- The system setting “Several invoices per PO” is enabled and configured as “Separate invoices and deliveries = Yes”.
Sales Invoices
- Once an invoice type is marked Invoice or Credit invoice:
- and status is Unpaid, it is synced to Xero as a draft invoice. It must be approved in Xero.
- and status is Paid or Paid partially, it is synced to Xero as an approved invoice. It must have a Due date saved in MRPeasy to post it to Xero.
- After an Invoice is approved in Xero, it is not possible to update it via the integration from MRPeasy.
- At CRM -> Invoices, the column Xero shows if the invoice is sent to Xero.
- See also: Synchronization of payments.
Prepayments from customers
Prepayment invoices are posted to Xero as direct payments with Transaction: Receive Money.
- The Prepayment invoice in MRPeasy must be fully paid.
- On the final invoice, a negative value prepayment line is added.
- The posted prepayments are in Xero, at Accounting -> Bank accounts -> Open your bank account -> Account transactions.
- Though Xero has a dedicated Prepayment functionality, it is not possible to update a Prepayment via API after a prepayment is created. Because of that limitation, the integration with Xero does not use that document.
Synchronization of payments
Purchase invoices, sales invoices, and credit invoices:
- Payments are automatically synchronized according to the synchronization schedule.
- Payments for purchase orders are synchronized only if PO-s are sent to Xero as Bills.
Vendor prepayments and customer prepayments can only be sent one-way from MRPeasy to Xero.
Tax rates
The synchronization of tax rates works as follows:
- MRPeasy operates with tax percentages only; no 'named' tax rates exist.
- When a document with tax is sent to Xero, the tax rate with the same percentage is automatically chosen. If several tax rates have the same percentage, then the correct tax rate must be chosen in Xero.
- If you need a 'No tax' invoice, please leave the tax percentage field empty in MRPeasy.
- If you need a 0% tax, please enter tax as '0%' in MRPeasy.
- Unfortunately, MRPeasy cannot post 'Tax included' invoices. If this is important, please update these invoices in Xero.
Additional currencies
If several currencies are used in order to send invoices, POs, or bills to Xero, standard 3-character currency codes (USD, GBP, EUR, etc., according to ISO 4217) should be used for
- the system's base currency in MRPeasy.
- additional (foreign) currencies in MRPeasy.
The currency is sent to Xero along with the exchange rate saved for the document in MRPeasy.
Inventory and manufacturing transactions
For an in-depth integration, the "Inventory transactions" can be synchronized.
This means that a summary of inventory and manufacturing transactions is posted to Xero with a Manual Journal entry once per day.
Transactions corresponding to the following events are recorded:
- Purchased goods are received to stock.
- Materials are consumed in manufacturing.
- Workers start and finish operations.
- Manufacturing is finished, and products are put into stock.
- Goods are shipped to customers.
- Positive and negative manual inventory adjustments.
- Fees are applied when goods are transported to another warehouse.
- Parts are shipped to subcontractors.
- Subcontractors perform operations with a product.
Detailed descriptions can be found in the section "Events and transactions".
Inventory tracking in MRPeasy
In MRPeasy, the principles of inventory tracking are the following:
- MRPeasy uses stock lot tracking.
- Each batch of physical items is accounted for separately.
- All costs are based on specific stock lots.
- Average costing is not used.
- MRPeasy uses FIFO by default (or FEFO, when Expiry dates are used).
- It is also possible to manually manage inventory, e.g. for actual costing and/or for very detailed tracking and traceability.
- Read about bookings and consumption of goods.
- Financial transactions are automatically created when specific events happen with the inventory.
- MRPeasy is a "Perpetual inventory system".
- If you use the periodical method for inventory valuation (and Cost of Goods Sold calculation) (in Xero), then synchronization of inventory transactions should be disabled.
Events and transactions
The following tables describe all events that are synchronized:
- Documents, MRPeasy -> Xero.
- Documents, Xero -> MRPeasy.
- Journal entries, MRPeasy -> Xero.
- Synchronization schedule.
Events and transactions for synchronization of sales and purchasing documents
| # | MRPeasy document | MRPeasy event | Xero event | Xero Debit account | Xero Credit account |
| Purchase invoices | |||||
| 1.1 | Purchase Order | Purchase Order is created. | No event. | ||
| 1.2 | Purchase Order / Purchase Invoice | 'Invoice ID' is saved. | If MRPeasy PO is posted as PO, PO is created*. | No transaction. | |
| If MRPeasy PO / PI is posted as a Bill, Bill is created*. | 'Purchases' | Xero controlled (eg, Accounts Payable) | |||
| 1.3 | Purchase Order / Purchase Invoice | PO is updated. | If MRPeasy PO is posted as PO, PO is updated*. | No transaction. | |
| PO / PI is updated. | If MRPeasy PO / PI is posted as a Bill, Bill is updated*, if Xero accepts the update. Approved documents cannot be updated by MRPeasy. |
||||
| 1.4 | Purchase Order / Purchase Invoice | Payment is saved. | If MRPeasy PO / PI is posted as a Bill, payment is saved for the Bill**. (Payment is created according to the difference in the sum of saved payments in MRPeasy and Xero.) |
Xero controlled (eg, Accounts Payable) | 'Bank' |
| 1.5 | Purchase Invoice | Prepayment is applied. | Line "Prepayment" with the negative prepayment amount is added to the Bill*. | 'Purchases' | 'Purchases' |
| 1.6 | Purchase Order / Purchase Invoice | Payment is deleted. | No event, payment must be deleted manually. | ||
| 1.7 | Purchase Order / Purchase Invoice | PO / PI is deleted. | PO / Bill is not deleted, it must be deleted manually. | ||
| 1.8 | Vendor Credit Invoice | 'Invoice ID' is saved. | Credit Note is created*. | Xero controlled (eg, Accounts Payable) | 'Purchase Credits' |
| 1.9 | Vendor Credit Invoice | Document is updated. | Credit Note is updated*if Xero accepts the update. MRPeasy cannot update approved documents. |
||
| 1.10 | Vendor Credit Invoice | Prepayment is applied (for a refund). | The line "Prepayment" with the positive prepayment amount is added to the Credit Note* |
Xero controlled (eg, Accounts Payable) |
'Purchases' |
| 1.11 | Vendor Credit Invoice | Payment is saved. | Payment is saved for Credit Note** (Payment is created according to the difference in the sum of saved payments in MRPeasy and Xero.) |
'Bank' |
Xero controlled (eg, Accounts Payable) |
| 1.12 | Vendor Credit Invoice | Payment is deleted. | No event, payment must be deleted manually. | ||
| 1.13 | Vendor Credit Invoice | Document is deleted. | No event, Credit Note must be deleted manually. | ||
| 1.14 | Vendor Prepayment Invoice | 'Invoice ID' is saved. | No event. | ||
| 1.15 | Vendor Prepayment Invoice | Payment is saved. | Direct Payment is created*. | 'Purchases' | 'Bank' |
| 1.16 |
Vendor Prepayment Invoice |
Payment is deleted. | No event, Direct Payment must be deleted manually. | ||
| Sales invoices | |||||
| 2.1 | Invoice | Invoice status is changed from 'Dummy' to 'Unpaid'. | Invoice is created*. | Xero controlled (eg, Accounts Receivable) | 'Sales' |
| 2.2 | Invoice | Invoice is updated. | Invoice is updated*, if Xero accepts the update. Approved documents cannot be updated by MRPeasy. | ||
| 2.3 | Invoice | Payment is saved. | Payment is saved for Invoice**. (Payment is created according to the difference in the sum of saved payments in MRPeasy and Xero.) | 'Bank' | Xero controlled (eg, Accounts Receivable) |
| 2.4 | Invoice | Payment is deleted. | No event, payment must be deleted manually. | ||
| 2.5 | Invoice | Invoice is deleted. | No event, invoice must be deleted manually. | ||
| 3.1 | Credit-invoice | Credit-invoice status is changed from 'Dummy' to 'Unpaid'. | Credit Note is created*. | 'Sales' | Xero controlled (eg, Accounts Receivable) |
| 3.2 | Credit-invoice | Credit-invoice is updated. | Credit Note is updated*, if Xero accepts the update. MRPeasy cannot update approved documents. | ||
| 3.3 | Credit-invoice | Payment is saved. | Payment is saved for Credit Note** (Payment is created according to the difference in the sum of saved payments in MRPeasy and Xero.) | Xero controlled (eg, Accounts Receivable) | 'Bank' |
| 3.4 | Credit-invoice | Payment is deleted. | No event, payment must be deleted manually. | ||
| 3.5 | Credit-invoice | Credit-invoice is deleted. | No event, credit-invoice must be deleted manually. | ||
| 4.1 | Prepayment invoice | Invoice status is changed from 'Dummy' to 'Unpaid'. | No event. | ||
| 4.2 | Prepayment invoice | Payment is saved. | Direct Payment is created*. | 'Bank' | 'Customer Prepayments' |
| 4.3 | Prepayment invoice | Payment is deleted. | No event, Direct Payment must be deleted manually. | ||
| 4.4 | Invoice | Prepayment is applied to an invoice. | A line "Prepayment" with the negative prepayment amount is added to the invoice*. | 'Customer Prepayments' | 'Sales' |
| 4.5 | Credit-invoice | Prepayment is applied to a credit-invoice, for a prepayment refund. | Line "Prepayment" with a positive prepayment amount is added to the Credit Note. | 'Customer Prepayments' | Xero controlled (eg, Accounts Receivable) |
| # | Xero document | Xero event | MRPeasy event |
| Payments | |||
| 5 | Bill, Invoice, Credit Note | Payment is saved. | The payment is saved in the corresponding document in MRPeasy.** (Payment is created according to the difference in the sum of saved payments in MRPeasy and Xero.) See also: synchronization of payments. |
| 6 | Bill, Invoice, Credit Note | Payment is deleted. | No event; payment must be deleted manually. |
Events and transactions for synchronization of inventory transactions
| # | MRPeasy document | MRPeasy event | Xero event | Xero Debit account | Xero Credit account |
| Purchasing | |||||
| 7.1 | Purchase Order / Purchase Invoice | PO is received. | Journal is made***. (Exceptions: 6.3, 7.2) |
'Materials on Hand' | 'Purchases' |
| Purchasing - additional transactions of Subcontracting Purchase Orders | |||||
| 8.1 | Shipment (for a Purchase Order.) | Shipment is created for shipping parts to the vendor | No event. | ||
| 8.2 | Shipment | Goods are picked from stock. | Journal is made***. | 'Work in Progress' | 'Materials on Hand' |
| 8.3 | Purchase Order | PO is received. | Journal is made***. (This is an exception to 5.1) | 'Finished Goods' | 'Work in Progress' 'Purchases' |
| 9.1 | Purchase Order (for an operation in a MO.) | "Shipment date" is saved. | Journal is made***. | 'Work in Progress' | 'Purchases' |
| 9.2 | Purchase Order | PO is received. | No event. (This is an exception to 5.1) | ||
| Manufacturing | |||||
| 10.1 | Manufacturing Order | Manufacturing Order is created | No event. | ||
| 10.2 | Manufacturing Order | Parts are consumed. | Journal is made***. | 'Work in Progress' | 'Materials on Hand' |
| 10.3 | Manufacturing Order | Operations are started. | 1. Journal is made with full planned manufacturing overhead cost***. | 'Work in Progress' | 'Applied manufacturing overhead' |
| 2. Journal is made with full planned labor cost***. | 'Work in Progress' | 'Payroll/Direct labor' | |||
| 10.4 | Manufacturing Order | Manufacturing Order is finished. | 1. Journal is made***. | 'Finished Goods' | 'Work in Progress' |
| 2. Journal is made to adjust manufacturing overhead and labor cost***. | |||||
| Sales | |||||
| 11.1 | Shipment (for a Customer Order.) | Shipment is created. | No event. | ||
| 11.2 | Shipment | Goods are picked from stock. | Journal is made***. | 'Cost of Goods Sold' | 'Finished Goods' |
| RMA (Return Merchandise Authorization) | |||||
| 12 | RMA order | RMA order is created and received. | No event. | ||
| 12.1 | Stock lot | The received item is returned into general stock (status of the stock lot is changed from 'RMA returned' to 'Received', the cost is manually assigned). | Journal is made***. | 'Materials on Hand' / 'Finished Goods' | 'Inventory gain' |
| 12.1 | Manufacturing Order | RMA service order is created. | No event. | ||
| 12.2 | Manufacturing Order | Parts are consumed. | Journal is made***. | 'Work In Progress' | 'Materials On Hand' |
| 12.3 | Manufacturing Order | Operations are started. | 1. Journal is made with full planned manufacturing overhead cost***. | 'Work in Progress' | 'Applied manufacturing overhead' |
| 2. Journal is made with full planned labor cost***. | 'Work in Progress' | 'Payroll/Direct labor' | |||
| 12.4 | Manufacturing Order | Order is finished. | 1. Journal is made***. | 'Cost of Goods Sold' | 'Work in Progress' |
| 2. Journal is made to adjust manufacturing overhead and labor cost***. | |||||
| Other inventory transactions | |||||
| 13 | Manual stock lot | A manual stock lot is created in MRPeasy during the stock-taking. | Journal is made***. | 'Materials on Hand' / 'Finished Goods' | 'Inventory gain' |
| 14 | Write-off | A manual write-off is created in MRPeasy during the stock-taking. | Journal is made***. | 'Inventory loss' | 'Materials on Hand' / 'Finished Goods' |
| 15 | Transfer Order | Transport fees are applied to a Transfer Order, and Transfer Order is received. | Journal is made***. | 'Materials on Hand' / 'Finished Goods' | 'Transfer orders liability' |
| Other transactions | |||||
| 16 | Purchase Order, Purchase Invoice, Manufacturing Order, Manual stock lot, Write-off, Transfer Order, Shipment | Document is changed and inventory cost or balances change. | If the original transaction, that is adjusted, is less than 3 months old, a journal is made with net adjustment***. If transactions older than 3 months are adjusted, then this adjustment will not be posted to Xero automatically. You can find and post old transactions from here: https://app.mrpeasy.com/accounting/integrations/old-adjustments/xero Adjustments for past periods can be restricted by setting the "Books closing date" in the MRPeasy Standard Accounting module. |
According to the transactions, which are updated. | |
Synchronization schedule:
- *) New invoices and purchase orders are sent to Xero once per 5 minutes. Alternatively, it is possible to send a particular document to Xero immediately by clicking the button Add to Xero on the document's details page.
- **) The synchronization of payments happens in the following cases:
a. When a new invoice or a purchase order is sent to Xero from MRPeasy*.
b. When an invoice or a purchase order is opened in MRPeasy and the button Update in Xero is pressed.
c. If payments are added in Xero, they are synchronized to MRPeasy once per day, during the evening. - ***) Inventory transactions are synchronized once per day, during the evening (usually between 9 p.m. and 11 p.m.).
This synchronization can be run manually by clicking the button Synchronize now at Settings -> System settings -> Integration -> Xero. The manual synchronization can be performed once per 5 minutes.
Setup of the integration between MRPeasy and Xero
Jump to:
- Before you start.
- Connect MRPeasy and Xero.
- Select what to synchronize.
- Choose how Purchase Orders / Purchase Invoices are synchronized.
- Select accounts for the integration.
- Custom accounts for products.
- Xero tracking categories.
- Check products' Purchases and Sales accounts in Xero.
- Get MRPeasy and Xero in sync.
- Import customers, vendors, and items from Xero.
- Review, change, or disconnect the integration.
Before you start
Xero Tracked Inventory
Inventory (stock) tracking should not be used in Xero for items managed in MRPeasy. Xero makes some automatic inventory transactions for these items, e.g. when they are bought or sold, which MRPeasy does not control.
MRPeasy itself posts inventory transactions to accounts during nightly synchronizations.
Technical reasons why MRPeasy does not integrate with Xero Tracked Inventory are the following:
- At present, Xero does not support importing inventory values for items via API.
- Xero advises not to use its' inventory tracking for manufacturing companies (https://central.xero.com/s/article/Track-your-inventory) or when using a 3rd party inventory application (https://central.xero.com/s/article/Options-for-managing-inventory-in-Xero)
Base currencies
The same base currency must be used in both systems.
The base currency in MRPeasy is defined in the Regional settings of MRPeasy. It must be the same currency as in your Xero account.
Technically, if you have different base currencies in two systems, this is what happens:
- When an invoice with [MRPeasy] base currency is sent to Xero, then no information about currency conversion is sent, as there is no conversion rate for the base currency to itself.
- As a result, such invoices would have Xero's base currency, as Xero does not receive any currency conversion information.
- Also, inventory transactions are sent to Xero only in absolute values, which would be misinterpreted (e.g., a value of 100 will be interpreted as USD by MRPeasy but as GBP by Xero).
Connect MRPeasy and Xero
Step 0. Stop all activity
You should cease all activity in MRPeasy and Xero during the process of setting things up.
Step 1. Connect MRPeasy and Xero
- Log in to MRPeasy.
- Navigate to Settings -> System settings -> Integrations.
- Click on Connect to Xero to connect MRPeasy and Xero.
Step 2. Choose what to synchronize
It is possible to choose the synchronization of the following:
- Sales
- Sales documents are sent to Xero automatically.
- If not selected, sales invoices can be sent manually.
- Procurement
- Purchasing documents are sent to Xero automatically.
- If not selected, purchase orders or invoices can be sent manually.
- Inventory transactions
- The inventory and manufacturing transactions that are recorded in MRPeasy are automatically posted to Xero with journal entries.
- Several additional accounts must be mapped.
- These entries are shown in detail at MRPeasy -> Settings -> System settings -> Integrations -> Xero -> Synchronization logs.
- Advisor access for the Xero account manager is required; otherwise, it is not possible to see the journals that MRPeasy has posted in Xero.
- The syncing of inventory transactions should be disabled:
- If you use Xero-tracked inventory.
- If your accounting uses a periodic inventory system (in Xero), MRPeasy is a perpetual inventory system.
- If not selected, the posting of inventory transactions with journals is completely disabled. Cannot be done manually.
Considerations when syncing inventory transactions when the use of planned goods is allowed
The software allows the use of stock items in status Planned or On hold, if the setting Settings -> System Settings -> Software settings -> Use planned goods is enabled.
If this setting is enabled, the following should be considered:
- The cost of all planned goods used is considered to be 0 at the time when the goods are used.
- When goods are finally received (e.g., PO is received, MO is finished), financial transactions regarding the usage of goods are posted only retrospectively, with the value date of the next synchronization after the goods are received.
- As MRPeasy does not post backdated journals, the transactions are posted as "adjustments to previous periods".
- The integration does not automatically synchronize transactions that are older than 3 months.
- This means that if goods were used more than 3 months ago, the "adjustment for previous periods" will not be posted automatically.
- It is possible to look up old transactions and synchronize them from here: https://app.mrpeasy.com/accounting/integrations/old-adjustments/xero
Step 3. Choose how Purchase Orders are sent to Xero
Purchase Orders from MRPeasy can be posted to Xero as:
- Xero Purchase Orders.
- If the "Several invoices per PO" setting is enabled, then POs are not posted to Xero, regardless of this setting. Then, purchase invoices are posted as Bills.
- Xero Bills.
- Payments for bills are synchronized only if purchase orders are posted to Xero as Bills.
Step 4. Select accounts.
- A default Purchases (Current Asset) account.
- This is the product's Purchases account on the Xero Bill.
- MRPeasy uses this account to create new items in Xero.
- If inventory transactions are synchronized, this account holds the billed value but has not received the goods. The PO receipt transaction (credit) is posted in a journal on this account. - A Purchase credits (Current Asset) account.
- This account is used for items in the Xero Credit Note document, which is created when a Vendor Credit Invoice from MRPeasy is posted to Xero.
- Credits received from vendors accumulate on this account. - A Bank (Bank) account.
- An account to where payments are saved if entered in MRPeasy. - A Customer Prepayments (Liability) account.
- It is used when a customer pays a prepayment invoice. - A default Sales (Revenue) account.
- This is the Sales account on the Xero Invoice.
- MRPeasy uses this account when creating new items in Xero.
If inventory transactions are not synchronized, skip to selecting custom accounts for your products.
If synchronization of inventory transactions is enabled, additionally select:
- Default Finished goods (Current asset) and Materials on hand (Current asset) inventory accounts.
- By default, all items with a BOM are considered finished goods; items without a BOM are considered materials.
- Do NOT choose an account type of 'INVENTORY'. - A Work in progress (Current asset) account.
- An account for holding the value of currently unfinished goods, open manufacturing orders. - An Applied manufacturing overhead (Current liability) account.
- An account for posting manufacturing overhead costs, which are applied to the product's cost (to work in progress).
- If the allocation of manufacturing overhead is not desired, then workstations’ hourly rates, and fixed, and variable costs in routings must be defined as 0 in MRPeasy. - A Direct labor (Current liability) account.
- An account for posting direct labor costs, which are applied to product's cost (to work in progress) according to time worked on a job.
- If the allocation of direct labor is not desired, then users’ hourly labor rates must be defined as 0 in MRPeasy. - A default Cost of goods sold (Expense) account.
- Inventory Adjustments (Expense/Revenue) accounts.
- A Transfer orders liability (Current liability) account.
If you move items between several sites, transfer fees, which are applied to inventory, are posted on this account.
Step 5. Select custom accounts for products
Optionally, in the "Custom accounts" section on the integration configuration page, you can define custom accounts per product group:
- A Purchases (Current asset) account.
- This is the product's Purchases account on the Xero Bill.
- MRPeasy uses this account to create new items in Xero.
- If balances are synchronized, this account holds the billed value but has not received the goods. The PO receipt transaction's credit is posted in a journal on this account. - A Sales (Revenue) account.
- This is the product's Sales account on the Xero Invoice.
- MRPeasy uses this account to create new items in Xero. - An Inventory (Current asset) account.
- Do NOT choose an account type of 'INVENTORY'.
- Used only if balances are synchronized. - A Cost of Goods Sold (Expense) account.
- Used only if balances are synchronized.
If balances are not synchronized, save the account mapping, and the integration is set up! Then, continue to get MRPeasy and Xero in sync.
If balances are synchronized, continue to the next step.
Step 6. Map Xero tracking categories
If you use Tracking Categories in Xero, you can match them with Custom fields of Purchase Orders and Customer Orders in MRPeasy. The values of these custom fields will be transferred to Xero as tracking category options, along with their associated transactions.
To configure the use of Xero's tracking categories:
- The tracking categories must be set up in Xero.
- The custom fields must be set up in MRPeasy:
- Purchase Order and Customer Order custom fields are supported.
- The custom field type must be "Dropdown".
- The dropdown field values must match the options of the corresponding tracking category in Xero.
- Map MRPeasy custom fields with Xero tracking categories in the integration configuration page section "Tracking categories".
- Two custom fields can be mapped to tracking categories. (Limited by Xero.)
Step 7. Check products' Purchases and Sales accounts in Xero
Important notes about the Purchases and Sales accounts:
- The Purchases and Sales accounts from the integration configuration are used only in two cases:
- When creating new products in Xero.
- When posting manual journals about inventory movements (if balances are synchronized).
- Xero chooses the accounts on Purchase Orders, Bills, and Invoices in Xero from the details of the product in Xero.
If balances are not synchronized, the Purchases account in the Xero product need not match the integration configuration.
If balances are synchronized for all existing products in Xero, you must verify that the Purchases account matches the integration configuration.
- Go to Xero -> Products and services.
- Open a product.
- Check that the "Purchases" account in Xero product details matches the "Purchases" account defined in the integration configuration.
- Repeat for all products.
- Once done, save the integration configuration.
After the mapping of accounts is saved, the integration is set up! Continue to get MRPeasy and Xero in sync.
Getting MRPeasy and Xero in sync
When the integration is first established, it is important that data in both of the systems match.
First synchronization
The first time when the connection between MRPeasy and Xero is established:
- The earlier input POs and Invoices are posted only after you open and save them. If you do not make changes to old documents, they are not posted to Xero.
- If you already have some invoices, POs, or bills in Xero, you should not send these from MRPeasy to Xero again. You will risk having duplicates in Xero. - The changes in account balances from that day are posted to Xero during the next nightly synchronization.
Get starting account balances in sync
If you are synchronizing balances, you must take great care that the beginning balances in MRPeasy and Xero match.
This is easiest if there are no in-progress Manufacturing Orders and no invoiced-and-not-received Purchase Orders in MRPeasy.
Generally, the following steps should be taken:
- Establish the right balances for all of your accounts.
- Make sure that the inventory counts and balances are correct in MRPeasy and that the balances match with Xero.
- Send data from MRPeasy to Xero:
- Post any balance changes during this day with a journal entry by clicking "Synchronize now" in Settings -> System settings -> Integrations -> Xero.
- Optionally, sales invoices by opening them and sending them to Xero.
- Optionally, purchase invoices by opening them and sending them to Xero. - Check if the balances match those of MRPeasy and Xero.
- You may need to adjust the manual journal, which was just created.
If you have in-progress Manufacturing Orders in MRPeasy, consider the following:
- If MO was started:
- Before the integration is initialized, its WIP account in Xero should reflect the value of consumed materials from previous days.
- On the day of initializing the integration, its transactions are posted with the first synchronization. No manual action is necessary. - Alternatively:
a) You may want to finish all in-progress Manufacturing Orders before initializing the integration.
b) If there is still in-progress manufacturing, you could also:
- Manually create a stock lot for the finished goods in MRPeasy. Do not create a MO in MRPeasy.
- Or, re-create the situation in MRPeasy and Xero as if the manufacturing had not started. Start the MO only after step (5) above.
If there are invoiced and not received Purchase Orders in MRPeasy:
- The value of these POs should be reflected on the account in Xero, which was configured as the Purchases account for the integration. I.e. these Bills should use that account.
Import stock items, customers, and vendors from Xero
You can import stock items, customers, and vendors from Xero to MRPeasy at MRPeasy -> Settings -> System settings -> Integrations -> Xero.
Update or disconnect the integration
If you wish to review the chosen integration settings or make any changes to the integration, you can do this at Settings -> System settings -> Integrations -> Xero -> Change accounts.
Please note that when you change accounts, then the next transactions are posted to the new accounts. No changes are made to any historical data already posted to Xero.
The integration can be disconnected at Settings -> System settings -> Integrations -> Xero -> Disconnect.
Troubleshooting
Issues:
- I don't understand why some manual journal entries have been posted to Xero or how these are calculated.
- To see detailed information about all manual journals sent to Xero, please go to Settings -> System settings -> Integrations -> Xero -> Synchronization logs.
- Please check the list of events and transactions to understand when certain transactions are recorded.
- Note that MRPeasy posts journals always with the current date of the synchronization, which only happens after the action is actually performed in MRPeasy.
- MRPeasy does not backdate transactions in Xero, but stock movements transactions can be backdated or historical transactions changed in certain cases in MRPeasy.
- An invoice is not posted to Xero:
- To quickly find the reason, please click the Add to Xero button. You should then see a relevant error message.
- There may be several reasons:
- Invoices are posted once per 5 minutes. To synchronize immediately, click Add to Xero on the Invoice details page.
- MRPeasy only posts invoices in the statuses 'Unpaid', 'Paid partially', or 'Paid' and the types 'Invoice' or 'Credit invoice'. Invoices in other statuses or types are not posted. Please check the status and type of the invoice.
- The invoice does not have a "Due date".
- The invoice was created before the integration was initialized. Please open and save it.
- An invoice cannot be updated. Error message "Invoice not of valid status for modification"
- MRPeasy cannot update invoices, which have status "Void", "Deleted", or "Paid" (even partially). Xero does not allow MRPeasy to update these.
- If it has the status "Paid", please update it manually in Xero.
- "Void" and "Deleted" invoices are hidden in Xero, but can be searched for.
- If the invoice has the status "Void" or "Deleted", then either:
- It could be manually re-created in Xero. (It will not be connected with MRPeasy)
- Or, it could be deleted in MRPeasy and re-sent to Xero to create a new invoice.
- A Purchase Order is not posted to Xero:
- To quickly find the reason, please click the Add to Xero button. You should then see a relevant error message.
- There may be several reasons:
- Purchase orders are posted once per 5 minutes. To synchronize immediately, click Add to Xero on the purchase order details page.
- The "Invoice ID" must be saved in the purchase order details in MRPeasy before the order will be posted. Please check that this is done and that the PO is saved.
- In MRPeasy, you have enabled the software setting "Several invoices per PO = Yes", in which case POs are not sent to Xero. Please open the PO and create an invoice to send a bill to Xero.
- The PO was created before the integration was initialized. Please open and save it.
- A Purchase Order, or a bill cannot be updated. Error message: "Invoice not of valid status for modification"
- MRPeasy cannot update bills or purchase orders with the status "Approved," "Void," or "Deleted." Xero does not allow MRPeasy to update these.
- If it has the status "Approved", please update it manually in Xero.
- "Void" and "Deleted" bills are hidden in Xero, but can be searched for.
- If the bill has the status "Void" or "Deleted", then either:
- It could be manually re-created in Xero. (It will not be connected with MRPeasy)
- Or, it could be deleted in MRPeasy and re-sent to Xero to create a new bill.
- Error message: "Account code or ID must be specified" or "The TaxType field is mandatory"
- Please go to Xero -> Products and services, and check that every product in the document has both purchases and sales accounts set.
- Important notes about choosing these accounts: Setup: Check products' Purchases and Sales accounts in Xero.
- Error message: "Organisation is not subscribed to currency ..."
- This means that Xero does not recognize this currency.
- Please check that currency symbols in MRPeasy correspond to international standard codes. E.g. the US dollar should be USD, not US$, the Australian dollar should be AUD, not AU$. See: https://en.wikipedia.org/wiki/ISO_4217
- Please check that the currency is set up for use in your Xero account.
- Error message: "(Item): the ... account is invalid"
- This means that the configured "Purchases" or "Sales" account is incorrect for Xero.
- The account could be incorrect in one of the two locations:
- If the referred item does not yet exist in Xero, then at MRPeasy and Xero integration settings. (MRPeasy -> Settings -> System settings -> Integrations -> Xero -> Change accounts)
- Or, if the referred item already exists in Xero, then on the item details page in Xero. (Xero -> Business -> Products and services -> Item details).
- Some special account types cannot be used for items, such as 'INVENTORY'.
- MRPeasy is not connected with Xero anymore; the system asks me to renew the connection. "Xero returned the following error: Integration with Xero has expired"
- For security reasons, the connection between Xero and MRPeasy expires once per hour. This is the functionality of Xero.
- When this happens, MRPeasy tries to renew the connection. Usually, this happens successfully. But sometimes, the connection cannot be renewed. In this case, this message is displayed.
- To restore the connection, please click the "Renew now" button at Settings -> System settings -> Integrations -> Xero -> Change accounts.
- Cannot post prepayment invoices with zero or no price line items to Xero. Error message: "The UnitAmount value '0.0000' is invalid. UnitAmount must not be equal to zero."
- MRPeasy posts Prepayment invoices to Xero as Transaction: Receive Money.
- Neither zero nor empty price is allowed. This is a limitation of Xero.
- To post this prepayment invoice to Xero, please remove products without prices from the prepayment invoice. If the information below these items is needed, please copy it to the "Free text" field in the upper right corner of the page. Alternatively, please leave these products on the order confirmation only.
- Error message: "The specified contact details matched an archived contact. Archived contacts cannot currently be edited via the API".
- The error message says that the contact in Xero associated with the vendor or customer on the invoice(-s) is archived. Please restore this contact in Xero and try to synchronize it again.
Support
MRPeasy maintains the integration between Xero and MRPeasy. If you have technical questions about the integration, please turn to MRPeasy support. However, our Support team cannot consult you regarding the setup of your accounting in Xero.
Zapier
Zapier is a powerful workflow automation system that allows you to integrate MRPeasy with numerous applications available on this platform.
MRPeasy integration with Zapier provides flexible and powerful access to Customer Orders in MRPeasy from the programs of your choice via Zapier.
By making a Zap in Zapier, it is possible to:
- Create Customer Orders in MRPeasy.
- Update Customer Orders in MRPeasy.
- Search for Customer Orders in MRPeasy.
- Catch the event when a Customer Order status changes in MRPeasy.
- Troubleshooting.
Creating a Zap to send a Customer Order to MRPeasy
For sending a Customer Order from an app to MRPeasy via Zapier, please create a Zap as follows:
- Configure the trigger:
- Find the source app.
- Choose the trigger event.
- Select your account (if needed, sign in).
- Set up trigger details.
- Test the trigger.
- Configure the action:
- Find the MRPeasy app.
- Choose the action "Create Customer Order".
- Select your account (if needed, sign in).
- Map the source information from the source app to the MRPeasy Customer Order data (find the data structure below).
- Optionally, in the "Status" field, set the desired Customer Order status in MRPeasy.
- If the status is "Confirmed" or greater, MRPeasy will try to book products.
- If the status is "Shipped" or greater, MRPeasy will try to create a shipment and pick all products.
- If omitted, the "Confirmed" status is used by default. - Optionally, choose if the order should be marked as paid in MRPeasy. If yes,
- A new invoice for all products has been created in MRPeasy. The invoice is created with tax included.
- Full payment is added to the invoice. - Test the action.
- Enable the zap.
Data structure for mapping MRPeasy Customer Order data
The Customer Order data in MRPeasy consists of three structures, which all need to be mapped to the data from your source app:
1. Data structure of a Customer Order in MRPeasy
| Field name | Field type | Comments |
| Customer name* | String | Required. If you do not want to import customers' information to MRPeasy, please type a generic description, for example, "E-shop buyer". |
| Products (Lines)* | Structure | Required. Contains the list of ordered products. The structure is described in the table below. |
| Customer Order number | String | Optional. It must be unique in MRPeasy to identify the specific Customer Order. If no order with this number exists, a new Customer Order is created with this number. If not provided, MRPeasy generates a unique CO number automatically. |
| Reference | String | Optional. Use this field to save the original order (or customer's PO) number without a uniqueness check. |
| Internal notes | String | Optional. Any notes for your company's internal use. |
| Currency | String | Optional. 3-character currency code (according to the standard ISO 4217). The currency must be defined in MRPeasy -> Settings -> System settings -> Regional settings or Settings -> System settings -> Additional currencies. If omitted, customer's default currency is used. |
| Pricelist | Number or string | Optional. Available if the Professional function Tiered Pricing is enabled. The price list of the customer order. Price list number or database ID can be provided. If omitted, customer's default price list is used. |
| Delivery date | Timestamp | Optional. If provided, must be a valid Unix timestamp. If omitted, CO will have no expected delivery date. |
| Shipping address | Structure | Optional. The structure contains a shipping address. Described in the table below. |
2. Data structure of ordered products in MRPeasy
| Field name | Field type | Comments |
| SKU* | String | Required. SKU must match the part number of the product in MRPeasy. |
| Quantity* | Number | Required. Quantity must be greater than 0. |
| Price per item | Number | Optional. Price per item without discount. |
| Total price | Number | Optional. Total price after discount. |
| Discount percentage | Number | Optional. |
| Delivery date | Timestamp | Optional. If provided, must be a valid Unix timestamp. The expected delivery date for this item. |
Important notes:
- If the product structure contains invalid information (for example, the SKU does not exist in MRPeasy), only this order line is skipped.
- The Customer Order can be successfully created if it contains at least one product line.
- If the total price is provided, it has the highest priority.
If the total price is omitted, the price per item is used.
If the price per item is omitted, the price from the price list is used (if the Professional function Tiered Pricing is enabled).
The default selling price is used if there is no price in the price list.
3. Data structure of the shipping address in MRPeasy
| Field name | Field type | Comments |
| Street line 1* | String | Required, only if the shipping address needs to be imported. |
| City* | String | Required, only if the shipping address needs to be imported. |
| State* | String | Required, only if the shipping address needs to be imported. |
| Postal code* | String | Required, only if the shipping address needs to be imported. |
| Country code* | String | Required, only if the shipping address needs to be imported. A 2-character ISO country code (ISO 3166). |
| First name | String | Optional. |
| Last name | String | Optional. |
| Company | String | Optional. |
| Street line 2 | String | Optional. |
| Phone | String | Optional. |
Important notes:
- The address is not mandatory for the Customer Order. However, if it is provided and valid, it will be saved for the customer and used for this Customer Order.
Testing the Zap
After the mapping is completed, you must test the Customer Order input to ensure that the mapping is correct and that the resulting Customer Order in MRPeasy contains the information that was passed from the Zap.
The response contains the following fields:
| Field name | Field type | Comments |
| result_code | Number | Result code.
|
| result_txt | String | Description of the result. |
| result_error | String | Additional error messages. |
- Also, if a Customer Order is created successfully, the response contains full CO information in a structure, as defined here.
Finding a Customer Order in MRPeasy
To find Customer Orders in MRPeasy, please use the "Search Customer Order" action when configuring a Zap.
The following search parameters are available:
| Field name | Field type | Comments |
| Source | Dropdown |
Two options to choose from:
|
| Customer Order number | String | |
| Reference | String | |
| Customer name | String | |
| Status | Dropdown | Several statuses can be selected. |
Important notes:
- If successful, the "Search Customer Order" action returns a list of CO information in a structure, as defined here.
Getting notified when a Customer Order status changes in MRPeasy
MRPeasy can notify Zapier when the status of a customer order changes in MRPeasy.
When configuring MRPeasy as a trigger, please select the event "Customer Order status changed" when configuring a Zap.
Several options are available:
| Field name | Field type | Comments |
| Customer Order source | Dropdown | Customer Orders which are observed:
If left empty, all orders are observed. |
| Status from | Dropdown | If CO status before the change was one of the selected, the event can be triggered. If no statuses are selected here, CO in any status can trigger an event. Several statuses can be selected. |
| Status to | Dropdown | If CO status after the change is one of the selected, the event can be triggered. If no statuses are selected here, CO in any status can trigger an event. Several statuses can be selected. |
Important notes:
- When the trigger generates an event, it returns full CO information in a structure, as defined here.
Troubleshooting
- A Customer Order in MRPeasy is not created at all, even though some lines have SKUs with matching part numbers in MRPeasy.
- If the order contains a line without any SKU (empty/undefined/missing), Zapier will completely skip this order, and it will not be sent to MRPeasy.
- All line items must have at least some SKU; if it does not match the MRPeasy part number, only that line will be skipped. For Zapier, both fields, SKU and Quantity, are mandatory.
WooCommerce
WooCommerce is a powerful e-commerce platform. WooCommerce and MRPeasy work seamlessly together so that sales are done in WooCommerce, and products are manufactured, materials are handled, production is planned, and purchasing is managed in MRPeasy.
Jump to:
- Demo video: MRPeasy and WooCommerce integration.
- Synchronization of orders:
- Synchronization of inventory levels.
- Setup:
- Support for integration.
Synchronization of orders
Orders valid for import from WooCommerce
1. When you establish the integration, orders that are already in WooCommerce will not be sent to MRPeasy until they are updated (opened and saved).
- This allows the user to re-import orders if needed.
2. Orders that satisfy one of the following conditions can be imported from WooCommerce:
- not fulfilled, or
- created within the last 30 days.
3. Unpaid and fully paid orders can be imported from WooCommerce.
- The order is imported once it reaches the minimum payment state selected in the integration configuration (Pending, on Hold, or Processing).
4. Products must be pre-defined in MRPeasy.
- Products are matched by the SKU field in WooCommerce and the Part Number field in MRPeasy.
- If some products must not be sent to MRPeasy (for example, a service), they must have no SKU value or an SKU that does not match any part number in MRPeasy.
- If the order has no products with matching SKUs:
- It is not imported to MRPeasy.
- A note is attached to the order.
5. Additional notes:
- POS orders should also be imported.
- If some plugin updates all orders, then orders that are too old will be ignored.
- If the integration was configured more than 30 days ago, then all valid orders are imported already.
Step 1. Posting an order from WooCommerce to MRPeasy
- An order is imported to MRPeasy as a Customer Order at CRM -> Customer Orders.
- A note "In production" is added to the order in WooCommerce.
- The WooCommerce order number is copied to the Reference field in the MRPeasy Customer Order.
Step 2. Booking products for the order in MRPeasy
When an order has been imported into MRPeasy from WooCommerce:
- The software tries to book products. Available products are booked immediately.
- If there are products which couldn't be automatically booked, then:
- The Customer Order status will be Confirmed.
- The Product status will be Not booked.
- To book these parts, please see the instructions: How do you check stock and book products for a customer order?
- Demand for these items is created automatically. If items have a Reorder point value set, then these will already be displayed on the Critical On-hand report, which shows shortages.
Step 3. Notification when products are available for shipment
When all products are ready:
- The MRPeasy Customer Order’s status is changed to Ready for shipment.
- In WooCommerce, the order details include a note "Ready for shipment," indicating that the order can be fully fulfilled.
Step 4. Shipping the items and subtracting the stock from MRPeasy
For shipping the items, there are two alternative options:
- Create a shipment in MRPeasy and pick all items. The status of the order in WooCommerce will be changed to Completed.
- Or, change the order status to "Completed" in WooCommerce. A shipment will be created in MRPeasy, and all items will be automatically marked picked to deduct products from the inventory.
Taxes
All prices in the imported Customer Order are without tax.
- All sales prices in MRPeasy are tax-exclusive. If an item's price in WooCommerce is tax-inclusive, then its net sales price is derived.
- Taxes are added to invoices, not orders in MRPeasy.
If invoices are created (option "Mark orders as paid" is enabled):
- Taxes are added to sales invoices.
- Tax is calculated and rounded per line.
Canceled orders
If an order that was imported to MRPeasy is canceled in WooCommerce, MRPeasy can try to cancel the customer order.
To enable this functionality:
- Select the option "When order is canceled in WooCommerce: "Cancel in MRPeasy"" in the integration settings.
Please note:
- Manufacturing Orders (MO) and/or Purchase Orders (PO) will not be canceled,
- If a shipment has been created for a customer order, the customer order cannot be canceled.
If a customer order cannot be canceled automatically by MRPeasy, a note is added to the order in WooCommerce.
Synchronizing inventory levels from MRPeasy to WooCommerce
MRPeasy can update the available quantities of products in WooCommerce.
If this function is enabled:
- Once per hour, MRPeasy will update the available quantities of products in WooCommerce with the quantities available from MRPeasy.
See also: How to read the inventory numbers - in stock, available, expected? - Products are matched by "Part number" in MRPeasy and "SKU" in WooCommerce.
- If some product does not exist in WooCommerce or its’ inventory is not tracked in WooCommerce, then this product is ignored during the synchronization.
To enable this functionality:
- Go to Settings -> System settings -> Integrations -> WooCommerce.
- Click the Edit button next to your shop.
- Select the option "Sync inventory levels".
- If you have several sites in MRPeasy, choose what sites to synchronize.
- If you need to synchronize products with parameters, please enable the Legacy API at WooCommerce -> Settings -> Advanced -> Legacy API.
Setting up the WooCommerce integration
To set up the integration between WooCommerce and MRPeasy:
- Go to MRPeasy -> Settings -> System settings -> Integrations -> WooCommerce.
- Click the "Connect to WooCommerce" button.
- Fill in the required information:
- enter the store domain,
- Select which orders to import:
- Paid orders only.
- Paid and unpaid orders.
Unpaid are considered orders with statuses Pending, and On hold.
- Select what to do when an order is canceled in WooCommerce: cancel in MRPeasy also, or do nothing.
- select whether to import customer information or to use a generic customer,
- select whether to import shipping costs or not.
- select whether to mark customer orders as paid or not.
- if the Enterprise functionality "Multi-Stock and Production Sites" is enabled, select the site for booking products.
- Select whether to synchronize inventory levels from MRPeasy to WooCommerce.
- Click the "Install app" button.
- Set up products in MRPeasy.
- Optionally, add another WooCommerce store.
Importing customer information from WooCommerce
Depending on your business specifics, you may want to import customer information from WooCommerce to MRPeasy.
For privacy and data consistency reasons, it is advised to have customer information in one place only. For example, if a customer signs up in WooCommerce, his contact details should be in WooCommerce only.
You can set up the integration in one of the following ways:
- Use a generic customer in MRPeasy without importing any customer information.
- Do not select the option "Import customers".
- Do not select the option "Import shipping address".
- In this case, MRPeasy will create one generic customer in MRPeasy CRM, and use it for all orders that are imported from WooCommerce. It contains the domain name of your WooCommerce store.
- Do not select the option "Import customers".
- Import the customer.
- Select the option "Import customers".
- Now, when importing an order, MRPeasy looks for a customer with the same e-mail address.
- MRPeasy searches by the customer's general email first. If no customer is found, MRPeasy searches by the customer's contacts' email. If there are several records with the same email, any record can be selected—it is not possible to predict which record will be used.
- If the customer exists, it will be used to create the order.
- If no customer is found, a new customer will be created.
- The shipping address will be added to the customer's details.
- Only import the shipping address while using a generic customer in MRPeasy.
- Do not select the option "Import customers".
- Select the option "Import shipping address".
- Now, when importing an order, the shipping address is imported, saved in the generic customer’s details, and selected in CO.
- Do not select the option "Import customers".
Please note that WooCommerce allows updating the shipping address after placing the order. In this case, MRPeasy tries to update the address in the customer's details in MRPeasy. Nevertheless, please check that the addresses match in both systems.
Guest checkout in WooCommerce
If you allow guest checkouts in WooCommerce, WooCommerce does not create accounts for your customers, and MRPeasy also does not create customer accounts.
If importing of customers is enabled and guest checkout is used:
- The order will be imported under a generic name.
- The shipping address will be imported with the customer's name included in the address.
Importing shipping costs
To import shipping costs from WooCommerce to MRPeasy:
- Go to Settings -> System settings -> Integrations -> WooCommerce.
- Configure the integration between WooCommerce and MRPeasy.
- Select the option "Import shipping costs".
- Select the stock item for saving shipping costs.
When an order is imported from WooCommerce, a new line with this item and the shipping cost is added to the order in MRPeasy.
Shipping costs will be imported from WooCommerce without tax.
Marking customer orders as paid
To mark customer order as paid:
- Go to Settings -> System settings -> Integrations -> WooCommerce.
- Configure the integration between WooCommerce and MRPeasy.
- Select the option "Mark orders as Paid".
When an order is imported from WooCommerce, a new invoice with all products and shipping costs is created in MRPeasy. The invoice is also tax-included. Full payment is added to the invoice.
Configuring products in MRPeasy and WooCommerce
Products must be set up separately in MRPeasy and WooCommerce.
The "SKU" field in WooCommerce must match the "Part Number" field in MRPeasy. Otherwise, the product's order will not be imported to MRPeasy.
Please see:
- Demo video: Inventory management in MRPeasy.
- Demo video: Setting up procured items.
- Demo video: Setting up manufactured items.
- Demo video: Setting up inventory levels.
- Setting up new items.
- Import items.
- Enter initial inventory values.
Connecting several WooCommerce stores with MRPeasy
It is possible to integrate multiple WooCommerce stores with MRPeasy.
To do that:
- Please go to Settings -> System Settings -> Integrations.
- At the WooCommerce section, click the "+" button to add an additional WooCommerce store.
If you do not import customer information, every WooCommerce store has its own generic customer, which contains the domain name of your store.
Support
MRPeasy maintains the integration between WooCommerce and MRPeasy. If you have any technical questions about the integration, please contact MRPeasy support.
PDF Editor
The Settings -> System settings -> PDF Editor page allows customizing the layouts of PDF documents.
Demo video: Setting up business details, working hours, PDF editor.
It is possible to:
- add your company logo,
- edit titles of documents,
- edit layouts of documents,
- edit footers of documents (e.g. for adding terms and conditions),
- choose which company contact details are printed on documents,
- change the font size used in documents.
See also:
Company logo
The company logo can be displayed on documents that are sent to your customer or vendors: invoices, quotations, purchase orders, Waybills, etc.
For invoices and POs, the logo is added to the document "PDF for customer/vendor".
The logo is not displayed on internal use documents. For example, customer order PDF, manufacturing order PDF, etc.
For adding a logo:
- Upload it to external storage (Dropbox, OneDrive, Google Drive, any external URL).
- Open Settings -> System settings -> PDF Editor and click Edit.
- Choose the logo file from the external storage.
- Save.
- The placement of the logo can be set: left, center, right, or hidden.
Notes:
- The logo file must be either GIF, JPG, or PNG.
- The logo file size must be max. 250 KB.
- The recommended size is about 800 px width X 200 px height. MRPeasy reduces the logo 4 times for better quality.
Document titles
It is possible to rename document titles:
- Go to Settings -> System settings -> PDF Editor and click Edit.
- Find the document in the Names section.
- Type the new title next to the name of the original document.
Notes:
- This new title will be used in all languages.
- If you want the software to translate document titles to customer's or vendor's language, empty the Names section.
Company details
Company information, from Settings -> System settings -> Company details, is printed on invoices, waybills, and purchase orders. In the PDF Editor it is possible to select what details are included:
- Company name
- Address
- Phone
- Website
- Reg. no.
- Tax/VAT number
- Payment details
Document layouts
It is possible to choose which elements to print and how they are displayed on PDF documents that are sent outside of your company.
For editing a layout of a document:
- Open Settings -> System settings -> PDF Editor and click Edit.
- Scroll to the Layouts section.
- Click on the layout you wish to edit.
- It is possible to
- choose the orientation of the document: Portrait or Landscape.
- edit the layouts of the document header, main table, and footer.
- choose which fields and columns are displayed.
When editing the header and footer of a document:
- To print an element, check it.
- To hide an element, uncheck it.
- To move an element to a new location, click on it, and drag it to a new place.
- Elements can be moved from the header to the footer and vice versa.
When editing the main table of a document:
- All the columns in the Visible fields section will be printed on the document, in the displayed order and width.
- To change the order of columns, drag the column to a new location.
- To change the width of a column, drag the column's right boundary to the left or right.
- To change the alignment of a column, click on the column's name, and then select the needed alignment in the Alignment section.
- To show a column, drag it from the Hidden fields to the Visible fields. Place it where you want it to appear.
- To hide a column, drag it from the Visible fields to Hidden fields.
Manufacturing Order PDF layouts
MO PDFs "Wide" and "Medium" show the "Quantity" column only for the done (finished) MOs.
Document Footers
Footer is text that is printed at the bottom of PDF documents. It is possible to set different texts for different documents and select font size and alignment.
For adding a footer to a document:
- Open Settings -> System settings -> PDF Editor and click Edit.
- Scroll to Footers.
- Choose the footer to edit.
- Enter the footer text.
- Save.
The General footer is added to all documents, in addition to the document-specific footer.
The maximum footer length is 30,000 characters, which allows comfortably attaching terms and conditions or other standard notes.
Label editor
The Settings -> System settings -> Label editor page allows customizing the layouts of labels and configuring bulk printing.
- Demo video: Label editor.
- The following labels can be edited:
- Edit a label.
- Add multiple layouts for a label.
- Bulk printing.
Label layout
With the Label Editor, you can choose which elements to print and how they are displayed on the label.
To edit a label:
- Go to Settings -> System settings -> Label editor and click Edit.
- Click on the label name to open the layout for editing.
In the layout editor, you can:
- Add alternative layouts to the same label type.
- Change the label size.
- Define the exact size in mm or inch.
- Or, drag the label's right or bottom boundary.
- Add elements to the label.
- Drag and drop the element from the Fields list into the label.
- Remove elements from the label.
- Drag and drop the element from the label into the Fields list.
- Move elements on the label.
- Drag and drop it into a new place.
- Change the size of an element.
- Drag the element's right or bottom boundary.
- Change the alignment and font of text on an element and the visibility of the element's title and border.
- Click on the element and select the needed options in the Field options section.
Multiple label layouts
When you are editing a label layout, from the top of the page, you can:
- Select the active layout that you are editing.
- Add a new layout to the same label type.
- Delete an existing layout.
While printing the label, if it has multiple layouts, you will be prompted to choose the desired print layout.
Bulk printing
By default, each label is printed on a separate page. MRPeasy supports printing:
- Several identical labels at once, e.g., several copies of the same item label.
- Several different labels at once, e.g., labels of different items.
It is possible to put several labels on one page. To do this:
- Enable the Bulk printing functionality below the label layout.
- Select the paper size, enter margins, and how many labels should be printed on one page.
E-mail Editor
The Settings -> System settings -> E-mail Editor page allows customizing subjects and texts of e-mails that can be sent to your customers and suppliers.
Jump to:
Available placeholders
Placeholders can be used in the e-mail templates, which will be automatically replaced with real information when compiling the e-mail.
| Placeholder | Information that will be written instead of it |
| [document] | The name of the document |
| [code] | The code/number of the document |
| [company] | The name of your company |
| [customer_company] | The name of your customer company |
| [vendor_company] | The name of your vendor company |
| [link] | The link to the document |
Order reference in Invoice e-mails
If the linked customer order has a reference, the [code] placeholder is replaced with the document code followed by the reference in brackets, in this format: [document code] (reference: [customer order reference]).
Internet-kiosk Editor
The Settings -> System settings -> Internet-kiosk Editor page allows customizing the information displayed in the Internet-kiosk, which workers can use for production reporting.
Jump to:
Worker sees in Internet-kiosk
Select which scheduled operations workers can view in the Internet-kiosk:
- All operations that are scheduled for this worker.
- Ready for execution - operations are visible only after all previous operations in the manufacturing order are finished.
Advanced Internet-kiosk
Enable this setting to display additional information in the Internet-kiosk.
When the advanced Internet-kiosk is enabled, workers gain:
- An overview of parts and materials.
- Access to attached files.
- Serial numbers reporting for used components and finished products.
In the parts section, only the required quantity is shown by default. Here, additionally, the following information can be enabled:
- stock lot,
- storage location.
Field Configuration
Configure the visibility and order of fields displayed in the Internet-kiosk:
- Enable fields by ticking their checkboxes.
- Drag fields to rearrange them.
It is possible to enable or disable the following fields:
| Manufacturing order | Shows the number of the manufacturing order the operation belongs to. |
| Product | Name of the product being manufactured. |
| Remaining quantity | Quantity still to be produced in the operation. |
| Operation | Name of the specific operation. |
| Workstation | The workstation or machine assigned to the operation. |
| Planned time | Scheduled time of the operation. |
| Customer order | Number of the customer order linked to the manufacturing order. |
| Customer | Name of the customer for whom the product is being manufactured. |
| Due date | Planned due date of the manufacturing order. |
| Custom fields | Any custom fields of manufacturing orders defined in the MRPeasy settings. |
Write-off Types
The Settings -> System settings -> Write-off types page allows you to manage custom write-off codes for tracking items that have been manually written off inventory.
Types are used to group write-offs by type for better control over non-manufacturing and non-sales consumption of stock items (for example, development of new products, gifts to partners, etc).
Once a type has been defined, it can be selected when creating a manual write-off at Stock -> Write-offs.
Manual write-offs can be sorted by type in the following reports:
- Stock -> Write-offs;
- Stock -> Stock movement.
The number of write-off types in the system is limited to 25.
Customer Statuses
The Settings -> System settings -> Customer statuses page allows defining the statuses of how you group your customers.
The default customer statuses in the CRM are:
- No contact
- No interest
- Interested
- Permanent buyer.
The statuses can be freely defined, how is logical for your company. The statuses could represent for example:
- Stages in the sales process (No contact -> No interest -> Interested -> Customer, or Opportunity -> Lead -> ..., etc.)
- The type of customer (Wholesale, Retail, etc.)
- The importance of customer (A, B, C)
Delivery Terms
Delivery terms can be selected in customer orders.
The Settings -> System settings -> Delivery terms page allows managing delivery terms. It is possible to create, change, delete and reorder delivery terms.Standard Accounting
MRPeasy has a built-in standard accounting module.
It consists of:
- chart of accounts,
- general ledger,
- balance sheet,
- profit and loss statement.
All transactions that are made in manufacturing, stock, procurement, and CRM are automatically reflected in the accounting.
Jump to:
- Demo video: Standard Accounting module.
- Setting up accounting.
- Chart of accounts.
- Transactions.
- Locking previous financial periods.
- Payroll.
- Tax calculations, rounding of tax.
Setting up accounting
To enable accounting, do the following:
- Go to Settings -> System settings -> Software settings, and enable the Standard Accounting module.
- Go to the "Accounting" section of the software. The software will create default accounts. If you do not see the menu point "Accounting", then check your user rights.
- After the chart of accounts is created, the software will ask you for the accounts' start date.
- When accounts are created and the start date is saved, the Standard accounting module is enabled.
To enter initial account values, please go to Accounting -> Settings -> Accounts -> Manual Journals and create a new journal.
Trialing the standard accounting
We understand that you may want to test the accounting module for a while and then discard testing transactions.
There are two options on how to do that:
- If all your data (including orders and stock levels) is for testing, please delete it at Settings -> Database Maintenance -> Delete orders and stock only;
- If you are already using MRPeasy and your data is valid, please go to Accounting -> Settings and change the "Accounts start date." All transactions that took place prior to that date will be ignored.
Chart of accounts
Principles
General principles:
- The accounts are divided into different categories.
- An account can be a sub-account to a parent account.
- Initially, a default chart of accounts is loaded.
- For every account, it is possible to choose which kind of automatic journal entries are posted to it.
- Transactions are automatically generated when specific actions occur.
Categories of accounts
| # | Category | Type | Credit- or Debit-positive | On balance sheet | On the profit and loss statement |
| 1 | Bank | Asset | Debit | Yes | No |
| 2 | Current assets | Asset | Debit | Yes | No |
| 3 | Fixed assets | Asset | Debit | Yes | No |
| 4 | Current liability | Liability | Credit | Yes | No |
| 5 | Future liability | Liability | Credit | Yes | No |
| 6 | Equity | Equity | Credit | Yes | No |
| 7 | Sales | Revenue | Credit | No | Yes |
| 8 | Other income | Revenue | Credit | No | Yes |
| 9 | Direct expenses | Expense | Debit | No | Yes |
| 10 | Indirect expenses | Expense | Debit | No | Yes |
Default chart of accounts
In the default chart of accounts, automatic transaction types (configured with the Default account for setting) are pre-assigned for certain accounts.
The default chart of accounts:
| # | Code | Name | Category | Default account for |
| 1 | 1010 | Checking | Bank | payments (Bank) |
| 2 | 1020 | Cash | Bank | |
| 3 | 1100 | Accounts receivable | Current assets | unpaid invoices (Accounts receivable) |
| 4 | 1210 | Purchases | Current assets | not received ordered items (Purchases) |
| 5 | 12101 | Purchase credits | Current assets | credits from vendors for returned or refunded items |
| 6 | 1220 | Materials on hand | Current assets | received parts |
| 7 | 1230 | Work in progress | Current assets | work in progress |
| 8 | 1240 | Finished goods | Current assets | finished goods |
| 9 | 1260 | Non-inventory items | Current assets | non-inventory items |
| 10 | 1500 | Property and equipment | Fixed assets | |
| 11 | 2000 | Accounts payable | Current liability | |
| 12 | 2310 | Sales tax payable | Current liability | sales tax |
| 13 | 2350 | Customer prepayments | Current liability | customer prepayments |
| 14 | 2400 | Applied manufacturing overhead | Current liability | applied manufacturing overhead costs |
| 15 | 2500 | Accrued payroll | Current liability | direct labor costs |
| 16 | 2700 | Transfer orders liability | Current liability | transport costs at transfer orders |
| 17 | 3000 | Equity | Equity | |
| 18 | 4000 | Sales | Sales | sales |
| 19 | 5000 | Cost of goods sold | Direct expenses | shipped goods (Cost of goods sold) |
| 20 | 5800 | RMA service | Direct expenses | RMA service orders |
| 21 | 5900 | Inventory adjustments | Direct expenses | manual stock lots, manual write-offs |
| 22 | 6000 | Wages expense | Indirect expenses | |
| 23 | 6200 | Income tax expense | Indirect expenses | |
| 24 | 6400 | Utilities expense | Indirect expenses | |
| 25 | 6450 | Office supplies | Indirect expenses | |
| 26 | 6600 | Advertising expense | Indirect expenses | |
| 27 | 6700 | Bank fees | Indirect expenses |
Configuring an account
Accounts can be created and managed at Accounting -> Chart of accounts.
For creating a new account:
- Go to Accounting -> Chart of accounts.
- Click '+' to add a new account.
- Choose the Category, and enter the Number, and the Name.
- Optionally, choose the Parent account.
- Optionally, under Default account for, select transaction types for which this account is used when journal entries are automatically made.
For configuring an existing account:
- Go to Accounting -> Chart of accounts.
- Click on the account to open its details for viewing and editing.
Different inventory accounts per product group
It is possible to set different inventory accounts per product group at Stock -> Stock settings -> Product groups -> Product group details -> Inventory account.
Changing the account of a product group when items are in stock
The change of the product group mapping to a general ledger account has no back-value effect. That is, parts accounted for in the previous account will still be reflected in that account after the configuration change.
If you need the product group inventory value reflected fully on the new account, you must calculate the inventory value of it on the old account for the date, when the setting was changed, and make a manual journal entry to transfer the amount from the old account to the new account.
Transactions
Automatic transactions
When some transaction happens in MRPeasy, a journal entry is automatically made.
| # | Source document | Event | Posting date | Debit account | Credit account |
| Purchasing | |||||
| 1 | Purchase Order | Purchase Order is created | No transaction | ||
| 1.1A | Purchase Order | "Invoice ID" is saved. (Setting "Several invoices per PO = No") |
"Invoice date" if defined, else “Created” date of Purchase Order. | Purchases, Sales Tax Payable |
Accounts Payable |
| 1.1B | Purchase Invoice | "Invoice ID" is saved. (Setting "Several invoices per PO = Yes") |
"Invoice date" if defined, else “Created” date of Purchase Invoice. | ||
| 1.2A | Purchase Order | Payment is saved (Setting "Several invoices per PO = No") |
"Date" of payment. | Accounts Payable | Bank (e.g. Checking) |
| 1.2B | Purchase Invoice | Payment is saved (Setting "Several invoices per PO = Yes") |
"Date" of payment. | Accounts Payable | Bank (e.g. Checking) |
| 1.3 | Purchase Invoice | Prepayment is applied. | No transaction | ||
| 1.4A | Purchase Order | Goods are received (Workflow A) |
"Arrival date" of Purchase Order, or the current date when saving the document, whichever is earlier. *Transaction date is fixed after it is created. |
Materials on Hand | Purchases |
| 1.4B | Purchase Invoice | Goods are received (Workflow B) |
"Created" date of Purchase Invoice, or the current date when saving the document, whichever is earlier. *Transaction date is fixed after it is created. |
Materials on Hand | Purchases |
| 1.4C | Delivery | Goods are received (Workflow C) |
"Created" date of Delivery, or the current date when saving the document, whichever is earlier. *Transaction date is fixed after it is created. |
Materials on Hand | Purchases |
| 1.5 | Purchase Order, Purchase Invoice, or Delivery | Non-inventory items are received | According to 1.4 | Non-Inventory Items | Purchases |
| 1.6 | Vendor Credit Invoice | "Invoice ID" is saved. | "Invoice date" if defined, else "Created" date of Purchase Invoice. | Accounts Payable | Purchase credits, Sales Tax Payable |
| 1.7 | Vendor Credit Invoice | Prepayment is applied (for a refund). | No transaction | ||
| 1.8 | Vendor Credit Invoice | Payment is saved. | "Date" of payment. | Bank (e.g. Checking) | Accounts Payable |
| 1.9 | Vendor Prepayment Invoice | "Invoice ID is saved. | "Invoice date" if defined, else "Created" date of Purchase Invoice. | Purchases, Sales Tax Payable |
Accounts Payable |
| 1.10 | Vendor Prepayment Invoice | Payment is saved. | "Date" of payment. | Accounts Payable | Bank (e.g. Checking) |
| Manufacturing | |||||
| 2 | Manufacturing Order | Manufacturing Order is created | No transaction | ||
| 2.1 | Manufacturing Order | Parts are consumed | The date, when the materials are reported consumed from stock: - Date when the materials consumption is reported in My production plan or Internet-kiosk. - Or, if the "Finish production as planned" button is pressed: a) If operations were not reported, the MO "Start" date. (Note that if the MO is planned in the future, the initial planned "Start" date will be recalculated, so it wouldn't be in the future.) b) If the operations were reported, the button press date. - Or, if the MO was already finished, the date when extra materials are added to the MO manually. |
Work in Progress | Materials on Hand |
| 2.2 | Manufacturing Order | A worker finishes a manufacturing operation at a workstation | - An operation's "Actual finish" date. - Note that if the "Finish production as planned" button is used and the MO is planned in the future, the initial operation planned dates will be recalculated, so these wouldn't be in the future. |
Work in Progress | Accrued Payroll |
| Work in Progress | Applied Manufacturing Overhead | ||||
| 2.3 | Manufacturing Order | Manufacturing Order is finished | - MO "Finish" date. - Note that if the "Finish production as planned" button is used and the MO is planned in the future, the initial planned "Finish" date will be recalculated, so it wouldn't be in the future. |
Finished Goods | Work in Progress |
| 3 | Manufacturing Order | A service order is created to repair a rejected stock lot | No transaction | ||
| 3.1 | Manufacturing Order | Parts (incl. the original stock lot) are consumed | Date when the "consume" button is pressed | Work in Progress | Materials on Hand |
| 3.2 | Manufacturing Order | A worker finishes an operation at a workstation | Operation's "Actual finish" date | Work in Progress | Accrued Payroll |
| Work in Progress | Applied Manufacturing Overhead | ||||
| 3.3 | Manufacturing Order | The service order is finished | MO "Finish" date, or the date when "Finish production as planned" is pressed (whichever is earlier) | Materials on Hand / Finished Goods | Work in Progress |
| Sales | |||||
| 4 | Customer Order | Customer Order is created | No transaction | ||
| 5 | Shipment | Shipment is created (planned) | No transaction | ||
| 5.1 | Shipment | Goods are picked from stock | Date when the "pick" button is pressed | Cost of Goods Sold | Finished Goods |
| 5.2 | Shipment | Shipment packages are picked | Date when the "pick" button is pressed | Cost of Goods Sold | Materials on Hand / Finished Goods |
| 6.1 | Invoice | An invoice is created and confirmed (type is ‘Invoice’ and status is changed from 'Dummy' to 'Unpaid') | "Created" date of invoice | Accounts Receivable | Sales, Sales Tax Payable |
| 6.2 | Invoice | Payment is saved | "Date" of payment | Bank (e.g. Checking) | Accounts Receivable |
| 7.1 | Credit-Invoice | A credit-invoice is created and confirmed (type is ‘Credit-invoice’ and status is changed from 'Dummy' to 'Unpaid') | "Created" date of credit-invoice | Sales, Sales Tax Payable |
Accounts Receivable |
| 7.2 | Credit-Invoice | Payment is saved | "Date" of payment | Accounts Receivable | Bank (e.g. Checking) |
| 8.1 | Prepayment invoice | A prepayment invoice is created and confirmed (type is ‘Prepayment invoice’ and status is changed from 'Dummy' to 'Unpaid') | "Created" date of prepayment invoice | Accounts Receivable | Customer Prepayments, Sales Tax Payable |
| 8.2 | Prepayment invoice | Payment is saved | "Date" of payment | Bank (e.g. Checking) | Accounts Receivable |
| 8.3 | Invoice | Prepayment is allocated to an invoice (type is ‘Invoice’ and status is changed from 'Dummy' to 'Unpaid') | "Created" date of invoice | Customer Prepayments | Sales |
| 8.4 | Credit-Invoice | Prepayment is allocated to a credit-invoice (type is ‘Credit-invoice’ and status is changed from 'Dummy' to 'Unpaid') | "Created" date of credit-invoice | Customer Prepayments | Accounts Receivable |
| Inventory | |||||
| 9.1 | Stock lot | A manual stock lot is created during the stock-taking | "Available" date of the stock lot when its status is saved as "On hold" or "Received". Or date when it was added with the Stock -> Inventory function. *Transaction date is fixed after it is created. |
Materials on Hand / Finished Goods | Inventory Adjustments |
| 9.2 | Write-off | A manual write-off is created during the stock-taking | "Created date" of the write-off | Inventory | Materials on Hand / Finished Goods |
| Subcontracting | |||||
| 10 | Purchase Order | Subcontracting PO is created. | No transaction | ||
| 10.1 | Purchase Order or Purchase Invoice | Invoice is received and entered (the 'Invoice ID' is saved). | "Invoice date" of PO, or "Created" date of PI |
Purchases | Accounts Payable |
| 10.2 | Shipment for PO | Parts are picked from stock, and issued to the subcontractor. | Date when the "pick" button is pressed | Work in Progress | Materials on Hand |
| 10.3 | Purchase Order or Purchase Invoice | Subcontracting PO (not for an operation in a MO) is received | "Arrival date" of PO, or "Created" date of PI. *Transaction date is fixed after it is created. |
Finished Goods | Work in Progress, Purchases |
| 10.4 | Purchase Order or Purchase Invoice | Subcontracting PO, made for an operation in a Manufacturing Order, is received. | "Arrival date" of PO, or "Created" date of PI. *Transaction date is fixed after it is created. |
Work in Progress | Purchases |
| RMA | |||||
| 11 | RMA order | RMA order is created and received | No transaction | ||
| 11.1 | Stock lot | The received item is returned into general stock (status of the stock lot is changed from 'RMA returned' to 'Received', the cost is manually assigned) | "Available" date of the stock lot when its status is saved as "On hold" or "Received". *Transaction date is fixed after it is created. |
Materials on Hand / Finished Goods | Inventory Adjustments |
| 11.2 | Manufacturing Order | RMA service order: Parts are consumed | Date when the "consume" button is pressed | RMA service | Materials on Hand |
| 11.3 | Manufacturing Order | RMA service order: a worker finishes an operation at a workstation | Operation "Actual finish" date | RMA service | Accrued payroll |
| RMA service | Applied manufacturing overhead | ||||
| Other transactions | |||||
| 12 | Transfer Order | A transfer order is shipped and fees are applied | "Shipment date" of transfer order | Materials on Hand / Finished Goods | Transfer orders liability |
| 13 | Any document | When a source document is updated so that values change original transactions, then these transactions are updated. | The date of the original transaction. | The original transaction is changed. | |
| 14 | Any document | When a source document is deleted/canceled, then transactions are canceled. | The date of the original transaction. | The original transaction is canceled. | |
Inventory tracking in MRPeasy
In MRPeasy, the principles of inventory tracking are the following:
- All items in inventory are tracked using stock lot tracking within MRPeasy. I.e. each batch of physical items is accounted for separately.
A stock lot is an internal business object in the MRPeasy software, used for providing the FIFO method of using goods, and also for specific functionality, like expiry date, or batch traceability. Without such specifics, you do not need to operate with stock lots in your daily business (MRPeasy does it in the background). - By default, MRPeasy uses FIFO (FEFO, when Expiry dates are used) principle when booking goods for consuming or shipping goods from inventory.
It is possible to manually manage and override the bookings and consumption of inventory, e.g. for actual costing and/or for very detailed tracking and traceability. - Financial transactions are automatically made when specific events happen with the inventory.
Inventory tracking transactions step-by-step
In MRPeasy, together with all automatic accounting transactions, the inventory tracking and financial transactions work as follows:
- All items in inventory are tracked using stock lot tracking within MRPeasy. I.e. each batch of physical items is accounted for separately.
A stock lot is an internal business object in the MRPeasy software, used for providing the FIFO method of using goods, and also for specific functionality, like expiry date, or batch traceability. Without such specifics, you do not need to operate with stock lots in your daily business (MRPeasy does it in the background). - When a purchase order is ordered and a purchase invoice ID is entered, but items are not yet received, then the cost of items is posted on a purchases account:
D Purchases (Current assets)
C Accounts payable (Liabilities) - When purchased items are received, then items are transferred from purchases to materials on hand:
D Materials on hand (Current assets)
C Purchases (Current assets) - Additional expenses incurred with purchases (e.g. transport, customs) can be accounted into the cost of the procured items, by entering them as “Additional fees” on the Purchase Order (or Purchase Invoice).
D Purchases (Current assets)
C Accounts payable (Liabilities)
Once the PO is received:
D Materials on hand (Current assets)
C Purchases (Current assets) - When a manufacturing order is planned, then according to the bill of materials, the materials are reserved for this job.
- When materials are reported consumed in production, they are moved to work in progress (WIP):
D Work in progress (Current assets)
C Materials on hand (Current assets) - When an operation is finished, then the performed direct labor and the applied manufacturing overhead costs are posted to WIP according to recorded start-stop times:
D Work in progress (Current assets)
C Accrued payroll (Liabilities)
D Work in progress (Current assets)
C Applied manufacturing overhead (Liabilities) - Once a manufacturing order is finished, WIP is cleared and posted to finished goods:
D Finished Goods (Current assets)
C Work in progress (Current assets) - When additional fees are posted to transfer orders, these increase the cost of the transferred items:
D Materials on hand / Finished goods (Current assets)
C Transfer Orders liability (Liabilities) - When products are shipped to the customer, then the cost of the products is posted to the cost of goods sold account:
D Cost of goods sold (Expenses)
C Finished Goods (Current assets) - When a manual inventory adjustment is made:
D Materials on hand / Finished goods (Current assets)
C Inventory adjustments (Expense)
or
D Inventory adjustments (Expense)
C Materials on hand / Finished goods (Current assets)
Manual journal entries
To make a manual journal entry:
- Go to Accounting -> Settings -> Accounts -> Manual Journals.
- Click "+" to create a new manual journal entry.
Locking historical financial records
To prevent modification of historical financial records, the books closing date should be set at Accounting -> Settings -> Books closing date.
The date is inclusive. Any action in the system, that would affect accounts on that day or earlier, will be blocked, excluding actions that get logged in the "Adjustments to books closed period" report.
How can previous financial records change, when books are not closed
- Primarily, stock history and the cost of items can change if old documents are changed.
- E.g. a modification or deletion of a Purchase Order will have cascading effects through the system, as the cost of materials changes.
- If planned goods are used, initially the cost of all used goods is considered as 0.
- By default, the software allows using (consume, ship, transfer) goods that are not received, i.e. goods that are planned.
- Read more: software setting "Use planned goods".
- When adding "Additional fees" to Purchase Orders, the cost of all items on that PO will be updated, incl. items that were received in the earlier periods.
- When using the function "Finish production as planned" to finish Manufacturing Orders.
Adjustments to books closed period
To avoid disrupting a normal business process, the software allows some actions in the closed financial period which it additionaly logs in the report Accounting -> Reports -> Report: Adjustments to Books Closed Period:
- When the Software setting MO partial completion is enabled, in progress (not finished) MOs that were started before the Books closing date can be updated freely without any restriction.
- All actions with such MOs are allowed. Once the MO is finished, all further actions that affect the closed period will get blocked.
- All financial adjustments in the closed period get logged: showing the reason for this adjustment, the old lot cost, and the new cost.
- All existing financial transactions (relating to the MO) in the closed period can be updated, meaning that related inventory, work in progress, applied manufacturing overhead, and accrued payroll, COGS, etc. balances can all change. For example:
- If the MO was partially completed in a now-closed period, the cost of the earlier completed products can be updated, when further actions are performed with the MO.
- If any input (materials, overhead, or labor) or output (final quantity of products, additional products) changes, then the product cost will change, because manufacturing costs in the MO are divided equally among all produced items (the unit cost is the same in all target lots).
- If an operation was finished in the now-closed period, it can be updated.
- Materials that were consumed in the now-closed period can be returned to stock.
- Etc.
Payroll
Payroll report
This report shows the performance pay per employee during the period.
When the Professional function Piece Payment is enabled, then it is possible to choose how employees are paid:
- Time-payment - Operation duration x Hourly rate
- Piece-payment – Price per piece x Quantity
- or both.
When the Piece Payment function is disabled, then only time-payment can be applied, when an hourly rate is set in employees’ details.
If you have a right to view users, it is possible to click on the user’s name and see the list of operations that were performed by the employee during the period.
Processing payroll
It is possible to process payroll with manual journal entries.
When you are making payroll, you should:
- Use manual journal entries to enter the payroll and payments at Accounting -> Manual journals.
- Use manual journal entries to zero the accrued payroll account periodically.
A simplified example with numbers:
- The following automatic journals happen:
1. When work is reported in a Manufacturing Order (MO) (Assumption: materials costs and applied manufacturing overhead costs are 0.)
D Work in progress (Current assets) 100
C Accrued payroll (Current liability) 100
2. When the MO is finished
D Finished goods (Current assets) 100
C Work in progress (Current assets)100
3. When the product is shipped
D Cost of goods sold (Expense) 100
C Finished goods (Current assets) 100 - When payroll is made, the following manual journals could be made:
4. When payroll is calculated:
D Wages and salaries (Expense) 1000
C Payroll (Current liability) 1000
5. When payroll is paid:
D Payroll (Current liability) 1000
C Bank (Current assets) 1000
6. Periodically accrued payroll account is zeroed:
D Accrued payroll (Current liability) 100
C Wages and salaries (Expense) 100 (This expense will be reported in the COGS account, in the same period when the product is sold.)
As the above is only a generic simplified example, please always consult your accountant and be sure to follow local laws and regulations.
Tax calculations, rounding of tax
MRPeasy calculates tax on documents as follows:
- The tax amount is calculated for each line separately.
- The line's tax amount is rounded to the number of decimal places defined by the software setting “Decimal places: Subtotal”.
- The rounded tax amounts of each line are added up.
Example:
| Product | Subtotal | Tax % | Tax | |
| Item A | 95 | 6.75% | 95 x 6.75% = 6.4125 -> | 6.41 |
| Item B | 95 | 6.75% | 95 x 6.75% = 6.4125 -> | 6.41 |
| Subtotal: | 95 + 95 = | 190 | ||
| Tax: | 6.41 + 6.41 = |
12.82 | ||
| Total: | 190 + 12.82 = | 202.82 | ||
Human Resources
The Settings -> Human resources section contains settings regarding users, departments and departments planning.
The Human resources sections have the following sub-sections:
- Users - shows a list of the users of the system. It is possible to edit their rights and see a log of their actions.
- Departments - shows the list of departments. A department represents a group of workers that can perform the same manufacturing operations.
- Human resources planning - shows the number of users required for each department in each day if planning is done by departments.
Users
The Settings -> Human resources -> Users section lists the system's users. You can edit their rights and view a log of their actions.
This page allows:
- adding or editing users,
- accessing the database log,
- accessing users' action logs,
- accessing users' reports.
Jump to:
- Demo video: User management.
- Tips and tricks.
- Set the user's access permissions and options.
- Enable the internet-kiosk.
- How to add users to the free trial?
- How to add users to the subscription?
- What is a free user?
- Access the user actions logs, database logs, and audit logs.
- Change a user's password.
- Change the account administrator.
- Delete a user.
- Restore a deleted user.
Tips and tricks
- Click Create to add a new user.
- Click Reports to see the user's reports.
- Click Actions in the top-right corner of the table to view the database log.
- Click Actions on a user's line to view their actions log.
- The account administrator is displayed in italics.
Adding new users to the free trial
Users can be added freely during the free trial.
- Click the Create button to start adding new users at Settings -> Human resources -> Users.
- Enter the user's details and access permissions.
- Save.
Free users
A free user (team member) is an entry in Settings -> Human resources -> Users with no rights or access permissions (ALL checkboxes are unchecked).
So-called 'free user':
- is not billed for,
- cannot log in,
- may have assigned manufacturing operations.
To add a free user, click the "Create" button (the one with a plus mark), enter an email address, their name (optional), and a password, then click Save. You will see a new free user in the user list. All checkboxes with user rights should be unchecked, including the "Free Use" checkbox.
User Details
The user details page, accessible from Settings -> Human resources -> Users, shows the user's information and access rights.
This page allows:
- defining the user's information,
- assigning user access rights,
- assigning the user to departments,
- changing the password,
- editing, deleting, and restoring a user.
Jump to:
- Set up a new user.
- Set user access permissions.
- User's hourly wage for labor cost calculations.
- Access the internet-kiosk.
- User's departments.
- Change the password.
- Change the account administrator.
- Delete a user.
- Restore a deleted user.
Creating a new user
When creating a new user:
- Enter the user's email address to sign in to MRPeasy.
- Enter the Password.
- Enter the Name.
- Set the access rights of the user:
- If this is a worker, optionally:
- Enter the Hourly wage.
- Assign Departments.
- Save.
Read also:
User access rights
User's access rights are defined by:
- The Resources, which is the list of the pages or functions the user can access.
- The Options, which define additional constraints and possibilities for the user.
These can be edited on the User details page in Settings -> Human resources -> Users.
In the program, users will only see modules allowed by their user rights.
Access to resources
For each section/page or function of the software, it is possible to set whether the user can
- create,
- read,
- update,
- or delete
documents in that section.
Tips:
- Clicking on a row or a column title toggles all rights on that row or column.
- It is possible to copy the access permissions from an existing user.
- To access the Internet kiosk, grant access rights only to the "Internet-kiosk". The administrator cannot access it.
User options
Jump to:
- Hide costs and prices from the user.
- Give order approval rights.
- Lock handler.
- Limit the IP addresses from which the user can log in.
- Enable two-factor authentication.
Hiding costs and prices
It is possible to prohibit the user from seeing costs/prices in certain parts of the software.
This can be done at Settings -> Human resources -> Users -> User details, by checking the appropriate checkboxes in the Options section.
Hide prices in procurement:
-
Hides all prices in the procurement section.
-
Does not allow the user to add new lines to existing POs.
Order approval
It is possible to grant a user the right to approve orders (e.g., Purchase Orders, Manufacturing Orders) before they are processed further.
This can be done at Settings -> Human resources -> Users -> User details, by checking the appropriate checkboxes in the Options section.
To use this, the Approval System functionality must be enabled.
Lock handler
The "Lock Handler" right can be assigned at Settings -> Human resources -> Users -> User details, by checking the Lock Handler checkbox in the Options section.
What is the right "Lock handler"?
There might be situations where:
- Several users try to update an entry at once. In this case, the first user gets access to the data, and others are locked out until the first user saves it. The problem arises when the user is away from the computer or has forgotten to finish data entry, and others need to access the computer to finish the data entry or enter new data.
- Sometimes, when the user navigates away from the entry, the lock might not be released (e.g., if the browser is closed without saving the data). In these cases, only the same user can edit this data.
To solve this problem, there is a special user right that can be granted - the Lock handler:
- If a user with that right tries to edit a blocked entry, a "Take lock" button is displayed next to the "entry locked" notification.
- When a user clicks on the Take lock button, the old lock is canceled, and the entry can be changed by this user.
Be careful using this feature! If the lock has been canceled, the original user will not be able to save their changes. When taking the lock, make sure that the other user is not in the middle of entering data.
Access limitation by IP address
It is possible to limit users' access to only certain allowed IPs, e.g., your company's static IP address.
This can be done at Settings -> Human resources -> Users -> User details, by checking the Access limited checkbox in the Options section.
The Allowed IPs must be set at Settings -> Allowed IPs.
Notes:
- Before using this function, consult your Internet Service Provider (ISP) if you have a static IP.
- The Administrator user's access cannot be limited by IP addresses.
Two-factor authentication
It is possible to require the user to complete a two-step authorization when logging in. For configuring two-factor authentication:
- Install the Google Authenticator app on the user's phone who will use 2FA:
- Go to Settings -> Human resources and open the user details page.
- Enable Two-factor authentication (2FA) for the user and save changes.
- Click the link Show 2FA key".
- Open the Google Authenticator app.
- Click Begin setup or "+".
- Click Scan barcode and scan the QR code that is displayed,
or click Manual entry. - Enter the key to the field Key.
- The account can be your MRPeasy username.
- Time-based must be turned on.
To use this, Two-Factor Authentication (2FA) must be enabled.
Hourly Wage
In Settings -> Human resources -> Users -> User details, you can enter a worker's hourly wage, which is used to calculate production costs.
Since this is the total cost of labor, it should include the worker's total expenses, including taxes.
Departments of a user
A user can be added to departments in the Departments section on the user's details page at Settings -> Human resources -> User details.
A user can be in several departments at once.
Internet-kiosk mode
The Internet-kiosk mode is for reporting the completion of production operations.
For accessing the Internet-kiosk:
- Create a new user at Settings -> Human resources -> Users -> User details.
- Give access rights to the "Internet-kiosk" only.
- If the user should report Serial numbers, additionally provide Create rights for serial numbers.
- ALL other checkboxes with user rights must be unchecked.
- This user will see MRPeasy in kiosk mode.
Internet kiosk users don't have a special price in MRPeasy because the price drops after the 10th user.
Changing the administrator of the account
Only one user can be marked as the administrator of the MRPeasy account.
The administrator is denoted by
- Italic font on the Settings -> Human resources -> Users section.
- The checked Admin checkbox on the user details page.
To change the administrator:
- Log in as the administrator.
- Go to Settings -> Human resources -> Users.
- Open the user details of the user you wish to assign as the new administrator.
- Check the Admin checkbox.
- Confirm.
- Save.
Notes about the administrator:
- The administrator's e-mail should be a valid e-mail. This is the contact e-mail used by MRPeasy.
- The e-mail address is also displayed on your company profile under Settings -> Account and billing -> Profile.
- Only the administrator can:
- Delete the MRPeasy account.
- Change the administrator.
- Use the "Forgot password?" feature to regain access to the MRPeasy account.
- The administrator's user cannot be deleted.
- The administrator will always have unrestricted access to the Settings -> Human resources -> Users section.
- The administrator's access cannot be limited by IP address.
Changing the password of a user
Only users with "Update" rights to Settings -> Human Resources -> Users section can change user passwords.
Usually, it is the MRPeasy company administrator who can edit the user's details page accessible.
To change the password:
- Go to Settings -> Human Resources -> Users.
- Open the user details.
- Click Edit.
- Scroll to the bottom of the page.
- Enter the New Password.
- Enter your password.
- Save.
Deleting users
You can delete a user at the user's details page accessible from Settings -> Human Resources -> Users.
To delete a user:
- Open the user details.
- Click Edit.
- Click Delete.
The account administrator cannot be deleted.
A deleted user is not permanently deleted; it is archived and can be found by searching for it in the list of users.
Restoring deleted users
To restore a deleted user:
- Find the user at Settings -> Human resources -> Users by username via search. (Deleted users are hidden by default, but can be searched for.)
- Open it.
- Click Edit.
- Scroll to the bottom of the page.
- Click Restore.
User Actions History
The actions report shows the history of actions performed by your users in your MRPeasy database. This is accessible from Settings -> Human resources -> Users by clicking the Actions button.
The database actions history report can be filtered and searched by users, actions, and date range.
User Reports
Each user has several reports, which can be accessed from Settings -> Human Resources -> Users, by clicking on the Reports button on a user's line.
Jump to report:
- Calendar - a calendar view of the production operations assigned to the user.
- Production operations - a list view of the production operations assigned to the user.
- Invoices - the list view of invoices created by the user.
- Summary report - the summary report on all users.
Report "Calendar"
This report shows the calendar (month, week, or day) of all production operations from approved manufacturing orders assigned to the user. To view more detailed information about the operation, click on it.
The backdrop color indicates the current progress:
- Not started, the planned start time is in the future.
- In progress;
- Paused;
- Finished;
- (Red striped) Not started, but should have been started. The planned start time has passed.
The text color indicates the status of parts availability:
- Not booked - all required parts are not booked;
- Delayed - all parts are booked and ordered. Some parts will become available after the planned start time of the manufacturing order.
- Expected - all parts are booked and ordered. Some parts have not yet been received, but will arrive according to the schedule.
- Received - all parts are booked and in stock.
Report “Production operations”
This report lists all manufacturing operations assigned to the user. For each operation, the following information is displayed:
- The number of the manufacturing order.
- The status of the operation. Multiple statuses can be selected by pressing the Ctrl key on the keyboard and clicking on several statuses.
- The labor cost of this operation.
- The planned start time, end time, and duration of the operation.
- If the operation has been completed, the actual start time, end time, and duration.
- The difference between planned and real durations in hours or as a percentage.
Report "Invoices"
This report lists invoices issued by the user. For each invoice, the following information is displayed:
- Invoice details (number, type, status, date, due date).
- Customer details (number, name).
- Financial details (invoice sum, currency, tax, paid sum, unpaid sum, etc.)
Report "Summary report on all users"
This report lists workers and MOs performed by all users during the given period.
The report is accessible by clicking the Summary report on all users button at the top right of the Users table in Settings -> Human Resources -> Users.For each worker and MO, the following information is displayed:
- User name
- MO details (number, actual start, actual finish, actual time).
- Part/product details (name, description)
- Workstation details (name, group)
- Result details (quantity made, labor cost).
Departments
The Settings -> Human resources -> Departments page shows the list of departments. A department represents a group of workers that can perform the same manufacturing operations.
This page allows creating and editing departments
Users can be added to departments at the user's details page accessible from Settings -> Human resources -> Users page.
Jump to:
- What is the department?
- How to plan works by departments? How to assign operations to departments?
- How to report production operations using the departments?
- How to assign default departments to operations or workstations?
- How to plan human resources when production is constrained by skilled workers?
- How to optimize production scheduling when workers' availability is constrained or unreliable?
What is the department?
A department represents a group of workers that can perform the same manufacturing operations. For example:
| Department | Users |
|
Department A
|
User A User B User C |
| Department B | User B User C User E |
One department can also represent a particular skill set. As a user can be part of several departments, an employee skill matrix can be composed.
Departments are used in production planning:
- instead of assigning workers to operations, the departments are assigned;
- all workers part of the department see the operation;
- if a worker picks the job - starts the operation - this operation is assigned to the worker, and other workers cannot see it any longer.
This function greatly simplifies the assigning and reporting of the manufacturing operations for a large number of workers, or where workers can freely pick their jobs without a strict assignment from supervisors.
Demo video: Departments and Workforce Planning.
Planning and reporting by department
- When a manufacturing order is created - where operations are assigned to Departments (as opposed to individual workers) - then all workers in the corresponding Departments can automatically see the open jobs in “My production plan” or the “Internet-kiosk”.
- When the job is started by an operator, then it is assigned to that person and others do not see it anymore.
- If more than one person is needed for the same operation, then the job remains visible until the required number of users pick it.
Demo video: How to assign operations to departments.
Default departments for operations or workstations
Default departments can be assigned:
- to individual Workstations at Production planning -> Workstations,
- to operations in Routings (keep in mind that the Workstation setting overrules the Routing).
If several workers are required to perform an operation, several departments can also be assigned.
Demo video: How to set default planning departments for operations and workstations.
Department details
The department details page, accessible from Settings -> Human resources -> Departments page, shows the department's information.
This page allows creating or editing an existing department.
It's possible to choose whether the cost of labor when estimating manufacturing costs will be taken as the average Hourly wage of the employees in the department, or some other manually defined amount.
Once an operation is reported by a worker, the worker's (user's) hourly wage is used for exact calculation, not the department's hourly rate, which is used only for estimation.
Users can be added to departments at the user's details page accessible from Settings -> Human resources -> Users page.
Human resources planning
The Settings -> Human resources -> Planning page shows the maximum number of workers required for each department in each day (if operations are assigned to departments). For example:
| Day 1 | Day 2 | Day 3 | Day 4 | |
| Department 1 | 10 | 12 | 8 | 10 |
| Department 2 | 10 | 10 | 10 | 9 |
This number is calculated as follows:
- if there is a job that is assigned to a department, then one worker is needed to perform the operation;
- if there is another job assigned to the same department, and it starts after the previous job is finished, then one worker is enough to perform both operations;
- if the other job starts before the previous job is finished, then two workers are needed to perform both operations.
Technically, this number shows the maximum number of parallel operations that are assigned to one department on that day. Which means, in essence, that if workers cannot perform two operations at once, then the same number of workers is required for the day - or else, the production plan cannot be satisfied.
This allows understanding of how to allocate workers when the production is constrained by the number of available skilled workers.
Jump to:
- What is the department?
- How to plan works by departments? How to assign operations to departments?
- How to report production operations using the departments?
- How to plan human resources when production is constrained by skilled workers?
- How to optimize production scheduling when workers' availability is constrained or unreliable?
- How to assign default departments to operations or workstations?
How to plan human resources in production?
When scheduling production, then the order of priorities is almost always the following:
- First priority: availability of materials.
- Second priority: availability of workstations capacity.
- Third priority: availability of workers.
Why so? Because:
- Material availability is difficult or impossible to negotiate. If you do not have it, you cannot make the product.
- Many machines' and workstations' equipment is much more expensive and the uptime is more valuable (i.e. productive) than labor hours. Hence these assets should be loaded as much as possible.
- The workers resource can be most easily rescheduled, workers could be negotiated, possibly re-assigned to another department or re-trained. Or when needed, extra shifts could be introduced.
This means that:
- It is more important to schedule optimal loading for workstations and try to fill the departments for each day.
- As a second option, reschedule the manufacturing orders when available workers cannot be gathered.
- If this happens constantly, some workstations might need to be closed to prevent the issue.
Because of this, in MRPeasy by default, the production scheduling:
- first looks for material availability (based on the BOM),
- then schedules workstation's capacity (based on the Routing),
- and then assigns the default workers from the Routing or the workstations' details to the operation (without considering workers' capacity).
It might feel comfortable trying to schedule workers as 'workstations' in higher priority than workstations, but in reality, this will yield poorer effectiveness, productivity and workstation loading, which will directly and negatively affect the lead time of the products, customer satisfaction, and revenue. The primary focus needs to be to perform works in an optimal tight schedule, and negotiating workers availability before rescheduling the orders.
How to optimize production scheduling, if there's not a constant number of required skilled workers?
Re-scheduling is always a headache, so it's better to avoid it, if possible. The answer in many cases is to keep open an optimal amount of workstations in the software for scheduling, which would correspond to the average number of skilled workers available.
Then your capacity planning and lead time estimation will be in broad terms reasonably accurate.
Technically, this means that you might schedule only 5 workstations of Welders for each day,
- but on some days 2 welders will show up, and you will fall behind schedule these days;
- and on other days 8 welders will show up, and you will catch up these days.
How to do that, read tips from here: What is a workstation group?
Procurement Section - For Buyer
The Procurement module gives the ability to:
- manage purchase orders (POs),
- manage vendors,
- make procurement forecasts,
- perform quality inspection of incoming goods,
- see low inventory alerts,
- see material demand in manufacturing or sales.
The Procurement section has the following sub-sections:
- Purchase Orders - a list of all the purchase orders to your vendors and subcontractors.
- Vendors - a list of all vendors and subcontractors.
- Forecasting - a list of procurement forecasts, which can be calculated based on a sales forecast of products.
- Inspections - a list of pending inspections (all stock lots that have been received into stock and need to be inspected) and performed inspections. Available with Return Merchandise Authorization and Quality Control functionality.
- Procurement Critical on-hand - a list of procured items which are below their minimum available quantity and need re-ordering.
- Requirements - a list of all the purchasable components that are required for customer orders or manufacturing orders but have not been booked.
- Statistics - statistical reports based on purchase orders.
Procurement - Frequently asked questions
Demo video: Purchasing Management
Purchasing, Purchase Orders:
- Send a Purchase Order.
- Send a Request For Quote (RFQ).
- Receiving items, partial delivery. Undo receipt.
- Purchase orders to subcontractors.
- Purchase Order status.
- Auto-fill Purchase Order.
- Discounts, taxes, additional fees.
- PO delivery schedule.
- Payments.
- Foreign currency.
- Import a Purchase Order.
- Approve a Purchase Order.
- Attach files.
- Automatically attach item files to Purchase Orders.
- Edit document PDFs.
- Troubleshooting Purchase Orders.
Managing the vendors of an item:
- Purchase Terms.
- Convert a vendor's unit of measurement.
- Pricing tiers.
- How are Purchase Terms used to auto-fill POs?
- How are Purchase Terms used when estimating the cost of an out-of-stock item?
- Update Purchase Terms.
- Import Purchase Terms.
Material traceability and handling:
- Batch and serial numbers.
- Free issue stock to subcontractors.
- Quality control of received items.
- Processing rejected items which failed quality control.
- Inspecting customer returns.
Material requirements:
- Low inventory alerts.
- Estimate costs and lead time for a customer order.
- Book products for a customer order and create demand for items.
- Schedule Manufacturing Orders.
- What is a procurement forecast? How does it work?.
- Create a procurement forecast.
- Create manufacturing and purchase orders from a forecast.
- Consider or ignore available materials in a forecast.
- Multi-site forecasting.
- Tips for using the forecast.
Vendors:
- Vendor contact information.
- Vendor's currency.
- Default payment period.
- Documents in another language.
- Import vendors.
- Import purchase terms.
Jump to other FAQs:
Purchase orders
The Procurement -> Purchase orders shows a list of all the purchase orders to your vendors and subcontractors. New purchase orders can be added from here.
Use the tab menu above the table to choose whether to show a list of "Purchase orders" or a list of all "Items" ordered.
Jump to:
- Demo video: Purchasing management.
- Purchase order details.
- Low inventory alerts.
- Automatically create purchase orders.
- Managing subcontractors.
- Procurement FAQ.
Low inventory alerts
There are two reports that show what needs to be ordered and which help to easily raise necessary Purchase Orders:
- Procurement -> Requirements.
- A list of items missing in specific sales and manufacturing orders.
- Procurement -> Procurement Critical on-hand.
- A list of items for which availability is below their Reorder point (ROP).
These reports are automatically generated based on the information from stock, customer orders, and manufacturing orders.
Automatically created purchase orders
New POs can appear in the list when the Sales Manager chooses to automatically create POs for missing parts while booking products for the customer orders.
Purchase Order Details
The Procurement -> Purchase Orders -> Purchase order details shows the detailed information about a purchase order.
Jump to:
- Purchase Order status.
- Creating a new Purchase Order or a Request For Quote (RFQ):
- Sending documents to the vendor.
- Reporting PO receipt, delivery of goods, putaway to storage locations:
- Purchase invoices, bills, payments.
- Subcontracting Purchase Orders, free issue stock.
- Troubleshooting.
Purchase Order status
- RFQ - When a purchase order is in this status, no target stock lots are created and no products are booked.
- New PO - This is the default status if a PO is created automatically. Items have the status "Requested".
- Approved - If the PO is approved. Available, if Purchase Order Approval is enabled.
- Ordered - The Order date is filled. The status of the items changes to "Planned".
- Shipped - The Shipping date is filled.
- Received - All items are received.
- Canceled - The PO is deleted, it can be still looked up by this status.
- Archived - Archived using the “Archive old data” functionality.
Creating a Purchase Order
Creating a Purchase Order
It is possible to create Purchase Orders manually:
- Go to Procurement -> Purchase Orders.
- Click "+" to create a new Purchase Order.
Purchase Orders can also be created:
Creating a Request for Quotation (RFQ)
There are two ways to create RFQs - with and without stock lots.
Until a PO is in the RFQ status, stock lots for the items are not created, thereby the system will not see that the items are expected into stock and thus these cannot be considered for usage, they cannot be booked.
If RFQ must be sent to several vendors:
- create a PO with status RFQ,
- send it to the first vendor,
- and copy it to create the next RFQ for the next vendor.
Purchase Terms
Press the arrow button in the "Vendor part no." field to display the list of the item's Purchase Terms.
The software can automatically select a suitable purchase term and auto-populate the PO.
Additional fees, discounts, taxes, landed cost
Additional fees:
- Transportation, freight, customs, and other costs can be added to fields Taxable fees and Additional fees.
- These are used to calculate the landed cost of the items. The fees are proportionally divided between ordered items based on the total cost of each target lot.
- Additional fee per item = Item cost / PO cost * Additional fees
- The additional fees are added to the stock lot cost. In the PO, click on the Target lot number to check the total cost of the stock lot.
- If the software setting "Several invoices per PO" is enabled, then additional fees are entered into incoming invoices.
- It is possible to select a different vendor for the invoice (e.g. the transportation company who charged you for freight).
- It is possible to select a different currency for the invoice when no line items are selected. (Additional currencies must be predefined.)
- It is possible to use a different tax rate for the invoice when no line items are selected.
- If the Separate Invoices and Deliveries setting is set to "No", fees are distributed among the invoice items.
- If the Separate Invoices and Deliveries setting is set to "Yes", fees are proportionally distributed among all items in the purchase order, regardless of which invoice they were entered on.
Discounts:
- If a discount for the whole purchase order has been provided, it can be entered into the field Discount. It will be added to every item.
- If a discount applies to one item only, please reduce the price of that item.
Taxes:
- It is possible to add a Tax.
- Tax is used to calculate the total sum of the purchase order and to produce a correct cash flow report.
- Tax is ignored when calculating the costs of procured items.
One PO for several shipment dates
It is possible to create one Purchase Order for several deliveries (blanket order). To do this:
- Add a separate line for each delivery.
- Define the Expected date for each line when it should be received.
- Report partial delivery of PO according to each delivery.
If different expected dates are defined, the column "Expected date" is added to the PDF.
PO Currency
To create a PO in another currency:
- Create a new Purchase Order.
- Choose the Currency.
- Save.
After the Purchase Order is saved, the currency of the PO cannot be changed.
Purchase Orders can be made in any Additional Currency, which is previously defined.
Importing Purchase Order line items and updating an existing Purchase Order from CSV
When creating a new purchase order or when updating an existing PO, it is possible to import a list of procured items from a CSV file. The file must be no longer than 100 lines and can contain the following columns:
| Part number* | Required. The part number of the stock item that is procured. |
| Quantity | The total quantity of the item. |
| Price | The price per unit. |
| Vendor part no. | The vendor's part number. |
| Free text | The free text that is displayed below the stock item. |
| Expected date | The date when this item is expected to arrive. |
| Site | The site where this item will be delivered. Available, if several sites are used. Cannot be used when updating a PO. |
| Expiry date | The expiry date of the goods. Available, if Expiry dates are used. |
Other PO information should be added manually before the import.
Sending documents to the vendor
Sending a Purchase Order
- Create a new Purchase Order and Save.
- Click Send e-mail to open your e-mail client and to prefill the letter.
Or click PDF for a vendor to download the PDF.
POs can be printed in two versions:
- PDF for a vendor, a document for the Vendor, which includes your company logo and details. The layout can be edited with the PDF editor.
- Internal PDF, an internal document with information for internal use only.
Sending a Request For Quote (RFQ)
- Create a new Purchase Order in status RFQ (without stock lots) or New PO (with stock lots) and Save.
- Click Send RFQ to open your e-mail client and to prefill the letter.
Or click RFQ to download the PDF.
Sending a Delivery Note
- Open the Purchase Order or Invoice.
- Click on the Send note to open your e-mail client and to prefill the letter.
Or click the Delivery note button for the PDF.
Reporting receipt of goods
Full or partial receipt of PO
Depending on your software setting "Several invoices per PO", there are three alternative workflows for reporting receipt:
- A. PO receipt reported by entering the "Arrival date".
- The default settings: "Several invoices per PO = No".
- 1 PO = 1 invoice = 1+ deliveries. - B. PO receipt reported by entering an Invoice.
- "Several invoices per PO = Yes".
- "Separate invoices and deliveries = No".
- 1 PO = 1+ invoices = 1+ deliveries. 1 invoice = 1 delivery. - C. PO receipt reported by entering a Delivery.
- "Several invoices per PO = Yes"
- "Separate invoices and deliveries = Yes".
- 1 PO = 1+ invoices = 1+ deliveries. Deliveries are separated from invoices.
Workflow A. PO receipt reported by entering the "Arrival date"
- Open the Purchase Order.
- If an item was received partially, change the field Expected quantity to quantity that was actually received.
If some lines aren't received, clear the Expected quantity fields for these. - Enter the Arrival date.
- Save the PO.
- The quantities in the Expected quantity fields will be received to stock with the Arrival date.
Workflow B. PO receipt reported by entering an Invoice
- Open the Purchase Order.
- Scroll to the Invoices section and click the Create button.
- Enter the received quantities.
- Save the invoice.
- The Created date of the invoice will be saved as the Arrival date of the received items.
- The Arrival date of the PO will be filled automatically once all items have been received.
Workflow C. PO receipt reported by entering a Delivery
- Open the Purchase Order.
- Scroll to the Deliveries section and click the Create button.
- Enter the received quantities.
- Save the delivery.
- The Delivery date of the delivery will be saved as the Arrival date of the received items.
- The Arrival date of the PO will be filled automatically once all items have been received.
When a partial receipt is reported:
- The received amount will be taken into stock;
- If a PO line is partially received, a new line is created for the not received quantity.
Putaway of goods, registering the storage location
By default:
- An item's location is set by its default storage location (defined in the item details page).
- If it is undefined, it will be the generic 'undefined' location (the first location, displayed in italic, in the list of Storage locations).
To register the putaway of received goods to a different storage location:
- Open the PO.
- Press the Reports button and open the Bookings report.
- or create and save a Delivery, where you can press Reports to open the Bookings report only relevant to the received items. - Select the new storage location(s), and press Save or Save all.
With a barcode reader, the putaway of received goods can be registered as follows: (Enterprise feature "Barcode system")
- Open the PO.
- Report (partial) arrival of the PO.
- Print the stock lot labels with barcodes for each line and label the goods.
- Scan the barcode of the lot of goods you are putting away.
- Scan the barcode of the label of the storage location you put the goods to.
- Check that all is correct on the prefilled "Move product" form and save.
- Repeat steps 4 - 6 for all goods.
Undo the receipt of PO
To undo the receipt of PO, first, open the purchase order.
Then, according to your software settings:
Workflow A. If 1 PO = 1 invoice:
(Default settings. "Several invoices per PO = No".)
- Find the line, for which you wish to undo receipt.
- Click on the Target lot number.
- Change the stock lot status to Planned.
- Save the stock lot.
- Clear the Arrival date field of the Purchase Order.
Workflow B. If 1 Invoice = 1 delivery:
("Several invoices per PO = Yes", "Separate invoices and deliveries = No".)
- Open the incoming Invoice.
- Remove the received line from the invoice.
- Save the invoice.
Workflow C. If there is a separate "Deliveries" section in the PO:
("Several invoices per PO = Yes", "Separate invoices and deliveries = Yes".)
- Open the Delivery.
- Remove the received line from the delivery.
- Save the delivery.
Lot numbers, serial numbers
MRPeasy automatically creates unique stock lot (batch) numbers for tracking the purchased products. To change the proposed lot number:
- Open the Purchase Order.
- Click on the line item's Target lot link.
- Edit the lot Number.
When you wish to track some batch number, which is not equivalent to the stock lot number, you can act as follows:
- it is possible to encode the batch number in the stock lot number, e.g. by adding it as a suffix.
- it is possible to use a persistent custom field to keep your batch number.
See also: Entering serial numbers of purchased items.
User access permissions for the stock clerk
If the person in charge of receipt is the stock clerk, then in the user's access permissions (Settings -> Human resources) you can enable the option Hide prices in the Procurement.
Purchase Invoices
One or several purchase invoices
With default system settings, one purchase order equals one purchase invoice:
- Enter the Invoice ID of the purchase invoice you received.
- Enter payments in the Payments section,
- Optionally attach the copy of the purchase invoice to the PO.
For entering several invoices per purchase order, enable Settings -> System Settings -> Software Settings -> Several invoices per PO: Yes.
In this case, enter the invoices in the Invoices section of the PO. The way of reporting PO receipt also changes according to this setting.
Vendor Prepayment Invoices
To enter a prepayment to a vendor:
- Open the purchase order.
- Scroll to the Invoices section.
- Add a new invoice.
- From the Type field, choose Prepayment.
- Enter the sum and save.
- Scroll to the Payments section.
- Add the prepayment.
To use a prepayment on a purchase invoice:
- Open the purchase order.
- Scroll to the Invoices section.
- Open or create an invoice.
- Add the prepaid amount on the Prepayment line.
To receive a credit or a refund for a prepayment:
- Create a Vendor Credit Invoice.
- Add the refund amount on the Prepayment line.
- If necessary, scroll to the Payments section and add a payment.
The following precondition must be met for the ability to handle prepayments to vendors:
- The system setting “Several invoices per PO” is enabled and configured as “Separate invoices and deliveries = Yes”.
Vendor Credit Invoices
To enter a credit invoice from a vendor:
- Open the purchase order.
- Scroll to the Invoices section.
- Add a new invoice.
- From the Type field, select Credit-invoice.
- Enter the sum and save.
- If necessary, scroll to the Payments section and add a payment.
The following preconditions must be met for the ability to handle credits from vendors:
- The system setting “Several invoices per PO” is enabled and configured as “Separate invoices and deliveries = Yes”.
- The credit account for purchase credit invoices must be created at Accounting -> Chart of accounts and configured as the default account for “purchase credits”. (See also: Default chart of accounts)
Payments, Purchase Order payment status
To enter payment for incoming invoices:
- open the purchase order,
or the purchase invoice if several invoices per PO is enabled, - Scroll to the Payments section.
- Add the payment.
Based on the sum of payments, the payment status of the PO will be automatically set to Unpaid, Paid partially, or Paid.
Importing a Purchase Invoice from CSV
When creating a new purchase invoice, it is possible to import a list of items from a CSV file. The file must be no longer than 100 lines and can contain the following columns:
| Part number* | Required. The part number of the stock item that is procured. |
| Quantity | The total quantity of the item. |
Other invoice information should be added manually before the import.
Troubleshooting Purchase Orders
Jump to:
- Cannot enter the "Arrival date"
- Unable to partially receive a Purchase Order
- Unable to delete a Purchase Order, a Purchase Invoice, or a Delivery.
- Tax calculations, rounding of tax.
Cannot enter the "Arrival date"
Probably, the Software setting "Several invoices per PO" is enabled in Settings -> System Settings -> Software settings.
When the Software setting "Several invoices per PO" is enabled, then to enter a receipt, a delivery or a purchase invoice must be entered, which you can do at the bottom of the PO page.
The Arrival date of the PO will be filled automatically once all items have been received.
Unable to partially receive a Purchase Order
Error message:
- "Stock lot cannot be received partially because items have been consumed already."
Explanation: This means that items on the Purchase Order, Invoice, or Delivery have already been
- consumed in a Manufacturing Order,
- shipped to a customer via a Customer Order and Shipment,
- written off,
- or shipped to a subcontractor via a subcontracting Purchase Order.
You are trying to enter a partial receipt, which is less than the already consumed quantity. The quantity which has already been received, cannot be split as received and not received (only a quantity that is equal to or greater than the already consumed quantity can be received).
Likely, the bookings are not correct and consumption of these items has been reported incorrectly (i.e. from an incorrect stock lot).
Resolution:
To correct the incorrect bookings:
- Open the Purchase Order.
- On the item's line, click on the Target lot number, this will take you to the specific stock lot's details.
- Click on the button Reports.
- Choose report Bookings.
- Open the specific bookings and correct, cancel, or redo them. If the booking is to a...
- Manufacturing Order: open it and correct the bookings of materials.
- Customer Order: open the Shipment and correct the Shipment.
- Manual write-off: open it and edit the write-off.
- Subcontracting Purchase Order: open it, and correct the Shipment.
Related questions:
- Why does the software think that exactly these items are consumed? In MRPeasy, everything works via stock lot (batch) tracking. Thus, someone has clicked a button in some function, letting the software know that exactly these items from the stock lots of this PO were used.
- How can these items be consumed, even if the PO was not marked received? By default, when a Purchase Order is not ordered yet, it is not possible to consume the items (items are in status Requested); but when it is already ordered, then it is possible to report the ordered items consumed (items are in status Planned).
- How can I prevent the consumption of planned items? Please set the setting "Use planned goods" to No, at Settings -> System settings -> Software settings.
Unable to delete a Purchase Order, a Purchase Invoice, or a Delivery
Error messages:
- "Purchase order cannot be deleted because items from its target lot have been consumed"
- "Stock lot cannot be un-received, because it is already consumed."
Explanation: This means that items on the Purchase Order or Invoice have already been
- consumed in a Manufacturing Order,
- shipped to a customer via a Customer Order and Shipment,
- written off,
- or shipped to a subcontractor via a subcontracting Purchase Order.
It is not possible to delete it, because this would break information integrity (e.g. a situation would occur that consumed materials never existed).
Likely, the bookings are not correct and consumption of these items has been reported incorrectly (i.e. from an incorrect stock lot).
Resolution: The consumption operation must be undone before it can be deleted.
To be able to delete it:
- Open the Purchase Order or Purchase Invoice.
- On the item's line, click on the Target lot number, this will take you to the specific stock lot's details.
- Click on the button Reports.
- Choose report Bookings.
- Open the specific bookings and correct, cancel, or redo them. If the booking is to a...
- Manufacturing Order: open it and correct the bookings of materials.
- Customer Order: open the Shipment and correct the Shipment.
- Manual write-off: open it and edit the write-off.
- Subcontracting Purchase Order: open it, and correct the Shipment.
Related questions:
- Why does the software think that exactly these items are consumed? In MRPeasy, everything works via stock lot (batch) tracking. Thus, someone has clicked a button in some function, letting the software know that exactly these items from the stock lots of this PO were used.
- How can these items be consumed, even if the PO was not marked received? By default, when a Purchase Order is not ordered yet, it is not possible to consume the items (items are in status Requested); but when it is already ordered, then it is possible to report the ordered items consumed (items are in status Planned).
- How can I prevent the consumption of planned items? Please set the setting "Use planned goods" to No, at Settings -> System settings -> Software settings.
Purchase Order Reports
Each purchase order has statistical reports, which can be accessed from Procurement -> Purchase Orders, by clicking on the Reports Reports button on a Purchase Order's line.
Jump to report:
- Bookings - the list of bookings of the ordered articles.
Report "Bookings"
This report is available if Tracing is enabled.
This report shows manufacturing or customer orders where the purchased goods are booked and allows for quick changes of storage locations when putting away the goods.
- If an item has bookings, a separate row is shown for each order it is allocated to, along with the corresponding quantity and the lot's storage location.
- An additional row displays the unallocated quantity if an item is partially booked.
Users with sufficient rights can change the Storage Location of the purchased goods if these have not been consumed or transferred yet:
- Select the new Storage location for the line(s).
- Press Save to save the current line only or Save all to save all changes.
If your Purchase Order includes a Deliveries section, a similar "Bookings" report is available in each Delivery:
- To access it, press the Reports button on the Delivery details page.
- The report follows the same logic as the "Bookings" report in purchase orders, but contains only bookings relevant to the items received in that delivery.
- Storage locations of the goods in this Delivery can be updated here.
Vendors
The Procurement -> Vendors section contains a list of all vendors. New vendors can be added from here.
Jump to:
Vendor's key performance indicators
- On time delivery percentage
- Each product in a purchase order is considered separately. If a vendor delivered 10 products, and one is delayed, "On time" is 90%.
- Delivery of the item row is considered on-time if it is late less than 1 day.
- Average delay
- Rejected units
- Rejected percentage
Importing vendors or purchase terms from a CSV file
At Procurement -> Vendors -> Import from CSV, it is possible to upload new and update existing vendors or purchase terms.
Jump to:
- Demo video: Importing data.
- Importing new vendors.
- Example for uploading new vendors.
- Updating existing vendors.
- Importing and updating purchase terms.
- Example for uploading purchase terms.
- Important notes.
What is CSV? CSV (Comma-Separated Values) is a universal format for importing or exporting tabular data. A CSV file can be obtained by saving/exporting e.g. an Excel file as CSV (Comma delimited) (*.csv).
When uploading the CSV file:
- Select and match the names of the fields corresponding to the columns in the data.
- Check the "The first row is heading" option if the first row of the file contains headers. Then the first row will not be imported.
- Select "Do not import" as the column type if some column is not to be imported.
- Click Import to upload the data into the appropriate fields of the database.
- If importing some data failed, a skip file will be generated and downloaded to your computer, which indicates all errors line-by-line.
Importing vendors
Importing new vendors
It is possible to import vendors from a CSV file, at Procurement -> Vendors -> Import from CSV.
For uploading new vendors, the fields that can be used are:
| Company name* | Required. The company name of the vendor. |
| Vendor number | A unique code to identify the supplier. If a supplier with the same number already exists, then this entry is ignored. If not imported, the code is generated automatically. |
| Contact person's name | |
| Phone | |
| Fax | |
| Teams | |
| Web | |
| Free-text address | |
| Address | Structured address. Possible columns:
|
| Additional information | Saved into notes. |
| Currency | The default currency for the vendor. |
| Tax rate | The default tax rate for the vendor. |
| Default lead time in days | How many business days it takes for the items to arrive from the vendor to your stock. |
| Payment period | The default payment period in days. |
| Payment period type |
|
| Custom fields | Any custom field defined for vendors. |
|
Vendor |
Company name |
Address | ... | |
| V-00001 | Wood Inc. | sales@wood.com | PO Box 123 Charlotte Texas 78012 USA |
... |
| V-00002 | Chemicals Inc. | sales@chemicals.co.uk | Baker Street 10 Worcester UK |
... |
| (Up to 3000 lines can be imported at once) | ||||
Download a sample file: import-vendors.csv
Re-importing data for updating vendors
It is possible to update vendors from a CSV file at Procurement -> Vendors -> Import from CSV.
The Number field is used for matching the vendors. If a vendor with the same number already exists, then software updates this vendor. If there are new values that will be updated, then:
- A confirmation page is shown with a list of values that will be changed.
- The user can choose whether to update a particular vendor or skip it.
For updating existing vendors, the following fields can be used:
| Number* |
A unique number to identify the vendor. Required. Used for matching the vendors. |
| Company name |
The name of the vendor company. |
| Currency |
The default currency for the vendor. |
| Tax rate |
The default tax rate for the vendor. |
| Payment period |
The default payment period in days. |
| Payment period type |
|
| Custom fields |
Any custom field defined for vendors. |
Import or update purchase terms
The page Procurement -> Vendors -> Import from CSV allows importing and updating Purchase Terms of stock items from a CSV file. There may be several purchase terms per item.
Pay attention to the following:
- For creating new purchase terms, Vendor, Part Number, Price per unit, and Lead time are required.
- For updating existing purchase terms, values Vendor, Part number and Minimum purchase quantity must match in MRPeasy and the CSV file. If this number is undefined in MRPeasy and your file, this is also considered as "matching". Otherwise, a new purchase terms entry is created.
- For updating the minimum order quantity of existing purchase terms in bulk, please go to Procurement -> Vendors -> A vendor's reports -> Report: "Purchase terms".
For uploading purchase terms, the fields that can be used are:
| Vendor Number* or Company name* |
The vendor number (for "Vendor number") or name (for "Company name") in MRPeasy, as in Procurement-> Vendors. *Required when creating new or updating existing purchase terms. |
| Part Number* |
The part number in MRPeasy, as in Stock -> Items. The part that the purchase term relates to. *Required when creating new or updating existing purchase terms. |
| Price per unit* |
The expected price of the item from the "Vendor". If the Vendor-specific unit of measurement is used, then this is the price of the vendor's 1 unit, e.g. the price of 1 "box" of 200 items. *Required when creating new purchase terms. |
| Lead time in days* |
The number of business days from ordering when goods will arrive from the "Vendor". *Required when creating new purchase terms. |
| Minimum purchase quantity |
The minimum order quantity you can place to the "Vendor". *Required when updating existing purchase terms with a minimum purchase quantity greater than 0. |
| Vendor part no. |
The part number in the vendor's database (or e.g. a manufacturer part number). |
| Priority |
A higher number indicates a higher priority. Optionally used if you have several purchase terms per item and need to create an order of priorities. This information is also used when auto-filling POs. |
| BOM |
The number of the subcontracting BOM that this purchase term is connected with. Available if Subcontracting is enabled. |
| Vendor-specific unit of measurement |
The custom unit, different from your stock-keeping unit, which the vendor sells this item. E.g. "box". |
| Vendor's UoM conversion rate |
The conversion rate of the vendor's unit to your stock-keeping unit. E.g. if your stock-keeping unit is "pcs", Vendor UOM is "Box", and value 200 is imported, then this would mean that 1 Box = 200 pcs. |
| Vendor's UoM is indivisible |
The vendor's UoM is indivisible (1), only multiples of the unit can be ordered. E.g. 0.5 "Box" cannot be ordered, only 1, 2, 3... boxes can be ordered. |
| Custom fields |
Any custom field defined for purchase terms. |
Example, importing purchase terms for 2 items:
| Vendor number | Part number | Price per unit | Lead time in days | Priority | ... |
| V-00001 | P-00001 | 11 | 5 | 20 | ... |
| V-00002 | P-00001 | 8 | 20 | 10 | ... |
| V-00002 | P-00002 | 50 | 20 | ... | |
| (Up to 3000 lines can be imported at once) | |||||
Important notes!
- If the imported file contains non-Latin characters, the file must be in UTF-8 (preferred) or Unicode encoding. If Excel is used to save the file, select the "Unicode Text (*.txt)" option in the "Save as type" field. Even though the extension of the file is TXT, it can be imported as a CSV-file.
- The limit is 3000 lines per upload. If the file is bigger, divide it into several smaller files.
- Since importing can be a question of trial-and-error, we strongly suggest making a back-up of the database before importing. In that case, if anything goes wrong, it is always possible to restore the previous session.
Vendor Details
The vendor details page, accessible from Procurement -> Vendors, displays all the vendor's information and contacts:
Jump to:
- Contact information.
- Documents in another language.
- Vendor's currency.
- Default payment period.
- Import vendors.
- Import purchase terms for the vendor.
Recording vendor's contact information
For recording contact information, first, a vendor should be created:
- Go to Procurement -> Vendors and click Create to add new.
- The contact type field is a drop-down (phone, fax, Teams, e-mail, web, address, free-text address, etc.).
- Each type of contact must be on its own line.
- The address entered here will be printed on the purchase orders.
- Contact details can also be entered for the vendor's contact person(s). This data will not be printed on any document.
Language of documents issued to the vendor
You can choose the language at the vendor's details at Procurement -> Vendors.
Documents, like for example, invoices, will be printed in the vendor's default language. By default, the language is your sign up language.
Payment period, vendor's currency, and tax rate
You can enter the payment period, the vendor's currency, and the tax rate at the vendor's details at Procurement -> Vendors.
- When a purchase order is created, the vendor's currency and tax rate are used.
- To define the default Due date for vendor, insert Payment period and select the method from dropdown field:
- the invoice date - then the Due date is calculated as the Invoice date plus the Payment period;
- the end of the invoice month - then the Due date is calculated as the end of the month plus the Payment period.
- Purchase terms from the vendor are in the vendor's default currency.
Vendor Reports
Each vendor has several statistical reports, which can be accessed from Procurement -> Vendors, by clicking on the Reports Reports button on a vendor's line.
Jump to report:
- Vendor Purchases - list of purchases from the vendor.
- Vendor Terms - list of the purchasable items from this vendor with the possibility to bulk edit.
- The statistical "On-time percentage" and "Average delay" are shown on the Procurement -> Vendors page.
Report “Purchases”
This report shows the list of purchases from this Vendor – what has been purchased at what price.
The report:
- Includes POs, which have their "Arrival date" within the report's period.
- Includes POs without an "Arrival date" (i.e. POs which are not received or partially received) if the PO "Expected date" is within the report's period.
- Ignores canceled POs.
Report “Purchase terms”
This report shows the list of goods that can be purchased from this Vendor, along with terms such as purchase price, lead time, minimum quantity, etc.
This is the list of purchase terms associated with this vendor.
Click Bulk editing to edit the selected purchase terms in bulk.
Forecasting
The Procurement -> Forecasting section contains a list of procurement forecasts, which allows the calculation of material requirements based on sales forecasts.
Jump to:
- What is a procurement forecast?
- Forecast details.
- Tips for using the forecast.
- Create a new procurement forecast.
- Limits.
What is a procurement forecast?
A procurement forecast calculates the quantities of parts required to make selected products. The forecasting functionality combines two separate functions.
The first half of this functionality is historically also known as BOM explosion, meaning that the BOM is 'exploded' to calculate the total number of required purchasable parts and materials.
- Therefore, only products can be entered into the forecast as input information.
- The products must have a Bill of Materials and a Routing defined.
The second half of this functionality uses materials and capacity planning to:
- Calculate when Manufacturing Orders can be started for the products.
- Starting from the MRPeasy Enterprise edition, it is possible to define a Due date, which will then be utilize by Backward Production Scheduling.
- Calculate when the Purchase Orders must be placed so that materials will arrive on time for the Manufacturing Orders to start.
Tips
While forecasting is a powerful function, keep in mind these tips:
- This is best utilized in make-to-stock manufacturing.
- a forecast is only a forecast, just a general plan until manufacturing orders are scheduled and purchase orders created.
- If you make-to-order, then you should create Manufacturing Orders, which will drive demand for purchased materials. Manufacturing Orders are always scheduled so that materials that are not in stock have time to be ordered.
Limits
Why is the max. amount of products in a forecast limited to 12?
A forecast is a very resource-consuming functionality. For every product, a substantial amount of complex calculations should be made. Because of that, you cannot forecast more than 12 products at once and cannot upload forecasts from CSV files.
Why are some materials missing in forecasts when subcontracting is involved?
The procurement forecasting functionality in MRPeasy supports multilevel BOMs, ensuring that forecasts account for all components and subcomponents needed for manufacturing.
However, a limitation applies to subcontracted products:
- In a multi-level BOM hierarchy, when moving from higher to lower levels, only the first encountered Subcontracting BOM in a branch is exploded. If further Subcontracting BOMs are below it at lower levels, then these are not exploded.
Forecast Details
The Procurement -> Forecasts -> Forecast details page shows the detailed information of a calculated forecast.
Jump to:
- What is a procurement forecast?
- Create a new forecast.
- Create manufacturing and purchase orders.
- Consider or ignore available materials.
- Multi-site forecasting.
- Tips for using the forecast.
Creating a procurement forecast
For creating a procurement forecast:
- Go to Procurement -> Forecasts and click Create.
- Enter the forecast title to identify it (for example, "3rd quarter").
- Select, whether:
- a) Available parts will be considered in the calculation (i.e. available items already in stock, plus available items still waiting to be received).
- b) Available parts will be ignored in the calculation.
- Enter products and quantities that are planned to be produced in the future.
- Enter the Due date when the products should be available in stock.
- Available only together with the Backward Production Scheduling functionality.
- Select the BOM for each product.
- The BOM column provides a dropdown listing the product's bills of materials. The first BOM is selected by default.
- The material requirements are calculated according to the selected BOM.
- Click Calculate materials and timing button. As a result:
- For every product, the software shows when a manufacturing order should be started.
- A list of required raw materials is displayed (part, quantity, cost, vendor, last order date).
Create MOs and POs
Manufacturing orders can be scheduled to the production plan by checking the products MO column and clicking Create manufacturing orders button.
Purchase orders can be created by selecting the materials PO column and clicking the Create purchase orders button.
Consider or ignore available materials.
When calculating the materials, it's possible to choose whether the current inventory levels should be considered, or not.
As output, the forecast provides the following information
- Total materials requirements, if available stock is ignored.
Or, net materials requirements, if available stock is considered. - The date, when manufacturing orders for products can start the earliest if forward planning is used (available in all editions).
Or, the date when manufacturing orders for products can start the latest to be completed by the Due date (available only in Enterprise edition.) - The vendor, the cost, the required delivery date, and the latest order date for each part or material, based on Purchase Terms.
- Options to create Manufacturing Orders and Purchase Orders.
Multi-site forecasting
If there are multiple production sites, there are two options to choose from when creating a forecast:
- Select one site for the forecast.
- Select option All sites for considering all sites in the forecast.
If a site is selected:
- The software calculates required manufacturing and purchase orders.
- The manufacturing orders can be added to the production schedule at the selected site.
If All sites option is selected:
- The software calculates the total quantity of materials that are required to produce all the desired products.
- It is not possible to create manufacturing and purchase orders, because these must be placed at particular sites.
Inspections
The Procurement -> Inspections section shows a list of pending inspections (for items that have been received into stock with status On Hold and not yet inspected) and already performed inspections.
Open an item to perform the inspection or view the details of already performed inspections.
Jump to:
- Demo video: Quality Control
- Demo video: Return Merchandise Authorization (RMA)
- Notes.
- Quality control inspection.
- Working with rejected items.
- Customer returns inspection.
- Setting up quality control for an item.
Notes
- The column Producer shows the vendor for procured items or the assigned person of the manufacturing order for produced items.
- The column Rejection rate shows the rejected items percentage out of items inspected.
- The column Arrival date shows when the goods were received.
- This section is available if:
- Quality Control functionality is enabled,
- or the Return Merchandise Authorization functionality is enabled.
Inspection Details
On the Inspection Details page, accessible from Procurement -> Inspections, it is possible to enter the results of the quality inspection of incoming goods and see the results of preformed inspections.
Jump to:
Inspection of Lot
When you open an inspection with the status “New” from Procurement -> Inspections then the view "Inspection of lot" opens, where is possible to enter the results of quality inspection of incoming goods or manufactured products.
Jump to inspection for items:
Performing inspection for items without serial numbers:
- Open the line with status "New" at Procurement -> Inspections.
- Enter the approved quantity.
- To reject the whole lot, enter the approved quantity as 0.
- In the "Rejections" section:
- If only a part of the items in the lot failed inspection, you can enter notes individually for every item.
- A new line will be generated automatically as soon as you fill in the last empty line.
- Add a note to the "Notes" section. Attach pictures or files if necessary.
- To save the inspection results, click "Approve/Reject".
- Note that the approved quantity of a saved inspection is not editable!
- As a result:
- The approved quantity will be taken into stock.
- The rejected quantity will be given a new stock lot with the status "Rejected", and these will be unavailable for use. Their bookings will be canceled. These can be either repaired or written off.
Performing inspection for items with serial numbers:
If the item has serial numbers, you must enter the serial number and fill in the reason for rejection.
- Open the line with status "New" at Procurement -> Inspections.
- In the "Rejections" section, you must enter the serial numbers which failed inspection.
- Here you are able to write a reason failure for each serial number separately.
- A new line will be generated automatically as soon as you fill in the last empty line.
- The “Approved quantity” will automatically show the resulting number of good items.
- Approved quantity = Lot quantity - Rejected quantity
- Add a note to the "Notes" section. Attach pictures or files if necessary.
- To save the inspection results, click "Approve/Reject".
- Note that the approved quantity of a saved inspection is not editable!
- As a result:
- The approved quantity will be taken into stock.
- The rejected quantity will be given a new stock lot with the status "Rejected", and these will be unavailable for use. Their bookings will be canceled. These can be either repaired or written off.
Inspection results
You can see the result of each performed inspection at Procurement -> Inspections by looking up inspections with the status "Done".
This page reflects the results of the inspection. It is possible to edit the notes, attached files, and reasons for rejection, but not the approved quantity.
You can print a PDF with the inspection results.
Inspection details PDF
The inspection details PDF includes the results of the inspection. It can be edited with the PDF editor.
By default, the following information is displayed:
- Date of inspection.
- Inspected lot number.
- Inspected item.
- Inspected item quantity.
- Inspector name.
- List of attached files names.
- Rejected items with serial numbers (if exist) and notes.
- Subtotal for rejected items.
- Rejected lot number.
- Approved items with serial numbers (if exist) and notes.
- Subtotal for approved items.
- Footer with the Notes section.
RMA Inspection Details
The RMA inspection details page, accessible from Procurement -> Inspections and from the individual RMA order details, allows you to inspect the returned products from the customer and determine the RMA type.
One of the following decisions can be made:
- Repair - repair the products.
- Repair and ship back - repair the products and ship them back to the customer.
- Replacement - send replacement products to the customer.
- Receipt and credit - receive the returned products and provide a refund.
- Receipt and no credit - receive the returned products without a refund.
- Reject and ship back - reject the return based on the inspection of the returned products, and ship the products back to the customer.
Procurement Critical On-hand Report
The Procurement -> Procurement Critical on-hand page shows procured items for which the available quantity is below their Reorder Point (ROP), and need re-ordering.
For an item to show up on this report, its Reorder point parameter must be defined.
- If the Reorder point is left empty, the item will not appear in the report, regardless of its stock level.
- If the Reorder point is set to some value, the item will appear once its available quantity is below that threshold.
For creating a Purchase Order:
- Click on the Create a purchase order Create a purchase order button on an item's line.
- All other items below the minimum from the same vendor are automatically added to the same PO.*
- All PO details are automatically filled, including price, minimum order quantity, and expected delivery date.*
- *For the automatic grouping and Purchase Order pre-population to work, the Purchase Terms must be saved for the items.
- Update any details of the PO, e.g., add, remove, or edit the line items.
- Save to create the PO.
- When the Purchase Order is saved, all the ordered items are automatically booked to where they are required -> Customer or Manufacturing Orders (following the FIFO principle).
Requirements
The Procurement -> Requirements shows a report with a list of all the purchasable items that are required for specific orders (Source), when these are required (Requirement date), and when these should be ordered the latest (Action date) according to lead time.
For creating a Purchase Order for a single line:
- Click Create a Purchase Order on the item's line to create a new PO.
- The PO, once saved, will be automatically linked to where these materials were demanded.
For creating a Purchase Order for several lines at once:
- Select the lines by marking the checkboxes.
- To select all lines from the same vendor, first, select one line, then use the checkbox on the top-right, which is now not greyed out anymore.
- All selected items must be purchasable from the same vendor.
- Then, click the button Create purchase orders in bulk on the top-right.
- The PO, once saved, will be automatically linked to where these materials were demanded.
Usage tips
- If these items are available in stock and should be taken off the list, then bookings need to be finalized for these:
- Customer Orders, for which bookings have never been raised, are not displayed here.
- Demand needs to be created while trying to book the item to the CO.
Important notes
- The software shows the first 10000 parts sorted by the date when the part is required.
Statistics
The Procurement -> Statistics page shows statistical reports generated based on purchase orders.
- The reports can be selected from the drop-down menu.
- The period of a report can be custom-defined or selected from pre-defined options.
- Reports can be saved in PDF or CSV.
Jump to:
- Materials used in shipped goods - parts for products that were shipped in the selected period.
- Premature orders - the time between the expected arrival of parts and their first use.
Report "Materials used in shipped goods"
This report lists parts for the shipped products in the period:
- The raw materials used in the products' Manufacturing Orders.
- The items which were resold - i.e. items that were received with a PO and shipped to the customer.
So, it shows items, which originated from:
- a Purchase Order, or
- a manual stock adjustment.
If you have adjusted inventory manually:
- The report may include items that were entered with a manual stock adjustment, in which case no further breakdown into the raw materials can be done by MRPeasy.
- This means that a final product or subassembly which is entered with a manual stock adjustment and shipped to the customer is shown in that report. MRPeasy does not know what actual materials were used to make it - so it only lists the product itself and its cost which was entered during adjustment.
Report "Premature orders"
This report shows the amount of time between the planned receipt of the material and its first use. If this time is too long, you can try to postpone the purchase order.
Statistics include:
- Purchase order number
- Part number and description
- Expected arrival date
- Earliest date of use
- Earliest booking – a link to the earliest MO, CO, TO, or RMA.
- Days – days between the planned arrival and earliest use.
Stock Section - For Stockkeeper
The Stock module gives the ability to:
- manage new and existing stock items, their lots (batches) and serial numbers,
- move items between storage locations (shelves, bins),
- create and report shipments to customers,
- transfer items between sites,
- perform inventory counts,
- see low inventory alerts,
- see stock history,
- create write-offs,
- see detailed financial stock balance movements.
The Stock section has the following sub-sections:
- Items - a detailed overview of all your stock items – both the parts and the finished products.
- Stock lots - a list of all stock lots (batches) that are either currently in stock or scheduled to arrive, plus the history of all stock lots in the system.
- Shipments - a list of all shipments to customers or subcontractors, both planned and shipped.
- Transfer Orders - a list of all transfer orders between warehouses. Available with the Multi-stock and Production Sites functionality.
- Inventory - a list of all items that are stored in the stock, and allows to update the inventory levels during a cycle count.
- Critical on-hand - a list of procured and manufactured items which are below their minimum available quantity and need re-ordering.
- Write-offs - a list of all products and parts that have been manually written off stock.
- Stock movement - financial report of on-hand stock balance and its detailed movements in any chosen period.
- Serial numbers - a list of all serial numbers of all parts. Available with the Serial Numbers functionality.
- Stock settings - settings of Product Groups, Units of Measurement, Storage Locations, Parameters, and Relations.
Stock - Frequently Asked Questions
Demo video: Inventory management
Setting up items:
- Item's settings and parameters.
- Create a new item.
- A procured item.
- A manufactured item.
- Make-To-Order bespoke manufacturing.
- A kit of products to be packed, bundle, auto-assembly product.
- A kit of parts to be assembled/kitted, phantom (BOM) item.
- A process for disassembling a product that you manufacture.
- A material that is cut into pieces, or a procured kit to be disassembled.
- An item with parameters (Matrix BOM).
- A subcontracted item, that is produced by your vendor from your materials.
- A non-inventory item.
- Copy an existing item, duplicate an item.
- Attaching files.
- Showing item attachments in Purchase Order PDFs.
- Displaying item icons.
- Importing items into MRPeasy.
Units of measurement:
- Define a unit of measurement.
- Unit conversions from the main unit for use in BOMs and MOs.
- Convert a vendor's unit of measurement.
Inventory levels and financials:
- Starting inventory values.
- Reading inventory numbers - in stock, available, expected...
- Item cost.
- Stock financials, stock balance, and movements.
- Virtual stock.
- Historical inventory levels.
- Cycle count.
- Write offs.
Storage locations and several sites-warehouses:
Shipments:
- Creating Shipments.
- Picking and shipping.
- Waybill, a Picking list, a Packing list.
- Shipped serial numbers.
- Shipment statuses.
- Edit document PDFs.
Stock lot traceability, batch inventory traceability, serial numbers tracking, quality:
- What is a stock lot?
- How does stock lot tracking work in MRPeasy?
- Incoming quality control.
- Print a stock lot label.
- Demo video: Serial numbers
- Serial numbers tracking.
Reports:
Jump to other FAQs:
Items
The Stock -> Items section contains a list of all your stock items, all the parts, and the finished products. New items can be added here.
Jump to:
- Demo video: Inventory management.
- Item details.
- Reading inventory numbers.
- Virtual stock.
- Item cost.
- Item labels.
- Item reports.
- Bulk editing.
- Import items.
- Deleted, archived items.
- Stock FAQ.
Checking stock availability
At Stock -> Items, there's a very detailed overview of how many units of each item are physically in stock, available for use, booked for something, consumed in WIP, expected to be received in the future, etc.
- In stock - the total quantity that is physically in stock right now.
- In stock = Available + Booked + Rejected + (Expired - Booked from expired).
- Available - the quantity that is in stock and also available (not booked).
- This quantity is displayed in red when it is below the item's Reorder point.
- If Available + Expected, Available < Reorder Point, the item will be shown in the Critical on-hand report and indicated on the Dashboard by the "Items below reorder point" indicator.
- This number can also go negative (I.e. negative inventory) when demand for the item is greater than supply. I.e. more is demanded than is available in stock.
- Available = In stock - Booked - Rejected - (Expired - Booked from expired).
- Booked - the quantity that is in stock and booked (reserved) plus the quantity which is required, but not booked.
- If items are in demand, but not booked from any stock lots, these are included in this number.
- It may be that no items were available for booking when a booking was raised initially, in which case a booking is not matched with a stock lot later when goods become available.
- Calculated based on Bookings. Read more about booking and consumption of goods.
- Booked = the total sum of Bookings, excluding booked expected goods (reflected in "Expected, Booked").
- Clicking the number brings up existing Bookings.
- If items are in demand, but not booked from any stock lots, these are included in this number.
- Expected, Total - the total quantity that is expected to be received in the future.
- Expected, Total = The total quantity of expected stock lots, minus the goods already reported consumed (possible if Use planned goods = Yes).
- Clicking the number brings up all expected goods.
- This includes items that are received, but on hold and waiting for inspection.
- Expected, Total = The total quantity of expected stock lots, minus the goods already reported consumed (possible if Use planned goods = Yes).
- Expected, Available - the quantity that is expected and available (not booked).
- Expected, Available = Expected, Total - Expected booked.
- Expected, Booked - the quantity that is expected and already booked, not freely available.
- Calculated based on Bookings, minus the goods already reported consumed.
- Clicking the number brings up all expected goods.
- Work in progress - the quantity that has been consumed in manufacturing orders which are currently still in progress.
- At the moment when materials are marked as consumed in production, they are moved to Work in Progress (WIP), and they are not part of the inventory anymore.
- When the Manufacturing Order is finished, finished goods are counted into stock and the WIP is cleared.
- Virtual stock - the number of products that can be made from the current available inventory of parts.
- Click on the button to calculate how many of this product could be made from the current stock of materials.
- Packaged - the quantity in stock that is packaged.
- Available, when Packing is enabled.
- Expired - the quantity in stock that has expired.
- Available, when Expiry Date is enabled.
- Clicking the number brings up the list of expired lots.
- Rejected - the quantity in stock that is rejected in quality control.
- Available, when Quality Control is enabled.
- Clicking the number brings up the list of rejected lots.
Virtual stock
At Stock -> Items, it is possible to calculate how many products can be made from the current available inventory of parts.
To calculate virtual stock:
- Enable column "Virtual stock".
- Find the desired product.
- Click on the button on that item's line to calculate the quantity.
- The button is displayed in the "Virtual stock" column for each item, which has a BOM.
The virtual stock is calculated on the fly. This means the following:
- It is subject to change at any moment when the available in-stock quantity changes.
- The calculation does not have any effect on the inventory and virtual stock of other products.
- It is not saved in the database.
Item label, item barcode
The labels for items can be printed by clicking the Print Label button on the Stock -> Items page.
The size, information, and layout of the label can be edited with the Label editor.
The standard label contains the unique stock lot barcode if the Barcode System functionality is enabled.
It is also possible to just print the barcode. For printing barcodes only:
- go to Stock -> Items and open the item details page.
- Click the button "Print barcode" in the upper right corner of the page.
(If the product has matrix BOM and parameters, then this button is located in the Variations section.)
Deleted items
Items are never fully deleted, deleted items are hidden/archived to conserve your stock history and database consistency.
You can find these items by searching for the part number. Or search for "del", this suffix is added to all deleted items.
Deleted items can also be restored.
- Find the deleted item.
- Open it.
- Press Restore on the bottom actions menu.
Importing items from a CSV file
At Stock -> Items -> Import from CSV, you can upload all your items (articles, SKUs) into MRPeasy at once to define new items or update existing ones.
Jump to:
- Demo video: Importing data.
- Importing new items.
- Example for new items.
- Updating existing items.
- Important notes.
What is CSV? CSV (Comma-Separated Values) is a universal format for importing or exporting tabular data. A CSV file can be obtained by saving/exporting an Excel file as CSV (Comma-Delimited) (*.csv).
When uploading the CSV file:
- Select and match the fields' names corresponding to the data's columns.
- If the file's first row contains headers, check the "The first row is heading" option. Then, the first row will not be imported.
- Select "Do not import" as the column type if some column is not to be imported.
- Click Import to upload the data into the appropriate fields of the database.
- If importing of some data fails, a skip file will be generated and downloaded to your computer, which indicates all errors line-by-line.
Importing new items
Please note that inventory quantities and purchase terms can be imported in this section only during the initial creation of items. Use the dedicated CSV imports of
- inventory quantities to upload/update inventory levels later;
- purchase terms to upload/update purchase terms later, or if you have several purchase terms.
When importing new items, the fields that can be imported are:
| Part description* |
The name or short description of the item. Required. |
| Part No. |
A unique number to identify the item. If not imported, then the code (part number) is generated automatically. |
| Product group |
The name or the number of the product group. If a product group with this name or number exists, the product is placed in this group. |
| Unit of measurement |
The unit of measurement for your item. If not defined earlier, a new unit of measurement is created. |
| Is inventory item (1/0) |
If the item is an inventory item (1) or a non-inventory item (0). Available if Non-inventory items are enabled. |
| Selling price |
A default sales price for the item (if price lists are not used). |
| Tiered prices |
If Tiered pricing is enabled, then different default selling prices per quantity can be imported. For example: If you import it in this file, then this must be formatted in a single cell as follows (as a JSON): Here, "q" is quantity, and "p" is price. Alternatively, you can use a table format if you separately use the pricelist import from CSV functionality, which allows updating price breaks for stock items (or creating a separate pricelist). |
| Net cost per 1 unit |
The cost per item of items currently in stock. Must be imported together with "Quantity at stock." |
| Quantity at stock |
The number of items currently in stock. It must be imported together with "Net cost per 1 unit"; otherwise, the cost of these items is zero (the cost can later be manually amended at stock lots' details). If several sites are configured, there's one column for each site. Alternatively, if you wish to upload inventory levels and item costs, possibly at different sites or storage locations, you can import this information from CSV from Stock -> Inventory -> Import. |
| Default storage location |
The default location of this item in stock. If several sites are configured, there's one column for each site. Storage locations must be pre-defined in the system. Storage locations can be uploaded at Stock -> Stock settings -> Storage locations -> Import from CSV. |
| Reorder point |
The level of available inventory, below which the available quantity is critically low, and the item should be reordered. If no safety level is kept in stock, then the recommended value is 0, or a negative inventory level cannot be seen in the "Critical on-hand" report. If several sites are used, there's one column for each site. |
| Is procured item (1/0) |
1 - this item is purchased from vendors. 0 - it is a product produced by your company. If not imported, defaults to "0" - not a procured item. |
| Not for sale (1/0) |
1 - the item is excluded from product selection in customer orders, quotes, and invoices. 0 - the item is available for sale. If not imported, defaults to "0". |
| Icon URL |
URL of an image that is used as the item's icon. |
| Quality control (1/0) |
1 - enabled, goods received to stock are put on hold and must pass quality inspection. "On-hold period" must also be imported. 0 - disabled. If not imported, defaults to "0" - not enabled. Available if Quality control functionality is enabled. |
| On-hold period |
The number of days the goods will be on hold for quality inspection. This is used for items with "Quality control" enabled. Available if Quality control functionality is enabled. |
| Shelf life |
The number of days before the goods expire. Available if Expiry date functionality is enabled. |
| Serial numbers (1/0) |
1 - this stock item has serial numbers. 0 - this stock item does not have serial numbers. Available if Serial numbers functionality is enabled. |
| Barcode UPC-A/EAN-13 |
The UPC-A/EAN-13 barcode of the product. Available if Barcode System functionality is enabled. |
| Revision |
The current revision of the item. Available if Version Control System functionality is enabled. |
| Custom fields |
Any custom field for stock items defined in the MRPeasy settings can be imported. |
| Min. quantity for manufacturing |
It is possible to import one Purchase Term during the initial import of an item. (For all other cases, use the Purchase Terms import).
For including Purchase Terms in the item import, include the following columns:
| Vendor |
The number or name of the vendor. A new vendor with this name is created if the vendor does not exist. Must be imported together with "Vendor price per unit" and "Lead time in days." |
| Vendor part no |
The item code of the vendor. |
| Vendor price per unit |
The expected price of the item is from the "Vendor." If the Vendor-specific unit of measurement is used, then this is the price of the vendor's one unit, e.g., the price of one "box" of 200 items. Must be imported together with "Vendor" and "Lead time in days." |
| Lead time in days |
The number of business days from ordering when goods will arrive from the "Vendor." Must be imported together with "Vendor" and "Vendor price per unit." |
| Priority |
A higher number indicates a higher priority. This is optionally used if you have several purchase terms per item and need to create an order of priorities. This information is also used when auto-filling POs. |
| Minimum purchase quantity |
The minimum order quantity you can place to the "Vendor." |
| Vendor-specific unit of measurement |
The custom unit, different from your stock-keeping unit, which the vendor sells this item. E.g., "box". |
| Vendor's UoM conversion rate |
The conversion rate of the vendor's unit to your stock-keeping unit. For example, if your stock-keeping unit is "pcs," the Vendor UOM is "Box," and the value 200 is imported, then 1 Box = 200 pcs. |
| Vendor's UoM is indivisible (1/0) |
The vendor's UoM is indivisible (1), only multiples of the unit can be ordered. E.g. 0.5 "Box" cannot be ordered, only 1, 2, 3... boxes can be ordered. |
Example table, importing 6 items, 4 procured items, and 2 products:
| Part No. | Part description | Product group | Unit of m. | Reorder point | Is procured? | Quantity at stock | Net cost per 1 unit | ... |
| P-00001 | Table Leg | Raw materials | pcs | 0 | 1 | 20 | 20 | ... |
| P-00002 | Varnish | Raw materials | l | 10 | 1 | 5 | 5 | ... |
| P-00003 | Sheet metal | Raw materials | kg | 0 | 1 | 100 | 0.25 | ... |
| P-00004 | Capacitor, 10uF, 0805 | Electronic parts | pcs | 2000 | 1 | 5000 | 0.008 | ... |
| P-00005 | Table | Finished goods | pcs | 0 | 0 | 0 | 0 | ... |
| P-00006 | Electronics assembly | Finished goods | pcs | 5 | 0 | 10 | 15 | ... |
| (Up to 3000 lines can be imported at once) | ||||||||
Download a sample file: import-items.csv
Re-importing data for updating items
With a CSV import, it is possible to update existing items at Stock -> Items -> Import from CSV. (Alternatively, bulk editing can be used at the Stock -> Items table.)
If an item with the same number already exists, then the software updates this item. If there are new values that will be updated, then:
- A confirmation page shows a list of values that will be changed.
- The user can choose whether to update a particular item or skip it.
Part No. field is used for matching the items.
The following fields can be used:
| Part No.* |
A unique number to identify the item. Required. Used for matching the items. |
| New part number |
The new part number. If the Professional function Matrix BOM is enabled and a product has variations with unique part numbers, updating part numbers by uploading a CSV file is impossible. Please use the Batch editing functionality to update part numbers in batch. |
| Part description |
The name or short description of the item. |
| Product group |
The name or the number of the product group. If the item is to be imported into an existing product group, use only the group's number for import. If not defined earlier, a new group is created. |
| Unit of measurement |
The unit of measurement for your item. If not defined earlier, a new unit of measurement is created. |
| Reorder point | The reorder point (ROP) is the level of inventory that triggers an action to replenish that particular inventory stock. If no safety level is kept in stock, then the recommended value is 0, or a negative inventory level cannot be seen in the "Critical on-hand" report. If several sites are used, there's one column for each site. |
| Selling price |
A standard sales price for the item (if price lists are not used). |
| Tiered prices |
If Tiered pricing is enabled, then different default selling prices per quantity can be imported. For example: This must be formatted in a single cell as follows (as a JSON): Here, "q" is quantity, and "p" is price. |
| Is procured item (1/0) |
Use "1" if this item is purchased from vendors, or use "0" if it is a product produced by your company. |
| Not for sale (1/0) |
Use "1" to exclude the item from product selection in customer orders, quotes, and invoices, or use "0" to keep it available for sale. |
| Icon URL |
URL of an image that is used as the item's icon. |
| Quality control (1/0) |
1 - enabled, goods received to stock are put on hold and must pass quality inspection. "On-hold period" must also be imported. 0 - disabled. Available if Quality control functionality is enabled. |
| On-hold period |
The number of business days the goods will be on hold for quality inspection. This is used for items with "Quality control" enabled. Available if Quality control functionality is enabled. |
| Shelf life |
The number of days before the goods expire. Available if Expiry date functionality is enabled. |
| Serial numbers (1/0) |
1 - this stock item has serial numbers. 0 - this stock item does not have serial numbers. Available if Serial numbers functionality is enabled. |
| Barcode UPC-A/EAN-13 |
The UPC-A/EAN-13 barcode of the product. Available if Barcode System functionality is enabled. |
| Revision |
The current revision of the item. Available if Version Control System functionality is enabled. |
| Custom fields |
Any custom field defined in the MRPeasy settings. |
| Min. quantity for manufacturing |
Important notes!
- If the imported file contains non-Latin characters, the file must be in UTF-8 (preferred) or Unicode encoding. If Excel is used to save the file, select the "Unicode Text (*.txt)" option in the "Save as type" field. Even though the file extension is TXT, it can be imported as a CSV file.
- The limit is 3000 lines per upload. If the file is bigger, divide it into several smaller files.
- Since importing can be a trial and error, we strongly suggest backing up the database before importing. In that case, if anything goes wrong, it is always possible to restore the previous session.
- If you wish to upload several Purchase Terms or Vendors for the item, you can import these at Procurement -> Vendors -> Import from CSV.
- If you wish to upload inventory levels and item costs, possibly at different sites or storage locations, you can import this information from CSV from Stock -> Inventory -> Import.
Bulk Editing
At Stock -> Items it is possible to edit several stock items at once.
For editing items bulk:
- Check the checkbox at the end of each item's line you wish to edit. (Up to 100 lines)
- Click on Bulk editing.
- Edit individual values.
(The header row allows for bulk updating of a column across all items at once.) - Click Save.
Bulk deletion
For deleting items in bulk:
- Check the checkbox at the end of each item's line you wish to edit. (Up to 100 lines)
- Click on Bulk editing.
- Click Delete.
Items with quantity 0 at stock can only be deleted, if it's not zero you must reduce the quantity to 0 before it can be deleted.
Take note, that technically items are never deleted, but instead archived for keeping the history and data consistency. It will be possible to look these items up by searching Stock -> Items by the part number.
Item Details
The Stock -> Items -> Item details page shows the information and the configuration of the item.
Jump to:
- Item's settings and details.
- Setting up new items.
- A procured item.
- A manufactured item.
- Make-To-Order bespoke manufacturing.
- A kit of products to be packed, bundle, auto-assembly product.
- A kit of parts to be assembled/kitted, phantom (BOM) item.
- A process for disassembling a product that you manufacture.
- A material that is cut into parts, or a procured kit to be disassembled.
- A product with configurations (Matrix BOM).
- A subcontracted item, that is produced by your vendor from your materials.
- A non-inventory item.
- Copy an existing item, duplicate an item.
- Import items from a file.
- Attaching files.
- Item attachments in Purchase Order PDFs.
- Item icons.
- Item reports.
- Preview images and CAD files.
Item's settings, details
At Stock -> Items -> Item details, the following settings and details are available for an item:
- Part Number - a unique number to identify the item. Automatically generated by MRPeasy, can be changed. Required;
- Copy item - if you wish to copy all the details of an existing item. Available while creating a new item;
- This is an inventory item (Yes/No) - choose if this item is tracked in inventory, or not. Defaults to "Yes".
Non-inventory items can only be used in Purchase Orders and Invoices. Non-inventory items cannot be used in BOMs, Customer Orders, Shipments.
They aren't visible in Stock -> Inventory.
This setting cannot be changed after the item is created. Available, if the Non-Inventory Items function is enabled. - Part description - the name or short description of the item. Required;
- Product group - the product group the item belongs to;
- Unit of Measurement - in which units the item is being stored in stock and used in production;
- Weight - the weight of the item, optional. Weight can be defined in ounces (oz), pounds (lbs.), grams (g), or kilograms (kg). “Weight” and “Unit of weight” columns can be added to the items list view. Available if the Packing function is enabled.
- Reorder point - the minimal inventory level of the item, when it is needed to make a purchase order or manufacturing order. Recommended setting at least "0" (empty field is not equivalent to zero-value).
If the item's availability falls below the ROP, it will be displayed in the Critical on-hand report. Keep it undefined if you explicitly want to exclude the item from the Critical on-hand report.
When the Professional function Matrix BOM is enabled, it is possible to set separate ROP values for each variation. Changing the ROP value of the stock item updates the values of all variations. - This is a procured item (Yes/No) - choose whether the item is procured (or subcontracted), or manufactured in-house. Defaults to "No". A procured item must have Purchase Terms, a manufactured item must have a Bill of Materials, and a Routing.
- Not for sale (Yes/No) - choose whether the item should be excluded from product selection in customer orders, quotes, and invoices. Defaults to "No". Such items remain available in Customer Returns (RMA).
- Minimum quantity for manufacturing - the minimum quantity for a Manufacturing Order. Available for non-procured items.
- Serial numbers (Yes/No) - choose whether each piece of this item is tracked by a serial number, or not. Defaults to "No". Available, if the Serial Numbers functionality is enabled.
- Shelf life - if the item can expire, set the default shelf life in days for a new batch (a stock lot) of these items. Available, if the Expiry Dates functionality is enabled.
- Quality control (Yes/No) - choose whether a batch (a stock lot) of the item is subject to quality control when it arrives in stock, or not. Defaults to "No". Available, if the Quality Control functionality is enabled.
- Show parts (Yes/No) - display the item’s components on the shipping and invoicing PDFs.
Applies only to the top-level BOM materials. Defaults to "No". Use the PDF editor to show/hide the list of parts in particular document layouts. - Standalone MO (Yes/No) - this setting prevents nesting this item’s Manufacturing Order as a subassembly within a multi-level MO of a higher-level product. When an MO is generated for a product that includes this item in its BOM, a separate MO must be created for this item. Defaults to "No". Available for non-procured items.
- Selling price - you can set the default selling price. Possible to use different pricing per quantity and price lists, if the Tiered Pricing functionality is enabled.
- Default storage location - assign the default storage location (e.g. shelf) for the item in every warehouse. This is the location assigned by default to these items when they arrive in stock.
- Files - attach any documents, images, drawings, 3D models, instructions, etc. to the item. The files will be accessible from various places in the software, see the Document system.
- Parameters - if the item has certain variations or configurations (e.g. various colors, packages, configurations), add the parameters which can change. Available if the BOM with Parameters functionality is enabled.
- Any user-defined custom fields - the Custom Fields functionality is available from the Professional package.
- Variations - the list of all different combinations of parameter values that are allowed for this product. Subsection displayed if the item has saved Parameters. Available if the BOM with Parameters functionality is enabled;
- Purchase Terms - the list of vendors and purchasing options, incl. price, lead time, vendor part number, priority, etc. Subsection displayed for procured items ("This is a procured item": Yes) after the new item is saved;
- Bills of Materials - the list of parts, materials, and components that are needed to produce the item. Subsection displayed for manufactured or subcontracted items after the new item is saved.
- Routings - the list of equipment and operations for producing the item. Subsection displayed for manufactured items ("This is a procured item: No") after the new item is saved.
- Notes - notes can be saved to items.
Creating a new item
It is possible to create a new item:
- At Stock -> Items, by clicking "+".
- Or from within any other workflow, at the point when you are choosing an item, e.g. from the Customer Order details page, by choosing "Add a new product" from the product choice field.
Set up a procured item
Demo video: Setting up procured items.
If the item is purchasable from vendors:
- Create a new item.
- Fill in all item details.
- Mark "This is a procured item: Yes".
- Save.
- Scroll to the "Purchase Terms" section and enter the vendors' purchase terms.
A procured item:
- Has the statistical report "Purchase orders".
- Even if it has a BOM (it is a subcontracted item, for which you supply materials), it will not be included in a multi-level manufacturing order.
Set up a manufactured item - finished product, sub-assembly

Demo video: Setting up manufactured items.
To add a manufactured item:
- Create a new item.
- Fill in all item details.
- Mark "This is a procured item: No".
- Save.
- Scroll to the "BOM" section and enter its Bill of Materials.
- Scroll to the "Routings" section, and enter its routing.
Read also about creating a multi-level BOM.
A manufactured item:
- Has the statistical report "Manufacturing Orders".
- If it is a sub-assembly, its operations and materials can be automatically included in a multi-level manufacturing order, when it is out of stock.
- Can also be procured (toggle "This is a procured item" to "Yes" to be able to enter purchase terms).
Make-To-Order bespoke manufacturing
If capacity planning is required, then a new item with BOM and a Routing needs to be created for every bespoke project.
This can be done very easily from within the flow the Customer Order:
- Open the Customer Order.
- When choosing the Product, choose to Add a new product from the drop-down menu.
- Enter the product details.
- If it is similar to an existing item create a copy of the item, and modify it.
- Once the product is entered, click Back to return to the Customer Order.
- Continue with the Customer Order.
If capacity scheduling is not required, you do not need to create a new item every time. Read: How to create a make-to-order bespoke manufacturing order?
Set up a kit of products, bundle, auto-assembly product
Demo video: Kitting.
A kit is a bundle of products that are sold together. The kit item has a BOM, but no routing (no operations to complete).
A kit is auto-assembled after a Manufacturing Order is created for it. The MO is automatically finished immediately when all required parts are received to stock. The MO for it will not be a multi-level MO.
To set up a kit of products:
- Create a new item.
- Fill in all item details.
- Mark "This is a procured item: No".
- Save.
- Scroll to the "BOM" section and add a Bill of Materials, where you list its components.
- Do not enter a routing in the "Routings" section.
Selling bundles or kits:
- Create a Customer Order.
- Book the items for the Customer Order:
a) If Manufacturing Orders have already been created earlier, book the kits from stock.
b) If kits are not ready in stock, create Manufacturing Orders. - Kits become ready for shipment when MOs are finished.
- Continue with shipping.
Set up a kit of parts, phantom BOM, phantom assembly
Demo video: Kitting.
A kit of parts may be used for better organizing collections of parts that are used together in manufacturing. The kit item has a BOM, but no routing (no operations to complete).
A kit of parts:
- Could be pre-assembled to stock with a Manufacturing Order for it.
- The MO is automatically finished immediately when all required parts are received to stock.
- This MO for it will not be a multi-level MO. - Or, if it is not made to stock, it is a virtual kit - a phantom BOM - for a better organization of parts in a product.
- In which case, when it is required in the manufacturing of another product, it will be part of a multi-level Manufacturing Order.
- No operations will be required to assemble it.
- If the kit contains manufactured items, then operations and materials may be included to manufacture these.
To set up a kit of parts:
- Create a new item.
- Fill in all item details.
- Mark "This is a procured item: No".
- Save.
- Scroll to the "BOM" section and add a Bill of Materials, where you list its components.
- Do not enter a routing in the "Routings" section.
Set up a disassembly process for a product that you manufacture
Main function: Disassembly BOM
Sometimes you may need to disassemble a product that you manufactured.
To set up the disassembly of a product:
- Enable the Disassembly BOM functionality.
- Open your manufactured item, that you have set up, and wish to have the possibility to disassemble it.
- Scroll to the "BOM" section and add a new BOM, where you:
- Check the option "This is a disassembly BOM".
- Enter the list of components this product is disassembled into.
Tip! If you wish, you can choose to copy the original BOM to get the full list of parts, that you can then modify. - Save and go back to the item details page.
- Optionally, scroll to the "Routings" section of the item, and enter its routing.
- If you do not add a routing, this will be an (auto-)disassembly kit. To disassemble the product into components, you need to create an MO, which will be automatically completed once the product arrives in stock.
- If you add a routing, the operations of the MO need to be explicitly reported to disassemble it.
Set up a material that is cut into pieces, or a procured kit to be disassembled
Main function: Disassembly BOM
A procured kit of parts is something that you buy from a vendor as a single line item. But once you receive it, you break it down into individual components, which are added to your stock.
To set up a procured kit of parts:
- Enable the Disassembly BOM functionality.
- Create a new item.
- Fill in all item details.
- Mark "This is a procured item: Yes".
- Save.
- Scroll to the "Purchase Terms" section and enter the vendors' purchase terms.
- Scroll to the "BOM" section and add a Bill of Materials, where you:
- Check the option "This is a disassembly BOM".
- Enter the list of components this kit is disassembled into.
- Save and go back to the items details page.
- Optionally, scroll to the "Routings" section, and enter its routing.
- If you do not add a routing, this will be an (auto-)disassembly kit. To disassemble the kit into components, you need to create an MO, which will be automatically completed once the kit arrives in stock.
- If you add a routing, the operations of the MO need to be explicitly reported to disassemble it.
Set up a product with parameters, configurations, Matrix BOM
Demo video: Product configurator / Matrix BOM.
With the Matrix BOM functionality, it is easier to enter families of products so that it is not necessary to enter different BOMs and items for each combination. For example
- Products with variations, e.g. garments that have variations in size and color.
- Products with configurations, e.g. electronics which uses a few different parts based on the setup.
- Products in different packages, e.g. food, ice-cream which is produced in bulk and then packaged into many different standard packages; or fasteners, nails which are produced thousands at a time, but then packaged into different boxes in different quantities.
- Etc.
Set up a non-inventory item
Demo video: Non-inventory items.
Non-inventory items are items that are not tracked in stock. These can only be used in Purchase Orders and invoices.
- Enable the Non-inventory items functionality.
- Create a new item.
- Mark "This is an inventory item: No".
- Fill in all item details.
- Save.
Duplicate an item, copy an item
The easiest way to create a similar item to some previous item - for example, a one-off product - is to copy the original and modify it.
For duplicating an existing item with all its details, incl. Purchase Terms, Bills of Materials, and Routings:
- Create a new item.
- Choose the item you wish to duplicate in the "Copy item" field.
- Edit the item details.
- Save.
- Edit the Purchase Terms, Bills of Materials, or Routings.
Purchase Terms
The Purchase Terms connect a stock item to its vendors. One item can have many purchase terms. These are used for auto-filling Purchase Orders, and for lead time and cost estimation when items are not in stock.
Jump to:
- Demo video Setting Up: Procured Items, Purchase Terms
- Create a Purchase Term.
- Use of Purchase Terms to auto-fill purchase orders.
- Use of Purchase Terms when estimating costs.
- Import Purchase Terms.
- Update Purchase Terms.
Saving a Purchase Term
- Open the article details in Stock -> Items.
- Scroll down to the Purchase Terms table. (If you do not see it, mark the checkbox for This is a procured item)
- Click "+" to add a new Purchase Term.
- Fill in the Price per UoM and Lead time fields, which are mandatory.
- The price is per 1 unit of item, or 1 unit of vendor UoM.
- The lead time is measured in business days, defined by the "Working hours" setting.
- Optionally, fill in:
- Vendor part no. - part number of the vendor.
- Min. quantity - minimum order quantity (MOQ) for this purchase term.
- Priority - useful if the item has several purchase terms, a higher number indicates higher priority.
- Vendor-specific unit of measurement - useful when the item should have another unit of measurement on the purchase order.
- Save.
Conversion from a vendor's unit of measurement
If the vendor has another unit of measurement than used in your stock:
- Go to the Purchase terms table at the bottom of the Item details page, and create a new purchase term or edit an existing one.
- Check the option Vendor-specific unit of measurement.
- Enter the name of the unit to the Vendor's UoM, e.g. 1 box.
- If the unit of measure is indivisible, select the option Indivisible UoM. Then a decimal quantity will be rounded up.
- Set the Conversion rate, e.g. 40 pcs = 1 box.
- Set the Price per UoM and Min. quantity according to the vendor's UoM, e.g. box.
When a purchase order is created, then the PO will show the vendor's unit of measurement which will be converted into your internal unit.
Entering price breaks or pricing tiers from a vendor
To enter price breaks from one vendor, enter several purchase terms with the same vendor, and for each define the Minimal order quantity of the pricing tier and a different Price per UoM. MRPeasy will choose the correct tier according to the PO quantity.
For example, 4 pricing tiers:
| Vendor | Priority | Price per 1 unit | Min. quantity |
| Vendor A | 10 | 10 | |
| Vendor A | 10 | 9 | 10 |
| Vendor A | 10 | 7 | 50 |
| Vendor A | 10 | 5 | 100 |
Use of Purchase Terms when Creating Purchase Orders
When adding a Part to a purchase order:
- If it has one vendor, all details will be filled in automatically.
- If it has several vendors, its vendors will be highlighted in bold. After choosing the vendor, all details will be filled in automatically.
- If you choose a Vendor, then the parts from this vendor will be highlighted in bold. After choosing the part, all details will be filled in automatically.
- If a Vendor part number is chosen, only purchase terms with the same vendor part number are compared.
How the suitable Purchase Term is chosen:
- The purchase term with the highest priority, which satisfies the Minimal Order Quantity, is chosen.
- If there are several terms with equal priority, which all satisfy the Minimal Order Quantity, then the lower price term is chosen.
- If no supply terms meet the minimum quantity requirement, the term with the highest priority is used. If in this situation there are several terms with the highest priority the lower price term is chosen.
For example, if an item has four purchase terms:
| Vendor | Priority | Price per 1 unit | Min. quantity |
| Vendor A | 30 | 4 | 100 |
| Vendor B | 25 | 4.5 | 100 |
| Vendor A | 20 | 5 | 20 |
| Vendor A | 10 | 6 |
Then, if the order quantity is
- greater than 100, the price is set to 4.
- less than 100, but greater than 20, the price is set to 5.
- less than 20, the price is set to 6.
Use of Purchase Terms when estimating the cost of out-of-stock items
When creating a Manufacturing Order and materials are not in stock, then the purchase term selection corresponds to the use of purchase terms when creating Purchase Orders.
At Stock -> Items page column "Cost", BOM cost estimation, and CO cost estimation, when the item is not in stock, the cost of the procured item is found as follows:
- The software selects the purchase term with the highest priority.
- If several purchase terms have the same priority, the lowest price is selected.
- Minimal order quantities are ignored.
Uploading and updating Purchase Terms
Updating Purchase Terms:
- When a purchase order is saved and an item has only one purchase term, then MRPeasy will use the price from the purchase order to automatically update the purchase term.
To disable this functionality, please go to Settings -> System Settings -> Software settings, and change the setting Update purchase terms from PO to No. - It's possible to bulk update purchase terms at Procurement -> Vendor -> Particular vendor's reports: Purchase terms.
- To upload new purchase terms for existing items from a CSV file, or to update existing ones, please go to Procurement -> Vendors -> Import from CSV.
BOM (Bill of Materials)
From Stock -> Items -> An item's details or Production planning -> BOM it is possible to add a bill of materials (BOM) to your products.
A Bill of Materials lays the foundation for
- material planning for production,
- planning material purchases,
- estimation of material costs when quoting.
Jump to:
- About BOMs:
- Creating BOMs:
- Updating BOMs:
- BOM costs:
- Find the BOMs where an item is used in ("Where used" / "Engagement" report).
What is a Bill of Materials?
In MRPeasy, a Bill of Materials (BOM) is the list of materials that are needed to create one unit of product. In other words:
- for discrete manufacturing, like electronics, industrial equipment, etc., it's the list of parts;
- for process manufacturing, like food, pharmaceutics, etc., it is the formula or recipe that lists the quantities of ingredients per unit of product.
When a manufacturing order is created, the BOM is multiplied by the order quantity to calculate the total material requirements.
The bill of materials usually consists of several parts, and it could also include other consumables that don't make up the product (e.g. gloves, water, fasteners, etc.).
Read more about the Bill of Materials.
Single- and multi-level BOMs:
- A product can have a single-level assembly structure, where it is directly made from raw materials, or
- it could have multi-level sub-assemblies, where each sub-assembly has its own BOM and even a routing.
- If a sub-assembly does not have a routing, then it is considered as a collection of parts in a multi-level Manufacturing Order. This is also known by the terms "phantom assembly" or "phantom BOM".
| Part code | Part description | Quantity | Unit of measurement |
| A-00001 | Tabletop | 1 | pcs |
| A-00002 | Table Leg | 4 | pcs |
| A-00003 | Varnish | 0.5 | l |
An "engineering BOM" is not always the same as the "manufacturing BOM" or "MRP BOM":
- The engineering BOM states exact quantities of parts or ingredients inside the product, including the detailed assembly structure of the product.
- Often does not reflect everything that is actually consumed during production.
- This kind of bill of materials is a typical output of a CAD program and is used by the engineering department as the technical specification. - The manufacturing BOM or MRP BOM takes into account wastage and other consumables used in production; considers the material requirements planning goals, and corresponds to the process of how the product is actually manufactured.
- Some structures and parts might even not be included. For example, when materials planning for some material is not necessary, or that level of detail, each sub-assembly planning separately, is not necessary.
- The assembly structure is often simplified, if possible, even to a single level.
- This kind of bill of materials is used for production planning in an MRP system, where it's necessary to know the gross number of all materials for planning purposes and inventory picking. - The main difference?
- For example, while the engineering BOM states that a 1-meter stick contains 1-meter of a stick, the manufacturing BOM will say that making of a 1-meter stick consumes 1.2 meters of a stick (incl. 0.2m of scrap).
- For example, when the engineering BOM states that Part A will be used, the manufacturing BOM will say that Part A alternative will be used, because, in reality, the shop-floor uses another material.
- For example, when the engineering BOM defines each sub-assembly separately, the manufacturing BOM will not define the sub-assemblies separately, but only includes the total material requirements for making the sub-assemblies.
How is a Bill of Materials used for production scheduling?
- The software will multiply the materials in the BOM with the requested number of products.
- The availability of materials in checked.
- If some materials are not available, their lead times are used to calculate estimated availability dates.
Adding Bills of Materials (BOM)
Creating a Bill of Materials
For adding a Bill of Materials:
- Go to Stock -> Items -> An item's details or Production planning -> BOM
- Click on Create a BOM Add to add a BOM.
Or import the Bills of Materials from a CSV file at Production planning -> BOM -> Import from CSV.
Creating a multi-level Bill of Materials
Creating a multi-level BOM for a product:
- Create separate articles for the sub-assemblies and the product.
- Add BOMs to the sub-assemblies.
- Add the sub-assembly articles to the BOM of the product.
Phantom assembly, phantom Bill of Materials (phantom BOM), phantom item, kit of parts
If an item
- has a BOM,
- has no Routing,
- and is not configured as a procured item ("This is a procured item: No"),
then it is considered as a collection (kit) of parts, a phantom BOM.
If it is included in the BOM of another part, and a Multi-level Manufacturing Order is made for that product, then:
- All the parts of the kit will be included in the MO.
- No operations will be required to assemble the kit.
- If the kit contains other manufactured items, then operations and materials may be included to manufacture these items.
Take note that if a MO is made for such a kit item separately, to pre-assemble it, then it is treated identically to a kit (bundle) of products for selling. No multi-level MO will be made then, and it will be auto-assembled when all parts arrive in stock.
Connecting Bills of Materials and routings
BOMs and Routings are associated:
- It is possible to associate a particular BOM with a particular Routing that goes together.
- For production planning, a product must have both a BOM and a Routing. And both must be connected with each other.
Estimating the cost of a BOM
When a BOM is saved, MRPeasy tries to estimate its cost by totaling the costs of materials used in it.
The cost of a BOM is estimated as follows:
- If the material is in stock, the cost is approximated by using the weighted average cost of the item.
- If the material is not in stock, the estimated cost of the material is used.
On the BOMs details page, the link on the "Average cost" number (Edit mode = Yes) leads to a page with an exact calculation of the item’s cost.
The cost cannot be estimated if:
- the cost of some raw material is unknown (no lots at stock and it neither has no vendors);
- the Matrix BOM functionality is enabled and the BOM includes a relation or some parameter changes the number of raw materials.
The actual cost of the product is only available after the Manufacturing Order finishes, then based on reporting, the manufacturing costs are added up, and materials have been used from particular stock lots (what is a stock lot?).
Multi-level BOM, indented BOM estimated cost
When you open the indented BOM PDF, the following should be kept in mind:
- Component quantities are shown per 1 sub-assembly. I.e. the sub-assembly BOM is shown.
- The cost is found for each line separately. Some items may be in stock, others not.
- The cost of a sub-assembly might not equal the estimated cost of its BOM.
- If the sub-assembly is in stock, then, for it, the average cost from stock is shown. But the cost of components is found separately.
Example:
| # | Part | Quantity | Average cost | Comments |
| 1 | A | 1 | $2.00 | |
| 2 | B | 2 | $6.00 | Not in stock, the cost is estimated. = 2 x (B1 + B2) = 2 x ($1.50 + $1.50) |
| 2.1 | B1 | 4 | $1.50 | |
| 2.2 | B2 | 4 | $1.50 | |
| 3 | C | 1 | $4.00 | In stock, the average cost from stock is used, which is more than its estimated materials cost would be. |
| 3.1 | C1 | 1 | $1.00 | |
| 3.2 | C2 | 1 | $1.00 | |
| Total: | $12.00 | The estimated cost of the BOM = A + B + C = $2.00 + $6.00 + $4.00 |
Calculating the actual material cost for a product
In general, a manufactured item's cost comprises three components:
The final cost of materials is calculated when a product has been manufactured via a Manufacturing Order:
- When a Manufacturing Order is created, materials are automatically booked to it (default by FIFO; or by FEFO, for perishable goods) from specific stock lots, based on the items BOM.
- If some materials were not available, these must be booked later to the MO.
- Each item has its own actual cost, which it was purchased or manufactured with, saved in the stock lot details.
- When booked materials are reported consumed and the manufacturing order is finished, the actual cost of materials is added up and divided by the number of products.
The material cost of a product is:
- The cost of materials = Cost of consumed materials in the MO / Number of products on the order
Updating the BOM of already scheduled Manufacturing Orders
If the BOM is saved and there are current manufacturing orders (MO) that are based on this BOM, then the software asks if you wish to update MOs. It will show a list of MOs and give options to update them.
For automatically updating the materials in existing MOs according to an updated BOM:
- Change the BOM.
- Save.
- Proceed to update MOs.
- a. Click Update all.
b. Or choose which MOs you wish to recalculate, and confirm the new schedule for these MOs. - If MO with a new BOM does not take a longer time than originally, then it is left in the schedule without any changes.
Limitations:
- It is only possible to automatically update MOs which are not started yet. For other MOs, the materials must be updated manually.
- It is not possible to automatically update MOs where serial numbers are reported. Serial numbers must be removed first, or the materials must be updated manually.
- It is not possible to automatically update MOs where POs for subcontracted operations are created. Purchase Orders must be deleted first, or the materials must be updated manually.
It is possible to manually update the materials of MOs in every status, see: How to book, add, or release materials of a Manufacturing Order.
Routing
At Stock -> Items -> An item's details, in section Routings and at Production planning -> Routings it is possible to add the routings to your products.
A routing lists the stages of production of a product and lays the foundation for
- capacity planning and production scheduling,
- assigning jobs to workers,
- estimation of costs and production lead time,
- tracking actual costs and production time.
Jump to:
- Demo video: Setting up manufactured items, BOMs, routings, workstations.
- What is a routing?
- Defining a routing.
- Adding subtasks to an operation.
- Setting default workers or departments.
- Calculation of operation's duration.
- Calculation of applied manufacturing overhead, direct labor, and materials costs.
- Examples.
- Subcontracted operations.
- Update the routings of planned Manufacturing Orders.
- Track changes to a routing (revisions).
- Export a routing.
- Import a routing.
Defining a product's routing in MRPeasy
A new routing can be added:
- For items, which are manufactured (This is a procured item = No).
- At Stock -> Items -> An item's details, in section Routings.
- At Production planning -> Routings it is possible to add the Routings to your products.
Each operation in a Routing has the following parameters:
| Parameter | Description |
| Number |
The line number of the operation. |
| Workstation group* |
The workstation group, from where a workstation will perform this operation. When scheduling the production, the individual workstation from that group with the best availability is chosen. An operation becomes a passive (waiting) operation when its workstation group is of type Passive processing. Use this for steps where items wait without labor (e.g., drying, cooling, storage, quarantine). *This is the only required field that must be filled. |
| Subtasks |
An ordered checklist of smaller steps within the operation. Subtasks help workers follow a clear procedure on the shop floor. They do not affect scheduling. See Adding subtasks to an operation below for details. |
| Sequence |
The number(s) of the operation(s) which must be completed, before this operation can start. This allows defining parallel and converging/diverging chains of operations. Set 0 if it can start immediately. Available, if the Overlap and Special Sequences function is enabled. |
| Overlap |
The number of processed products in the previous operation, that can be directly passed to this operation, even before the previous operation is fully finished with the full batch. If undefined, then the full batch must be processed in the previous operation, before this operation can start. If this function is used:
Available, if the Overlap and Special Sequences function is enabled. |
Additionally, for the operations that have a workstation group of type Active processing, the following fields can be defined:
| Parameter | Description |
| Setup time |
A fixed time, the estimated time that is needed to start or prepare this operation. Setup time cannot be defined for an operation in the routing that has "Parallelize" or "Overlap" enabled. |
| Fixed cost |
The estimated manufacturing overhead when setting up and preparing for the operation, corresponding to the "Setup time". |
| Variable cost |
The estimated manufacturing overhead per "Cycle time" producing "Capacity" of products. (Variable cost = Cycle time / 60 minutes * Hourly rate * Manufacturing Order quantity) |
| Capacity |
The number of products that can be processed simultaneously within the "Cycle time". The default value is 1. A value greater than 1 corresponds to the maximum capacity (e.g. in an oven, mixer, furnace, etc.) that can be processed within the "Cycle time". |
| Time payment |
If the worker is paid by the hour. Enabled by default. Each user's hourly labor rate is defined in Settings -> Users -> The user's details. Setting visible if the Piece Payment functionality is enabled. |
| Piece-payment |
The labor cost per product, if the Worker is paid per piece. Available if the Piece Payment functionality is enabled. |
| Parallelize |
If instead of being processed on one workstation, the operation should be divided into smaller parallel operations among all available workstations in the same group. (E.g. processing of 100 pieces is divided among 4 workstations that process 25 each, in parallel.) Available, if the Parallel Execution of Production Operations function is enabled. |
| Department/Worker |
Default worker(s) or department(s) who are assigned to this operation. The "Default worker" in the workstation's details overrules this setting when a Manufacturing Order is planned! When estimating the Routing cost, the hourly rate of the department/worker is used to estimate the labor cost. |
Adding subtasks to an operation
Subtasks let you break down an operation into an ordered list of smaller steps without overcomplicating the routing, as subtasks do not affect the production schedule. Workers can then see and complete the checklist during production.
To add subtasks:
- Open the routing in edit mode at Production planning -> Routings.
- In the operations table, click on the “Add subtasks“ button on the operation’s line. A subtask list will open below that operation.
- Type the subtask description in the input field.
- Reorder subtasks by dragging and dropping, or remove them with the delete button.
- Save the routing.
The subtask column header has a toggle icon that shows or hides all subtask lists at once.
Subtasks can also be included when importing routings via CSV.
Default workers and departments
By default, the following worker/department is assigned to an operation when a new Manufacturing Order is created:
- The default worker in the workstation's details.
- The default worker in the routing, if (1) is undefined.
- The user creating the Manufacturing Order, if (2) and (3) are undefined.
The workers/departments can be changed anytime in the Manufacturing Order.
Please note that passive operations are not assigned to the worker or department.
Calculation of operation duration:
In a Manufacturing Order, the duration of the active operation is calculated according to the following logic:
- Operation duration = (Setup time + Cycle time x Order quantity / Operation's cycle capacity*) / Productivity of the workstation.
* Cycle time is rounded up to the next full cycle duration if a planned quantity for the given cycle is less than the operation's cycle capacity. - If Parallelize is used, then the Operation duration is also divided by (i.e. among) the number of available workstations.
For the passive operations, the operation duration is a single cycle time for any quantity (e.g., if the drying time is 60 minutes, the operation, regardless of quantity, will complete in 60 minutes).
Direct labor, manufacturing overhead, and direct materials cost calculations
Each product, which is produced via a Manufacturing Order, has three cost components:
- Direct labor cost - wages for the time spent on operations.
- Applied manufacturing overhead - or Factory overhead, or Factory burden, or just Applied overhead includes costs involved in manufacturing with the exception of the cost of raw materials and direct labor. More information about it you can find in our blog article.
- Direct materials cost - the actual cost of the materials that were used.
Together these three cost components form the total production costs.
Calculation of labor cost
Labor cost is the wages for the time spent on operations.
For an active operation in a Manufacturing Order:
- Initially, the labor cost is estimated:
Labor cost = Operation duration x Worker hourly rate* + Piece-payment rate x Manufacturing Order quantity - Once operations are reported finished, these are recalculated:
Labor cost = Reported operation duration x Worker hourly rate* + Piece-payment rate x Reported quantities
*The hourly wage for any worker can be defined at Settings -> Human resources at the user's details page.
Calculation of applied manufacturing overhead cost
Applied overhead includes costs involved in manufacturing with the exception of the cost of raw materials and direct labor.
For an active operation in a Manufacturing Order:
- If the workstation does not have an hourly rate set:
- The overhead of the operation is calculated solely based on the routing:
Manufacturing overhead = Fixed cost + Variable cost* x Order quantity + Other variable cost* x Order quantity.
- The overhead of the operation is calculated solely based on the routing:
- If the workstation has an hourly rate set:
- Initially, the overhead of the operation is estimated:
Manufacturing overhead = Operation duration x Workstation hourly rate** + Other fixed cost + Other variable cost* x Order quantity. - Once the MO is finalized, it is recalculated based on reported times:
Manufacturing overhead = Reported operation duration x Workstation hourly rate** + Other fixed cost + Other variable cost* x Order quantity
- Initially, the overhead of the operation is estimated:
* If variable costs are defined not per 1 unit, but per more units, then the variable cost is found by rounding up to the next full variable cost quantity.
**An hourly rate can be set for any workstation at Production planning -> Workstations at the specific workstation's details page.
Calculation of direct materials cost
Materials cost is the actual cost of the materials that were used.
For a Manufacturing Order:
- Initially, the cost of materials is estimated:
The cost of materials = Cost of booked materials + Estimated cost of not booked (unavailable) materials. - Once the MO is finalized:
The cost of materials = Cost of consumed materials
Keep in mind that the estimated BOM cost of a product may be different than the final materials cost of a product.
Updating the Routings of already scheduled Manufacturing Orders
If the routing is updated, the software shows a list of the product’s MOs and gives an option to choose which not started MOs to update.
- Change the Routing.
- Save.
- Proceed to update Routings.
- Choose which MOs you wish to recalculate.
- Confirm the new schedule for the MOs.
Started MOs cannot be updated automatically. In these MOs, operations can only be adjusted manually: How to edit operation in the Manufacturing Order?
Export a Routing to Excel
For exporting a Routing into Excel:
- Open a Routing
- Click the button Excel in the upper right corner of the page.
What is Routing?
Routing is a document related to a manufactured product. It lists production operations (stages), in the order in which the product is made. The goal of the Routing is primarily to provide grounds for scheduling the capacity of production resources, e.g. machines (workstations).
What a Routing is not: the technical instruction for building the product. In general, it's often a good idea to strive towards simplification and generalization when defining the Routing.
Each line of the Routing represents one production operation at one stop - a machine or a work area - with an estimated time (and costs) it takes at that stop.
Here's an example of a simple Routing:
| Workstation group | Operation description | Time for setup (setup time) |
Time per piece (cycle time) |
| Woodworks stations | Assembly of all the table components | 30 min | 12 min |
| Painting stations | Painting of the table | 2 min | 5 min |
The example above tells us that setting up the assembly area takes 30 minutes of work after which every table will be assembled with 12 minutes on average. The same logic applies to the painting process, which will take place after assembly.
Did you notice? Instead of defining the particular machine (workstation) in the Routing, the Routing points to the group of machines (workstation group) that can perform this operation.
How is the Routing used in production capacity planning?
- The order quantity is used to calculate the total time of every operation.
- For every operation, the software checks all the workstations in the workstation group to find the particular workstation with the best availability.
- The operations are put into the production calendar in the correct order while keeping in mind the available resources.
- If the workstation hourly rates and employee hourly wages are known, the manufacturing overhead and labor costs will be calculated.
Examples
Jump to:
- A metal fabrication company.
- Electronics and high-tech assembly.
- An engineering or a pre-fab construction company.
- A food processor.
- Special sequences of operations, parallel converging processes.
- An operation does not require a worker.
- Passive operations not constrained by capacity and working hours (e.g., drying, etc.).
Example. A metal fabrication company
Let us imagine a CNC job shop.
- The CNC machine is set up, which takes 3 hours.
- The parts are machined, each taking 6 minutes.
- The hourly rate for the CNC machine is $70.
- The workers are assigned before starting the job, and their hourly wage will be used to calculate the labor cost.
The Routing could be defined as follows:
| Operation | Workstation group | Setup time | Cycle time | Fixed cost | Variable cost | Capacity |
| Machining | CNC | 180 minutes | 6 minutes | 210.00 | 7.00 | 1 |
Example. Electronics and high-tech assembly
Let us imagine an electronics manufacturer:
- The pick-and-place machine places the components on the PCB board. The hourly rate is $140.
- The oven solders the parts. The hourly rate for the oven is $70.
- The software is installed and tested. The hourly rate is $12.
- The workers are assigned before starting the job, and their hourly wage will be used to calculate the labor cost. (Time payment for workers can be disabled for automated operations without a supervisor)
The Routing could be defined as follows:
| Operation | Workstation group | Setup time | Cycle time | Fixed cost | Variable cost | Capacity |
| Placing the components | Pick-and-place | 3 minutes | 7.00 | 1 | ||
| Soldering | Oven | 3 minutes | 3.50 | 1 | ||
| Software installation and testing | Computer terminal | 3 minutes | 0.60 | 1 |
Example. An engineering or construction company
Let us imagine a manufacturer who builds e.g. cottages, pre-fab bathrooms, or similar.
- Preparation for building the frame and walls is done at the Woodworks, where individual pieces are fabricated and smaller parts are assembled.
- At the same time, the preparation for internal installable parts starts also at the Woodworks.
- When the frame and wall parts are ready, the assembly starts on an Assembly line
- The internal parts, as they become ready, are installed.
- In parallel, the roof is installed.
- When all parts are installed, the cottage is detailed and painted.
- Lastly, the cottage is moved to a packaging station, where it is prepared and picked up for transport.
- The hourly rate for all stations is $10.
- The workers who are available in corresponding Departments pick the jobs, and their hourly wage will be used to calculate the labor cost.
The Routing could be defined as follows:
| # | Operation | Workstation group | Setup time | Cycle time | Fixed cost | Variable cost | Capacity | Sequence | Department |
| 1 | Preparation of frame and wall parts | Woodworks | 240 minutes | 40 | 1 | 0 | Carpenters x2 | ||
|
2 |
Preparation of internal parts |
Woodworks | 480 minutes | 80 | 1 | 0 | Carpenters | ||
|
3 |
Frame assembly, |
Assembly lines | 1440 minutes | 240 | 1 | 1 |
Carpenters x2 |
||
| 4 | Preparation for transport | Packaging | 30 minutes | 5 | 1 | 1,2,3 | Packaging x2 |
Example. A food processor
Let us imagine a small bakery. They bake buns, which they sell in bags of four. In stock, they count each bun individually (the product is 1 bun), even though these are stored in bags of four.
- A mixer combines the ingredients. The dough for one batch, maximally 80 buns, is mixed at once which takes 30 minutes. The hourly rate for the mixer is $12.
- There's an oven that can bake 40 buns simultaneously. Baking a bun takes 15 minutes. The hourly rate for the oven is $12.
- Lastly, there is a machine that packs buns into bags (4 buns per bag) which takes a very short amount of time. But since the machine is fully occupied, it must wait behind the previous processes, the average packing speed is 1.5 minutes per bag of 4 buns. The hourly rate for the packaging line is $12.
- The workers are assigned before starting the job, and their hourly wage will be used to calculate the labor cost.
Optionally, with Piece payment functionality enabled, Time payment could be disabled, and possibly Piece payment could be enabled.
The Routing could be defined as follows:
| Operation | Workstation group | Setup time | Cycle time | Fixed cost | Variable cost | Capacity | Overlap | Time payment | Piece payment |
| Mixing | Mixer | 5 minutes | 30 minutes | 1.00 | 6.00 | 80 | No | Optionally, No | Optionally, Yes |
| Baking | Oven | 15 minutes | 3.00 | 40 | Yes, 80 | Optionally, No | Optionally, Yes | ||
| Packing | Packing machine | 1.5 minutes | 0.30 | 4 | Yes, 40 | Optionally, No | Optionally, Yes |
Example. Special sequences of operations, parallel converging processes
The Sequence setting in the Routing details allows for defining parallel and converging/diverging chains of operations. While by default the sequence of operations in Routing is linear, this allows configuring a custom order of production operations. E.g. when two independent operations start in parallel and the third operation can only start after these two have finished.
For configuring a special sequence of operations:
- The first operation's Sequence value must be chosen as 0.
- Set the Sequence values for the operations which can start immediately as 0.
- For every other operation, in the operations' Sequence choice, choose the number of operations that must be finished before this operation can start. (Press the Ctrl or Shift key, or click-hold left mouse button to select multiple values.)
If there are two chains of operations that converge into a final step, then the Sequence is configured as follows:
| Operation # | Operation | Sequence |
| 1 | 1st operation of the first sequence | 0 |
| 2 | 1st operation of the second sequence | 0 |
| 3 | 2nd operation of the first sequence | 1 |
| 4 | 2nd operation of the second sequence | 2 |
| 5 | Final operation after both sequences have finished | 3,4 |
The number in the Sequence field indicates after which operations this operation can start. The id number of an operation is displayed at the beginning of the operation's line.
Example. An operation does not require a worker
In case the operation doesn’t require an employee:
- You can use a passive processing workstation if it is a waiting operation that is not constrained by capacity and workstations (all items wait/pass concurrently).
- You may create a phantom free user for such an operation who has no "Hourly wage" defined. Then you can assign this user for this operation without considering labor costs.
- You can create a phantom department with zero hourly rate.
Example. Passive operations not constrained by capacity and working hours (e.g., drying, etc.)
Let us imagine a furniture shop that stains wooden panels and then lets them dry.
- The panels are stained at the Painting station by a worker.
- The panels then dry for 8 hours in a dedicated Drying area that does not require a worker. The drying runs continuously (24/7).
- After drying, the panels are packed and prepared for transport.
The Routing could be defined as follows:
| # | Operation | Workstation group | Setup time | Cycle time | Fixed cost | Variable cost | Capacity | Department |
| 1 | Staining | Painting stations | 10 minutes | 6 minutes | 0.70 | 1 | Carpenters | |
| 2 | Drying | Drying area (Passive) | 480 minutes | |||||
| 3 | Preparation for transport | Packaging | 30 minutes | 0.30 | 1 | Packaging |
Item Reports
Each item has several reports, which can be accessed from Stock -> Items, by clicking on the Reports Reports button on an item's line.
Jump to report:
- Stock history - historical information on stock levels and balance.
- Bookings - the list of bookings for this item.
- Expected lots - the list of incoming stock lots.
- Manufacturing orders - the list of manufacturing orders and cost statistics for this item.
- Purchases - the list of purchases and cost statistics for this item.
- Engagement - the list of BOMs this item belongs to.
- Relations - the list of relations this item belongs to.
- Serial numbers - the list of serial numbered parts of this item.
Report “Stock history”
The Stock -> Items -> An item's reports -> Stock history report shows the historical stock levels of this item as a graph, and detailed stock movements and balance as a table.
Report “Bookings”
The Stock -> Items -> An item's reports -> Bookings report shows the list of Manufacturing Orders and Customer Orders for which this item has been booked. The bookings can be edited by clicking on the Edit Edit button.
Report “Expected lots”
The Stock -> Items -> An item's reports -> Expected lots report shows the detailed list of future expected stock lots (batches) of this item and their sources – purchase orders for parts, and production orders for products.
Report “Manufacturing orders”
The Stock -> Items -> An item's reports -> Manufacturing Orders report shows the list of manufacturing orders made for this item as a table, and the manufacturing cost per unit as a graph. Manufacturing orders can be edited.
To see this report, the item must be marked as This is a procured item: No.
Report “Purchases”
The Stock -> Items -> An item's reports -> Purchases report shows the list of purchases made for this item as a table and the historical purchase price per unit as a graph.
To see this report, the item must be marked as This is a procured item: Yes.
Report “Engagement”
The Stock -> Items -> An item's reports -> Engagement report shows the list of products that have this item in their Bill of Materials as a part. This is also known as the "Where used" report.
Important notes:
-
If an item is referred to on the different BOM levels, the quantities to produce 1 unit of the resulting product are summarized and shown as used on the lowest level.
-
If the item is part of a Matrix BOM, the reference to the BOM, the level, and 0 quantity is displayed. Quantity is not calculated (per variation), variations of a product are not listed.
Report “Relations”
The Stock -> Items -> An item's reports -> Relations report shows the list of relations that contain this item.
Report “Serial numbers”
The Stock -> Items -> An item's reports -> Serial numbers report shows the list of all serial numbers of that stock item.
Item cost
MRPeasy keeps track of the actual cost of inventory, but it can also estimate the costs of items that are currently not in stock.
Jump to:
- An item's cost at Stock -> Items.
- Item cost in MRPeasy - actual/real versus estimated costs.
- Booking and consumption of inventory.
- Entering initial inventory values.
- Inventory balance and stock movements.
Item's cost at Stock -> Items
The Cost column at Stock -> Items shows either:
- the actual/real cost if the item is in stock,
- or if it is not in stock, a rough estimation, of how much the item could cost.
- For getting a more accurate estimate,
- please use the Estimate costs and dates functionality,
- or even better, create a new MO with real batch quantities.
- Sometimes the cost cannot be estimated.
- For getting a more accurate estimate,
To check how an item's cost at Stock -> Items table is calculated, click on the cost of an item in the Cost column.
Item cost in MRPeasy
The following terms are in use when referring to the cost of a single unit of an item (in the order of decreasing accuracy):
Actual cost, real cost
The actual cost refers to the inventory cost - i.e. the real cost of individual units of items in inventory.
- The actual cost of a single unit of an item is taken from its stock lot.
- For purchased items, based on the source Purchase Order, it is the price paid for it, plus any additional fees.
- For manufactured items, based on the source Manufacturing Order, it is the total manufacturing cost. (Before the MO (or PO) is finished and accurately reported, the stock lot exists, but its cost can be considered an estimation only.)
- When manually entering stock lots, e.g. when entering initial inventory levels, the user must define the actual cost. The cost can be later modified in the stock lot.
- When making an inventory adjustment, the system may try to determine the cost of the new stock lot automatically. The cost can be later modified in the stock lot.
- The accuracy of the inventory cost relies completely on the accuracy of data entry.
The actual cost is used:
- For the cost calculation (or, initially, estimation):
- When items have been booked, e.g. materials are reserved for a Manufacturing Order or products for a Customer Order.
- When using the Estimate costs and dates function in a Customer Order and an item is in stock (or expected) and available.
- When inventory increases:
- Purchased items are received.
- Manufacturing is finished, and finished products are added to stock.
- Inventory levels are manually increased.
- When inventory decreases:
- Goods are picked from stock for shipment.
- Materials are consumed in manufacturing.
- Inventory levels are manually decreased.
Weighted average cost
The weighted average cost refers to the average actual cost of the items that are in stock currently.
The weighted average cost is calculated based on the actual cost of the in-stock items.
The weighted average cost is used:
- At Stock -> Items for items that are in stock.
- At Stock -> Inventory.
- During BOM cost estimation if a material is in stock.
Approximated cost
The approximated cost refers to using the actual cost from the stock lots of a part as a basis for a product's cost estimation.
When a BOM cost is estimated:
- The cost of a material - if it is in stock - is approximated according to the weighted average cost (instead of using FIFO or FEFO).
When estimating costs for a CO:
- The cost of an item - if it is available, either in stock or expected - is approximated according to the actual cost of the stock lot(s) (using FIFO or FEFO, according to the required quantity in CO).
- If more items are required than available, the estimated cost is used for the remainder.
Estimated cost
The estimated cost refers to a rough estimation of cost for an item that is currently not in stock. E.g. a part that should be procured, or a product that should be manufactured.
For purchased items:
- The estimated cost is the price of the highest priority purchase term.
- When there are several purchase terms with the same priority, the lowest price is used.
For manufactured items:
- For getting a more accurate estimate,
- please use the Estimate costs and dates functionality,
- or even better, create a new MO with real batch quantities.
- The Stock -> Items -> Cost column gives a very rough estimate, by summing the estimated cost of the Bill of Materials and the Routing.
- Read about BOM cost estimation.
- The routing cost is calculated as the sum of all costs defined in the routing.
Cost estimations cannot be calculated in some cases
- If there is missing data.
- A procured item does not have purchase terms.
- A manufactured item does not have a BOM and routing.
- The cost of a BOM cannot be estimated. For example, because a part's cost cannot be estimated.
- For all manufactured items at once, and displayed at Stock -> Items:
- If Matrix BOM is used in them.
- If there are more than 1000 BOMs or routings.
- In such cases, use the Estimate costs and dates functionality or create a new MO to estimate the cost.
When an item or a BOM is opened and saved, then MRPeasy tries to estimate its cost.
So, you may try opening the item or its BOM, which cost is not displayed, and clicking Save to make the system re-calculate the cost (assuming all information is now available).
Stock Lots
The Stock -> Stock lots section contains a list of all stock lots that are either currently in stock or scheduled to arrive, plus the history of all stock lots in the system.
General advice about stock lots:
It is an internal object in the MRPeasy software, usually created automatically, and used for providing the FIFO method for consuming goods and for some other functionality, such as expiry date.
In your daily business, you should not usually operate with these automatically created lots.
Jump to:
- What is a stock lot?
- Stock lot statuses.
- Stock lot reports.
- Stock lot labels.
- Move items between storage locations.
- Transfer items to another warehouse.
- How does stock lot tracking work in MRPeasy?
- Booking and consumption of inventory.
- Import stock lots.
Notes
- Depleted stock lots are not shown by default. To find them, search by lot number or filter by "0" total quantity.
Stock lot statuses
- Requested – required items are requested from:
- The purchasing manager, the purchase order status is New PO.
- The production manager, the manufacturing order status is New or Not Scheduled.
Requested items cannot be consumed or picked for shipment. - Planned—items are expected to arrive in the future. Purchase orders are placed. Manufacturing orders are scheduled or started.
The software setting "Use planned goods" controls if planned items can be consumed and picked for shipment. - Received – items are received.
- Canceled – the stock lot is deleted.
- On hold – items are received but wait for inspection. 5 and 6 are available, if Quality Control is enabled.
- Rejected – items that did not pass inspection.
- RMA waiting for inspection—the returned item has been received and is awaiting inspection. Points 7-10 are available if Return Merchandise Authorization (RMA) is enabled.
- RMA waiting for repair – the returned item has been inspected and should be repaired.
- RMA ready for shipment – the returned item hs been repaired and can be shipped back to the customer.
- RMA returned—The customer returned the item. By changing the status to Received, it can be added to the inventory.
Stock lot label, lot barcode
Printing labels to identify physical items from different stock lots is possible.
There are two types of stock lot labels:
- Label for the whole lot.
- Label per location, representing only the part of the lot stored there.
The label's size, information, and layout can be edited with the Label editor.
The standard labels contain the unique stock lot barcode if the Barcode System functionality is enabled.
Read also: What happens when a barcode is scanned?
Stock lot label for the whole lot
The labels for stock lots can be printed by clicking Print label on
- the Stock -> Stock lots page,
- the Stock -> Stock lots -> Stock lot details page (top right),
- the Purchase Order, where the parts were procured.
- the Manufacturing order, where the products were manufactured.
Stock lot label with storage location
Parts of the stock lot can be stored at different storage locations.
To print a label per location, showing only the quantity on that location:
- Go to the Stock -> Stock lots -> Stock lot details page.
- Find the Storage locations section.
- Press the printer button on a storage location's line.
What is a stock lot?
Stock lots keep the detailed history of each item that moves through your inventory.
For example, each time you purchase a material, a new stock lot is created to identify it. All stock can be found at Stock -> Stock lots.
You may have many stock lots of the same item - purchased at different times, with different costs, possibly from different vendors, with different expiry dates, stored in different locations/shelves, some of which have certificates, files attached, or notes, etc.
General advice about stock lots:
It is an internal business object in the MRPeasy software, usually created automatically, and used to provide the FIFO method for consuming goods and also for some other functionality, like, for example, expiration date.
In your daily business, you should not usually operate with these automatically created stock lots.
Stock lots and batch tracking
Stock lot functionality can be used for batch tracking as it technically provides traceability.
However, a stock lot is not always equivalent to a (manufacturing) batch number. For example, you may receive goods from the same batch of products from your vendor in two deliveries—in this case, the system will create two stock lots.
When you wish to track some batch number that is not equivalent to the stock lot number, you can act as follows:
- it is possible to encode the batch number in the stock lot number, e.g., by adding it as a suffix.
- it is possible to use a custom field to keep your batch number.
How do stock lots work in MRPeasy?
MRPeasy inventory management is designed for lot/batch and serial number traceability. Lot tracking helps to ensure that the history of every product and material is known. Technically, this means the following:
- Each lot of an item is tracked and identified separately. Unique lot numbers are automatically generated.
- Every time a material is purchased, a unique lot number is created.
- Each production run produces a new stock lot of products.
- During production planning, MRPeasy automatically proposes which lot to pick materials from (FIFO or FEFO principle). The materials will be booked.
- No product or material can be overbooked; MRPeasy manages bookings.
- During production, workers see which materials they need to pick - the lot numbers, quantities, and location(s) - and can report the materials they've used. (Section "My production plan")
- For each sale, specific stock lots from where products are booked and will be given out are recorded.
- Product defects can be traced back to specific production operations or material purchases in seconds. For a defective batch of materials, it is easy to identify all affected products.
- Expiry dates are recorded in stock lots.
- The actual cost of each product lot is known (from direct materials, manufacturing, and labor costs).
- If an item is subject to Quality Control, the stock lot will be quarantined until inspected and approved or rejected, fully or partly.
- Service/repair orders can be scheduled for items that failed quality control or were returned by the customer.
- Individual serial numbers can be tracked within stock lots.
- Notes and files, e.g., certificates, can be attached to individual stock lots.
- Use a persistent custom field to keep a lot number the same after it is transferred to another stock/production site.
Booking and consumption of inventory from stock lots
If the Tracing functionality is turned on, goods from stock must be booked (reserved) before they can be consumed and taken off stock (e.g., picked for shipping or used in manufacturing).
- If the Tracing functionality is turned off, then goods will be automatically booked and taken off stock at the moment of consumption according to FIFO.
What is a "Booking"?
- A "Booking" is a technical object in the software that reserves goods from stock. For example, materials from a specific lot (which comes from a specific PO) are reserved for a manufacturing order via a "Booking."
- If some goods are already booked, these cannot be double-booked. These can only be booked again if the existing booking is removed.
- Note that a Booking can also be "not booked." This means an item is in demand but not yet reserved from a specific stock lot.
- The "Booking" connects the source of goods (stock lots) with their destination (manufacturing orders, customer orders, etc.).
- Goods are consumed from stock lots according to Bookings. I.e., they are consumed from the stock lot that is booked (for this MO, CO, etc.).
When a user is booking goods (Tracing is enabled), it is generally possible to create bookings:
- Automatically. The system uses the FIFO method to book the goods from the available goods at the time. (Or FEFO, if expiry dates are used.)
- Or manually. The user can choose a quantity from a list of available stock lots. Stock lots that are already booked are not shown.
Importing stock lots from a CSV file
At Stock -> Stock lots -> Import from CSV, it is possible to upload many new stock lots' information at once.
Jump to:
- Demo video: Importing data.
- Demo video: Setting up inventory levels.
- Importing new stock lots.
- Example stock lots import table and file.
- Updating existing stock lots.
- Important notes.
What is CSV? CSV (Comma-Separated Values) is a universal format for importing or exporting tabular data. A CSV file can be obtained by saving/exporting e.g. an Excel file as CSV (Comma delimited) (*.csv).
When uploading the CSV file:
- Select and match the names of the fields corresponding to the columns in the data.
- Check the "The first row is heading" option if the first row of the file contains headers. Then the first row will not be imported.
- Select "Do not import" as the column type if some column is not to be imported.
- Click Import to upload the data into the appropriate fields of the database.
- If the importing of some data failed, a skip file will be generated and downloaded to your computer, which indicates all errors line-by-line.
Importing new stock lots
New stock lots are created with the Received status.
When uploading stock lots, the fields that can be used are:
| Part number* | The part number in MRPeasy, as in Stock -> Items. Required. |
| Quantity* | Stock lot quantity. Required. |
| Total cost* | Total cost of a stock lot. Required. |
| Lot number | A unique code to identify the stock lot. If not imported, the code will be generated automatically. |
| Site | The name of the site. Available, if the function Multi-stock and Production Sites is enabled. It is possible to create stock lots at multiple sites. |
| Storage location | Storage location, where the new stock lot is placed. If no value is given, the stock lot is placed at the item's default storage location. |
| Available from | Date, when the stock lot became available. |
| Expiry date |
Expiry date of the stock lot. Available, if Expiry Date functionality is enabled. |
| Revision |
The current revision of the item. Available, if Version Control System functionality is enabled. |
| Custom fields | Any custom field for stock lots defined in the MRPeasy settings can be imported. |
Example customers import table:
| Part No. | Quantity | Total cost | ||||||||
| IA-0001 | 10 | 22 | ||||||||
| IA-0002 | 5 | 24 | ||||||||
| (Up to 3000 lines can be imported at once) | ||||||||||
Download a sample file: import-lots.csv
Re-importing data for updating stock lots
With a CSV import, it is possible to update existing stock lots, at Stock -> Stock lots -> Import from CSV.
The Lot number field is used for matching the stock lots. If a stock lot with the same number already exists, then software updates this stock lot. If there are new values that will be updated, then:
- A confirmation page is shown with a list of values that will be changed.
- The user can choose whether to update a particular stock lot or skip it.
| Lot number* | A unique number to identify the customer. Required. Used for matching the lots. |
| New lot number |
The new stock lot number. |
| Available from | Date, when the stock lot became available. |
| Expiry date |
Expiry date of the stock lot. Available, if Expiry Date functionality is enabled. |
| Revision |
The current revision of the item. Available, if Version Control System functionality is enabled. |
| Custom fields | Any custom field for stock lots defined in the MRPeasy settings can be imported. |
Important!
- If the imported file contains non-Latin characters, the file must be in UTF-8 (preferred) or Unicode encoding. If Excel is used to save the file, select the "Unicode Text (*.txt)" option in the "Save as type" field. Even though the extension of the file is TXT, it can be imported as a CSV-file.
- The limit is 3000 lines per upload. If the file is bigger, divide it into several smaller files.
- Since importing can be a question of trial-and-error, we strongly suggest making a back-up of the database before importing. In that case, if anything goes wrong, it is always possible to restore the previous session.
Stock Lot Details
The Stock Lot Details page, accessible from Stock -> Stock lots -> View a stock lot's details, shows the detailed information of a stock lot and its reports.
The Stock Lot Details page allows to
- see and update a stock lot's information and status,
- see the source and reports of the stock lot,
- print the stock lot label,
- move items between storage locations,
- attach files (e.g. Certificate of Conformity, Delivery Note, etc.)
- manage serial numbers of this lot,
- create service orders for rejected items.
See also:
- Stock lot statuses.
- Transfer items to another warehouse.
- What is a stock lot?
- How does stock lot tracking work in MRPeasy?
Notes
- When creating a new lot, it is possible to define where items are located. If the location is left undefined:
- The location of the item is set to the item's default storage location.
- If the default storage location is undefined, the location is the first location (the default generic location) set in Stock -> Stock settings -> Storage locations.
Stock Lot Reports
There are several statistical reports, which can be accessed from Stock -> Stock lots, by clicking on the Reports button on a stock lot's line.
Jump to report:
- Stock history - the history of this stock lot.
- Bookings - bookings for items from this stock lot.
- Movements - movements between storage locations.
- Engagement - a list of stock lots that contain items from this particular lot.
- Content - a list of stock lots that this lot consists of.
Report “Stock history”
This report shows the list of all stock movements performed with this Stock lot, its source, and where it is consumed, along with the lot’s quantity and cost.
Report “Bookings”
This report shows the list of Manufacturing Orders or Customer Orders for which items from this stock lot has been booked.
Report “Movements”
This report shows the list of movements between storage locations.
Report “Engagement”
This report shows the list of stock lots that whether contain items from this stock lot or are made from items from this stock lot.
Report “Content”
This report contains a list of lots that this lot consists of. If the product contains subassemblies, then the stock lots from which the used subassemblies are made are also displayed.
Move Stock Item
It is possible to move items in the stock to other locations, e.g. from one shelf to another. Whereas, different units of the same item can be at different locations.
Storage locations in MRPeasy represent shelves, racks, storage areas, or separate rooms inside one warehouse/site. The physical storage location(s) of an item can be saved in the stock lot details.
Jump to:
- Move a single item.
- Bulk move stock lots.
- See also: Storage locations.
- See also: Transfer items to another warehouse.
Move a single item
For changing the storage location of a single item:
- Go to Stock -> Stock lots and press the Move stock item button.
- Or open the Stock lot Details page and press the Move stock item button in the Storage locations section.
For moving an item to a new location:
- Choose the Stock item.
- Choose the Stock lot of this item that will be moved.
- Choose the Old place in stock from where it is moved.
- Enter the Quantity, that will be moved.
- Enter the New place in stock to where it will be moved.
- Save.
Move items in bulk
For changing the storage locations of stock lots in bulk:
- Go to Stock -> Stock lots.
- Check the checkbox at the end of each stock lot line you wish to move.
- Click on the Bulk editing button.
- Fill in the details.
- The header row allows for bulk updating of the new storage location column across all lines at once.
- Save.
- The chosen stock lots are moved to the new location(s).
- If the stock lot was located in two or more storage locations, then all old locations will be changed for new.
Shipments
The Stock -> Shipments section contains a list of all shipments to customers or subcontractors, both planned and shipped.
Use the tab menu above the table to see a list of "Shipments" or "Items".
Jump to:
- Creating Shipments.
- Picking and shipping.
- Waybill, a Picking list, a Packing list.
- Shipped serial numbers.
- Shipment statuses.
- Edit document PDFs.
Creating shipments
New Shipments can be initiated from several pages:
- Section CRM -> Customer Orders -> In an order's details, at the Shipments section, for sending products to the customers.
- Section Stock -> Shipments, for sending products to customers.
- The Customer Orders must be created.
- If Tracing is enabled, then the products must be booked to COs first.
- Section Procurement -> Purchase Orders -> In an order's details, at the Shipments section, for free issuing stock to subcontractors.
- Available with the Subcontracting functionality.
- Section CRM -> Customer returns (RMAs) -> In an order's details, at the Shipments section, for sending returned products back to the customer.
- Available with the Return Merchandise Authorization (RMA) functionality.
Shipment Statuses
Status shows the progress of a shipment.
The following statuses are available:
- New - the shipment is planned. This status is assigned automatically.
- Ready for Shipment - this status shows that all products are ready in stock. They can be shipped to the customer. This status is assigned automatically.
- Shipped - this status shows that all products have been shipped. This status is assigned automatically.
- Canceled - shipment is canceled. This status is assigned when the user deletes the shipment or sets it's status manually to cancel.
Shipment Details
The Shipment details page, accessible from Stock -> Shipments, a CO, a PO, or an RMA, shows information about a shipment, is used to report picking of goods from stock, and allows to print the Waybill, Picking list, and Packing list.
The precondition for planning any shipment is booking the products from stock for the respective Customer Order (CO), Purchase Order (PO), or Return Merchandise Authorization (RMA).
Jump to:
- Book items for a shipment.
- Waybill, Picking list, Packing list.
- Ship products, pick products from stock.
- Shipment label, package label.
- Shipped serial numbers.
- Weight of shipment.
- Edit document PDFs.
- What to do when products were shipped from the incorrect stock lot?
Book items for a shipment
Note: this article corresponds only to Software settings -> Tracing = Yes.
If Tracing is enabled, then the precondition for planning any shipment is booking the products from stock for the respective Customer Order (CO), Purchase Order (PO), or Return Merchandise Authorization (RMA).
Waybill, Picking list, Packing list
To create shipping documents (Waybill, Picking list):
- Open the Customer Order, Purchase Order, or RMA order and scroll down to the "Shipments" section.
Or go to Stock -> Shipments. - Open the shipment, or create a new one and save it.
- Print the Waybill, Picking list, and Packing list by clicking the respective buttons.
Shipping products out from stock
For shipping products:
- Open the Shipment from Stock -> Shipments.
Or from the Customer Order, Purchase Order, or RMA order. - Report picking of the items from stock:
a) for reporting line-by-line, click the "Pick" button on each line to report picking.
b) if reporting all-at-once, click the "Pick all items" button.
Products with serial numbers
If the item has serial numbers
- After the picking button is pressed, a page for selecting shipped serial numbers will open for selecting the serial numbers.
- When using the "Pick" button, it is possible to paste serial numbers in bulk from a spreadsheet. This is not possible with "Pick all items" button.
- If you do not see any serial numbers, then these have not been entered into the system. This must be done before the items for the Shipment can be picked.
Print labels for the shipment
Shipment label
It is possible to print labels for each item that is shipped. The labels for shipped items can be printed by clicking "Print labels" at Stock -> Shipments -> Shipment details page.
The size, information, and layout of the label can be edited with the Label editor.
Package label
When Packing functionality is enabled, you can print package labels by pressing the "Print package labels" button at Stock -> Shipments -> Shipment details page.
The size, information, and layout of the label can be edited with the Label editor.
What to do when products were shipped from the incorrect stock lot?
Note: this article corresponds only to Software settings -> Tracing = Yes.
If your company does not physically track items by stock lots, then probably nothing should be done.
If you wish to change the lot, which was reported shipped, then, generally, the following actions should be done:
- Undo the picking operation and remove these items from the Shipment:
1. Open the shipment.
2. Delete it.
OR
1. Open the shipment.
2. On that lot line, click the "Pick" button and enter negative (-) quantity.
3. On that lot line, click the "Edit" button to reduce the booked quantity for that Shipment. - Change the bookings:
A. If it is a shipment for a Customer Order:
1. Open the CO and click on the "Reports" button.
2. In the "Bookings" report, edit the booking for this lot.
3. Inside the booking, click the "Return to stock" button on that lot line, to release this lot.
4. Inside the booking, click "+", to book items from the correct lot.
B. If it is a shipment for a subcontracting Purchase Order:
1. Open the PO and click on "Show bookings".
2. In the "Materials" report, edit the bookings for this item.
3. Inside the booking, click the "Return to stock" button on that lot line, to release this lot.
4. Inside the booking, click "+", to book items from the correct lot. - Redo the shipping operation:
1a. Create a new shipment.
1b. Inside the original Shipment, click "+" to add the correct lot to the shipment.
2. Pick the items.
Transfer Orders
The Stock -> Transfer orders section contains a list of all transfer orders and allows transferring items between different sites. New Transfer Orders can be created from here.
Use the tab menu above the table to see a list of "Transfer Orders" or "Items".
Jump to:
Pre-requisites for using transfer orders
This section is available if the Multi-stock and Production Sites functionality is enabled.
Transfer Order Details
The Stock -> Transfer Orders -> Transfer Order details page shows all information about the shipment of goods between two sites.
The Transfer Order details page allows
- seeing and editing a transfer,
- reporting picking of items for shipping,
- reporting receipt of items at another warehouse,
- printing Waybills and Picking lists,
- recording transfer costs.
Jump to:
- Transfer Order statuses.
- Preparing a transfer and printing documents (Waybill, Picking list).
- Dispatch from the sending site.
- Receipt at the receiving site.
- Transportation fees.
- Import a Transfer Order.
- Keeping batch numbers during the transfer.
- Keeping expiry dates during the transfer.
Transfer Order statuses
- New - A new and not shipped Transfer Order, the items are not available for shipment.
- Ready for shipment - All items are available for shipment.
- Shipped - All items are marked picked.
- Received - All items are received.
- Must be assigned manually by the user.
- Canceled - This shipment is canceled.
Transferring items between sites
A transfer of items takes place in three stages:
Planning a transfer
For initiating the transfer and creating transfer documents (Waybill, Picking list):
- Go to Stock -> Transfer Orders.
- Click + to add a new transfer order.
- Fill in the details and choose the products to transfer.
- Save.
- You can print the Waybill and Picking list PDFs.
Dispatch
For dispatching the items to another warehouse:
- Open the Transfer Order at Stock -> Transfer Orders.
- Report picking of the items from stock:
- Line-by-line, by clicking the Pick button on each line.
- Or, all at once, by clicking the Pick all items button.
- If the item has serial numbers, a new page for selecting shipped serial numbers will open.
- Select the serial numbers, and save.
Receipt
For receiving the items at another warehouse:
- Open the Transfer Order and update its status to Received.
Additional fees, transfer costs
- Transport and any other costs can be added to the field Additional fees.
- The fees are proportionally divided between ordered items based on the total cost of each target lot.
- Additional fee per item = Item cost / TO cost * Additional fees
Import from CSV
When creating a new transfer order, it is possible to import a list of items from a CSV file. The file must be no longer than 100 lines and can contain the following columns:
| Part Number* | The part number of the item that is transferred. Required. |
| Quantity | The quantity that is transferred. |
| Stock lot | The stock lot number, if the item must be taken from a particular lot. If the site of origin is selected before importing the file, and no Stock lot column is selected, the software will book imported items by FIFO. Available, if Tracing is enabled. |
| Storage location | The storage location name, if the item must be taken from a particular lot and location. Available, if Tracing is enabled. |
Other TO information should be added manually before the import.
If the site of origin is selected before importing the file, and no Stock lot column is selected, the software will book imported items by FIFO. If a stock lot does not cover the required quantity, the available quantity is booked, and a new line is added for the next lot. This is done until the whole required quantity is booked.
Tracking the Batch Number
Because of technical reasons, it is not possible to keep the same stock lot number after transfer. A new target lot will be created. If you need to keep a batch number the same after transfer to new stock, use the following workflow:
- Create an additional custom field for your stock lots. Make that custom field "Persistent = Yes". It means that custom field values will be transferred to a new stock lot, that is created automatically as a result of a transfer order or rejection during an inspection.
- Enter the number of the batch there. This number will be automatically copied when the system will create a new lot after transfer.
Inventory
The Stock -> Inventory section contains an overview of all items' inventory levels in stock right now and on historical dates. It also allows to update the inventory levels after a stocktake.
Jump to:
- Demo video: Setting up inventory levels.
- Adjusting inventory levels after a cycle count.
- Starting inventory values.
- Import new inventory levels from CSV.
- WIP (Work in Progress) values meaning.
- Historical inventory levels.
- Distorted or negative numbers in the stock history.
Warning!
- Update inventory quantities with caution, this function is not for everyday use.
- Changing inventory values at Stock -> Inventory can terminate existing bookings.
- Back up your database before entering new quantities.
- If inventory count values differ, reasons need to be investigated carefully, before taking any action in the software.
- Be mindful of user access permissions.
- Usually, only one user (e.g. a member of the management) should have the Update right for the Inventory functionality.
- Any other user should not be able to adjust inventory manually.
Updating inventory values after a stocktake, cycle count
Jump to:
- Warnings - read before manually updating inventory levels.
- Where to adjust inventory levels.
- Updating inventory at Stock -> Inventory.
- Manually updating a stock lot quantity.
Where to adjust inventory levels
After making a physical inventory count, stock levels for items can be adjusted:
- At Stock -> Inventory to have MRPeasy automatically create stock lots or write-offs.
- At Stock -> Stock lots by creating new stock lots to add new items.
- at Stock -> Write-offs by writing off extra items.
Generally, the Stock -> Stock lots and Stock -> Write-offs may be preferred when inventory values differ because these allow manually setting all the variables, choosing the stock lots, entering comments, or using special write-off codes. The Stock -> Inventory page creates stock lots and write-offs automatically.
Updating inventory levels at Stock -> Inventory
For updating the stock levels at Stock -> Inventory:
- Choose the current date.
- Choose the Site, if you have several warehouses.
- Choose the Location, if you wish to update inventory levels only in a particular location, e.g. shelf.
- Or choose the By location value to see and update each storage location separately.
- By default, the software shows locations where an item exists or existed before. If you want to see all possible locations, find the item by the part number or description.
- Or choose the By location value to see and update each storage location separately.
- Enter the new total quantity.
- Click Save or Save all.
If the new quantity for an item is greater than the previous quantity:
- A new stock lot is created.
- The new stock lot will cost the same per unit as the latest lot (according to the "Available from" date) of the same item.
- If this item has not been in stock previously, the vendor's price will be used. If the item has several purchase terms, the price with the highest priority will be used.
- If the item has neither previous stock lots nor purchase terms, the software will ask to enter the cost manually.
If the new quantity for an item is smaller than the previous quantity:
- A new write-off is created from existing stock lots in status Received, by FIFO (FEFO, if expiry dates are used).
- First, the software tries to write off items that are available, not reserved.
- If more items should be written off than is available at the stock, then software tries to cancel bookings by LIFO until it is possible to create a write-off.
Updating a stock lot quantity
If you have labeled your physical products with stock lot numbers, and the quantities do not match in stock and in the software, this can mean one of the following:
- Some actions are not yet reported in the software (materials are used in manufacturing, but not yet reported as consumed).
- Stock lot's source document is incorrect (e.g. PO or MO quantity is wrong).
- Consumption actions are reported incorrectly (e.g. materials in MO are consumed in the wrong quantity or from the wrong lot).
To correct a stock lot quantity, there are two options:
- Find the root cause, and correct the wrong document in the software (e.g. correct a wrong consumption in an MO).
- Or, make an inventory adjustment:
- For a negative adjustment, create a write-off.
- For a positive adjustment, create a new manual stock lot.
- Define the cost.
- If necessary, number it accordingly (e.g. take the original lot number and add a suffix) and re-label the physical item.
- If necessary, fill in the custom field(s) of the lot (e.g. use a persistent custom field to track the batch number), notes, and other data.
- Existing lots cannot be inflated. These are the technical objects of the system, which must have a discrete source. For tracking batch numbers, please use persistent custom fields instead.
Historical inventory information
For any historical date, at Stock -> Inventory, it is possible to see:
- the total "In stock" quantity of every item,
- the quantity which had been consumed in unfinished production,
- the inventory value.
It is not possible to adjust historical inventory levels.
Distorted or negative historical inventory numbers
If some planned item is written off stock before it was received, this will distort historical inventory levels, as negative adjustments are before positive adjustments. Even a negative number may appear in the inventory history.
The software works as follows:
- If the software setting "Use planned goods = Yes" is used, then it is possible to consume (ship, write off, etc.) an item before its receipt has been reported into stock.
- When a planned item is consumed, the transaction is saved, but it is hidden from the stock history.
- This means, that when looking at today, you will never see negative numbers.
- When the planned item is finally received, then all its transactions are written into stock history.
- This means that if the receipt date is after the consumption date, then numbers are distorted in the lapse between those two dates.
Example, how an inventory report may be distorted if item receipt or consumption dates are incorrect:
| Date | Event | Inventory change | Running total (A) | Actual running total (B) | Difference (A-B) |
| Jan 1 | Starting balance | +5 | 5 | 5 | 0 |
| Jan 1 | PO is created, item is ordered. | 0 | 5 | 5 | 0 |
| Jan 10 | PO is received, but the receipt is not reported. | 0 | 5 | 15 | -10 |
| Jan 20 | Items are consumed in manufacturing. *Note that this line is considered in stock history only once the PO is marked as received. |
-5* | 0* |
10 | -10 |
| Jan 25 | Items are consumed in manufacturing. *Note that this line is considered in stock history only once the PO is marked as received. |
-5* | -5* | 5 | -10 |
| Feb 1 | PO is marked as received with the current date. | +10 | 5 | 5 | 0 |
To prevent this situation:
- Enter data in real-time: PO receipt, parts consumption in MOs, shipments to customers, etc.
- Report PO receipt with the correct date, when reporting receipt later, it is possible to backdate the arrival date.
- Consider that it is not possible to backdate parts consumption or shipments.
- When using "Finish production as planned", before using it, make sure that MO start and finish dates correspond to actual dates.
- Materials will be consumed according to "Start date" if it is in the past.
- Finished products will be counted to stock according to "Finish date" if it is in the past.
- Use the software setting "Use planned goods = No".
Work in progress: WIP cost and WIP quantity
The "WIP Quantity" and "WIP cost" numbers are not included in the inventory balance.
- The column WIP quantity shows the number of raw materials that have been consumed for manufacturing orders, which are still in progress.
- The column WIP cost shows the cost of materials in work in progress.
- At the moment when materials are marked as consumed in production, they are moved from inventory to Work in Progress (WIP). When the Manufacturing Order is finished, the WIP is cleared (the value is counted in the cost of the finished products).
Entering initial inventory levels into MRPeasy
Demo video: Setting up inventory levels.
There are several ways of entering initial inventory levels, which can also be combined:
- At Stock -> Items -> Import from CSV.
- Together with the initial article creation upload, it's possible to include the quantities and costs.
- However, from there it is not possible to upload inventory at particular locations or sites.
- Read: How to import items?
- Stock -> Inventory (-> Import from CSV).
- It is possible to update or initiate inventory levels, and also to upload a CSV file with quantities and costs.
- Read: How to update inventory levels?
- Read: How to import inventory levels?
- Stock -> Stock Lots -> Add a stock lot or Import from CSV.
- It is possible to manually create stock lots. Caution: use this in case of critical need only.
- Procurement -> Purchase orders -> Add new Purchase Order.
- Fill out a PO with all items in stock and mark it as received.
Importing inventory levels from a CSV file
It is possible to update or initiate inventory levels by uploading a CSV file. It's possible to import both quantities and costs, at several sites and locations.
Jump to:
- Demo video: Importing data.
- Demo video: Setting up inventory levels.
- Importing inventory levels.
- Example tables for importing inventory levels.
- Important notes.
What is CSV? CSV (Comma-Separated Values) is a universal format for importing or exporting tabular data. A CSV file can be obtained by saving/exporting e.g. an Excel file as CSV (Comma delimited) (*.csv).
When uploading the CSV file:
- Select and match the names of the fields corresponding to the columns in the data.
- Check the "The first row is heading" option if the first row of the file contains headers. Then the first row will not be imported.
- Select "Do not import" as the column type if some column is not to be imported.
- Click Import to upload the data into the appropriate fields of the database.
Importing new inventory levels
At Stock -> Inventory -> Import from CSV new inventory levels can be uploaded.
When uploading inventory levels, the fields that can be used are:
| Part Number* |
The part number in MRPeasy, as in Stock -> Items. Required. |
| Quantity* |
The new total in-stock quantity. Required. |
| Cost per item for the new items |
If the new quantity is greater than the previous quantity, a new stock lot will be created, and this cost per item will be used. If not imported, the latest cost of the same item from a previous stock lot is used |
| Site |
The name of the site. Available, if the function Multi-stock and Production Sites is enabled. It is possible to update inventory levels at multiple sites. |
| Storage location |
If imported, the quantity will be adjusted only at that particular location. If this column is selected, all lines in the file must contain a valid storage location. Lines with no storage location will fail to be imported. |
| Part number | Quantity | Cost per item |
| #A-00001 | 10 | 2 |
| #A-00002 | 10 | 3 |
| (Up to 3000 lines can be imported at once) | ||
Example 2, two sites:
| Part number | Quantity | Cost per item | Site |
| #A-00001 | 10 | 2 | Site 1 |
| #A-00001 | 10 | 2 | Site 2 |
| #A-00002 | 10 | 3 | Site 1 |
| (Up to 3000 lines can be imported at once) | |||
Example 3, two sites, storage locations:
| Part number | Quantity | Cost per item | Site | Storage location |
| #A-00001 | 10 | 2 | Site 1 | Room 1 |
| #A-00001 | 10 | 2 | Site 1 | Room 2 |
| #A-00002 | 10 | 3 | Site 2 | Room 1 |
| (Up to 3000 lines can be imported at once) | ||||
Important!
- If the imported file contains non-Latin characters, the file must be in UTF-8 (preferred) or Unicode encoding. If Excel is used to save the file, select the "Unicode Text (*.txt)" option in the "Save as type" field. Even though the extension of the file is TXT, it can be imported as a CSV-file.
- The limit is 3000 lines per upload. If the file is bigger, divide it into several smaller files.
- Since importing can be a question of trial-and-error, we strongly suggest making a back-up of the database before importing. In that case, if anything goes wrong, it is always possible to restore the previous session.
Critical On-hand
The Stock -> Critical on-hand page shows a list of all items (procured and manufactured) for which the available quantity is below their Reorder Point (ROP), and need re-ordering.
For an item to show up on this report, its Reorder point parameter needs to be set, even 0. See item details.
Creating a Purchase Order
- Click on the Create a purchase order Create a purchase order button on an item's line.
- All other below minimum items from the same vendor are automatically added to the same PO.*
- All PO details are automatically filled, including price, minimum order quantity, and expected delivery date.*
- *For the automatic grouping and Purchase Order pre-population to work the Purchase Terms must be saved for the items.
- Update any details of the PO, e.g. add, remove or edit the line items.
- Save to create the PO.
- When the Purchase Order is saved, all the ordered items are automatically booked to where these were demanded from, Customer or Manufacturing Orders (following the FIFO principle).
Creating a Manufacturing Order
- Click on the Create a manufacturing order Create a manufacturing order button on an item's line.
- The MO quantity is automatically calculated to replenish the available stock up to the Reorder Point level.
- Update any details of the MO, e.g. the quantity, or the start or due dates.
- Save to schedule the order.
- When the Manufacturing Order is saved, all the manufactured items are automatically booked to where these were demanded from, Customer or Manufacturing Orders (following the FIFO principle).
Write-offs
The Stock -> Write-offs section contains a list of all products and parts that have been manually written off stock. New write-offs can be created from here.
Jump to:
Booking and Write-off Details
Bookings connect items from individual stock lots to where these are needed, or written off - e.g. products are booked for Customer Orders and parts are booked for Manufacturing Orders. Or if items are disregarded from stock, it is also possible to write them off.
On this page, it is possible to:
- choose from which lots the items will be booked or written off,
- delete a booking,
- enter notes,
- create Manufacturing Orders, Purchase Orders, or manual stock lots for these items,
- choose a write-off type for manual write-offs.
Jump to:
Booking items manually
For manually choosing lots from where to book items:
- The system displays all available stock lots and locations of where this item is stored. These are sorted as follows:
1. by the stock lot status: received lots are shown first, planned lots are after;
2. by the expiry date, if the Expiry date's functionality is used;
3. by Available from date of each stock lot. - Enter the quantity to book into the Quantity field on desired stock lots' lines.
- Save
If the item is not in stock, then you could create a Manufacturing Order, Purchase Order, or a manual stock lot, after which you need to return to this page where you can book items from the newly created stock lots.
Booking expired items
The software does not automatically book expired items, but it is possible to manually book expired items, use these in production, or ship them to the customers.
If the item is expired and going to be shipped, then when picking the item for shipment, the software will issue a warning.
Manually making write-offs of stock
At Stock -> Write-offs it is possible to write items off stock manually.
For manually writing items off stock:
- Go to Stock -> Write-offs.
- Click Create Create
- Choose the Item.
- Optionally, enter notes.
- Optionally, choose the write-off type.
- Enter the quantity at every stock lots' line to write off.
The system displays line-by-line all stock lots and locations of where this item is stored. These are sorted by the FIFO principle as follows:
1. by the stock lot status: received lots are shown first, planned lots are after;
2. by the expiry date, if the Expiry date's functionality is used;
3. by Available from date of each stock lot. - Save.
- If the item has Serial numbers, click Add at the Serial numbers section to choose the serial numbers.
Stock Movement
The Stock -> Stock movement page shows a financial report of the beginning stock balance, the ending stock balance, and detailed stock movements in any chosen period.
Click on a number to see a detailed report, how it's calculated.
In the detailed reports of any category:
- Click Choose columns to choose which columns to display.
- Drag the columns to rearrange them.
- Click List to see all transactions line-by-line.
- Click Sum per stock item to see all transactions summed by stock item.
- The tables can be searched and filtered (see Usage tips for wildcards).
There are the following categories:
- Beginning - the beginning value of stock in the period.
- Beginning WIP (materials) - materials, which were used in Manufacturing Orders, which were in-progress on the period beginning date.
- Not included in the beginning balance. - Inward - the sum total of the costs of goods that have been added to the stock during the period:
- Purchases - goods that were bought and received during the period.
- Adjustments - manual positive adjustments to inventory.
- Manufactured - products that were manufactured during the period.
- Cost of materials - materials cost in the manufactured products.
- Applied overhead cost - applied overhead cost in the manufactured products.
- Labor cost - labor cost in the manufactured products.
- Manufactured = Cost of materials + Applied overhead cost + Labor cost
- Outward - sum total cost of goods that have been deducted from the stock during the period:
- Sales - products that have been shipped to customers;
- Write-offs - manual negative adjustments to inventory
- Sums by manual write-off types (sub-categories) are shown separately; - Used in manufacturing - raw materials that have been consumed during the period.
- Ending - the ending value of stock in the period.
- Ending = Beginning + Inward - Outward - Ending WIP (materials) - materials, which were used in Manufacturing Orders, which were in-progress on the period ending date.
- Not included in the ending balance.
Product groups
The Stock -> Stock settings -> Product groups section shows the list of all product groups.
Product groups help to logically organize items, and in the MRPeasy accounting module, each group can have a different inventory account.
How to make best use of product groups?
As the name says, a "product group" is a group of products. Products can be grouped in a myriad of ways, e.g. by raw materials, sub-assemblies, finished goods, or by certain products, etc.
- The main purpose is helping to filter the list of articles in a logical manner. Define the groups in a way that makes sense in your company, so that people can understand what they are looking for and can find it faster.
- The secondary purpose is defining groups with respect to accounting codes, which would save the accountant's time who could have special reporting responsibilities. E.g. there could be several packaging groups "Packaging - Plastic" - code 50001, "Packaging - Carton" - code 50002, so the stock movement report could be filtered by code "5000" to find all packaging movements, or by specific groups for more detail.
Product group details
The Product group details page allows defining new, editing, or deleting product groups.
For entering a new product group:
- Go to Stock -> Stock settings -> Product groups and click Create Create.
Or choose Add a new group from any product group choice menu. - Enter the name.
- Save.
- To edit the number, change the automatically assigned product group number, and click Save.
Custom accounts for MRPeasy accounting module
To select an account:
- Go to Stock -> Stock settings -> Product groups.
- Open the product group.
- Edit the Inventory account.
Important note:
- If you change the account of a group, existing values will not be transferred to the new account in the MRPeasy accounting module. This must be done manually.
Units of Measurement
The Stock -> Stock settings -> Units of measurement section contains a list of all main units of measurement (UoM) used in stock.
In addition to the stock units of items it is possible to:
- Define unit conversions for more comfortable use in BOMs (e.g. kg -> g, lbs -> oz). For example:
- You track an item in your inventory in pounds.
- A vendor sells items in "bags", where each bag is 12 lbs. Your PO to the vendor shows that you are ordering a number of bags. This is a vendor-specific UoM conversion.
- Define conversions from vendor's units of measurement to stock units (e.g. 1 package on PO -> 30 pcs in stock). For example:
- When a bag is received, inventory increases by 12 lbs.
- You use this item in a product in ounces. In a bill of materials (and later MO), the quantity to consume is e.g. 1 oz per product. This is a unit conversion from the main unit.
UoM Details
The Stock -> Stock settings -> Units of measurement -> UoM details page displays the details of a unit, in which you measure something in stock.
For adding a unit of measurement:
- Go to Stock -> Stock settings -> Units of measurement and click Create Create.
- Or click Add a new unit from the unit of measurement choice menu in an item's details page. - Enter the name of the unit.
- Save.
Stock unit conversions
For convenience, for each stock UoM it is possible to define additional units, that can be used in BOMs and MOs.
Note that this is not for vendor-specific units which are set up inside the Purchase Terms of items, and used in POs.
For adding unit conversions:
- Open the UoM details page.
- Add unit conversions into the Unit conversions table, e.g.
- Main unit is kg, additionally 1 gr = 0.001 kg.
- Main unit is m, additionally 1 km = 1000 m.
- Main unit is ft, additionally 1 in = 0.83 ft.
- Main unit is lb, additionally 1 oz = 0.0625 lbs.
- Once saved, it is possible to select the conversion in a BOM, if a material uses the main unit.
- If unit is chosen in BOM, it will also be shown in the MO.
Storage Locations
The Stock -> Stock settings -> Storage locations shows the list of all storage locations in the stock, in the warehouses.
There is a two-level system in MRPeasy for tracking the physical location of the goods:
- Storage locations represent bins, shelves, racks, storage areas, or separate rooms inside one warehouse/site.
- Available by default.
- For a hierarchy inside storage locations, e.g. a bin location within a room, name the storage locations appropriately: "Room 1, A1", "Room 2, A1".
- Each item has a default storage location, where it will be automatically placed to.
- Different units of the same item can be in various storage locations.
- Sites represent geographically separated production sites or warehouses.
- Available with the Multiple Stocks and Production Sites functionality.
- Each site has separate inventory management and its own storage locations, workstations, etc.
- Purchases are ordered to specific sites.
- Customer orders are fulfilled from specific sites.
- Each site has its own (site-specific) workstations.
- Goods can be moved from one site to another with a Transfer Order. They cannot be directly booked or consumed from another site but must be moved first.
- Generally, warehouses within one complex should not be set up as separate sites inside MRPeasy.
Jump to:
- Notes.
- The default storage location.
- Move items to another storage location.
- Putaway of received purchased goods, registering storage locations.
- Print storage location labels.
- Transfer items to another warehouse.
Notes
- Location number one cannot be deleted (displayed in italic), this is the default generic undefined (unknown) location.
The default storage location of items
- An item's default location is set by its "Default storage location" setting (defined in the item details page).
- If it is undefined, it will be the first location, displayed in italic, in the list of Storage locations.
- This is the 'undefined' location. I.e. the location has not been reported in MRPeasy, it is unknown.
- It can be renamed there, or in the Regional settings.
Storage location label, storage location barcode
The labels for storage locations can be printed by clicking the Print label button at the Stock -> Stock settings -> Storage locations page.
The size, information, and layout of the label can be edited with the Label editor.
The standard label contains the unique stock lot barcode if the Barcode System functionality is enabled.
Import storage locations from a CSV file
At Stock -> Stock Settings -> Storage Locations -> Import from CSV is possible to create storage locations by uploading a CSV file.
Jump to:
What is CSV? CSV (Comma-Separated Values) is a universal format for importing or exporting tabular data. A CSV file can be obtained by saving/exporting e.g. an Excel file as CSV (Comma delimited) (*.csv).
When uploading the CSV file:
- Select and match the names of the fields corresponding to the columns in the data.
- Check the "The first row is heading" option if the first row of the file contains headers. Then the first row will not be imported.
- Select "Do not import" as the column type if some column is not to be imported.
- Click Import to upload the data into the appropriate fields of the database.
Importing new storage locations
When uploading storage locations, the fields that can be used are:
| Storage location* | The name of the storage location. Required. |
| Site | The name of the site, this storage location belongs to. Available, if the function Multi-stock and Production Sites is enabled. |
Example:
| Site | Storage location |
| Site 1 | Room 1 |
| Site 1 | Room 2 |
| Site 2 | Room 1 |
| (Up to 3000 lines can be imported at once) | |
Important!
- If the imported file contains non-Latin characters, the file must be in UTF-8 (preferred) or Unicode encoding. If Excel is used to save the file, select the "Unicode Text (*.txt)" option in the "Save as type" field. Even though the extension of the file is TXT, it can be imported as a CSV-file.
- The limit is 3000 lines per upload. If the file is bigger, divide it into several smaller files.
- Since importing can be a question of trial-and-error, we strongly suggest making a back-up of the database before importing. In that case, if anything goes wrong, it is always possible to restore the previous session.
Storage Location Details
The Stock -> Stock settings -> Storage locations -> Storage location details page allows defining new, editing, or deleting an existing storage location.
A storage location is a location inside one warehouse, e.g. an area, a bin, or a shelf.
For adding a storage location:
- Go to Stock -> Stock settings -> Storage locations and click Create Create.
Or click Add a new storage location from any storage location choice menu. - Enter the name of the storage location.
- Save.
More information: Storage locations.
Parameters
The Stock -> Stock settings -> Parameters section contains a list of all parameters. This page allows for creating new or editing existing parameters.
The parameters are a core part of the Matrix BOM / BOM with Parameters functionality.
What is a parameter? A parameter of a product is an attribute or a property, which is used for creating a family of different goods of one model.
Examples of typical parameters:
- color - a dress in different colors, where the parameter value changes the material used;
- size - a dress of different sizes, where the parameter value changes the quantity of the material;
- fabric - a dress with a choice of different kinds of the base fabric, where the parameter value changes the material used;
- power - a device with different capacities, where the parameter value changes the part (e.g. power supply) used
- etc.
In order to make use of parameters study the Matrix BOM documentation and examples.
Parameter Details
The parameter details page allows defining new, editing, or deleting an existing parameter or its values.
The Stock -> Stock settings -> Parameters section shows the list of all parameters.
Notes:
- Parameters are part of the Matrix BOM functionality, study the Matrix BOM documentation and examples.
- A parameter must have a list of values.
- Each parameter value has a code, which represents the parameter's value, and will be added as a suffix to the item's code to identify the unique variation.
- A parameter's value can either change the quantities of raw materials (e.g. parameter Size, where different values change the material quantity) or change the raw materials themselves (E.g. Power, where different values represent differ Power Supply Units).
For defining a parameter:
- Go to Stock -> Stock settings -> Parameters
- Click Create to add a new Parameter.
- Enter the parameter's name.
- Choose, if the parameter changes the quantities of raw materials.
- Enter the values this parameter can have and the corresponding codes.
- If variable selling prices for parameter values is enabled, enter how each parameter value affects the base selling price of the item.
- Save
If the parameter values change the quantities of raw materials:
- Then the BOM will have several quantity columns each representing a different parameter value.
- See examples.
If the parameter values do not change the quantities of raw materials:
- Then they will change the raw material items themselves.
- A relation must be defined to connect the parameter values to specific stock items.
- The relation must be entered into the BOM at a materials line, from the "Relations" drop-down field.
- See examples.
Relations
The Stock -> Stock settings -> Relations section contains a list of all relations. This page allows creating new or editing existing relations, which connect specific parameter(s) values to specific stock items.
The relations are a core part of the Matrix BOM / BOM with Parameters functionality.
- Relations define which stock items should be used in case of different variations of the final product.
- For example, if a sewing company produces the same dress in several different colors, it can define that if the dress is white (i.e. the color parameter value is white), white textile must be used, if it is black (i.e. the color parameter color value is black) – black textile, etc.
- Relations are used in BOMs instead of particular stock items. When a new manufacturing order is created, all relations are replaced with particular stock items based on the chosen parameter values of the final product.
- See examples of how to set up a BOM with Parameters.
Example relation 1:
| Relation: "Power parameter to PSUs" | |
| "Power" value | Corresponding PSU |
| 200W | #A-01, PSU 200W |
| 500W | #A-08, PSU 500W |
| 1000W | #A-14, PSU 1kW |
| ... | ... |
Example relation 2:
| Relation: "Fabric-Color to material" | ||
| "Fabric" value | "Color" value | Corresponding material |
| Cotton | Red | #A-01, Red cotton |
| Cotton | Blue | #A-08, Blue cotton |
| Linen | Red | #A-14, Red linen |
| ... | ... | ... |
Relation details
The relation details page allows defining new, editing, or deleting an existing relation and its values. A relation connects specific parameter(s) values to specific stock items
The Stock -> Stock settings -> Relations section shows the list of all parameters.
The relations are a core part of the Matrix BOM / BOM with Parameters functionality.
- Relations define which stock items should be used in case of different variations of the final product.
- For example, if a sewing company produces the same dress in several different colors, it can define that if the dress is white (i.e. the color parameter value is white), white textile must be used, if it is black (i.e. the color parameter color value is black) – black textile, etc.
- Relations are used in BOMs instead of particular stock items. When a new manufacturing order is created, all relations are replaced with particular stock items based on the chosen parameter values of the final product.
- See examples of how to set up a BOM with Parameters.
Example relation 1:
| Relation: "Power parameter to PSUs" | |
| "Power" value | Corresponding PSU |
| 200W | #A-01, PSU 200W |
| 500W | #A-08, PSU 500W |
| 1000W | #A-14, PSU 1kW |
| ... | ... |
Example relation 2:
| Relation: "Fabric-Color to material" | ||
| "Fabric" value | "Color" value | Corresponding material |
| Cotton | Red | #A-01, Red cotton |
| Cotton | Blue | #A-08, Blue cotton |
| Linen | Red | #A-14, Red linen |
| ... | ... | ... |
Serial numbers
The Stock -> Serial numbers section contains a list of all serial numbers of all parts, the information of the serial numbers, and the history of what has happened with each serial number.
Jump to:
- Demo video: Serial numbers
- Serial numbers functionality.
- Serial numbers statuses.
- Serial number labels.
Serial number statuses
The serial number statuses are updated automatically according to how these items are handled. The statuses are:
- Planned - the item has not been received yet.
- Received - the item is in stock.
- Consumed - the item is consumed in manufacturing;
- Shipped - the item is shipped to the customer.
- Written off - the item has been manually written off.
- Rejected - the item has failed quality control or RMA inspection.
- RMA - the item is undergoing a return process with the customer and is not yet available in stock.
- Returned - the item has been returned from a customer.
Statistics
Report "Stock aging"
The Stock aging report under Stock -> Statistics provides a list of items that have not been used for the specified number of days, with a default value of 60.
Using the ability to set the query interval, you can get data for any group, for example:
- 0-30
- 30-60
- 60-90
- 90-120
- 120+
Production Planning Section - For Production Planner
The Production Planning module allows:
- scheduling manufacturing orders,
- material and capacity planning,
- assigning resources (parts, equipment, workers),
- tracking the use of parts and fulfillment of work operations,
- click-and-drag rescheduling,
- seeing the production calendar and Gantt charts,
- managing Bills of Materials and Routings,
- managing Workstations,
- seeing manufacturing statistics.
The Production planning section has the following sub-sections:
- Manufacturing orders - a list of all manufacturing orders (MO), including service and repair orders.
- Production schedule - the production schedule, which shows all the manufacturing orders that have been scheduled, and allows click-and-drag rescheduling.
- Workstations - a list of all workstations.
- Workstation groups - a list of all workstation groups.
- BOMs - a list of all bills of materials.
- Routings - a list of all routings.
- Statistics - statistical reports generated based on manufacturing orders.
Production Planning - Frequently Asked Questions
Scheduling new manufacturing orders:
- How to schedule a Manufacturing Order?
- How is a Bill of Materials used during production scheduling?
- How is the operation's duration calculated?
- How are manufacturing overhead, labor, and materials costs calculated?
- How to edit the proposed schedule - materials, operations, workers?
- How are operations assigned to workers? How to set default workers or departments?
- What is finite resource scheduling? What is material and capacity planning?
- What is forward scheduling?
- What is backward scheduling?
- What is a multi-level manufacturing order?
- How to schedule subcontracted services?
- How to schedule make-to-order bespoke manufacturing?
- Demo video: How to create Manufacturing Orders.
Administrating manufacturing orders:
- Where do I see the production schedule?
- How to view the Gantt chart of production operations?
- How are manufacturing overhead, labor, and materials costs calculated?
- What are the parts statuses? What does the color-coding mean?
- How to book, add, or remove materials from manufacturing orders?
- How to edit an operation, e.g. to assign workers, etc.?
- How to return a finished manufacturing order back to production?
- What are the Manufacturing Order statuses, how are the statuses updated?
- What is a multi-level manufacturing order?
- How to add important notes or a flag to an order?
- How to record serial numbers?
- How to approve or release a Manufacturing Order for production?
- How to create the Materials requisition sheet?
- Demo video: The Manufacturing Order Details page.
Re-scheduling manufacturing orders:
- What options are available for rescheduling manufacturing orders?
- How to dynamically reschedule manufacturing orders?
- How to book, add or release materials from manufacturing orders?
- How to rebook materials of all planned Manufacturing Orders?
- How to manually edit an operation, e.g. to change workstation, worker, duration, etc.?
- How to change the manufacturing order quantity?
- Demo video: How to dynamically drag-and-drop reschedule in the production calendar and Gantt charts.
Production reporting for the planner:
- Production reporting FAQ for workers.
- Where and how to report production operations?
- How to edit an operation, e.g. to fix input mistakes?
- How to finish a manufacturing order as the production planner/manager?
- How to return a finished manufacturing order back to production?
- Report scrap, wastage.
Human resources planning in manufacturing:
- How to assign an operation to a worker from an MO?
- How are operations assigned to workers? How to set default workers or departments?
- What is a department?
- How to plan works by departments? How to assign operations to departments?
- How to report production operations using the departments?
- How to plan human resources when production is constrained by skilled workers?
- How to optimize production scheduling when workers' availability is constrained or unreliable?
- How to assign default departments to operations or workstations?
Production capacity - workstations and workstation groups:
- What is a workstation group?
- What is a workstation?
- What are the workstation properties?
- What are the workstation group's properties?
- How to schedule and perform workstation maintenance?
- How are the manufacturing overhead and labor costs calculated?
- What is routing? How is it used in production planning?
- Demo video: How to define workstation groups and workstations.
Bills of Materials (BOM) management:
- What is a Bill of Materials (BOM)? How is it used?
- How is a Bill of Materials used during the production scheduling process?
- How to add a Bill of Materials in MRPeasy?
- How to create a multi-level BOM?
- How to create a disassembly BOM?
- How to create a phantom BOM?
- How to enter a fixed quantity of parts in a BOM?
- How to add additional products?
- How to connect a BOM and a routing?
- How to set up the BOM with parameters?
- How to import a BOM?
- How to import a multi-level BOM?
- How to update existing Bills of Materials via CSV upload?
- How to bulk edit BOMs?
- How is the cost of the BOM estimated?
- How is the actual cost of materials for a product calculated?
- How to update the BOM of already planned Manufacturing Orders?
- How to track changes to a Bill of Materials (revisions)?
- How to find the BOMs where an item is used in ("Where used" / "Engagement" report)?
- Demo video: How to define Bills of Materials (BOM).
Routings management:
- What is routing? How is it used in production planning?
- How to enter a Routing in MRPeasy?
- How is the operation duration calculated?
- How are manufacturing overhead, labor, and materials costs calculated?
- Examples of Routings.
- How to update the Routings of already planned Manufacturing Orders?
- How to track changes to a Routing (revisions)?
- How to export a Routing?
- How to import a Routing?
- Demo video: How to define Routings.
Jump to other FAQs:
- CRM FAQ.
- Stock FAQ.
- Procurement FAQ.
- Production reporting FAQ.
- Settings FAQ.
- Demo video: Setting up your MRP system.
Manufacturing Orders
The Production planning -> Manufacturing orders section displays a list of all manufacturing orders (MO), including service and repair orders. New Manufacturing Orders can be added from here.
Jump to:
- Demo video: Production planning and management.
- Manufacturing Order details.
- Schedule a new Manufacturing Order.
- Rescheduling.
- Rebook parts of planned Manufacturing Orders.
- Manufacturing order statuses.
- Parts statuses. Color-coding.
- Production planning FAQ.
Rescheduling Manufacturing Orders or operations
There are several ways to reschedule manufacturing orders:
- Use Click-and-Drag Rescheduling in Production planning -> Production schedule in the Calendar or in the Gantt charts views, where it is possible to drag a MO or just individual operations to new times. The software will check material and capacity availability and resolve calendar conflicts.
- Use Click-and-Drag Rescheduling in the calendar Production planning -> Workstation groups -> A workstation group's report: calendar, where it is possible to drag operations of that particular workstation group to another time. The software will check material and capacity availability and resolve calendar conflicts.
- Remove Manufacturing Order operations from the schedule and add them back using buttons Remove from the schedule and Add to schedule at the MO details page; or by dropping the not scheduled orders back into the Gantt chart. (Available with Unscheduled Manufacturing Orders)
- Manually edit the operations' dates and durations of a Manufacturing Order.
- Use BOM update and Routing update features for existing Manufacturing Orders.
- Delete the order and schedule it again.
After Manufacturing Orders are rescheduled, it may be useful to rebook materials of the planned MOs: How to rebook parts of planned Manufacturing Orders?
Note that if one order is rescheduled, this will not automatically reschedule the whole production calendar. It's worth keeping in mind that while oftentimes it is good to reschedule, it's still not wise or necessary in every case:
- From the perspective of gathering feedback, it's okay to finish at other times, or in another order. This is vital information that can be used for better planning in the future.
- If the jobs are going to be finished on the same day, but in another order (for whatever reason), it's likely a waste of the production planner's time to formally drag them around in the planning calendar.
Manufacturing order statuses
Manufacturing order statuses are assigned automatically by MRPeasy:
- The order is in status New if it requires approval (only used if Order Approval functionality is enabled). Products have status Requested.
- The order status is Not scheduled, when it is not on the production schedule (available with the Unscheduled Manufacturing Orders functionality). Products have status Requested.
- The order status is Scheduled when it has not started. Status of products changes to Planned.
- The status is changed to In progress when the first operation is started. This is assigned when a worker clicks on the Start Start button of the first operation.
- The status is changed to Paused when a worker clicks on the Pause Pause button of an operation, or when a worker finishes the last operation and clicks on Finish Finish in My production plan (the order is not yet finalized).
In general, the status is Paused when the MO is in progress, but no operations are currently active. - The status is changed to Done when the manufacturing order is finished. This is assigned when a worker clicks on the Finish production button in My production plan or finishes the last operation in the Internet-kiosk, or the production manager clicks on the Finish production as planned button.
- There are two service statuses, what you can use for your organizational purposes, or do not use. They are Shipped and Closed. They will be assigned to the MO, if to input manually the date in the field Shipping Date, or Closing Date, accordingly.
- The status Archived is set when using the “Archive old data” functionality.
Parts status and color coding
The text color indicates the status of parts availability (corresponding to column "Parts status"):
- Not booked - all required parts are not booked;
- In use only when Tracing is enabled.
- Not enough - The quantity of parts currently in stock or planned is insufficient to fulfill this order.
- After completing orders with higher priority there will be not enough for this order.
- In use only when Tracing is disabled.
- Requested – all parts are booked. But some parts are not ordered yet. Their stock lots have the status Requested.
- Delayed - all parts are booked and ordered. Some parts will become available after the planned start time of the manufacturing order, or some parts are not received after the expected arrival date has passed;
- Expected - all parts are booked and ordered. Some parts have not yet been received but will arrive according to the schedule;
- Received - all parts are booked and in stock.
Create a New Manufacturing Order
Jump to:
- Demo video: Production Planning and Management.
- Schedule a new Manufacturing Order.
- Edit the proposed schedule - materials, operations, workers.
- Create an MO for make-to-order (MTO)
- Calculation of operation's duration.
- Calculation of manufacturing overhead, labor, and materials costs.
- Setting default workers or departments.
- Finite resource scheduling, material planning, and capacity planning.
- Forward scheduling.
- Backward scheduling.
- Create a make-to-order bespoke manufacturing order.
Scheduling a Manufacturing Order
A new Manufacturing Order can be created from Production planning -> Manufacturing Orders, by clicking Create Create.
When creating a new Manufacturing Order:
- Choose a Product.
- Enter the Quantity, after which the software will calculate the production schedule (read details here).
- Optionally, edit planning parameters:
- Start date to set the new starting point for forward scheduling.
- Due date to set the starting point for backward scheduling (Enterprise feature: Backward Production Scheduling). - Optionally, view/edit the schedule details, by opening the details of a BOM line.
- Optionally, select options:
- Do not book workstations.
- Do not book materials. - Choose the desired BOM, if there are several.
- Save to save the order on the production schedule.
When calculating the production schedule, the system will:
- Calculate a possible schedule for each of the item's BOMs and the Routings associated with each BOM.
- For each BOM, the routing with the earliest finish date is selected, by default.
- For a multi-level MO:
- sub-assembly BOM is automatically selected alphabetically according to its number.
- sub-assembly routing, connected to the selected BOM, is selected alphabetically according to its number. - Propose materials bookings (by FIFO; or FEFO for perishable goods). If some materials are missing, the BOM is displayed with a red italic font.
- When using forward scheduling, consider the lead time of missing materials.
Lead times are ignored when:
- some lead time is unknown;
- some sub-assembly does not have a BOM (a manufactured item must have a BOM);
- using backward scheduling. - Estimate the total manufacturing cost = material cost + applied manufacturing overhead + labor cost.
Minimum quantity for manufacturing
If a product has a "Minimum quantity for manufacturing" defined:
- When manually creating a new MO, and the entered quantity is less, the "Quantity" field will be highlighted.
When the cursor is moved over this field, a message will be displayed indicating the minimum manufacturing quantity for this item.
Saving the MO with a smaller quantity is allowed. - In case when the new MO is created automatically from a CO and the required quantity is less, the MO quantity will be increased up to the minimum quantity for manufacturing. A note will be saved to the MO.
Scheduling methodology
Finite resources scheduling, material and capacity planning
The scheduling takes into account all limitations in resources, including other jobs, the planned idle times for machines, and also, when performing forward scheduling, the lead times of out-of-stock materials. To use automatic scheduling, the item must have a Bill of Materials and a Routing.
Forward production scheduling
By default, the software schedules the Manufacturing Order to the first available time. By entering the Start date, you are letting the software know that production should start on or after that date, and the first availability will be searched for starting from the Start date.
Material lead time is considered when forward scheduling is used.
Incomplete information about material lead times
Note that if the availability of any material is unknown (a manufactured item (subassembly) not available; or procured item not available with no purchase terms), then the MO is scheduled ASAP, ignoring material lead times, as the information is incorrect/incomplete.
Backward production scheduling
In the Enterprise pricing plan, the software also allows backward scheduling: when you set the Due date when creating a new MO, the software will find the latest time to finish just in time before the Due date.
Material lead times are ignored when backward scheduling is used.
Options
If Professional feature Unscheduled Manufacturing Orders is enabled, it is possible to select options when scheduling a new MO:
- Do not book workstations - no time will be booked from workstations schedules for operations. The MO will be unscheduled.
- Do not book materials - no materials will be booked. The MO is created as if there are no materials available in stock. If the product has a multi-level BOM, then a multi-level MO will be created.
BOM information page, editing the proposed schedule
To see and edit the details of the proposed schedule when planning a new MO, click on the View/Edit View button on the BOM line.
This page allows
- seeing the detailed information about material availability,
- seeing the detailed operations schedule,
- seeing the detailed estimated costs,
- choosing between Routings - by default the one with the earliest finish time is selected,
- editing proposed material bookings,
- editing the operations (incl. adding extra workers),
- changing assigned workers.
Make-To-Order bespoke manufacturing
If your company works in the "Make to order" mode and makes bespoke products, then adding a BOM and the Routing could sometimes be an overwork.
For basic scheduling without capacity planning, it is possible to create a manufacturing order without these documents.
Creating a make-to-order manufacturing order:
- Start, as usual, by clicking Create Create at Production planning -> Manufacturing Orders.
- Choose a product and enter the quantity.
- From the pop-up warning, choose to create a Manufacturing Order without a BOM.
- Enter the required materials.
- Optionally, enter the Start and Finish dates, then the MO will be displayed in the Production Schedule.
Such a manufacturing order must be created manually, and cannot be created automatically from a customer order. For creating a make-to-order MO, it is also possible to do so from a CO:
- Open a Customer Order.
- Click Check stock and book items.
- Click To book manually.
- Click Create a manufacturing order.
If capacity scheduling is required, then a new item with BOM and a Routing needs to be created for every project.
This can be done very easily from within the Customer Order when entering the order, after which it is possible to also automatically schedule the Manufacturing Order.
Read: How to add a manufactured item?
Read: How to create a similar one-off product based on an existing item?
Manufacturing Order Details
The Production planning -> Manufacturing Orders -> MO details is the administrative view of the Manufacturing Order that allows to see all the details and edit them.
Jump to a topic:
- Reporting MO progress:
- Operation start-stop and consumption of materials.
- Manufacturing order quantity.
- Editing operations, assigning workers.
- Reviewing operation subtasks.
- Updating the routing.
- Booking, adding, or removing materials.
- Updating the BOM.
- Finalizing MO, or finish production as planned.
- Returning finished MO to production.
- Tracking serial numbers of parts and products.
- Subcontracting, outsourced operations.
- Reporting scrap, wastage.
- Notes, warnings, red flags.
- Operation time tracker.
- Printing MO PDF, label, job traveler, materials requisition sheet.
- Rescheduling MOs.
- Removing MO from the schedule.
- Approving or releasing a manufacturing order for production.
- Multi-level manufacturing orders.
- Calculation of operation duration.
- Calculation of manufacturing overhead, labor, and materials cost.
- Troubleshooting.
Reporting consumption of materials and progress of operations
Reporting as a manager
To access the reporting view:
- Open the MO from the Production planning section.
- Click on Go to production.
- This will take you to the My production plan reporting interface.
- You can report the consumption of materials and the progress of operations.
Reporting as a worker
Workers can use one of the two reporting views:
Operations need to be explicitly assigned to the users, or they must be part of the assigned department.
Changing the Manufacturing Order quantity
The total quantity of the MO can be changed:
- By the production manager at Production planning -> Manufacturing Orders -> MO details.
- Before the MO is started, the MO quantity can be changed freely in the MO header.
- After the MO is started, depending on the software setting MO partial completion, either the quantity field in the header can be updated, or the quantity can be updated by editing the reported quantity of the last operation.
- During production by the worker in My production plan, when reporting the finish of the last operation.
If the quantity is changed before the MO is started:
- Required materials and operations are completely recalculated according to the BOM and routing.
- Parts are automatically booked, if available.
- Operations are rescheduled.
- If MO quantity is decreased (duration of operations decreases), the operations are scheduled starting from the "Start" time of the first operation. I.e. generally, the start time of the MO should remain in place.
- If MO quantity is increased (duration of operations increases):
- If the "Due date" is undefined, the operations are scheduled by finding the first available time in the schedule starting from the current time. I.e. it is likely that the MO start time will become earlier.
- If the "Due date" is defined, and Backward scheduling (Enterprise feature) is available, the operations are scheduled to finish as late as possible before the due date. I.e. it is likely that the MO start time will change, while the finish time will stay in place.
- The quantity of the target lot is updated.
If the quantity is changed after the MO is started, or if it is already finished:
- The quantity of the target lot is updated.
- Materials and operations are not altered.
Adding, booking, and removing materials
Editing the required materials
The production manager can edit the materials of the MO in the Parts section at Production planning -> Manufacturing Orders -> MO details page.
To add a new part, press the Add a booking in the top right corner of the Parts list.
To increase or reduce a quantity, press the Increase booking or Return to stock buttons at the end of a material line.
Before the MO is started, it is possible to push a BOM update to the MO.
When Tracing is enabled:
- To remove a material, press Return to stock on the line with the “Not booked” status. If the material is fully booked from stock lots, as a first step, you must unbook it.
- Press Book all parts, above the Materials list, to book items from any available stock lots.
- Press Release all booked parts, above the Materials list, to unbook all booked materials.
- Consumed materials will not be affected.
- You can mass (re)book materials of all planned MOs at once to book materials.
Consuming materials from stock
Materials can be reported consumed in My production plan in real-time.
- As a manager, press Go to production to access it.
Booked materials will be automatically reported consumed, when the last operation in the Internet-kiosk is reported finished.
Editing operations, assigning workers or departments
Editing operations
The Operations section of a manufacturing order contains a list of the manufacturing operations, where it is possible to assign workers or departments and edit each operation.
For editing an operation:
- Open the Manufacturing Order.
- Scroll down to the Operations section.
- Click "View/Edit" to see and edit the operation details.
Editing assigned workers
When a new MO is created, the workers are assigned according to default settings.
For changing the worker on an operation:
- Open the Manufacturing Order.
- Find the operation in the Operations section.
- Change the Worker, using the drop-down menu.
- If you wish to assign another additional worker to the same operation, then edit the operation and click "Add worker".
Reviewing operation subtasks
If subtasks have been defined for an operation in the routing, they appear in the Operations section of the MO details page.
For viewing subtasks of an operation:
- Open the Manufacturing Order.
- Scroll down to the Operations section.
- Click the subtask icon on the operation line to expand the list.
You can also use the icon in the table header to expand or collapse subtasks for all operations at once.
Each subtask shows the description, who completed it, when, and an optional worker's note.
If the MO is not yet finished, the operation's assigned worker or the user with the update right for Production Planning can undo a subtask completion. Doing so removes the recorded completion time and the name of the user who completed it.
Finalizing the manufacturing order
To change the MO status to finished, open the MO and either:
- Press Go to production and then Finish production.
- At least one operation must be started and finished to press Finish production.
- Press Finish production as planned.
Note that:
- If the last operation is completed in the Internet-kiosk, the MO is finished automatically.
- In the My production plan, the worker must press Finish production separately - as an extra step -, after finishing the last operation.
- The worker cannot press Finish production if the whole manufacturing order is not assigned to him/her.
Finish production as planned
In the MO details page, it is possible to finish the MO with one click.
After you click Finish production as planned:
- The Manufacturing Order is marked finished (status Done) even if operations have not been reported, or some materials have not been booked.
- All booked materials will be automatically consumed. If some required materials were not booked, the software adds a flag Important notice and a Note to the order.
- All unreported operations:
- With planned times in the past, will be marked as reported according to their estimated times.
- With planned times in the future, will be scheduled backward from button press time. For all such operations, the finish time will be the button press time, and the duration will match the planned duration.
- Finished products will be available in stock.
Returning a finished manufacturing order to production
If the manufacturing order was marked finished by error, for returning the order to production:
- Open the Manufacturing Order.
- Press the Return to production button at the bottom of the Manufacturing Order details page.
Required user rights:
- This button is visible only to users with the "Lock handler" right.
Reporting scrap, wastage
How scrap should be reported and treated is an organizational decision of your company. Please find general guidelines below:
Scrapped products
Finished products are scrapped and will not be taken to stock:
- When reporting the number of made products, report only the number of good products.
- If you plan to finish the MO with the same quantity, you may need to add extra materials.
- If you need to finish the MO short:
- The MO quantity can be changed anytime in the administrative view of the MO.
- In My production plan, if the worker reports under-( or over)production the MO quantity can be updated automatically.
- The cost of the scrapped parts will be accounted for in the cost of good products.
Finished products are scrapped and will be taken to stock:
There are two options:
A) Use the "Quality Control" functionality to reject scrapped products after MO finish:
- Enable quality control for the product.
- When reporting the number of made products, report the number of all products = good + scrapped.
- When the MO is finished, perform inspection, and only approve the good products.
- The scrapped products are rejected and in stock, and can only be repaired with a service order, or written off.
- The scrapped products have the same cost as the good products.
B) Use the "Co-product BOM" functionality to place rejected products in stock immediately:
- Create a separate item in stock for the scrapped finished products. Add this item to the BOM of the finished product in the "Additional products" section.
- When reporting the number of made products:
- Report only the number of good products.
- Additionally, as the additional product quantity which is asked, report the number of scrapped products. These will be placed in stock immediately.
- The cost of the scrapped product can be controlled with the cost allocation percentage in the BOM of the finished product.
Scrapped parts, wastage
If scrapped parts will not be taken to stock:
- Consume the scrapped part in the MO.
- If necessary, add extra materials from stock to replace the scrapped part.
- The cost of scrapped parts will be reflected in the cost of the finished products.
If the scrapped part should be returned to stock and written off:
- If the part is already booked, the production manager must unbook / return the part to stock in the administrative view. (This cannot be done from My production plan.)
- Create a write-off.
If the scrapped part will be taken to stock for further processing, use the "Co-product BOM" functionality to place it in stock immediately:
- Create a separate item in stock for the scrapped part. Add this item to the BOM of the finished product in the "Additional products" section.
- When reporting the number of made products, also report the number of scrapped parts. These will be placed in stock immediately.
- The cost of the scrapped part can be controlled with the cost allocation percentage in the BOM of the finished product.
Notes and warnings
It is possible to enter Notes regarding a manufacturing order at the bottom of the MO details page, which is accessible:
- for the manager, from the Production planning section.
- for the worker, from the My production plan section.
Important notes (incl. warnings from MRPeasy):
- Are shown with an Important flag Important notice in Production planning -> Manufacturing Orders and My production plan -> List view tables.
- Are shown with a thick blue border inside the MO details in the Notes section.
Time tracker working principles
The production workers report when they start, pause, and finish operations, according to which the manufacturing time is tracked.
If an operation is not paused at the end of a workday:
- If it is paused or finished by the worker after hours, the full time from start to finish is considered.
- Working hours are 9 am to 5 pm. The operation started at 10 am one day and finished at 6 pm the same day. The working time is 8 hours. - It will be paused automatically by the system during the night (between 1 am and 3 am). In this case, the finish time is set to the work day's end.
- Working hours are 9 am to 5 pm. The operation is started at 10 am one day and paused by the system at 1 am the next day. The working time is 7 hours.
- Note that an operation will not be paused automatically if there is no pause between two working days. - If the operation starts during one workday and ends in another day's working hours, the non-working hours are ignored in the total time calculation.
- Working hours are 9 am to 5 pm. The operation started at 10 am one day and finished at 10 am the next day. The working time is 8 hours.
Multi-level Manufacturing Order
What is a multi-level MO?
When subassemblies are not in stock, by default, MRPeasy automatically nests their production within the same Manufacturing Order (MO).
Exceptions:
- A subassembly item will not be nested if the Standalone MO setting is enabled for it. Instead, a separate MO must be created manually for its production. The quantity of the required subassembly will be indicated in the Production planning -> Statistics -> Shortages and Stock -> Critical on-hand reports.
- A multi-level MO is not created if the MO product is a kit (a bundle, an auto-assembly product).
- If a packaging item (Packing functionality) has a BOM, its production will not be nested in a multi-level BOM.
If the manufacturing order is multi-level:
- The materials and operations are grouped by assemblies (i.e. by BOMs and Routings).
- If a sub-assembly does not have a routing, it is considered as a collection of parts (it is a phantom assembly / a phantom BOM).
- Component names are displayed in green if parts for it are ready (sub-assemblies from the same MO are finished). Otherwise, the component name is displayed in red.
Overproduction of sub-assemblies in a multi-level MO
All sub-assemblies produced within a multi-level MO are considered as consumed in the finished product.
For making sub-assemblies to stock in excess, the following approaches can be used:
- To prevent the situation, you could make the MO for the sub-assembly in advance. In such a case, it will not be nested into the MO of the upper-level product, and excess quantities will go to stock.
- In case the MO is in progress already, use one of the following approaches:
a) For the overproduced quantity, make a separate MO (and e.g. click the "Finish production as planned" button to put these to stock immediately).
b) For the overproduced quantity, find another existing MO, where these are also produced, and report these units as produced.
c) Use the Co-product BOM functionality to take excess subassemblies to stock.
Sorting of sub-assemblies and operations
The order in which the assemblies and their parts are displayed depends on the order into which they are sorted as a preparation before the production operations are scheduled.
All assemblies, which must be produced, are sorted as follows:
- First, according to the level in the BOM. The lower level assemblies are first.
- This means that the scheduling process will start with these first.
- Direct parts of the product are level 1, components of these are level 2, etc. A higher number is a lower level.
- If the part's sequence number in BOM is 28.1.3.13, its level is 4.
- Second, according to the sequence number of the part in the BOM at that level. The lowest numbers are first.
- If the part's full sequence number in BOM is 20.1.1.10, its sequence number at this level is 10.
- Part 30.1.1.1 is before part 20.1.1.10.
For example, if the BOM is as follows:
| Sequence nr in BOM | Part | Level in BOM | Sequence nr at this level of BOM |
| 1 | A | 1 | 1 |
| 2 | B | 1 | 1 |
| 2.1 | B1 | 2 | 1 |
| 2.2 | B2 | 2 | 2 |
| 2.2.1 | B21 | 3 | 1 |
| 3 | C | 1 | 3 |
| 3.1 | C1 | 2 | 1 |
| 3.2 | C2 | 2 | 2 |
The displayed order of assemblies and operations will be the following in the MO:
| # | Sequence nr in BOM | Part | Level in BOM | Sequence nr at this level of BOM |
| 1 | 2.2.1 | B21 | 3 | 1 |
| 2 | 2.1 | B1 | 2 | 1 |
| 3 | 3.1 | C1 | 2 | 1 |
| 4 | 2.2 | B2 | 2 | 2 |
| 5 | 3.2 | C2 | 2 | 2 |
| 6 | Not applicable | The product of MO | Not applicable | |
Displayed cost of nested assemblies
It is important to note the following:
- All costs of components, labor, and subassemblies are added directly to the costs of the MO (to the cost of the upper-level product).
- The cost of an item that is produced in the same MO:
- Is not included on the used part's total line (the upper line), where it is consumed.
- Below that line, in the line which refers to its source ("Manufacturing Order ..."), it is displayed as the sum of procured items it's directly made of (excludes any of its subassemblies' costs).
- The quantity of a subassembly that is produced in the same MO:
- Is displayed next to the assembly title, under which all its parts are listed.
- Is not included on the used part's total line (the upper line), where it is consumed. Below this line, which tells its source ("Manufacturing Order ...") the quantity is marked as consumed.
Example:
| Manufacturing Order MO-0001 | |||||
| Total materials cost of MO: | $150 + $100 + $0 + $150 + $100 + $25 = $525 | This is the sum of all parts' total lines. This equals the cost of all lines with Lot numbers, i.e. this is the cost of all used materials from stock. | |||
| Subassembly A | 25 pcs | The quantity of the assembly is displayed next to the heading of the assembly. | |||
| Stock item | Quantity | Total cost | Unit cost | Lot | Subassembly A is made of procured parts. |
| Part A1 | 100 pcs | $150 | $1.50 | This is a procured item. | |
| 50 pcs | $50 | $0.5 | L0001 | ||
| 50 pcs | $100 | $1 | L0002 | ||
| Part A2 | 100 pcs | $100 | $100 | This is a procured item. | |
| 100 pcs | $100 | $100 | L0003 | ||
| Subassembly B | 1 pcs | Subassembly B is made of Subassembly A and another procured part. | |||
| Stock item | Quantity | Total cost | Unit cost | Lot | |
| Subassembly A | 0 pcs | $0 | $0 | The cost and quantity of Subassembly A produced in this MO is not included in the total line here. | |
| 25 pcs | $250 | $10 | Manufacturing Order MO-0001 | This cost is the cost of procured items in the parts list of Subassembly A. | |
| Part B1 | 1 pcs | $150 | $150 | This is a procured item. | |
| 1 pcs | $150 | $150 | L0004 | ||
| The product of MO | 1 pcs | The product of the MO is made of Subassembly B and another procured part. | |||
| Stock item | Quantity | Total cost | Unit cost | The cost and quantity of Subassembly B produced in this MO is not included in the total line of Subassembly B here. But the cost and quantity of the second piece of Subassembly B, which is taken from stock (produced in a different MO), is included here. |
|
| Subassembly B | 1 pcs | $100 | $100 | ||
| 1 pcs | $150 | $150 | Manufacturing Order MO-0001 | This cost is the cost of procured items in the parts list of Subassembly B. | |
| 1pcs | $100 | $100 | L0005 | This is manufactured in another MO | |
| Part C1 | 1 pcs | $25 | $25 | This is a procured item | |
| 1 pcs | $25 | $25 | L0006 | ||
Printing documents
Jump to:
Printing the manufacturing order, job traveler
Manufacturing orders can be printed in four versions:
- PDF wide on the MO details page.
- PDF medium on the MO details page.
- PDF narrow on the MO details page.
- PDF from My production plan:
- Click on the Go to production, or go to My production plan and open the MO.
- Print the PDF.
Several manufacturing orders can be printed in bulk. This can be done from:
- Production planning -> Manufacturing orders list view (select the lines and press the printer icon on the top right of the list).
- CRM -> Customer orders -> CO details (if products originate from the MOs, a button to print MO PDFs will be present in the top right corner).
Notes:
- The MO PDF layouts can be configured in the PDF Editor.
- The MO PDFs contain unique MO, sub-assembly, and operation barcodes if the Barcode System functionality is enabled.
Manufacturing Order label, barcode
It is possible to print labels to identify physical items from different manufacturing orders. The labels can be printed by clicking Print label in the upper right corner of the Manufacturing order details page.
The size, information, and layout of the label can be edited with the Label editor.
The standard label contains the unique manufacturing order barcode if the Barcode System functionality is enabled.
Troubleshooting
Error message: "This manufacturing order cannot be canceled because items from its target lot have been consumed.".
Explanation: This means that products that were made from this MO are used somewhere already (e.g. shipped, written off, consumed in another MO...).
Resolution: The consumption of the products must be undone before the MO can be deleted.
- Open the Manufacturing Order.
- Click on the Target lot number.
- Open the Reports of the lot.
- Select the report "Bookings".
- Find and edit the lines where some items are consumed.
Service orders
A Service Order (SO) is an order for repairing or maintenance of returned products or items which failed quality control.
Materials and operations can be added to the service order at any point in time. Note that operations in the SO can only use workstation groups of type Active processing.
This is a special type of a Manufacturing Order (MO), it will be displayed normally in the production schedule like any other manufacturing order in Production planning -> Manufacturing Orders.
Jump to:
- How to add a service order? How to perform repairs or maintenance of products?
- How to plan materials for the service order?
- How to schedule production capacity for the service order?
Creating a service order, repair order, maintenance order
A service order can be started from:
- Stock -> Stock lots -> a stock lot's details page if this lot has failed quality control, the status of the lot is Rejected.
Available, if the Quality Control functionality is enabled. - CRM -> Customer returns (RMAs) -> RMA order's details page.
Available, if the Return Merchandise Authorization functionality is enabled.
Material and capacity planning for the service order
Automated capacity planning works when during the creation of the service order, the required parts and operations along with workstation groups and required times are all entered.
The scheduling of the service order works the same way as for a Manufacturing Order:
- If materials are available right now, the production could start earliest on the first availability of the required workstations.
- If materials are not available right now, the production could start earliest on the first availability of the required workstations after today's date + lead time of the materials.
Automated capacity planning does not work when the worker who fulfills the service order adds parts and operations at the time when the order is being done after it has been saved.
Production Schedule
The Production planning -> Production schedule shows all the Manufacturing Orders that have been scheduled. This page allows:
- seeing all the scheduled manufacturing orders in a Calendar and Gantt chart views.
- dynamic drag-and-drop rescheduling of manufacturing orders and operations,
- accessing the details of an MO.
Jump to:
- Tips and tricks.
- Color coding of the calendar.
- Dynamic drag-and-drop rescheduling of Manufacturing Orders.
- Mass rebooking parts of all planned Manufacturing Orders.
- What options are available for rescheduling manufacturing orders?
- How to view the Gantt chart of production operations?
Tips and tricks
- Click and drag to reschedule an order. Started or finished operations cannot be rescheduled.
- Click on a calendar entry to see details and to access the Administrative view of an MO.
- Click Rebook parts for all MO to rebook parts to all planned MOs.
- Click on the Gantt button to access the Gantt charts.
- In the Calendar view, use the tab menu above the calendar to change the view between "Manufacturing Orders" or "Operations"
- In the Gantt chart view, use the tab menu above the chart to change the view between "Manufacturing orders" and "Workstations".
- Click Choose columns to choose which information to display.
- The first day of the week is defined in Settings -> System settings -> Regional settings.
- To find a particular order, click the Search button in the upper right corner of the page. A popup with a filter will open.
To remove the filter and see all orders, click the Search button again. Then click the Clear button.
Color coding
The backdrop color indicates the current progress:
- Not started, the planned start time is in the future;
- In progress;
- Paused;
- Finished;
- (Red striped) Overdue. Should have been already started, if not started. Should have been already finished, if not finished.
The text color indicates the availability and status of parts.
Dynamic drag-and-drop rescheduling
Both manufacturing orders and operations can be dynamically rescheduled dragging and dropping them to the desired time in the Calendar and Gantt charts views at Production planning -> Production schedule.
Demonstration video of drag-and-drop rescheduling in Gantt charts: https://youtu.be/kKWHCSZFKh0?t=654
When using drag-and-drop in the calendar view:
- The software will not allow overbooking a workstation. The next available times in workstation schedules will be found for operations.
- Next operations in the same MO will be rescheduled.
- If materials will not be available by the time, a pop-up appears, asking whether to move MO start to when materials will be available.
When using drag-and-drop in the Gantt charts view:
- It is possible to choose:
- In case of an overlapping conflict, if overbooking of workstations is allowed.
- If the next operations in the same MO will be rescheduled. - The software will not check for material availability.
Important note:
- The software will only reschedule the manufacturing order which has been dragged to a new time, other manufacturing orders will not be rescheduled.
See also:
Mass rebooking of parts and materials
At Production planning -> Production schedule it is possible to click the Rebook parts for planned MOs Rebook materials button to rebook parts for all planned MOs.
This function does the following:
- All Manufacturing Orders in status "Scheduled", "Not scheduled", and "New" are looked up.
- All materials booked to these MOs are released.
- Starting from the earliest MO, according to start time, materials are booked to all MOs.
When a Manufacturing Order is scheduled, then materials are booked to it according to the FIFO principle (or FEFO, if expiry dates are used). However, in certain cases, this may not provide FIFO consumption of materials from stock. This function can help to align the order of MOs with the right order of consumption. This may happen, for example, when:
- new MOs are scheduled to earlier times than previously created MOs,
- the order of MOs is changed.
If you wish to only rebook materials of select MOs, you can do it by opening these MOs and clicking on buttons Release all booked parts and Book all parts.
Gantt chart
Besides the calendar view, the production schedule can also be viewed as a Gantt chart of:
- Manufacturing Orders, or
- Workstations load.
Demonstration video of drag-and-drop rescheduling in Gantt charts: https://youtu.be/GOmZuRnZvVM
For seeing the Gantt chart:
- Go to Production planning -> Production schedule.
- Click on the Gantt chart button.
For changing Gantt chart views, use the drop-down menu above the chart to change the view between
- Manufacturing orders - to see the Gantt chart of Manufacturing Orders. Click on the + button next to the MO number to expand its operations.
- Workstations - to see the Gantt chart of the loading of workstations.
Setting the date range:
- Change the date range from a predefined date range or set custom dates.
- Click on a month or a day in the Gantt chart header to zoom in.
Workstations
The Production planning -> Workstations page displays a list of all the workstations and their reports.
Jump to:
- What is a workstation group?
- What is a workstation?
- Workstation's properties.
- Workstation's reports.
- Summary reports of all workstations.
- Schedule and report workstation maintenance.
- Assign default departments to operations or workstations.
What is a workstation?
| Workstation group | Workstation | Default worker | Workstation's hourly rate | Productivity |
| Workstation group A | Workstation A1 | Worker A | 50 | 1 |
| Workstation A2 | Worker B | 50 | 1 | |
| Workstation group B | Workstation B1 | Department B | 15 | 1 |
| Workstation B2 | Department B | 15 | 1 | |
| Workstation B3 | Department B | 30 | 3 |
There are three key ideas to understanding what a workstation is:
- A workstation is a place where individual operations are done. The workstation could be a machine, a bench, an assembly table, work area, etc. One workstation can only be part of one workstation group.
- Your workstations define your production capacity. One operation can be done at one time in one workstation.
- A workstation belongs to a workstation group, which groups similar production resources. When defining an operation in a product's routing a corresponding workstation group must be chosen. Only during production scheduling, a specific workstation is assigned.
In some situations, a single workstation might not correspond to a specific machine:
- When many tools or machines are used for one operation. E.g. In a woodworks area or department there could be tens of tools, benches, tables, and machines, where one group would be used for one operation, but another group for another operation.
- In these situations, it might not be efficient to define every single machine, because this would make the routings and reporting unnecessarily complex. Instead, it's better to find the average number of operations which can be performed concurrently in this area.
- Most commonly, the number of operations that can run concurrently equals the average daily number of workers in the department.
- In this case, the "area" or "department" itself is the workstation group, and the number of possible concurrent operations is the number of workstations in the group.
Workstation Details
The workstation details page, accessible from Production planning -> Workstations, shows the configuration and information of a workstation.
This page allows:
- editing a workstation,
- setting hourly rates and default workers/departments,
- setting idle times (e.g. planned maintenance),
- setting the maintenance cycle
Individual workstations can only be created for workstation groups of type Active processing.
Jump to:
- What is a workstation?
- What is a workstation group?
- What are the workstation properties?
- How to schedule and perform workstation maintenance?
Workstation's properties
- The number is a unique code for the workstation.
- Name is the name/description of the workstation.
- The group is the code and name of the group of similar workstations.
- Hourly rate is optional. This is the applied overhead rate (i.e. factory burden - amortization, maintenance, electricity, and other indirect manufacturing costs) per hour for this workstation. If given, the software will take it into account when calculating the manufacturing cost. If not given, the applied manufacturing overhead cost of the operation should be entered into the routing. This setting has priority over what is defined in a routing (as more accurate/specific).
- Productivity is the rate between the productivity of this particular workstation and the first workstation in the group. If the productivity rate is 2, the time of fulfillment of a particular operation will be divided by 2. For the first workstation in the group always set productivity to 1.
- Default worker – it is possible to set a worker/department, or several, that works at this workstation by default. This setting has priority over what is defined in a routing.
- When a manufacturing order is created, the operation is automatically assigned to the worker that is set as the default.
- If no default worker is set at the workstation, the operation is assigned to the worker set in the routing.
- If no worker is set in the routing nor in the workstation, the operation is assigned to the worker assigned to manufacturing order. - Maintenance cycle - the maintenance cycle in working hours, parts processed and/or days since the last maintenance, after which the workstation should be maintained. If the cycles are defined, Maintenance done checkbox becomes available, which resets the maintenance counter. Available if the Maintenance Management System functionality is enabled.
- Idle time - periods when no works can be planned for this particular workstation.
If a new idle period is added for the time some works have been scheduled for this workstation, then the software shows a notification message.
However, setting an idle time does not reschedule works automatically which were previously planned for the idle time (Read: What options are available for rescheduling manufacturing orders?)
Workstation maintenance, maintenance cycle, performing regular maintenance
For each workstation it is possible to define a maintenance cycle in hours worked, parts processed, and/or days since the last maintenance, in the workstation details page accessible from Production planning -> Workstations, when opening the details of a workstation.
For checking the maintenance cycle of a workstation:
- Go to Production planning -> Workstations
- Check the columns Until maintenance (hours), Until maintenance (items), or Until maintenance (days), which show how long until the next maintenance.
For performing maintenance:
- If necessary, schedule an idle time in the workstation's details page, for the maintenance.
- When maintenance has been done, check the Maintenance done checkbox and click Save in the workstation's details page to reset the counters.
Summary Reports on All Workstations
All workstations have a number of statistical reports, summarized reports overall workstations can be accessed from Production planning -> Workstations by clicking on All workstations summary reports.
Jump to report:
- Calendar - calendar overview of the master production schedule colored by workstations.
- All production operations - list of operations assigned to all workstations.
- Execution - operations currently in progress or paused.
- MOs ready for operation - Manufacturing Orders on hold waiting for a workstation.
- Equipment usage chart - loading information on workstations.
- Overall equipment effectiveness - statistical indicators of performance.
Report “Calendar”
The report shows the calendar (month, week or day) of all production operations colored by the workstation.
Clicking the Choose options allows choosing which information to display on the calendar.
The backdrop color indicates the different workstation groups. The color can be set in the workstation group's details at Production planning -> Workstation groups.
The text color indicates the status of parts availability:
- Not booked - all required parts are not booked;
- Delayed - all parts are booked and ordered. some parts will become available after the planned start time of the manufacturing order;
- Expected - all parts are booked and ordered. Some parts have not yet been received but will arrive according to the schedule;
- Received - all parts are booked and in stock.
Report “All production operations”
The report displays a list of scheduled and active production operations, grouped by workstation groups and workstations. The list can be filtered by planned start time.
The maximum report period is one month.
Report “Execution”
The report shows the list of active manufacturing operations and their progress in real time. Only the operations which are currently in production or paused are shown.
Report “MOs Ready for Operation”
The report shows the list of manufacturing orders that are waiting for some workstations to start. These operations are ready to be started, but on hold, waiting for the operator to start.
To see the list of manufacturing orders that are in the queue of a workstation:
- Choose a workstation group or a subcontractor (if the Subcontractors functionality is enabled).
- The software shows manufacturing orders where all previous operations are finished, but operation at particular workstation group is not started, or purchase order for the subcontractor is not created.
Report “Equipment usage chart”
The report shows the loading of workstations over time as a line graph. The vertical axis of the graph can be set to either percentage or hours.
Report “Overall equipment effectiveness”
This report shows overall equipment effectiveness (OEE) of the workstation during the period.
OEE is calculated in real time when manufacturing operations are performed.
For calculating OEE for past periods, select the desired period (up to 1 month long) and click Calculate button.
OEE shows how well a manufacturing unit performs. OEE = Availability x Performance x Quality, where
- Availability represents the percentage of real run time compared to the planned time.
- Availability = reported run time / planned time
- If work has reportedly taken more time than planned then Availability can go over 100% (marked with red). If this happens often, it may mean that routing should be adjusted and cycle time should be increased.
- If Availability is greater than 100%, a value of 100% is used when calculating the OEE. - Performance represents the speed at which the workstation runs as a percentage of its designed speed.
- Performance = (number of items produced * cycle time from the routing) / reported run time
- If the cycle time in the routing is too long, then performance may go over 100% (marked with red). If this happens often, it may mean that routing should be adjusted and cycle time should be reduced.
- If performance is greater than 100%, a value of 100% is used when calculating the OEE. - Quality represents the good items produced as a percentage of the total items produced.
- If the function Quality Control is used, then Quality = number of approved items / total number of produced items.
- If the Quality Control functionality is not used, then Quality = 100%.
Total effective equipment performance (TEEP) measures OEE against calendar hours, indicating how much more effectively could production perform if machines would be loaded 24 hours every day.
- TEEP = total planned time / (time horizon in days * 24 * 60) * OEE
Workstation Reports
Each workstation has a number of statistical reports which can be accessed from Production planning -> Workstations by clicking on Reports Reports button on a workstation's line.
Jump to report:
- Calendar - calendar overview of the master production schedule of this workstation colored by status.
- Production operations - list of operations assigned to this work station.
- Equipment usage chart - loading information of this workstation.
- Overall equipment effectiveness - statistical indicators of performance.
- Maintenance - maintenance history.
Report “Calendar”
The report shows the calendar (month, week or day) of all production operations of this workstation colored by status.
Clicking the Choose options allows choosing which information to display on the calendar.
The backdrop color indicates the current progress:
- Not started, the planned start time is in the future;
- In progress;
- Paused;
- Finished;
- (Red striped) Not started, but should have been started. The planned start time has passed.
The text color indicates the status of parts availability:
- Not booked - all required parts are not booked;
- Delayed - all parts are booked and ordered. some parts will become available after the planned start time of the manufacturing order;
- Expected - all parts are booked and ordered. Some parts have not yet been received but will arrive according to the schedule;
- Received - all parts are booked and in stock.
Report “Production operations”
The report shows a detailed list of manufacturing operations and their progress in real time.
Report “Equipment usage chart”
The report shows the loading of workstations over time as a line graph. The vertical axis of the graph can be set to either percentage or hours.
Report “Overall equipment effectiveness”
This report shows overall equipment effectiveness (OEE) of the workstation during the period.
OEE is calculated in real time when manufacturing operations are performed.
For calculating OEE for past periods, select the desired period (up to 1 month long) and click Calculate button.
OEE shows how well a manufacturing unit performs. OEE = Availability x Performance x Quality, where
- Availability represents the percentage of real run time compared to the planned time.
- Availability = reported run time / planned time
- If work has reportedly taken more time than planned then Availability can go over 100% (marked with red). If this happens often, it may mean that routing should be adjusted and cycle time should be increased.
- If Availability is greater than 100%, a value of 100% is used when calculating the OEE. - Performance represents the speed at which the workstation runs as a percentage of its designed speed.
- Performance = (number of items produced * cycle time from the routing) / reported run time
- If the cycle time in the routing is too long, then performance may go over 100% (marked with red). If this happens often, it may mean that routing should be adjusted and cycle time should be reduced.
- If performance is greater than 100%, a value of 100% is used when calculating the OEE. - Quality represents the good items produced as a percentage of the total items produced.
- If the function Quality Control is used, then Quality = number of approved items / total number of produced items.
- If the Quality Control functionality is not used, then Quality = 100%.
Total effective equipment performance (TEEP) measures OEE against calendar hours, indicating how much more effectively could production perform if machines would be loaded 24 hours every day.
- TEEP = total planned time / (time horizon in days * 24 * 60) * OEE
Report "Maintenance"
This report shows the maintenance history of the workstation.
Read: How to schedule and perform workstation maintenance?
Workstation Groups
The Production planning -> Workstation groups section contains a list of all workstation groups.
Jump to:
- What is a workstation group?
- What is a workstation?
- Workstation group's properties.
- Workstation group's reports.
What is a workstation group?
A workstation group is a group of workstations that can all do the same tasks. For example,
- A "CNC" workstation group with five CNC machines;
- An "Assembly" workstation group with two assembly tables;
- A "Heat treatment" workstation group with one oven.
Workstation groups together with workstations define your production capacity.
Note that:
- Workstation groups are necessary for the software for it to be be able to pick a suitable and available workstation for an operation.
- A workstation must must belong to a workstation group.
- A workstation can only belong to one workstation group.
- Workstations from different sites can be included in one workstation group.
- When defining an operation in a product's routing a corresponding workstation group must be chosen. Only during production scheduling, a specific workstation is assigned by the system.
| Workstation group | Workstation | Default worker | Workstation's hourly rate | Productivity |
| Workstation group A | Workstation A1 | Worker A | 50 | 1 |
| Workstation A2 | Worker B | 50 | 1 | |
| Workstation group B | Workstation B1 | Department B | 15 | 1 |
| Workstation B2 | Department B | 15 | 1 | |
| Workstation B3 | Department B | 30 | 3 |
Workstation Group Details
The workstation details page, accessible from Production planning -> Workstation groups, shows the configuration and information of a workstation. A workstation group is a group of similar workstations.
This page allows:
- editing the general properties of a workstation,
- adding custom holidays,
- specifying custom working hours,
- specifying the workstation group's color.
Jump to:
Workstation Group Properties
All workstation groups (WSGs) have the following properties:
- Number is a unique code for this group of workstations.
- Name is the name of the group.
- Type defines how the workstation group behaves during scheduling:
- Active processing - for normal operations constrained by capacity (the number of available workstations) and working hours. The workstation group has a finite number of manned workstations.
- Passive processing - for operations not constrained by capacity and working hours. This is useful for waiting steps (e.g., drying, cooling, quarantine).
- This group is available 24/7 (apart from the defined holidays on the WSG or company level).
- This group does not have workers or hourly rates. This also means that the operations do not have any labor or applied overhead costs.
- The operation duration is a single cycle time for any quantity (e.g., if the drying time is 60 minutes, the operation, regardless of quantity, will complete in 60 minutes).
- Setting the number of instances, hourly rates, and custom working hours is unavailable.
- Note: The Type can be selected only when creating the workstation group.
- Custom holidays provide an option to define custom free days different from those defined for the company under Settings -> System settings -> Holidays.
- Color is the color for operations that are performed on workstations of that group in the following calendars:
- The Gantt chart at Production planning -> Production schedule -> Gantt chart
- The Execution report at Customer -> All customers summary reports
If the type of workstation group is set to Active processing, the following additional properties become available:
- The number of instances is used during group creation only, for automatically creating up to 20 workstations. More can be added at Production planning -> Workstations.
- Hourly rate is used during group creation only. It allows assigning an hourly rate to all automatically created workstations. Once the workstation group is saved, the hourly rate can be edited in particular workstation details at Production planning -> Workstations.
- Custom working hours provides an option to define custom working hours different from those defined for the company under Settings -> System settings -> Work hours.
Workstation Group Reports
Each workstation group has a number of statistical reports which can be accessed from Production planning -> Workstation groups by clicking on Reports button on a workstation group's line.
Jump to report:
- Calendar - calendar overview of the master production schedule of this workstation colored by status. Possible to click-and-drag reschedule operations.
- Equipment usage chart - loading information of this workstation.
- Overall equipment effectiveness - statistical indicators of performance.
- Engagement - the list of routings this workstation group belongs to.
Report “Calendar”
The report shows the calendar (month, week or day) of all production operations of this workstation colored by status. It's possible to reschedule operations by clicking-and-dragging.
Clicking the Choose options allows choosing which information to display on the calendar.
The backdrop color indicates the current progress:
- Not started, the planned start time is in the future;
- In progress;
- Paused;
- Finished;
- (Red striped) Not started, but should have been started. The planned start time has passed.
The text color indicates the status of parts availability:
- Not booked - all required parts are not booked;
- Delayed - all parts are booked and ordered. some parts will become available after the planned start time of the manufacturing order;
- Expected - all parts are booked and ordered. Some parts have not yet been received but will arrive according to the schedule;
- Received - all parts are booked and in stock.
Report “Equipment usage chart”
The report shows the loading of workstations over time as a line graph. The vertical axis of the graph can be set to either percentage or hours.
Report “Overall equipment effectiveness”
This report shows overall equipment effectiveness (OEE) of the workstations during the period.
OEE is calculated in real time when manufacturing operations are performed.
For calculating OEE for past periods, select the desired period (up to 1 month long) and click Calculate button.
OEE shows how well a manufacturing unit performs. OEE = Availability x Performance x Quality, where
- Availability represents the percentage of real run time compared to the planned time.
- Availability = reported run time / planned time
- If work has reportedly taken more time than planned then Availability can go over 100% (marked with red). If this happens often, it may mean that routing should be adjusted and cycle time should be increased.
- If Availability is greater than 100%, a value of 100% is used when calculating the OEE. - Performance represents the speed at which the workstation runs as a percentage of its designed speed.
- Performance = number of items produced * cycle time from the routing / reported run time
- If the cycle time in the routing is too long, then performance may go over 100% (marked with red). If this happens often, it may mean that routing should be adjusted and cycle time should be reduced.
- If performance is greater than 100%, a value of 100% is used when calculating the OEE. - Quality represents the good items produced as a percentage of the total items produced.
- If the function Quality Control is used, then Quality = number of approved items / total number of produced items.
- If the Quality Control functionality is not used, then Quality = 100%.
Total effective equipment performance (TEEP) measures OEE against calendar hours, indicating how much more effectively could production perform if machines would be loaded 24 hours every day.
- TEEP = total planned time / (time horizon in days * 24 * 60) * OEE
Report “Engagement”
The report shows the list of routings that contain operations, which are performed on workstations of this group.
Bills of Materials
The section Production planning -> BOMs contains a list of all the bills of materials.
From here, it is possible to
- edit and add Bills of Materials,
- import new or update existing Bills of Materials via CSV upload,
- bulk replace, remove, or add parts in selected Bills of Materials,
- see the reports of each BOM,
- export the bills of materials to a CSV file, which can be imported back into MRPeasy. (A Matrix BOM cannot be exported/imported via CSV.)
Jump to:
- What is a Bill of Materials (BOM)? How is it used in material planning?
- How to add a Bill of Materials in MRPeasy?
- How to create a multi-level BOM?
- How to import a BOM?
- How to update many BOMs at once?
- How is the cost of the BOM estimated?
- How is the actual cost of materials for a product calculated?
- How to update the BOM of already planned Manufacturing Orders?
- How to find the BOMs where an item is used ("Where used" / "Engagement" report)?
Importing BOM from a CSV file
At Production planning -> BOMs -> Import from CSV it is possible to upload many bills of materials at once, e.g. a BOMs for separate products and/or multi-level BOMs. It's also possible to update existing BOMs via CSV upload.
Jump to:
- Demo video: Importing data.
- Importing new BOMs.
- Example import table and file.
- Importing a multi-level BOM.
- Updating existing BOMs.
- Important notes.
- Troubleshooting.
What is CSV? CSV (Comma-Separated Values) is a universal format for importing or exporting tabular data. A CSV file can be obtained by saving/exporting e.g. an Excel file as CSV (Comma delimited) (*.csv).
When uploading the CSV file:
- Select and match the names of the fields corresponding to the columns in the data.
- Check the "The first row is heading" option if the first row of the file contains headers. Then the first row will not be imported.
- Select "Do not import" as the column type if some column is not to be imported.
- Click Import to upload the data into the appropriate fields of the database.
- If importing some data failed, a skip file will be generated and downloaded to your computer, which indicates all errors line-by-line.
Importing new Bills of Materials
When uploading Bills of Materials, the fields that can be used are:
| Product number* |
The product's ID number (item code), as in Stock -> Items. This is the "Product" to which the "Part" belongs. Required. If a BOM number is absent, or a new BOM is created, the product's ID number is required on every row (this allows importing several BOMs for several products at once. E.g. a Sub-assembly "Product" code is the sub-assembly item code, etc.). |
| Part No.* |
The part's ID number (article code), as in Stock -> Items. This "Part" belongs to the BOM of the "Product". |
| Quantity* |
The quantity per unit of "Product". Required. If the product has parameters (Matrix BOM functionality) that change the quantity of raw materials, all quantity columns are filled with this number. |
| Unit of measurement |
The unit of measure for the material. This field must be used if the quantity is not specified in the primary unit of measure, but in a secondary unit. |
| BOM number |
The BOM's ID number. If present, lines with parts are grouped into bills of materials by this column. If the BOM number is absent, lines with parts are grouped by product. If a BOM with this number exists, it will be updated. If a BOM with this number does not exist, a new BOM is created. If present, the BOM's number is required on every row. |
| BOM name |
Name of a BOM. |
| Relation number |
The relation's ID number. A line can contain either by a part number or relation number, but not both. Available, if the Matrix BOM functionality is enabled. |
| Notes |
Any notes, e.g. handling instructions. |
| Fixed quantity |
A fixed (pre-defined) amount of item which is always consumed in a manufacturing order, not proportional to the order quantity. Available, if function Fixed quantity is enabled. |
For example, importing 2 Bills of Materials:
| Product | Part | Quantity | Notes |
| PROD-1 | PART-01 | 5 | BOM of PROD-1, line 1: raw material PART-01, quantity 5 |
| PROD-1 | PART-02 | 7 | BOM of PROD-1, line 2: raw material PART-02, quantity 7 |
| PROD-2 | PART-15 | 3 | BOM of PROD-2, line 1: raw material PART-15, quantity 3 |
| PROD-2 | PART-16 | 9 | BOM of PROD-2, line 2: raw material PART-16, quantity 9 |
| (Up to 3000 lines can be imported at once) | |||
Download a sample file: import-boms.csv
Importing a multi-level BOM
At Production planning -> BOMs -> Import from CSV, it is possible to import multi-level BOMs.
Importing a multi-level BOM works the same way as importing several different BOMs at the same time:
- Each sub-assembly is a separate item, with its own product code.
- Each sub-assembly has its own BOM.
- Sub-assemblies are used as parts in a higher level BOM, which connects the multi-level BOM structure.
For example, the file structure for a multi-level BOM with 3 levels, 4 BOMs:
| Product | Part | Quantity | Notes |
| PROD-1 | SUB-1 | 1 | BOM of PROD-01 (final assembly), line 1: sub-assembly SUB-1, quantity 1 |
| PROD-1 | SUB-2 | 1 | BOM of PROD-01 (final assembly), line 2: sub-assembly SUB-2, quantity 1 |
| SUB-1 | PART-15 | 2 | BOM of SUB-1 (sub-assembly), line 1: raw material PART-15, quantity 2 |
| SUB-1 | PART-16 | 3 | BOM of SUB-1 (sub-assembly), line 2: raw material PART-16, quantity 3 |
| SUB-2 | PART-17 | 4 | BOM of SUB-2 (sub-assembly), line 1: raw material PART-17, quantity 4 |
| SUB-2 | SUB-3 | 1 | BOM of SUB-2 (sub-assembly), line 2: sub-assembly SUB-3, quantity 1 |
| SUB-3 | PART-18 | 5 | BOM of SUB-3 (sub-assembly), line 1: raw material PART-18, quantity 5 |
| SUB-3 | PART-19 | 6 | BOM of SUB-3 (sub-assembly), line 2: raw material PART-19, quantity 6 |
| (Up to 3000 lines can be imported at once) | |||
Updating existing Bills of Materials via CSV upload
At Production planning -> BOMs -> Import from CSV it is possible to update existing Bills of Materials by uploading a CSV file containing the new BOMs.
Upload a CSV file with bills of materials as described in the help section "Import BOM from a CSV file". A BOM is updated if:
- the file contains a column with a BOM number, and a BOM with this number exists,
- or the file does not contain a column with a BOM number, a column with a product is selected, and the product has a BOM.
Alternatively, it is possible to bulk update one part in selected BOMs at Production planning -> BOMs -> Substitute a part.
After upload, to update the BOMs of planned Manufacturing Orders:
- Open a BOM.
- Press Save.
- Proceed to update the MOs.
Important!
- If the imported file contains non-Latin characters, the file must be in UTF-8 (preferred) or Unicode encoding. If Excel is used to save the file, select the "Unicode Text (*.txt)" option in the "Save as type" field. Even though the extension of the file is TXT, it can be imported as a CSV file.
- The limit is 3000 lines per upload. If the file is bigger, divide it into several smaller files.
- Since importing can be a question of trial-and-error, we strongly suggest making a back-up of the database before importing. In that case, if anything goes wrong, it is always possible to restore the previous session.
Issues when importing a BOM from CSV
If the importing of some data failed, a skip file will be generated and downloaded to your computer, which indicates all errors line-by-line.
Common issues:
- Part numbers in the import file and in MRPeasy do not match. Please use only part numbers to refer to stock items.
- If your part numbers are numerical, it may happen that your spreadsheet program thinks of these as integers or decimals. Then, it may perform unwanted rounding or removal of leading/trailing zeroes (e.g. part number 0123,4560 could be changed to 123,46). Check your CSV file for such issues. - Some parts (or the product) have not been created. All stock items must exist in the software before importing BOMs.
- Incorrect formatting of the import file. Please check that the file contains a column with a product's part number and that this number is set on every line of the BOM.
- Select the correct columns. You must manually select the correct data type for each column if these are not automatically correctly selected.
Substitute part
The Production planning -> BOMs -> Substitute a part in all BOMs allows bulk editing many Bills of Materials.
This page allows adding, removing, or replacing a part in selected bills of materials, all of which are within selected filters at Production planning -> BOMs.
For editing bills of materials in bulk:
- For replacing an old part with a new one, select both parts.
- For removing a part, select the old part only.
- For adding a part, select the new part only.
How to select which Bills of materials to update?
- Changes apply to bills filtered on the previous page, the Production planning -> BOMs page.
- If some filters have been set to find particular bills of materials, only these bill are updated.
- If no filters have been set, all bills of materials are updated.
- When searching, you can use search operators and wildcards (_, %, &&, ||).
Please note that it may be not possible to undo changes. Because of that, it is advised to backup your database in Settings -> Database maintenance.
Routings
The section Production planning -> Routings contains the list of all the routings.
From this page, it is possible to
- edit and add Routings,
- import new or update existing Routings via CSV upload,
- to see the rough estimate cost of the Routing (to get an accurate estimate you need to create a MO).
Jump to:
- What is Routing? How is it used in production planning?
- How to enter a Routing in MRPeasy?
- How is the operation duration calculated?
- How are the manufacturing overhead and labor costs calculated?
- How are operations assigned to workers? How to set default workers or departments?
- Examples of Routings.
- How to update the Routings of already planned Manufacturing Orders?
- How to export a Routing?
- How to import a Routing?
Importing Routings from a CSV file
At Production planning -> Routings -> Import from CSV it is possible to upload the routings for several products at once. Also, it's possible to update existing routings.
Jump to:
- Demo video: Importing data.
- Importing new routings.
- Example table and file.
- Updating existing Routings.
- Important notes.
What is CSV? CSV (Comma-Separated Values) is a universal format for importing or exporting tabular data. A CSV file can be obtained by saving/exporting e.g. an Excel file as CSV (Comma delimited) (*.csv).
When uploading the CSV file:
- Select and match the names of the fields corresponding to the columns in the data.
- Check the "The first row is heading" option if the first row of the file contains headers. Then the first row will not be imported.
- Select "Do not import" as the column type if some column is not to be imported.
- Click Import to upload the data into the appropriate fields of the database.
- If importing some data failed, a skip file will be generated and downloaded to your computer, which indicates all errors line-by-line.
Importing Routings
When uploading Routings, the fields that can be used are:
| Routing number |
The routing's ID number. If present, lines with operations are grouped into routings by this column. If the routing number is absent, lines with operations are grouped by product. If a routing with this number exists, it will be updated. If a routing with this number does not exist, a new routing is created. If present, the routing number is required on every row. |
| Routing name |
Name of a routing. |
| Product* |
The part number of the product, as in Stock -> Items. If a routing number is absent, or a new routing is created, the product's ID number is required on every row (this allows importing routings for several products at once. E.g. Sub-assembly Routing Product code is the sub-assembly code). |
| Workstation group* |
The code or the name of the workstation group. If the workstation group does not exist, a new one will be created. |
| Vendor |
The code or the name of the vendor. Available, if the Subcontracting functionality is enabled. |
| Operation |
Free text description of the operation. |
| Setup time |
Fixed time in minutes for preparing/setting up the operation. |
| Cycle time |
Time in minutes per cycle of making "Capacity" (default 1) of products. |
| Fixed cost |
The default cost per "Setup time" (manufacturing overhead cost). The "Hourly rate" in the workstation details overrules this setting during actual scheduling. (Fixed cost = Setup time / 60 minutes * Hourly rate) |
| Variable cost |
The default cost per "Cycle time" (manufacturing overhead cost). The "Hourly rate" in the workstation details overrules this setting during actual scheduling. (Variable cost = Cycle time / 60 minutes * Hourly rate) |
| Capacity |
The number of products produced per "Cycle time". If not imported, defaults to "1". |
| Department/Worker |
The number or name of the department, or the username of the worker assigned by default. The "Default worker" in the workstation's details overrules this setting during actual scheduling. For several workers, separate the list with a comma (,). If your CSV separator is also a comma, then the list must be quoted ("worker1, worker2"). |
| Subtasks |
An ordered list of subtask descriptions for the operation. For several subtasks, separate the list with a new line. |
| Piece-payment |
The cost per piece paid to the worker (labor cost). Available, if the Piece Payment functionality is enabled. |
| Overlap |
The minimal processed quantity of the previous operation before this operation can start, if this operation should start before the last operation fully finishes (i.e. the subsequent operations overlap). Warning: If subsequent operations are not balanced (i.e. equal lengths), or 2nd longer than 1st, then a too low value can fragment this operation into several pieces (depending on total MO quantity). Available, if the Overlap function is enabled. |
| Parallelize (1/0) |
Enable (1), if the production run should be divided into smaller parallel operations among all available workstations of the same group. Available, if the Parallel Execution of Production Operations function is enabled. |
| Operation order number |
The line number (ID) of the operation in the routing. Optional. If missing, operations will be sorted in the order they appear in the import file. If used, must be defined on all lines. The numbers must start from 1 and be incremented with a step of 1. |
| Sequence | The number(s) (ID) of the operation(s) which must be completed, before this operation can start.
Optional. If missing, the sequence corresponds to the order of operations. If used, must be defined on all lines. At least one line must be 0, so it could start immediately. Separate several values with a comma, e.g. “1,2,4”. Available, if the Overlap and Special Sequences functionality is enabled. |
For example, importing routings for two products:
| Product | workstation group | Operation | Setup time | Cycle time | Fixed cost | Variable cost | Capacity | Department |
| IA-0004 | Woodworks | Assembling | 30 | 15 | 10 | 5 | 1 | |
| IA-0004 | Paint room | Painting | 5 | 10 | 1 | |||
| IA-0005 | CNC | Machining | 180 | 5 | 1 | CNC operators | ||
| IA-0005 | Oven | Heat treatment | 120 | 100 | Heat treating | |||
| (Up to 3000 lines can be imported at once) | ||||||||
Download a sample file: import-routings.csv
Updating existing Routings via CSV upload
At Production planning -> Routings -> Import from CSV it is possible to update existing Routings by uploading a CSV file containing the new Routings.
Upload a CSV file with routings as described in the help section "Import Routings from a CSV file". A routing is updated if:
- the file contains a column with a routing number, and routing with this number exists,
- or the file does not contain a column with a routing number, a column with a product is selected, and the product has a routing.
After upload, to update the routings of planned Manufacturing Orders:
- Open a routing.
- Press Save.
- Proceed to update the MOs.
Important!
- If the imported file contains non-Latin characters, the file must be in UTF-8 (preferred) or Unicode encoding. If Excel is used to save the file, select the "Unicode Text (*.txt)" option in the "Save as type" field. Even though the extension of the file is TXT, it can be imported as a CSV-file.
- The limit is 3000 lines per upload. If the file is bigger, divide it into several smaller files.
- Since importing can be a question of trial-and-error, we strongly suggest making a back-up of the database before importing. In that case, if anything goes wrong, it is always possible to restore the previous session.
Statistics
The Production planning -> Statistics page shows statistical reports generated based on manufacturing orders.
- The reports can be selected from the drop-down menu.
- The period of a report can be custom-defined or selected from pre-defined options.
- Reports can be saved in PDF or CSV.
Jump to:
- Notes.
- Costs by manufacturing orders - real-time costs of manufacturing orders.
- Costs by products - cost information by product.
- Manufacturing efficiency - the estimated (standard) costs and times versus reported, and the variation.
- Shortages - a list of not booked or delayed parts.
- Revenue and profit by manufacturing orders - revenue and profit information by manufacturing order.
Notes
- Costs are displayed in real-time as soon as materials are consumed and/or operations are finished in My production plan or Internet-kiosk.
- Planned values are saved when MO is started (not when it is created). All changes that are made before starting a MO are considered as planned. Changes that are made after starting a MO are considered as not planned in advance.
- A manufactured item's cost = The cost of materials consumed in production + Manufacturing overhead + Labor cost
- The materials, overhead, and labor costs are not pure costs, in the case of Manufacturing Orders that use components produced in other Manufacturing Orders. The total cost of the component produced in another MO is considered as the cost of materials for this particular MO. For example:
- MO 1 produces 1 unit of assembly A, which is used in MO 2.
- MO 1 total cost for producing 1 unit of this assembly A is $3 = $1 materials + $1 overhead + $1 labor.
- In MO 2, assembly A cost of $3 is considered as the "cost of materials", and not divided into its individual components.
Report "Costs by manufacturing order"
The report displays costs by period broken down by manufacturing order.
- Only results and expenses during the period are included in the report. I.e., if materials were not consumed and no reported operations are within the report's period, the MO will not be listed.
Statistics include:
- Part number and description
- Quantity
- Total cost
- Cost per unit
- Cost of materials (not pure)
- Applied manufacturing overhead (not pure)
- Labor cost (not pure)
- Cost overrun
- The difference between the estimated cost and actual cost. Displayed for finished Manufacturing Orders only.
- Cost overrun per item
- The difference between the estimated cost and actual cost. Displayed for finished Manufacturing Orders only.
- Customer orders
- Sale amount
- The selling price from the customer order, regardless of the selected period.
Report "Costs by product"
The report displays costs by period broken down by product.
- Only results and expenses during the period are included in the report. I.e., if materials were not consumed and no reported operations are within the report's period, the MO will not be listed.
Statistics include:
- Part number and description
- Quantity
- Total cost
- Cost per unit
- Cost of materials (not pure)
- Applied manufacturing overhead (not pure)
- Labor cost (not pure)
Report "Manufacturing efficiency"
This report gives a good overview of the manufacturing effectiveness by showing planned vs actual data of manufacturing orders.
It includes all data - not only data from the selected period - about MOs which are
- active now, or
- have been finished within the selected period.
Statistics include:
- Part number and description
- Quantity
- Actual vs planned duration
- Actual vs planned total cost
- Actual vs planned cost per unit
- Actual vs planned cost of materials (not pure)
- Actual vs planned applied overhead cost (not pure)
- Actual vs planned labor cost (not pure)
Report "Shortages"
The report is available if Tracing is enabled.
This report shows not booked parts from planned manufacturing orders, or parts that will be received after the manufacturing order is started.
Statistics include:
- MO number
- MO start date
- MO due date
- Part number and description
- Quantity
- Part status
- Source - the purchase or manufacturing order that will deliver the part.
- Available from - date when the part will be available.
- Lot - number of the stock lot from which the part is booked.
Report “Revenue and profit by manufacturing orders”
This report displays revenue and profit grouped by manufacturing order.
- The report displays only those MOs for which any finished products have been sold through customer orders.
- The period selection filters MOs whose start date or finish date falls within the selected period.
Statistics include:
- Total cost - the total cost of manufacturing.
- Unit cost - the cost per manufactured unit.
- Sold quantity - the number of products booked and/or shipped for any customer order.
- Revenue - the total sales revenue from the MO’s produced items.
- Average unit revenue - the average revenue per sold unit.
- Profit - the profit earned from the MO’s produce, calculated as (Average unit revenue – Unit cost) × Sold quantity.
Production Reporting - For Worker
There are two alternative views which the worker can use to see his/her jobs and report progress:
- My production plan - a full-functionality view, intended to be accessed by a computer or a large screen tablet.
- The Internet-kiosk - a simpler view, intended to be used on a smartphone or a tablet.
My production plan is an advanced mode that shows the worker's schedule as a calendar, provides all details of manufacturing orders and allows more precise reporting.
Internet-kiosk is a mode that is optimized for reporting using portable devices. It shows a list of manufacturing operations that are assigned to the worker and allows to report the progress of the manufacturing order.
Frequently asked questions
Assigning operations to workers:
- How to assign an operation to a worker? How to set default workers?
- How to re-assign a worker in a MO?
- How to edit an operation, e.g. to fix input mistakes?
- How to print the worksheet (job traveler, job sheet)?
- What is a Department?
- How to plan works by departments? How to assign operations to departments?
Reporting in the My production plan:
- Demo video: Real-time production reporting by workers.
- Where and how to report production operations?
- What is My production plan?
- How to report operations in My production plan?
- How to report used materials?
- How to finalize a Manufacturing Order?
- How to report serial numbers?
- How to change the visibility of other operations?
- How to report if the final MO quantity changes while the production is in progress?
- Report scrap, wastage.
- Demo video: How to use the "My Production Plan".
Reporting in the Internet-kiosk:
- Demo video: Real-time production reporting by workers.
- Where and how to report production operations?
- What is Internet-kiosk?
- How to access the Internet-kiosk?
- How to report operations in Internet-kiosk?
- How to report materials?
- How to finalize the manufacturing order?
- How to report serial numbers?
- How to access attachments (advanced mode)?
- How to use one device by many workers for access and reporting?
- How to report if the final MO quantity changes while the production is in progress?
- Report scrap, wastage.
Jump to other FAQs:
My Production Plan
My production plan section is for the worker to see his/her personal schedule and report production operations and used materials in real time. It is an alternative to the simplified Internet-kiosk.
In My production plan, the following operations can be seen:
- operations assigned to the user
- operations assigned to the departments in which the user is located.
Jump to:
- Demo video: Real-time production reporting by workers.
- Configuring and accessing the My production plan.
- Production reporting in My production plan.
- Production reporting FAQ
Color coding in the calendar
The backdrop color in the calendar view indicates the status of the operation:
- Not started, the planned start time is in the future;
- The operation has been reported started;
- Paused;
- Finished;
- (Red striped) Overdue. Should have been already started, if not started. Should have been already finished, if not finished.
The text color indicates the availability and status of parts.
Access to the My production plan
To access the My production plan:
- Open a user's details page at Settings -> Human resources -> Users.
- Give access rights to the "My production plan".
This user will see the My production plan section after they log in.
It is possible to configure the visibility of how many other operations the worker sees from the same Manufacturing order.
Manufacturing Order Details For Worker
This page is a detailed production reporting view for the worker. The page is accessible from:
- My production plan section when opening a Manufacturing Order details.
- Production planning -> Manufacturing orders -> MO details by pressing Go to production.
Jump to:
- Starting and finishing:
- Quantity of processed products:
- Used materials:
- Visibility of other operations.
Recording the progress of operations
- Scroll down to the Operations section and find the operation line.
- Press Start Start to start work.
- Press Pause Pause if the operation is stopped, but it is not finished yet.
- Press Finish Finish when the operation is fully completed.
The button press times are recorded and accordingly, the actual labor hours are calculated.
Completing subtasks
If subtasks have been defined for an operation, they are shown in a table below the operation line.
To complete a subtask:
- Find the operation in the Operations section.
- Check the Status checkbox next to the subtask. The time and your username are saved automatically.
- To undo, uncheck the checkbox. The saved time and username are removed.
It is possible to add or edit a free-text note at any time by clicking the Worker’s note area on the subtask row. Notes can be changed regardless of whether the subtask is completed, and do not affect the completion status.
The operation can be finished without all subtasks being completed.
Finishing the Manufacturing Order
- Finish all operations.
- Press Finish production on top of the page.
- If all parts have been consumed, the system will mark the manufacturing order as done.
- If some parts have not been consumed, then two options will be presented:
Consume all – consume all booked parts.
Release unused – bookings will be canceled. A note will be added to the MO stating the difference between planned vs reported materials.
After making a decision, press Finish production again.
Reporting the number of processed products
Operation conducted on active processing workstations
- Start an operation.
- When you press the Pause Pause or the Finish Finish button the software will ask you how many items were completed from the last start.
- Enter the quantity.
- If the operation has been stopped several times, make sure to enter the quantity from the last start.
- If there are additional or side-products defined in the BOM, also report the quantities of these that should be placed in stock.
Operation conducted on passive processing workstations
- Press the Start button. The software will prompt you to define how many items start the operation.
- You can enter up to the quantity produced for this MO (or the current subassembly in a multi-level MO) that has yet to start this step.
- Press the Finish button when the passive operation has ended. The software will record the finishing time as the Actual finish.
- After the passive operation is finished, the Start button will be displayed again on the line and marked with a yellow background. This can be used to return that quantity back to processing, in which case the Actual finish will be cleared.
- To report additional quantity:
- If you haven't reported the maximum allowed quantity yet, press Start on the next line to begin the same operation for the remaining items.
- Alternatively, if the data reported previously needs to be corrected, this can be done by editing the operation in the MO details.
Reporting over- or underproduction:
- Enter the actual quantity of products, when asked.
- If the reported quantity of the final operation differs from the initially planned quantity, the software will display a confirmation dialogue. If confirmed, the quantity of the MO is updated.
- The MO quantity can also be updated by the production manager at any time.
- See also: Sub-assembly overproduction in a multi-level MO.
Reporting used materials
Materials consumption can be reported in bulk while finishing the Manufacturing Order.
To report materials consumption individually:
- Press Consume Consume next to the part.
- Or scan the item or stock lot barcode.
- Enter the number of used parts.
- If the quantity is greater than what is booked, extra will be taken from stock.
- To undo consumption, enter the quantity with a negative (-) number.
To report materials consumption in bulk, according to the number of finished goods:
- Press Consume parts for end-products above the materials table.
- Enter the number of finished goods.
- The software consumes all booked parts proportionally.
Consumed quantity = Entered quantity x (Booked quantity / MO planned quantity) - When the "Packing" functionality is used, the packaging will not be consumed automatically. It must be consumed manually.
- The software consumes all booked parts proportionally.
Adding materials to the MO
If some additional part, that was not on the list of materials, has been used:
- Press the Add a booking (+) on the top right corner of the Parts list.
- Select the part.
- Enter the quantity.
-
If Tracing is enabled, you will see a list of available stock lots to choose from.
Enter the desired quantity next to each stock lot you wish to book.
-
If Tracing is enabled and you want to book materials from a specific stock lot:
- Press the Increase booking (+) on the material's line.
- You will see a list of available stock lots to choose from.
- Enter the desired quantity next to each stock lot you wish to book.
Internet-kiosk
The Internet-kiosk gives a simple way for workers to report shop-floor progress. It is a simplified alternative to the My production plan.
In the Internet-kiosk, the production operations assigned to the user or the user's departments can be seen.
The concept is that the worker must take the uppermost operation and complete it:
- Operations with the earliest start time are shown first.
- If the two operations have the same start time, the one with the lower operation number in the MO is shown first.
- Completed operations of the unfinished MO-s are at the end of the list. (Operations of finished MOs are removed.)
The Internet-kiosk advanced mode enables additional functionality.
Jump to:
- Demo video: Using the "Internet-Kiosk"
- Access to the Internet-kiosk.
- Configure visibility of operations.
- Internet-kiosk advanced mode.
- Access to attached files.
- Report operation's start, finish, and quantity.
- Finishing the Manufacturing Order.
- Materials used in production.
- Report serial numbers.
- Multiple users on one device.
- Color coding.
Report production operations
To perform manufacturing operations and record start-stop:
- Click on the Start Start button at the work operation’s line to start work.
- Click on the Pause Pause button, if the operation is stopped, but it is not finished yet. The software will ask to enter the quantity, how many items were completed from the last start (if left empty, defaults to 0). Click Start again to resume.
- Click on the Finish Finish button, when the operation is fully completed.
The software will ask to enter the quantity, how many items were completed from the last start (if left empty, defaults to match the order quantity).
Only the operations conducted on the active processing workstations can be reported from the Internet-kiosk. The passive processing operations have to be reported directly in the MRPeasy software.
Completing subtasks
If an operation has subtasks, they are shown in a table below the operation.
To complete a subtask:
- Expand the subtask table for the operation.
- Check the Status checkbox next to the subtask. Your username and the time are saved automatically.
- To undo, uncheck the checkbox. This can be done as long as the MO is not finished.
You can add or edit a note by clicking the note area on the subtask row. Notes are shown in italics and can be changed at any time, regardless of whether the subtask is completed.
Color coding
The color of the Start button indicates the status of the operation:
- Not started
- Paused
- Finished
Finish the Manufacturing Order
When the last operation is finished in the Internet-kiosk, then the order is automatically finished:
- all booked parts will be consumed,
- finished products will be available in stock,
- if more materials were required than were booked and could be consumed accordingly to the BOM, a note is added to the Manufacturing Order.
- if the final reported quantity differs from the order quantity, a note is added to the Manufacturing Order.
Materials used in production
When Internet-kiosk Advanced mode is enabled, it is possible to see materials in the Internet-kiosk.
When using the Internet-kiosk, all materials are marked consumed automatically after the completion of the first production operation.
For manual reporting of materials, My production plan should be used.
Report serial numbers in production
When Internet-kiosk Advanced mode is enabled, it is possible to track Serial numbers:
- To record a serial number for the final product, click the Serial numbers button.
- If serial numbers of the parts must also be recorded, then when specifying the serial number of the finished product, it is possible to select items used and add serial numbers for each (according to the stock lots of parts booked for this order).
The kiosk user must have Create rights to serial numbers to access serial number reporting.
Multiple workers reporting on one device
Several workers can use one device to access their production plans and reporting.
- When logged in, move your mouse over your username Current user on the top right corner of MRPeasy.
- A list of currently signed-in users appears.
- Click on a username to change the user.
- Click on the User sign in Sign in with another user button, to log in with a user, who is currently not signed in from this device.
Signing out:
- Move your mouse over your username Current user on the top right corner of MRPeasy.
- Click Log out after the username, to log a user out.
- If you close the browser, all users will be logged out.
CRM Section - For Sales
The CRM section is a complete Customer Relationship Management system, which allows:
- managing customer orders,
- tracking orders through the sales pipeline from quotation to shipping,
- create quotations and invoices, tracking payments,
- seeing sales statistics,
- managing price lists,
- managing customers and next contact dates,
- handling customer returns,
- seeing cashflow forecasts,
- seeing the profit and loss statement for the entire company or by customers.
The CRM section has the following sub-sections:
- Customer Orders - an overview of all the orders from the customers.
- Customers - a list of all the customers, and their reports.
- Today's contacts - a list of customers you need to contact today.
- Invoices - a list of all invoices, quotations, and order confirmations.
- Pricelists - a list of all your sales price lists. Available with the Tiered Pricing functionality.
- Cash flow forecast - week-by-week cash flow forecast for a selected period.
- Statistics - statistical reports based on shipped or partly shipped customer orders.
- Sales management - reports about the performance of sales staff per period. Available with the MRPeasy Enterprise package.
- Customer returns (RMAs) - a list of customer returns, i.e. the RMA orders. Available with the Return Merchandise Authorization functionality.
- Sales forecasting - AI-assisted sales forecasts for planning demand for products. Available with the Sales Forecasting functionality.
CRM - Frequently Asked Questions
Working with Customer Orders:
- Demo video: Customer Orders.
- Working with a Customer Order.
- Send invoices, order confirmations, quotations.
- Estimate costs and lead time.
- Cost and profit calculation.
- Book products.
- Cancel or modify bookings.
- Ship products.
- Kitting: kits and bundles.
- Bespoke make-to-order, unique, one-time products.
- Customer Order statuses.
- Product statuses.
- Invoice statuses.
- Payment statuses.
- Import a Customer Order.
Customers:
- Contact information.
- Several delivery addresses, a separate billing address.
- Documents in another language.
- Credit limit.
- Default payment period for the customer.
- Import customers.
- Track interactions and next contact date.
Invoices, quotations:
- Send invoices, order confirmations, quotations.
- Prepayments.
- Credit-invoice, and/or receiving returned products.
- Edit document PDFs.
Pricelists:
Customer returns management:
- RMA order.
- RMA statuses.
- RMA types.
- Receive returned products.
- Inspect returned products.
- Refund only.
- Return and refund.
- Return and no refund.
- Repair or maintenance.
- Replacement.
- Reject a return.
- Add returned items into inventory.
Jump to other FAQs:
Customer Orders
The CRM -> Customer Orders section displays all the orders from the customers. New Customer Orders can be added from here.
Use the tab menu above the table to choose whether to show a list of "Customer orders" or a list of all "Items" ordered.
Click Sales pipeline and List view buttons to toggle between the sales pipeline and list views.
Jump to:
- Demo video: Customer Orders.
- Customer order details.
- Customer order reports.
- Customer order statuses.
- Product statuses.
- Source statuses.
- Invoice statuses.
- Payment statuses.
- CRM FAQ.
Customer Order, Product, Invoice, and Payment statuses
Customer Order Statuses
The CO statuses show the progress of one order through the sales process, from quotation through manufacturing until delivery.
Some statuses are assigned automatically by the software (for example if production starts, or finishes), some need to be assigned by the user, and some can be skipped.
- Quotation - a request for a quotation is received, a Quotation should be created and sent to the customer. This stage is equivalent to a Sales Opportunity. Assigned manually.
- Waiting for Confirmation - waiting for the customer's confirmation. Assigned manually.
- Confirmed - the order is confirmed. Either booking needs to be made for products that are available in stock, or production should be planned. Assigned manually.
- Waiting for Production - all Manufacturing Orders have been scheduled, and all goods are booked to the order. Assigned automatically.
- In Production - the production operations have started. Assigned automatically.
- Ready for Shipment - all products are in stock and can be shipped to the customer. Assigned automatically.
- A shipped CO still stays in the pipeline as Ready for shipment, when the booked quantity is bigger than needed.
- Shipped - this status shows that all products have been shipped. Assigned automatically.
- Delivered - this status confirms that CO is finished, products have been received by the customer. Assigned manually.
- Canceled - order is canceled. Assigned manually. As a result, all bookings are released. A canceled CO cannot be restored.
- Archived - archived using the “Archive old data” functionality.
Demo video: How to gain an overview of the status of all sales orders.
Product statuses
Product status shows the current situation with products on order (or when viewing "items", then the particular product.).
The following statuses are automatically assigned:
- Not booked - the products are not booked in full quantity.
- When Tracing is disabled, this status shows no demand for the items has been generated. Change the Customer orders status to Confirmed to book items.
- Not enough - the demand is generated, but there are not enough products for this order.
- The number of products currently in stock or planned is insufficient to fulfill this order.
- There will be insufficient products for this order after shipping orders with higher priority.
- In use only when Tracing is disabled.
- Requested – all products are booked. But some products are not ordered yet. Their stock lots have the status Requested.
- Expected on time - all products are booked and are expected to be shipped on time, according to the promised delivery date.
- Possibly delayed - warning that there is a good chance that shipment of the products will be late. This is assigned if:
- MO finish date is same as CO delivery date;
- Expected date of PO is same as CO delivery date;
- CO delivery date is today and products are not received.
- Delayed - warning that the delivery of products will definitely be late. This is assigned if:
- MO finish date is after CO delivery date;
- Expected date of PO is after CO delivery date;
- CO delivery date is in the past and products are not received.
- Ready for shipment - all products are in stock and can be shipped to the customer.
- Delivered - all products have been shipped to the customer.
Statuses Possibly delayed and Delayed are assigned whether along with other manual actions (for example, when CO, MO or PO is updated) or automatically once per day between 1 a.m. and 3 a.m.
Source statuses
The field Source shows the MOs, POs, and TOs from where the products of this customer order are coming.
The background color shows the state of the order.
Manufacturing orders:
- Not booked - some parts are not booked.
- Requested - the MO is not approved or not scheduled, or some parts are in status Requested.
- Expected on time - all parts are whether received or expected on time, and all operations are not delayed.
- Possibly delayed - some parts are not received on time, or some operation is not started on time, or some operation is not finished and the planned finish time has passed.
- Delayed - the MO is not finished on time.
- Received - the MO is finished.
Purchase orders:
- Requested - the PO is requested, but not confirmed and ordered.
- Expected on time - the PO will be received on time for the promised delivery date.
- Delayed - the PO has not been received, and the promised delivery date has passed.
- Received - the PO is received.
Transfer orders:
- Expected on time - the TO will be received on time for the promised delivery date.
- Possibly delayed - the TO has not been shipped, but the planned shipment date has passed.
- Delayed - the TO has not been received, and the planned arrival date has passed.
- Received - the TO is received.
Invoice statuses
Invoice status shows whether the customer order is invoiced, partially invoiced, or not invoiced. The following statuses are automatically assigned:
- Not invoiced - no invoices issued. (Invoices in status Dummy are not considered)
- Part invoiced - CO is partially invoiced. A percent shows the part of the CO that has been invoiced.
- Invoiced - CO is fully invoiced.
Only invoices with the type Invoice and status Unpaid, Paid partially, and Paid are counted.
Payment statuses
Payment status shows whether the invoices are paid, partially paid, or not paid. The following statuses are automatically assigned:
- Not paid - no payments received.
- Part paid - Invoices are partially paid. A percent shows the part of the invoiced total that has been paid.
- Paid - Invoices are fully paid.
Customer Order Details
The CRM -> Customer orders -> Customer order details page shows the detailed information about a customer order.
Jump to:
- Demo video: Customer Orders.
- CO workflows:
- Special situations:
- Customer Order reports.
- Cost and profit calculation.
- Customer Order statuses.
- Product statuses.
Stages of working with a Customer Order
- Create a Customer Order, and save the order information.
- When adding products to a Customer Order, items marked Not for sale in the item’s details are not listed in the product selection. Read more about the Not for sale attribute.
- If necessary, issue a quotation, an order confirmation.
- Created the documents in the CO section named Invoices / Quotations.
- Note that the Customer Order PDF is not a document for the customer. This is an internal document.
- You can use the "Estimate costs and dates" function to calculate the cost and lead time of the products and add a sales markup.
- You can pre-define a selling price for each item, or use pricelists if you have standard pricing.
- At any time, according to your agreement with the customer.
- Created the invoices in the CO section named Invoices / Quotations.
- You can record that you received a payment inside the invoice.
- If you want to invoice a shipment, Click Create an Invoice button on a Shipment's line in the CO.
- Confirm the order and book the products:
- Change the customer order status to Confirmed.
- If available items are in stock or expected to arrive, book (reserve) these.
- If there are no available items in stock, raise demand, or generate Manufacturing Orders and/or Purchase Orders.
- Plan a Shipment and pick the products.
- To plan a shipment, create a new Shipment in the CO section named Shipments.
- From the shipment, you can create the Waybill, Picking list, and Packing list.
- To ship products, report them picked in the Shipment.
Estimating costs and delivery date
To estimate the cost of products and the dates when they could be ready:
- Create and Save the Customer Order.
- Click the Estimate costs and dates button inside the Customer Order.
- Choose from where to Take item cost:
- From stock - consider the available stock levels first (using FIFO; or FEFO, for perishable goods), for any missing goods manufacturing and procurement activities will be simulated.
- From vendor - do not consider stock levels, manufacturing and procurement activities will be simulated.
- Enter the desired Markup to calculate the sales price.
- Click the Estimate costs and dates button, the sales price and estimated earliest production finish date is calculated for each item.
- Click Show details to investigate the detailed cost breakdown for every product by materials, manufacturing overhead, and labor cost.
If item costs are taken from stock, then:
- The software first tries to simulate fulfilling the order with the available inventory, both on-hand and expected.
- For any items - procured or manufactured -, which are available in stock, the cost is taken from stock (FIFO or FEFO).
- For any manufactured products, if these are not in stock, the software simulates creating Manufacturing Orders.
- For any purchased items, if these are not in stock (incl. out-of-stock raw materials for simulated MOs), the cost is the price of the highest priority purchase term. When there are several purchase terms with the same priority, the lowest price is used.
- This means that the same item can be listed several times with a different cost, as the cost source may be different.
If item costs are taken from vendors, then:
- For manufactured products, the software simulates creating Manufacturing Orders.
- For all purchased items (incl. all raw materials for simulated MOs), the cost is the price of the highest priority purchase term. When there are several purchase terms with the same priority, the lowest price is used.
Important notes:
- If items are already booked to the CO, their actual cost will be used for the estimate. The cost will be taken from the booked stock lot, source Manufacturing Order, etc. The selection "Take item cost" will have no effect.
- When the costs or dates cannot be calculated, then some associated Purchase Terms and/or BOMs and Routings are missing or need updating (e.g. when an article has been deleted but is still listed in a BOM).
Reasons for differences in estimated and actual costs
Please note that the estimated cost and actual cost may differ once all products are booked, and also once all production activities have been finished.
Also, the cost of the same product may vary. For example, in real life, products that are separately manufactured will usually have different costs if accurately calculated:
- There is variability in materials costs.
- There is variability in manufacturing time, workers, and workstations, which results in different direct labor and applied overhead costs.
- There is variability in waste, which also changes materials costs.
Bookings products to the customer order
Booking products to the customer order with Tracing disabled
To allocate products to the order, change the customer order status to Confirmed. After this:
- demand is generated for the goods,
- all received and planned goods are reallocated between all confirmed orders,
- updated product status is shown,
- and the customer order status is updated accordingly.
Booking products to the customer order with Tracing enabled
Note: the following sections correspond only to Software settings -> Tracing = Yes.
Jump to:
- Check stock levels and book the products for the order.
- Make to order (MTO), automatically create 1 Manufacturing Order per 1 CO line.
- Automatically create Purchase Orders.
- Create demand for products, create 1 Manufacturing Order per several COs.
- Manually book items, create PO, create MO.
- Cancel or modify bookings for a customer order.
Checking stock and booking products to the customer order
Before you can ship products to a customer, you need to reserve the products for this particular order, either from stock (if you make-to-stock) or from future production (if you make-to-order).
Demo video: How to book Products for a Customer Order.
To see availability and book products for a customer order:
- Open the Customer Order.
- Click the Check stock and book items button.
- You will see the inventory levels of all items in the order.
- Click Book all items.
- Available goods, in stock and expected, will be booked to the CO (FIFO; or FEFO for perishable goods).
To automatically create Manufacturing Orders (MOs) for this CO, if you make to order:
This will result in a 1-to-1 connection between the CO line item and MO. If you wish to consolidate several COs into one MO, see the section about creating internal demand for products.
- Open the Customer Order.
- Click the Check stock and book items button.
- Check option Create MOs for missing products.
- Click Book all items.
- Manufacturing orders will be created:
- If products are not available in stock nor expected.
- Separately for each CO line.
- By default, using Forward scheduling.
- If the enterprise setting "Backward scheduling = Yes", then the MO is scheduled using Backward scheduling from the Delivery date, in order to finish as late as possible before it.
- If the product has several BOMs, BOM is automatically selected alphabetically according to its number.
- If the BOM has several connected routings, the routing with the earliest finish date is selected.
- If the CO quantity is less than the item's minimum quantity for manufacturing, the MO quantity will be increased automatically.
- If the product is not marked as purchased, does not have a BOM, but is part of a disassembly BOM, a disassembly manufacturing order is created.
To automatically create Purchase Orders (PO):
- Open the Customer Order.
- Click the Check stock and book items button.
- Check option Create MOs for missing products.
- Check option Create POs for missing parts.
- Click Book all items.
- As a result, if some items are not available nor expected:
- All required Manufacturing Orders will be created.
- All required Purchase Orders will be created, including materials for just created MOs.
To create demand for products:
- Open the Customer Order.
- Click the Check stock and book items button.
- Click Book all items.
- As a result, all available products will be booked, and for the products which could not be booked:
- At Stock -> Items, the Available quantity of these items will become negative.
- MOs can be scheduled from Stock -> Critical on-hand page (if "Reorder point" for items is defined), in which case the products will be automatically booked to the CO.
- POs can be created from Procurement -> Procurement Critical on-hand (if "Reorder point" for items is defined) or Procurement -> Requirements, in which case the products will be automatically booked to the CO.
- Open the Customer Order.
- Click the Check stock and book items button.
- Click Book manually and you will be taken to the "Add a booking" page.
- Optionally, use respective buttons to:
- Create a new PO.
- Create a new MO.
- Create a new manual stock lot.
- On the "Add a booking" page, find the desired available stock lot, and fill in the quantity you wish to book from it.
- Save.
Cancel or modify bookings for a customer order
Note: this article corresponds only to Software settings -> Tracing = Yes.
To cancel bookings for a customer order:
- Open the Customer Order.
- Click the Check stock and book items button.
- Click Cancel bookings on a products line, or Cancel all bookings.
- Bookings will be deleted if products are not shipped.
If some products are shipped and the customer cancels the rest of the order, then, if products were booked, the extra bookings must be released:
- By changing the quantity of the CO to reflect the actually delivered quantity.
- Or by manually modifying the bookings in the Customer Order's report "Bookings".
If products are already shipped (from the wrong stock lot) and bookings must be canceled (or modified):
To manually modify bookings for a customer order:
- Open the Customer Order.
- Click on Reports.
- Modify bookings in the report "Bookings". You can:
- delete bookings.
- change stock lots from which goods are booked.
- increase or decrease the quantity of booked goods.
Cost and profit
The profit is calculated as the difference between the sales price on the Customer Order and the actual cost of the product.
When products have not yet been booked:
- The cost and profit can be estimated with the Estimate costs and dates functionality. Otherwise, if that functionality is not used, cost and profit will not be shown until products are booked.
Once bookings for products have been made:
- The software tracks the actual cost of the product by using stock lot tracking.
- For example:
- The cost of a purchased item is the actual purchase price, plus any additional PO fees and/or transfer fees, which have been applied to it.
- You can manually create a stock lot (and define its cost), which also happens when you manually update inventory levels.
- From a Manufacturing Order, the cost of a manufactured product is calculated by adding up the following costs:
- the sum total of materials costs of the Manufacturing order (i.e. Materials cost);
- the sum total of operation costs (i.e. manufacturing overhead cost);
- the sum total of labor costs for performing the manufacturing operations (i.e. Labor cost).
Import from CSV
When creating a new customer order, it is possible to import a list of sold items from a CSV file:
- Go to CRM -> Customer Orders, and add a new customer order.
- Before saving the new CO, you can import the list of products from CSV. The import button is in the top right corner of the products table.
- Check the "The first row is heading" option if the first row contains headers and should not be imported.
- For each column, select the correct type of data from the dropdown menus above the columns.
- Click Import to upload the data.
- If importing of some rows failed, the rows which could not be imported will be displayed.
The file must be no longer than 200 lines and can contain the following columns:
| Part No.* | The part number of the stock item that is sold. Required. |
| Quantity | Total quantity. |
| Price per UoM | Price per unit. |
| Discount | The discount % of the item. |
| Free text | The free text description that is displayed below the stock item. |
| Delivery date | The delivery date of the line. |
Example data table, importing 2 products onto the Customer Order:
| Part No. | Quantity | Price per UoM | Discount | Free text |
| A00001 | 10 | 50 | Pack by 2 | |
| A00002 | 100 | 5 | 10 | |
| (Up to 200 lines can be imported at once) | ||||
Important notes:
- Other CO information should be added manually before the import.
- The file must not be longer than 200 lines.
- What is CSV? CSV (Comma-Separated Values) is a universal format for importing or exporting tabular data. A CSV file can be obtained by saving/exporting e.g. an Excel file as CSV (Comma delimited) (*.csv).
Customer Order Reports
Each customer order has several statistical reports, which can be accessed from CRM -> Customer Orders, by clicking on the Reports Reports button on a Customer Order's line.
Jump to report:
- Bookings - bookings made for this order.
- Raw materials - all raw materials used in the production related to products on this order.
- Missing parts - all raw materials which are not yet available for the production of products related to this order.
- Serial numbers - all serial numbers shipped with this order.
Report "Bookings"
This report shows the list of bookings from stock for this customer order.
Report "Raw materials"
This report shows the list of parts and their quantities used in this customer order.
Report "Missing parts"
This report shows the list of parts that are not booked for manufacturing orders, which are connected with this Customer Order.
Report "Serial numbers"
This report shows the list of serial numbers that have been shipped for this customer order.
Customers
The CRM -> Customers section contains a list of all the customers and their contacts.
Use the tab menu above the table to see a list of "Companies" or "Contacts".
Jump to:
- Customer details.
- Customer reports.
- Summary reports on all customers.
- Keep track of interactions with the customer and the next contact time.
- Import customers.
Importing customers from a CSV file
At CRM -> Customers -> Import from CSV it is possible to upload many customers' information at once.
Jump to:
- Demo video: Importing data.
- Importing new customers.
- Example customers import table and file.
- Updating existing customers.
- Important notes.
What is CSV? CSV (Comma-Separated Values) is a universal format for importing or exporting tabular data. A CSV file can be obtained by saving/exporting e.g. an Excel file as CSV (Comma delimited) (*.csv).
When uploading the CSV file:
- Select and match the names of the fields corresponding to the columns in the data.
- Check the "The first row is heading" option if the first row of the file contains headers. Then the first row will not be imported.
- Select "Do not import" as the column type if some column is not to be imported.
- Click Import to upload the data into the appropriate fields of the database.
- If the importing of some data failed, a skip file will be generated and downloaded to your computer, which indicates all errors line-by-line.
Importing new customers
When uploading customers, the fields that can be used are:
| Company name* | Required. The name of the customer company. |
| Number | A unique code to identify the customer. If not imported, the code will be generated automatically. |
| Status | The status of the customer (plain text). Customer statuses are saved at Settings -> System Settings -> Customer Statuses. If the status does not exist it will be created. |
| Contact started | Date when the contact was started. |
| Next contact | Date and time for the next contact. |
| Trade credit limit | The credit limit for the customer. |
| Account manager |
Your customer account manager. |
| Registration number | |
| Tax/VAT number | |
| Tax rate | The default tax rate for the customer. |
| Pricelist number | |
| Pricelist name | |
| Default discount | Default discount for the customer. |
| Payment period | Default payment period in days. |
| Payment period type |
|
| Phone | |
| Phone 2 | |
| Fax | |
| Teams | |
| Web | |
| Free-text address | |
| Free-text address line2 | |
| Free-text shipping address | |
| Address and Shipping Address |
Structured address fields. Possible columns:
|
| Additional information | Free text notes. |
| Contact person's name | |
| Contact person's position | |
| Contact person's phone | |
| Contact person's fax | |
| Contact person's Teams | |
| Contact person's e-mail | |
| Custom fields | Any custom field defined for customers. |
Example customers import table:
| Number | Name | Status | VAT nr | Phone | Phone 2 | Address | Shipping address | Contact person | ... | |
| CU-012 | Customer 1 | Permanent | Primary phone | Secondary phone | info@ABC | Primary address | John Smith | ... | ||
| Customer 2 | New | 12345 | Primary phone | Secondary phone | info@XYZ | Billing address | Shipping address | Jane Smith | ... | |
| (Up to 3000 lines can be imported at once) | ||||||||||
Download a sample file: import-customers.csv
Re-importing data for updating customers
It is possible to update existing customers from a CSV file, at CRM -> Customers -> Import from CSV. (Alternatively, the bulk editing can be used at CRM -> Customers table.)
The Number field is used for matching the customers. If a customer with the same number already exists, then software updates this customer. If there are new values that will be updated, then:
- A confirmation page is shown with a list of values that will be changed.
- The user can choose whether to update a particular customer or skip it.
The following fields can be used:
| Number* | A unique number to identify the customer. Required. Used for matching the customers. |
| Company name |
The name of the customer company. |
| Status | The status of the customer (plain text). Customer statuses are saved at Settings -> System Settings -> Customer Statuses. If the status does not exist it will be created. |
| Contact started | Date when the contact was started. |
| Next contact | Date and time for the next contact. |
| Account manager |
Your customer account manager. |
| Registration number | |
| Tax/VAT number | |
| Tax rate | The default tax rate for the customer. |
| Default discount | Default discount for the customer. |
| Payment period | Default payment period in days. |
| Payment period type |
|
| Trade credit limit | |
| Pricelist number |
Important!
- If the imported file contains non-Latin characters, the file must be in UTF-8 (preferred) or Unicode encoding. If Excel is used to save the file, select the "Unicode Text (*.txt)" option in the "Save as type" field. Even though the extension of the file is TXT, it can be imported as a CSV-file.
- The limit is 3000 lines per upload. If the file is bigger, divide it into several smaller files.
- Since importing can be a question of trial-and-error, we strongly suggest making a back-up of the database before importing. In that case, if anything goes wrong, it is always possible to restore the previous session.
Customer Details
The customer details page, accessible from CRM -> Customers, displays all the customer's contact information, contacts, and other settings.
Jump to:
- Customer's contact information.
- Several delivery addresses, a separate billing address.
- Documents in another language.
- Credit limit.
- Default payment period.
- Import customers.
Recording customer's contact information
For recording contact information, first, a customer should be created:
- Go to CRM -> Customers, and add a new customer.
- The contact type field is a drop-down (phone, fax, Teams, e-mail, web, address, etc.).
- Each type of contact must be on its own line.
- The address entered here will be printed on invoices, quotations, and waybills.
- Addresses can be saved in a structured or a “free-text” form.
- The field Shipping address or Free-text shipping address can be used if different from the billing address.
- Contact details can also be entered for the customer’s contact person(s).
- This data will not be printed on any document.
For several shipping addresses add more Shipping Address lines in the customer's details.
- Then, for the Shipment, it will be possible to choose from them in the Customer Order and the Shipment. The list of addresses will include both shipping and billing addresses, shipping addresses will be listed first.
Language of documents issued to the customer
You can choose the language at CRM -> Customers -> Customer's details -> Language.
Documents, like for example, invoices, will be printed in the customer's default language. By default, the language is your sign up language.
Payment period, invoice due date
You can enter the payment period at the customer's details at CRM -> Customers.
The payment date can be calculated as:
- the invoice date plus payment period, or
- the end of month date plus the payment period.
Customer's trade credit limit
You can set the credit limit at the customer's details at CRM -> Customers.
When an invoice is saved, the software checks the customer's trade credit limit and all current outstanding invoices of the customer.
- If the limit is exceeded, a notification is displayed to the user.
- Not entering a credit limit means that there is no limit, i.e. there is unlimited credit.
- The CRM -> Customers table displays the Trade credit limit and current Available credit. (You may need to unhide the columns.)
- Available credit = Trade credit limit - The sum of unpaid invoices (Dummy invoices are excluded)
Customer Reports
Each customer has several statistical reports, which can be accessed from CRM -> Customers, by clicking on the Reports Reports button on a Customer's line.
Jump to report:
- Invoices - the invoices and quotations sent to this customer.
- Customer orders - the orders of this customer.
- Manufacturing Orders - manufacturing orders associated with this customer.
- Products - products ordered by the customer.
- Raw materials - all raw materials used in production related to the manufacturing orders of this customer.
Report “Invoices”
This report shows:
- the list of invoices and quotations associated with this customer,
- the sum of invoices as a graph.
Report “Customer orders”
The report shows
- the list of customer orders associated with this customer,
- the total sum as a graph or a Gantt chart.
Report “Manufacturing orders”
The report shows the list of manufacturing orders associated with this customer.
Report “Products”
The report shows the list of products that were ordered by this customer during the period (customer order is created within the period and order status is at least Confirmed).
Report “Raw materials”
The report shows the list of parts that were used to produce products that were bought by this customer.
Summary Reports on All Customers
Summarized reports of all customers can be accessed from CRM -> Customers, by clicking on the All customers summary reports button on top-right of the table.
Jump to report:
- Bookings - bookings of all customer orders.
- Execution - production status of ordered products.
- Deliveries - products that must be shipped within the next 5 days.
Report "Bookings"
This report shows the list of bookings from stock for all customer orders.
Report "Execution"
This report shows the production stages for the products in active Customer Orders.
Report "Deliveries"
This report shows products that must be shipped within the next 5 days. Products are grouped by days and customers. The report is updated automatically once per minute.
This report has a direct link. It allows showing the report on any device, which has a browser, without signing in.
Today's Contacts
The CRM -> Today's contacts section shows a list of customers you (your user) need to contact today.
Setting a next contact time for the customer
- Open the customer's details.
- Set the Next contact date.
- Save
- The customer will be shown on Today's contacts when this date has arrived.
Invoices
The CRM -> Invoices section contains a list of all invoices, quotations, prepayment invoices, order confirmations, credit-invoices, and pro-forma invoices.
Use the tab menu above the table to see a list of "Invoices" or "Items".
Jump to:
- Types of documents at CRM -> Invoices.
- Customize PDFs.
- Invoice statuses.
- Send a quotation, an invoice, an order confirmation.
- Send a Waybill, Packing list.
Invoice statuses
Invoice status shows whether the invoice is dummy, paid, partially paid, or unpaid. The following statuses are possible:
- Dummy - a draft invoice that is ignored in accounting and statistics.
- Unpaid - no payments received.
- Paid partially - the invoice is partially paid.
- Paid - the invoice is fully paid.
- Canceled - the invoice is deleted.
Invoice statuses are colored when the type is Invoice or Credit-invoice and the status is not Dummy.
-
Unpaid and Paid partially are:
-
Yellow, if the due date has not passed.
-
Red, if the due date has passed.
-
Not colored, if the due date is undefined.
-
-
Paid statuses are green.
Types of documents
It is possible to create the following types of documents at CRM -> Invoices:
- Invoice - issued to the customer to bill for goods or services.
- Credit-invoice - issued to the customer to fully or partially cancel an issued invoice.
- Prepayment invoice - issued to the customer when they will be making a prepayment for a Customer Order. Once goods or services are delivered, an Invoice will be issued.
- Quotation - issued to the customer to provide information about pricing. (Not to be confused with a Customer Order's status "Quotation", which means that a quotation should be issued for that pending order.)
- Pro-forma invoice - a formal offer issued to the customer, with no obligations to the customer, but which the customer can pay to accept. After payment, the seller must provide a (commercial/tax) invoice and deliver goods or services. More commonly used in Europe.
- Order confirmation - confirmation sent to the customer that their order has been received, accepted, and will be fulfilled.
Attention! The type of document cannot be changed if it was "invoice", "prepayment", or "credit". If this is needed, a new document should be created by copying the old one.
Invoice Details
The invoice details page, accessible from CRM -> Invoices, displays all the details of an invoice, a credit-invoice, a prepayment invoice, a quotation, a pro-forma invoice, or an order confirmation.
- Send an Invoice.
- Send a Quotation.
- Send an Order Confirmation.
- Send a Credit invoice.
- Send a Pro-forma Invoice.
- Send a Prepayment Invoice.
- Record payments.
- Set different tax rates for lines.
- Saving an invoice PDF file.
- Tax calculations, rounding of tax.
Sending an Invoice
An invoice can be created at:
- CRM -> Invoices, even without recording a Customer Order.
- CRM -> Customer Orders -> CO details -> Invoices.
- CRM -> Customer Orders -> CO details -> Shipments table, by pressing the Create an Invoice button on an already created Shipment's line.
- CRM -> Customer returns (RMAs) -> RMA details -> Invoices, if Return Merchandize Authorization functionality is enabled.
To send an invoice to your customer:
- Click "+" to create a document.
- From the "Type" field, choose "Invoice".
- Fill in all the details.
- Save.
- Once the invoice is confirmed, change "Status" from "Dummy" to "Unpaid".
- Click "Send e-mail" to open your e-mail client and to prefill the letter,
or click "PDF" to download the PDF.
When adding products to an invoice, items marked Not for sale in the item’s details are not listed in the product selection. Read more about the Not for sale attribute.
Invoicing multiple customer orders at once
An invoice can cover more than one customer order. This is useful when you supply a customer on a recurring basis and want to issue a single invoice for all orders placed within a given period.
There are three ways to include multiple customer orders on a single invoice:
- Invoice header: Select the first customer order in the “Customer order” field in the invoice header. An option to add further customer orders becomes available once the first is selected.
- Order column on lines: Each invoice line includes an “Order” column. Select a customer order directly on a line to assign that line to a specific order. Selecting a customer order on a line automatically adds it to the invoice header.
- From a Shipment: Click the “Create an Invoice” button on a shipment line in CRM -> Customer Orders -> CO details -> Shipments. If the shipment spans multiple customer orders, all its lines are included automatically, and each is attributed to its source customer order.
Things to keep in mind:
- All customer orders on the invoice must be in the same currency.
- Customer orders from different customers can be included on the same invoice. The customer shown on the invoice is taken from the first customer order selected.
- The Prepayment type is not available once the invoice covers more than one customer order.
- Products available per line are filtered to items not yet fully invoiced from the selected customer order.
- The invoice is listed in the Invoices section of each customer order it includes.
- Invoices created from RMA (customer return) orders cannot cover multiple orders.
Sending a Quotation
A quotation can be created at:
- CRM -> Invoices, even without recording a Customer Order.
- or at CRM -> Customer Orders -> CO details -> Invoices.
- CRM -> Customer returns (RMAs) -> RMA details -> Invoices, if Return Merchandize Authorization functionality is enabled.
To send a quotation to your customer:
- Click "+" to create a document.
- From the "Type" field, choose "Quotation".
- Fill in all the details.
- Save.
- Click "Send e-mail" to open your e-mail client and to prefill the letter,
or click "PDF" to download the PDF.
Sending an Order Confirmation
An order confirmation can be created at:
- CRM -> Invoices, even without recording a Customer Order.
- CRM -> Customer Orders -> CO details -> Invoices.
- CRM -> Customer returns (RMAs) -> RMA details -> Invoices, if Return Merchandize Authorization functionality is enabled.
To send an order confirmation to your customer:
- Click "+" to create a document.
- From the "Type" field, choose "Order Confirmation".
- Fill in all the details.
- Save.
- Click "Send e-mail" to open your e-mail client and to prefill the letter,
or click "PDF" to download the PDF.
Sending a Credit Invoice
A credit invoice can be created at:
- CRM -> Invoices, even without recording a Customer Order.
- CRM -> Customer Orders -> CO details -> Invoices.
- CRM -> Customer returns (RMAs) -> RMA details -> Invoices, if Return Merchandize Authorization functionality is enabled.
To send a credit invoice to your customer:
- Click "+" to create a document.
- From the "Type" field, choose "Credit-invoice".
- Fill in all the details. Enter prices with a positive number.
- Save.
- Once the invoice is confirmed, change "Status" from "Dummy" to "Unpaid".
- Click "Send e-mail" to open your e-mail client and to prefill the letter,
or click "PDF" to download the PDF.
Sending a Pro-forma Invoice
A pro-forma invoice can be created at:
- CRM -> Invoices, even without recording a Customer Order.
- CRM -> Customer Orders -> CO details -> Invoices.
- CRM -> Customer returns (RMAs) -> RMA details -> Invoices, if Return Merchandize Authorization functionality is enabled.
To send a pro-forma invoice to your customer:
- Click "+" to create a document.
- From the "Type" field, choose "Pro-forma invoice".
- Fill in all the details.
- Save.
- Click "Send e-mail" to open your e-mail client and to prefill the letter,
or click "PDF" to download the PDF.
Prepayments
MRPeasy allows requiring and receiving prepayments for customer orders.
Attention!
- In accounting, prepayments credit the "Customer prepayments" liability account, not the "Sales" revenue account.
- If for any reason you do not want to send one more (final) invoice to your customer, then use a regular invoice even in case if you are asking for prepayment.
- Prepayment invoices cannot be created for consolidated invoices (invoices that cover multiple customer orders).
Jump to:
- Sending a Prepayment Invoice.
- Allocating a prepayment.
- Returning a prepayment.
- Setting up prepayments account in MRPeasy Accounting module.
Sending a Prepayment Invoice
A prepayment invoice can be created at:
- CRM -> Invoices.
- CRM -> Customer Orders -> CO details -> Invoices.
To send a prepayment invoice to a customer:
- Click "+" to create a document.
- From the "Customer order" field, choose a customer order.
- From the "Type" field, choose "Prepayment invoice".
- Fill in all the details.
- In the "Prepayment" field, enter the sum, which the customer should pay.
- Save.
- Once the invoice is confirmed, change "Status" from "Dummy" to "Unpaid".
- Click "Send e-mail" to open your e-mail client and to prefill the letter,
or click "PDF" to download the PDF.
Allocating a prepayment
To allocate the prepayment (deposit) to an invoice:
- Create an invoice (final invoice, tax invoice), and select the customer order.
- The software will show the prepaid amount. It is possible to change the allocated amount.
- In accounting, Customer prepayments will be debited, and Sales will be credited.
Returning a prepayment
To return a prepayment to a customer:
- Create a credit-invoice, and select the customer order.
- The software will show the unallocated prepaid amount of the customer order, which you can return.
Setting up prepayments account in MRPeasy Accounting module.
If the MRPeasy Standard accounting module is enabled:
- Create the Customer prepayments liability account at Accounting -> Chart of accounts,
- and mark it as the default account for "customer prepayments".
Recording payments
Payments can be recorded as they are received. The payment status of an invoice is updated automatically according to the total sum of payments recorded in the "Payments" section of the Invoice.
It's possible to check the payment status on the CRM -> Customer Orders and CRM -> Invoices pages.
To record a payment:
- Go to CRM -> Invoices, and open the document.
- Scroll to Payments section.
- Click "+" to record a payment.
- Fill in the details.
When a partial payment is recorded on an invoice covering multiple customer orders, it is allocated to the customer orders in order of due date, from earliest to latest. This determines the payment status displayed for each customer order.
Saving an invoice PDF
Invoices can be saved and printed to PDF. This includes your company logo and details. The layout can be edited with the PDF editor.
Pricelists
The CRM -> Pricelists section contains a list of all your sales pricelists.
Jump to:
- What is a pricelist?
- How to update a pricelist?
- How to update an item in all pricelists?
- How to import a pricelist?
What is a pricelist?
One pricelist lists your items and a sales price for each. If you have several pricelists, then you can assign default pricelists to customers, or choose the desired pricelist in a Customer Order.
If you wish to use pricelists in MRPeasy, then enable the Tiered Pricing functionality at Settings -> System Settings -> Professional functions -> Tiered pricing: Yes.
Updating a pricelist
There are several methods for updating a pricelist:
- Open the pricelist at CRM -> Pricelists and edit the prices
- Re-upload the pricelist at CRM -> Pricelists -> Import from CSV
Read: How to update a pricelist via CSV upload?
For updating an item’s selling price (that does not have a “Min. quantity”) in all pricelists, open the item details page at Stock -> Items, where you will be able to see the item's base prices in all pricelists and update them.
Importing pricelist or price breaks from a CSV file
At CRM -> Pricelists -> Import from CSV it is possible to upload and update pricelists (one pricelist at a time), or to upload and update price breaks for several stock items at a time.
Jump to:
- Demo video: Importing data.
- Uploading a pricelist or price breaks.
- Example table and file.
- Important notes.
To use this functionality, the Tiered Pricing functionality has to be enabled at Settings -> System settings -> Professional functions -> Tiered pricing: Yes.
What is CSV? CSV (Comma-Separated Values) is a universal format for importing or exporting tabular data. A CSV file can be obtained by saving/exporting e.g. an Excel file as CSV (Comma delimited) (*.csv).
Importing a pricelist or price breaks
When uploading the pricelist CSV file:
- Select your action in the field "Pricelist":
a) Create a new pricelist.
b) Update price breaks - upload or update price breaks for one or several stock items.
c) Update (replace) an existing pricelist. - Select and match the names of the fields corresponding to the columns in the data.
- Check the "The first row is heading" option if the first row of the file contains headers. Then the first row will not be imported.
- Select "Do not import" as the column type if some column is not to be imported.
- Click Import to upload the data into the appropriate fields of the database.
When uploading pricelists, the fields that can be used are:
| Product | Part number of the item, as defined in Stock -> Items. If you have products with parameters (Matrix BOM), then unique variation part numbers must be enabled. Each variation must have a unique part number, which is referenced in this field. |
| Selling price | The selling price in the pricelist currency. |
| Min. quantity | The minimum order quantity from which this sales price will be chosen. |
| Product | Price | Min. quantity |
| A-0001 | 10 | 0 |
| A-0001 | 9 | 10 |
| A-0002 | 20 | 0 |
| (Up to 40000 lines can be imported at once) | ||
Download a sample file: import-pricelist.csv
Important!
- If the imported file contains non-Latin characters, the file must be in UTF-8 (preferred) or Unicode encoding. If Excel is used to save the file, select the "Unicode Text (*.txt)" option in the "Save as type" field. Even though the extension of the file is TXT, it can be imported as a CSV file.
- Since importing can be a question of trial-and-error, we strongly suggest making a back-up of the database before importing. In that case, if anything goes wrong, it is always possible to restore the previous state.
Pricelist Details
The price list details page, accessible from CRM -> Pricelists, shows the details of a price list.
This page allows:
- setting the sales prices of items,
- configuring tiered pricing or a product,
- updating or deleting a price list,
Tiered pricing
If a product's sales price depends on the ordered quantity, then a Min. Quantity must be entered for each price. Then the correct price is automatically chosen in a Customer Order or an Invoice when the product is chosen, and this price list is applied.
Example, 4 pricing tiers:
| Product | Selling price | Min. quantity |
| Wooden table | 80 | 0 |
| Wooden table | 75 | 10 |
| Wooden table | 70 | 25 |
| Wooden table | 60 | 50 |
Important
- In the price list details page, It is possible to update a price list that has up to 300 products.
- If the price list is longer, please upload a CSV file with a new version of the price list.
- Items marked Not for sale in the item’s details are not listed when adding products to a price list, and their price fields are hidden in the item’s details. Read more about the Not for sale attribute.
Jump to:
- What is a price list?
- How to update a price list?
- How to update an item in all pricelists?
- How to import a price list?
Cash flow Forecast
The CRM -> Cash flow forecast and Accounting -> Cash flow forecast report shows a week-by-week cash flow forecast for a selected period.
- The period of a report can be custom-defined or selected from pre-defined options.
- The reports can be saved in PDF or CSV.
Example:
| Week | Sales invoices | Incoming payments | Incoming invoices | Outgoing payments | Cash flow forecast |
| Week 1 | Sum of sales invoices to customers which are due this week* | Sum of received payments for sales invoices which are due this week | Sum of incoming invoices from vendors, which are due to be paid this week | Sum of made payments for incoming invoices which are due this week | = (Sales invoices - Incoming payments) - (Incoming Invoices - Outgoing payments) |
| Week 2 | 10 000 | 5000 | 4 000 | 2000 | = (10 000 - 5000) - (4000 - 2000) = 3000 |
* The invoices' type must be "Invoice" and the status must not be "Dummy".
Statistics
The CRM -> Statistics page shows statistical reports based on shipped or partly shipped customer orders - the cost of goods sold (COGS), selling price, on-time delivery statistics, profit margin, etc.
Jump to:
- Notes.
- Cost of goods sold.
- Customers - summary of shipped orders by the customer.
- Goods shipped - summary of shipped goods.
- Customer orders - summary of shipped Customer Orders.
Notes
- These reports are calculated based on items that have been shipped to customers.
- The selling prices are taken from Customer Orders (not invoices).
Cost of goods sold
- The Cost of the goods sold (shipped) is obtained from the stock lot(s) of the shipped goods.
- For manufactured items, the Cost, as additional information, is also broken down into 3 components: Cost of materials, Applied overhead cost, and Labor cost.
- These costs are taken from the Manufacturing Order(s) of the product.
- The cost is not broken down for items that are purchased.
- The cost is not broken down for goods from stock lots, that are manually entered into the system. The information is absent.
- The materials, overhead, and labor costs are pure costs, in case you have products with multi-level BOM where different levels are manufactured in different MOs. For example:
- MO 1 produces 1 unit of assembly A, which is used in MO 2. The product from MO 2 is shipped to the customer.
- MO 1 total cost for manufacturing 1 unit of assembly A is $3 = $1 materials + $1 overhead + $1 labor.
- Inside MO 2, in addition to assembly A, another procured item is used that costs $1. Also, $1 of labor and $1 of overhead are allocated.
- In this report, the total cost of the product is $6 = $2 materials + $2 labor + $2 overhead.
Report "Customers"
Summary of shipped orders by the customer. The report includes:
- Customer
- Selling price
- Cost
- Profit
- Average delay of shipment in days
- This is the average of the maximum delay in each customer order exceeding the Delivery date.
- As products in one CO can have different delivery dates and can be shipped separately, the most delayed line is found for each CO.
- On-time delivery percentage
- If at least one product in a customer order is delayed, the whole customer order is considered delayed.
Report "Goods shipped"
Summary of shipped goods. The report includes:
- Part number and description
- Quantity
- Selling price
- Cost
- Profit
- Cost of materials (pure)
- Applied manufacturing overhead (pure)
- Labor cost (pure)
- Average delay of shipment in days
- The average delay of this product's shipments exceeding the Delivery date across all customer orders in the selected period.
- On-time delivery percentage
Report "Customer orders"
Summary of shipped Customer Orders.
The report includes:
- Customer order
- Customer
- Selling price
- Cost
- The cost of all items on the order (incl. non-manufactured items)
- Profit
- Cost of materials (pure)
- Applied manufacturing overhead (pure)
- Labor cost (pure)
Customer Returns (RMA)
The Customer returns (RMAs) page lists all return cases registered in the system.
This page is available in the Enterprise package if the RMA functionality is enabled.
Here you can:
- create, edit, and delete RMA orders;
- track the progress of customer returns.
Use the tab menu above the table to choose whether to show a list of "Customer returns (RMAs)" or a list of all "Items" returned or refunded.
Jump to:
- Demo video: Return Merchandise Authorization.
- RMA order statuses.
- Adding returned items to inventory.
RMA order statuses
An RMA order progresses through multiple statuses based on its line-level activity.
- New - a default status for the newly created RMA order, when items have not been received or the RMA types have not been selected yet.
- Waiting for inspection - at least one item has been received but not yet inspected.
- Waiting for action - all items have been received, and some require a next step (e.g., repair, replacement).
- In progress - one or more lines have ongoing actions (e.g., open service orders, unpaid credit invoices).
- Ready for shipment - outbound items are prepared and ready to be shipped.
- Shipped - all outbound items have been shipped.
- Resolved - the RMA order is finished. It is assigned automatically when the order without outbound items has no pending actions, but it can also be assigned manually.
- Delivered - the RMA order is finished, and the customer has received the products. Assigned manually only.
- Canceled - order is canceled. Assigned automatically on order deletion or manually. A canceled order cannot be restored.
- Archived - archived using the Archive old data functionality.
Adding returned items to inventory
By default, items received via RMA orders are not added to inventory. However, they can be found in Stock -> Stock lots by statuses that start with “RMA”.
If the item is returned and should be added to the inventory:
- Open the RMA order at CRM -> Customer returns (RMAs).
- Click on the target stock lot.
- Change the status from RMA returned to Received.
Please note that the cost of the RMA-originating stock lot is 0. You can update it by opening the stock lot details and entering the cost.
RMA Order Details
The RMA order details page displays all information related to a customer’s return order.
It has the following sections:
- Return items table - lists all products the customer returns.
- Outbound items table - lists all products shipped out from this RMA order, including replacements or items returned to the customer.
- Invoices - allows the creation of regular and credit invoices directly from the RMA order.
- Shipments - enables the shipping of the outbound items. Displayed when the order has any outbound items listed.
Jump to:
- Demo video: Return Merchandise Authorization.
- Types of RMA.
- Receiving returned products into stock.
- Inspecting returned products.
- Repair and maintenance of the returned products.
- Booking and shipping outbound items.
- Creating invoices.
Types of customer returns, RMA types
Each line in an RMA order’s Return items table represents a returned product and can be assigned an RMA type, which defines the intended handling of that item.
- Credit only - the product is not returned; only a refund is issued.
- Repair - the product is received for repair or rework.
- Repair and ship back - the product is repaired or maintained and sent back to the customer.
- Replacement - a replacement product is shipped to the customer.
- Receipt and credit - the product is received and credited.
- Receipt and no credit - the product is received but not credited.
- Reject and ship back - the return is rejected, and the product is sent back.
Receiving returned products into stock
When returned goods arrive, they must be received into stock before inspection or further processing.
To do so, tick the Received checkbox in the Return items table on each line once the product and quantity are filled. This will create a target lot and inspection record for that line.
To receive all pending lines at once, click Receive all items.
Please note that adding the received products to the inventory requires an additional action.
Inspecting returned products
After receiving, each line can be inspected to determine its condition and the next step:
- Click the Inspection link on the line to open the RMA inspection details.
- Record findings, attach photos or notes if needed, and set the inspection result.
- Confirm or adjust the RMA type based on the outcome (e.g., repair, replacement, credit, reject).
- Save the inspection.
Repair and maintenance of the returned products
Returned items that require repair or maintenance can be processed directly from the RMA order.
To do so, create a Service order from the Return items line. Service orders are used to record labor, materials, and time spent on repair work.
After repair completion, the repaired items can be booked for shipment or invoiced as needed.
Booking and shipping outbound items
Outbound items are the products you plan to ship from the RMA order: repaired items, replacements, or goods returned to the customer.
To prepare items for shipment:
- Add products to the Outbound items table.
- If Tracing = Yes, click the Book items button to select stock lots to reserve for shipment.
- Click “Book all items” to book all listed items automatically.
- Click “Book manually” to select specific stock lots. When booking manually, you can choose the products returned in that specific RMA order.
- If Tracing = No, the products will be booked automatically.
- For RMA types Repair and ship back and Reject and ship back, the same product is added, and the received stock lot is booked automatically.
To add a shipment:
- Scroll to the Shipments section of the RMA order.
- Click + to add the shipment.
- Review the prefilled details (shipping address, booked goods) and adjust if needed.
- Save the shipment.
Ensure all necessary items are booked before creating the shipment to avoid sending incomplete orders.
Creating invoices
Invoices can be created directly from the RMA order to issue refunds, bill repair services, or charge for shipments at the customer’s expense.
To create an invoice:
- Scroll to the Invoices section of the RMA order.
- Click + to add an invoice and choose the type:
- Regular invoice – for billable repairs, replacements, or other charges.
- Credit invoice – for refunded goods.
- Review the prefilled details (customer, billing address, items) and adjust if needed.
- Save the invoice.
If any return lines use the RMA types Credit only or Receipt and credit, a credit invoice is automatically prefilled with those lines and quantities.
All invoices linked to the RMA appear in this section and are also available under CRM -> Invoices for printing, sending to the customer, or marking as paid.